
應用程式小工具可以設定。舉例來說,時鐘小工具可讓使用者設定要顯示的時區。
如要讓使用者設定小工具,請建立小工具設定 Activity。視您指定的設定選項而定,應用程式小工具主機會在建立小工具時或稍後自動啟動這項活動。
宣告設定活動
在 Android 資訊清單檔案中,將設定活動宣告為一般活動。應用程式小工具主機會使用 ACTION_APPWIDGET_CONFIGURE 動作啟動活動,因此活動必須接受這項意圖。例如:
<activity android:name=".ExampleAppWidgetConfigurationActivity">
    <intent-filter>
        <action android:name="android.appwidget.action.APPWIDGET_CONFIGURE"/>
    </intent-filter>
</activity>
在 AppWidgetProviderInfo.xml 檔案中,使用 android:configure 屬性宣告活動。如要進一步瞭解如何聲明這個檔案,以下範例說明如何宣告設定活動:
<appwidget-provider xmlns:android="http://schemas.android.com/apk/res/android"
    ...
    android:configure="com.example.android.ExampleAppWidgetConfigurationActivity"
    ... >
</appwidget-provider>
由於啟動器是從套件範圍外參照活動,因此活動會以完整命名空間宣告。
這樣就能開始設定活動。接著,您需要實作實際活動。
實作設定活動
實作活動時,請務必記住以下兩點:
- 應用程式小工具主機會呼叫設定活動,而設定活動一律必須傳回結果。結果必須包含啟動活動的意圖所傳遞的應用程式小工具 ID,並以
EXTRA_APPWIDGET_ID形式儲存在意圖額外資訊中。 - 啟動設定活動時,系統不會傳送
ACTION_APPWIDGET_UPDATE廣播,也就是說,建立小工具時,系統不會呼叫onUpdate()方法。第一次建立小工具時,設定活動有責任向AppWidgetManager要求更新。不過,後續更新會呼叫onUpdate(),只有第一次會略過。
請參閱下一節的程式碼片段範例,瞭解如何從設定傳回結果並更新小工具。
從設定活動更新小工具
如果小工具使用設定活動,活動就必須在設定完成時更新小工具。如要更新,請直接透過AppWidgetManager提出要求。
以下是正確更新小工具及關閉設定活動的程序摘要:
從啟動活動的意圖取得應用程式小工具 ID:
Kotlin
val appWidgetId = intent?.extras?.getInt(
        AppWidgetManager.EXTRA_APPWIDGET_ID,
        AppWidgetManager.INVALID_APPWIDGET_ID
) ?: AppWidgetManager.INVALID_APPWIDGET_ID
Java
Intent intent = getIntent();
Bundle extras = intent.getExtras();
int appWidgetId = AppWidgetManager.INVALID_APPWIDGET_ID;
if (extras != null) {
    appWidgetId = extras.getInt(
            AppWidgetManager.EXTRA_APPWIDGET_ID,
            AppWidgetManager.INVALID_APPWIDGET_ID);
}
將活動結果設為
RESULT_CANCELED。這樣一來,如果使用者在活動結束前返回,系統就會通知應用程式小工具主機設定已取消,主機也不會新增小工具:
Kotlin
val resultValue = Intent().putExtra(AppWidgetManager.EXTRA_APPWIDGET_ID, appWidgetId)
setResult(Activity.RESULT_CANCELED, resultValue)
Java
int resultValue = new Intent().putExtra(AppWidgetManager.EXTRA_APPWIDGET_ID, appWidgetId);
setResult(Activity.RESULT_CANCELED, resultValue);
根據使用者的偏好設定小工具。
設定完成後,請呼叫
getInstance(Context)取得AppWidgetManager的執行個體:Kotlin
val appWidgetManager = AppWidgetManager.getInstance(context)
Java
AppWidgetManager appWidgetManager = AppWidgetManager.getInstance(context);
呼叫
updateAppWidget(int,RemoteViews),使用RemoteViews版面配置更新小工具:Kotlin
val views = RemoteViews(context.packageName, R.layout.example_appwidget)
appWidgetManager.updateAppWidget(appWidgetId, views)
Java
RemoteViews views = new RemoteViews(context.getPackageName(), R.layout.example_appwidget);
appWidgetManager.updateAppWidget(appWidgetId, views);
建立回傳意圖、透過活動結果設定該意圖,然後完成活動:
Kotlin
val resultValue = Intent().putExtra(AppWidgetManager.EXTRA_APPWIDGET_ID, appWidgetId)
setResult(Activity.RESULT_OK, resultValue)
finish()
Java
Intent resultValue = new Intent().putExtra(AppWidgetManager.EXTRA_APPWIDGET_ID, appWidgetId);
setResult(RESULT_OK, resultValue);
finish();
如需範例,請參閱 GitHub 上的 ListWidgetConfigureActivity.kt 範例類別。
小工具設定選項
根據預設,應用程式小工具主機會在使用者將小工具新增至主畫面後,立即啟動設定活動一次。不過,您可以指定選項,讓使用者重新設定現有小工具,或提供預設小工具設定,略過初始小工具設定。
允許使用者重新設定已放置的小工具
如要允許使用者重新設定現有的小工具,請在 appwidget-provider 的 widgetFeatures 屬性中指定 reconfigurable 標記。詳情請參閱宣告 AppWidgetProviderInfo.xml 檔案的指南。例如:
<appwidget-provider
    android:configure="com.myapp.ExampleAppWidgetConfigurationActivity"
    android:widgetFeatures="reconfigurable">
</appwidget-provider>
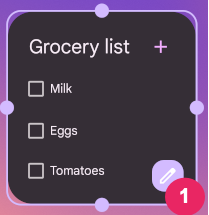
如要重新設定小工具,請按住小工具,然後輕觸「重新設定」按鈕,如圖 1 所示,標示為 1。
使用小工具的預設設定
您可以讓使用者略過初始設定步驟,提供更流暢的小工具體驗。如要這麼做,請在 widgetFeatures 欄位中同時指定 configuration_optional 和 reconfigurable 標記。這樣一來,使用者新增小工具後,系統就不會啟動設定活動。如先前所述,使用者之後仍可重新設定小工具。舉例來說,時鐘小工具可以略過初始設定,預設顯示裝置時區。
以下範例說明如何將設定活動標示為可重新設定和選用:
<appwidget-provider
    android:configure="com.myapp.ExampleAppWidgetConfigurationActivity"
    android:widgetFeatures="reconfigurable|configuration_optional">
</appwidget-provider>