
本頁將說明 AGSL 基本概念,以及如何在 Android 中使用 AGSL 的不同方法 應用程式。
簡易 AGSL 著色器
系統會針對每個繪製的像素呼叫著色器程式碼,並傳回像素的顏色。
圖像成問題非常簡單的著色器會永遠傳回
單色;這個範例使用紅色著色器是在 String 內定義。
Kotlin
private const val COLOR_SHADER_SRC =
   """half4 main(float2 fragCoord) {
      return half4(1,0,0,1);
   }"""
Java
private static final String COLOR_SHADER_SRC =
   "half4 main(float2 fragCoord) {\n" +
      "return half4(1,0,0,1);\n" +
   "}";
下一步是建立 RuntimeShader
物件。這也會編譯著色器。
Kotlin
val fixedColorShader = RuntimeShader(COLOR_SHADER_SRC)
Java
RuntimeShader fixedColorShader = new RuntimeShader(COLOR_SHADER_SRC);
RuntimeShader 可搭配標準 Android 著色器使用的任何位置。身為
舉例來說,您可以用來繪製到自訂 View
Canvas。
Kotlin
val paint = Paint()
paint.shader = fixedColorShader
override fun onDrawForeground(canvas: Canvas?) {
   canvas?.let {
      canvas.drawPaint(paint) // fill the Canvas with the shader
   }
}
Java
Paint paint = new Paint();
paint.setShader(fixedColorShader);
public void onDrawForeground(@Nullable Canvas canvas) {
   if (canvas != null) {
      canvas.drawPaint(paint); // fill the Canvas with the shader
   }
}
系統會繪製紅色的 View。您可以使用 uniform 將顏色參數傳遞至
要繪製的著色器首先,將顏色 uniform 新增至著色器:
Kotlin
private const val COLOR_SHADER_SRC =
"""layout(color) uniform half4 iColor;
   half4 main(float2 fragCoord) {
      return iColor;
   }"""
Java
private static final String COLOR_SHADER_SRC =
   "layout(color) uniform half4 iColor;\n"+
      "half4 main(float2 fragCoord) {\n" +
      "return iColor;\n" +
   "}";
接著,從自訂 View 呼叫 setColorUniform 來傳遞所需顏色
放入 AGSL 著色器中
Kotlin
fixedColorShader.setColorUniform("iColor", Color.GREEN )
Java
fixedColorShader.setColorUniform("iColor", Color.GREEN );
現在,您會收到綠色的 View;View 顏色是透過
參數,而不是嵌入View
著色器。
請改為建立色彩漸層效果。您需要先變更
著色器,接受 View 解析度做為輸入內容:
Kotlin
private const val COLOR_SHADER_SRC =
"""uniform float2 iResolution;
   half4 main(float2 fragCoord) {
      float2 scaled = fragCoord/iResolution.xy;
      return half4(scaled, 0, 1);
   }"""
Java
private static final String COLOR_SHADER_SRC =
   "uniform float2 iResolution;\n" +
      "half4 main(float2 fragCoord) {\n" +
      "float2 scaled = fragCoord/iResolution.xy;\n" +
      "return half4(scaled, 0, 1);\n" +
   "}";
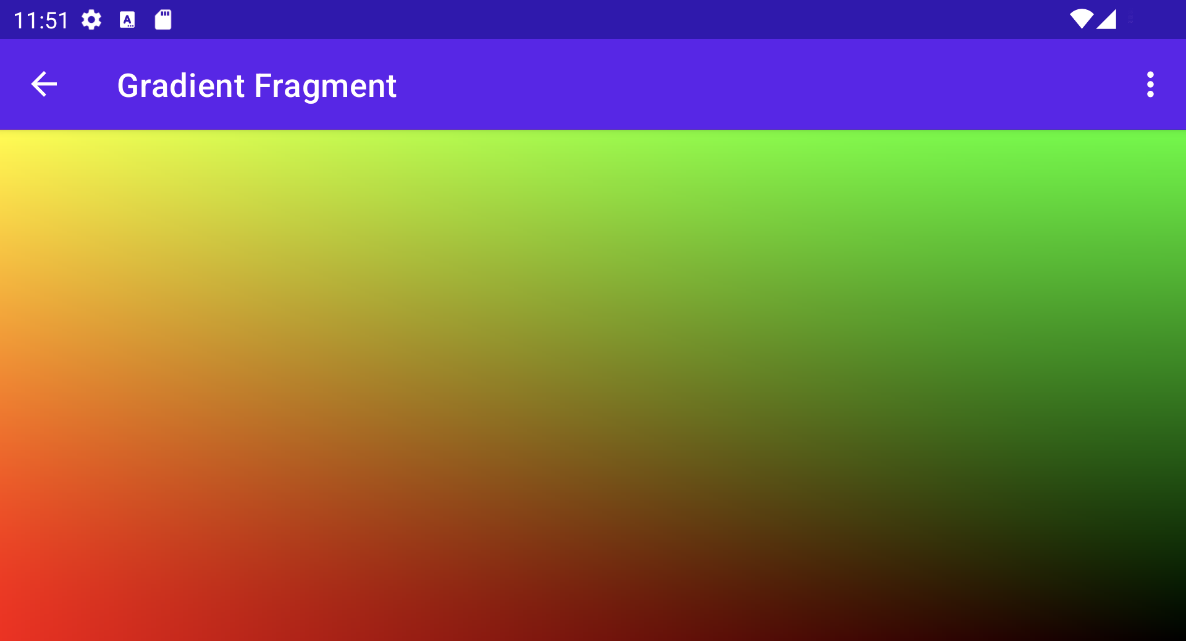
繪製漸層
這個著色器的功能有點複雜。系統會為每個像素建立 float2
包含 x 和 y 座標的向量
就會建立介於 0 與 1 之間的值接著,這個函式會使用經過縮放的向量
建構傳回顏色的紅色和綠色元件。
如要將 View 的解析度傳遞至 AGSL 著色器,uniform請呼叫
setFloatUniform。
Kotlin
val paint = Paint()
paint.shader = fixedColorShader
override fun onDrawForeground(canvas: Canvas?) {
   canvas?.let {
      fixedColorShader.setFloatUniform("iResolution", width.toFloat(), height.toFloat())
      canvas.drawPaint(paint)
   }
}
Java
Paint paint = new Paint();
paint.setShader(fixedColorShader);
public void onDrawForeground(@Nullable Canvas canvas) {
   if (canvas != null) {
      fixedColorShader.setFloatUniform("iResolution", (float)getWidth(), (float()getHeight()));
      canvas.drawPaint(paint);
   }
}
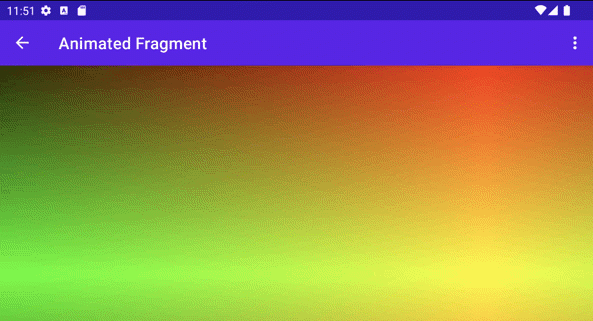
建立著色器動畫
您可以使用類似技巧為著色器修改著色器,讓著色器接收 iTime 和 iDuration 制服。著色器會使用這些值來建立
顏色的三角形波浪,導致顏色在漸層值之間來回循環。
Kotlin
private const val DURATION = 4000f
private const val COLOR_SHADER_SRC = """
   uniform float2 iResolution;
   uniform float iTime;
   uniform float iDuration;
   half4 main(in float2 fragCoord) {
      float2 scaled = abs(1.0-mod(fragCoord/iResolution.xy+iTime/(iDuration/2.0),2.0));
      return half4(scaled, 0, 1.0);
   }
"""
Java
private static final float DURATION = 4000f;
private static final String COLOR_SHADER_SRC =
   "uniform float2 iResolution;\n"+
   "uniform float iTime;\n"+
   "uniform float iDuration;\n"+
   "half4 main(in float2 fragCoord) {\n"+
      "float2 scaled = abs(1.0-mod(fragCoord/iResolution.xy+iTime/(iDuration/2.0),2.0));\n"+
      "return half4(scaled, 0, 1.0);\n"+
   "}";
在自訂檢視畫面原始碼中
ValueAnimator 會更新
iTime 個制服。
Kotlin
// declare the ValueAnimator
private val shaderAnimator = ValueAnimator.ofFloat(0f, DURATION)

// use it to animate the time uniform
shaderAnimator.duration = DURATION.toLong()
shaderAnimator.repeatCount = ValueAnimator.INFINITE
shaderAnimator.repeatMode = ValueAnimator.RESTART
shaderAnimator.interpolator = LinearInterpolator()

animatedShader.setFloatUniform("iDuration", DURATION )
shaderAnimator.addUpdateListener { animation ->
    animatedShader.setFloatUniform("iTime", animation.animatedValue as Float )
}
shaderAnimator.start()
Java
// declare the ValueAnimator
private final ValueAnimator shaderAnimator = ValueAnimator.ofFloat(0f, DURATION);

// use it to animate the time uniform
shaderAnimator.setDuration((long)DURATION);
shaderAnimator.setRepeatCount(ValueAnimator.INFINITE);
shaderAnimator.setRepeatMode(ValueAnimator.RESTART);
shaderAnimator.setInterpolator(new LinearInterpolator());

animatedShader.setFloatUniform("iDuration", DURATION );
shaderAnimator.addUpdateListener(new ValueAnimator.AnimatorUpdateListener() {
   public final void onAnimationUpdate(ValueAnimator animation) {
      animatedShader.setFloatUniform("iTime", (float)animation.getAnimatedValue());
   }
});
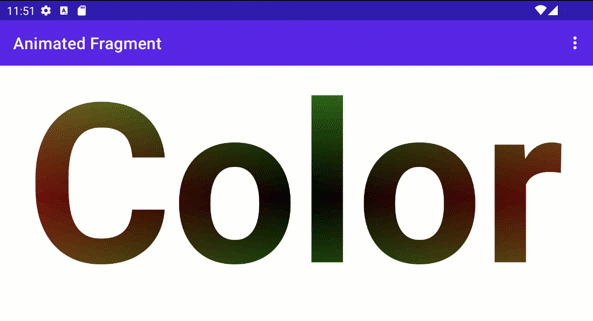
繪製複雜物體
您不必繪製著色器來填滿背景;可以
用於接受
Paint 物件,例如
drawText。
Kotlin
canvas.drawText(ANIMATED_TEXT, TEXT_MARGIN_DP, TEXT_MARGIN_DP + bounds.height(),
   paint)
Java
canvas.drawText(ANIMATED_TEXT, TEXT_MARGIN_DP, TEXT_MARGIN_DP + bounds.height(),
   paint);
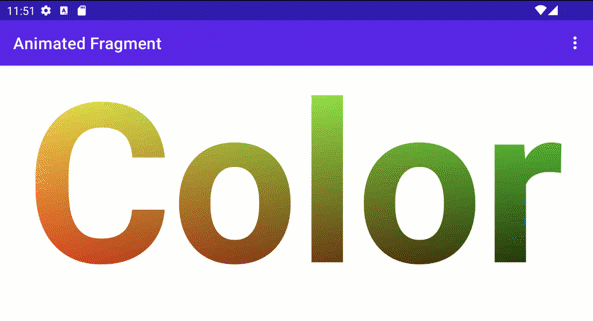
著色和畫布轉換
您可以對陰影文字套用額外的 Canvas 轉換,例如:
並輪替金鑰在 ValueAnimator 中,您可以更新 3D 旋轉矩陣
您可以透過內建的
android.graphics.Camera 類別。
Kotlin
// in the ValueAnimator
camera.rotate(0.0f, animation.animatedValue as Float / DURATION * 360f, 0.0f)
Java
// in the ValueAnimator
camera.rotate(0.0f, (Float)animation.getAnimatedValue() / DURATION * 360f, 0.0f);
由於您想從中心軸旋轉文字,而不是從角落旋轉
取得文字邊界,然後使用 preTranslate 和 postTranslate 修改
矩陣來翻譯文字,這樣 0,0 就會是旋轉中心,
變更文字在螢幕上繪製的位置。
Kotlin
linearColorPaint.getTextBounds(ANIMATED_TEXT, 0, ANIMATED_TEXT.length, bounds)
camera.getMatrix(rotationMatrix)
val centerX = (bounds.width().toFloat())/2
val centerY = (bounds.height().toFloat())/2
rotationMatrix.preTranslate(-centerX, -centerY)
rotationMatrix.postTranslate(centerX, centerY)
canvas.save()
canvas.concat(rotationMatrix)
canvas.drawText(ANIMATED_TEXT, 0f, 0f + bounds.height(), paint)
canvas.restore()
Java
linearColorPaint.getTextBounds(ANIMATED_TEXT, 0, ANIMATED_TEXT.length(), bounds);
camera.getMatrix(rotationMatrix);
float centerX = (float)bounds.width()/2.0f;
float centerY = (float)bounds.height()/2.0f;
rotationMatrix.preTranslate(-centerX, -centerY);
rotationMatrix.postTranslate(centerX, centerY);
canvas.save();
canvas.concat(rotationMatrix);
canvas.drawText(ANIMATED_TEXT, 0f, 0f + bounds.height(), paint);
canvas.restore();
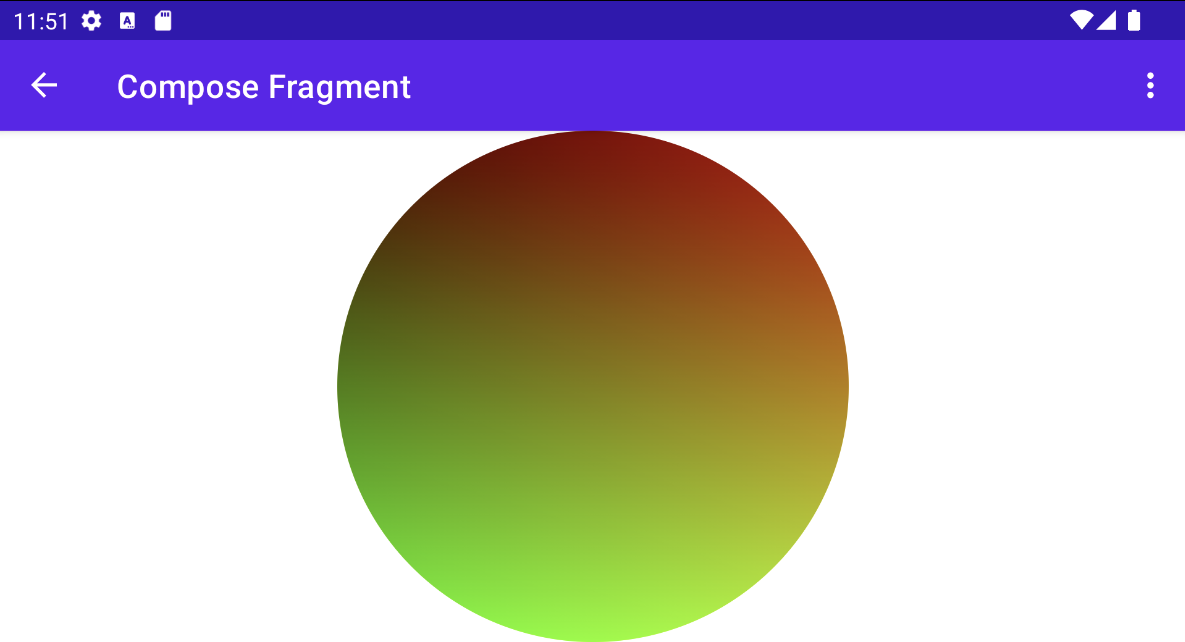
搭配 Jetpack Compose 使用 RuntimeShader
如果您要使用 RuntimeShader 轉譯 UI
Jetpack Compose。一開始先使用相同的漸層著色器:
變更前:
private const val COLOR_SHADER_SRC =
    """uniform float2 iResolution;
   half4 main(float2 fragCoord) {
   float2 scaled = fragCoord/iResolution.xy;
   return half4(scaled, 0, 1);
}"""
您可以將著色器套用至
ShaderBrush。個人中心
然後使用 ShaderBrush 做為參數,
Canvas的繪製範圍。
// created as top level constants
val colorShader = RuntimeShader(COLOR_SHADER_SRC)
val shaderBrush = ShaderBrush(colorShader)

Canvas(
   modifier = Modifier.fillMaxSize()
) {
   colorShader.setFloatUniform("iResolution",
   size.width, size.height)
   drawCircle(brush = shaderBrush)
}
將 RuntimeShader 與 RenderEffect 搭配使用
別擔心!您可以使用
RenderEffect,即可套用
RuntimeShader 比上層 View
和所有子檢視畫面。這會比繪製自訂 View 要昂貴。但
您可以輕鬆建立結合效果
原圖是運用的
createRuntimeShaderEffect。
Kotlin
view.setRenderEffect(RenderEffect.createRuntimeShaderEffect(myShader, "background"))
Java
view.setRenderEffect(RenderEffect.createRuntimeShaderEffect(myShader, "background"));
第二個參數是您可以採用 eval 的著色器統一格式名稱
座標參數 (例如透過 fragCoord 傳遞) 來取得原始顏色
的
RenderNode (View 及其子項)
執行各種效果
uniform shader background;       // Root node of View tree to be altered
return mix(returnColor, background.eval(fragCoord), 0.5);
格線效果混合在按鈕上方,但懸浮動作按鈕下方
(因為該階層位於不同的 View 階層)。