
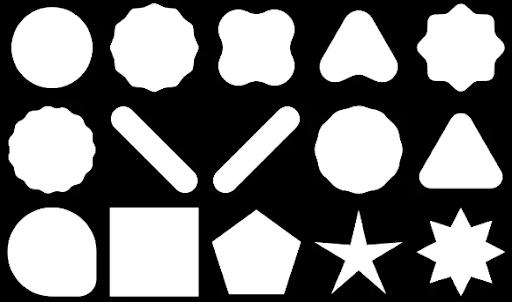
Compose를 사용하면 다각형으로 만든 도형을 만들 수 있습니다. 예를 들어 다음과 같은 종류의 도형을 만들 수 있습니다.
Compose에서 맞춤 둥근 다각형을 만들려면
graphics-shapes 종속 항목을
app/build.gradle에 추가합니다.
implementation "androidx.graphics:graphics-shapes:1.0.1"
이 라이브러리를 사용하면 다각형으로 만든 도형을 만들 수 있습니다. 다각형 도형에는 직선 모서리와 날카로운 모서리만 있지만 이러한 도형에는 선택적 둥근 모서리가 허용됩니다. 두 가지 도형 간에 간단하게 모핑할 수 있습니다. 임의의 도형 간에는 모핑이 어렵고 디자인 타임 문제가 발생하는 경향이 있습니다. 하지만 이 라이브러리를 사용하면 다각형 구조가 비슷한 도형 간에 모핑하여 간단하게 만들 수 있습니다.
다각형 만들기
다음 스니펫은 그리기 영역의 중앙에 6개의 점이 있는 기본 다각형 도형을 만듭니다.
Box( modifier = Modifier .drawWithCache { val roundedPolygon = RoundedPolygon( numVertices = 6, radius = size.minDimension / 2, centerX = size.width / 2, centerY = size.height / 2 ) val roundedPolygonPath = roundedPolygon.toPath().asComposePath() onDrawBehind { drawPath(roundedPolygonPath, color = Color.Blue) } } .fillMaxSize() )

이 예에서 라이브러리는 요청된 도형을 나타내는 기하 도형을 보유하는 RoundedPolygon을 만듭니다. Compose 앱에서 해당 도형을 그리려면 Compose에서 그리는 방법을 알고 있는 형식으로 도형을 가져오기 위해 Path 객체를 가져와야 합니다.
다각형의 모서리 둥글게 만들기
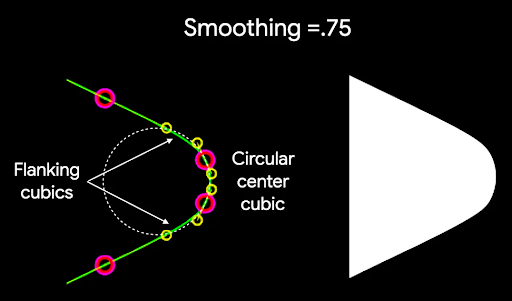
다각형의 모서리를 둥글게 만들려면 CornerRounding 매개변수를 사용합니다. 이 매개변수는 radius와 smoothing이라는 두 개의 매개변수를 사용합니다. 각 둥근 모서리는 1~3개의 3차 곡선으로 구성되며, 그 중심에는 원호 도형이 있고 두 개의 측면 곡선은 도형의 가장자리에서 중심 곡선으로 전환됩니다.
반경
radius는 꼭짓점을 둥글게 만드는 데 사용되는 원의 반지름입니다.
예를 들어 다음 둥근 모서리 삼각형은 다음과 같이 만들어집니다.


r은 둥근 모서리의 원형 둥근 크기를 결정합니다.평활화
평활화는 모서리의 원형 둥근 부분에서 가장자리까지 이동하는 데 걸리는 시간을 결정하는 요소입니다. 평활화 요소가 0(평활화되지 않음, CornerRounding의 기본값)이면 순전히 원형 모서리 둥근이 됩니다. 0이 아닌 평활화 요소 (최대 1.0)를 사용하면 세 개의 개별 곡선으로 모서리가 둥글게 됩니다.

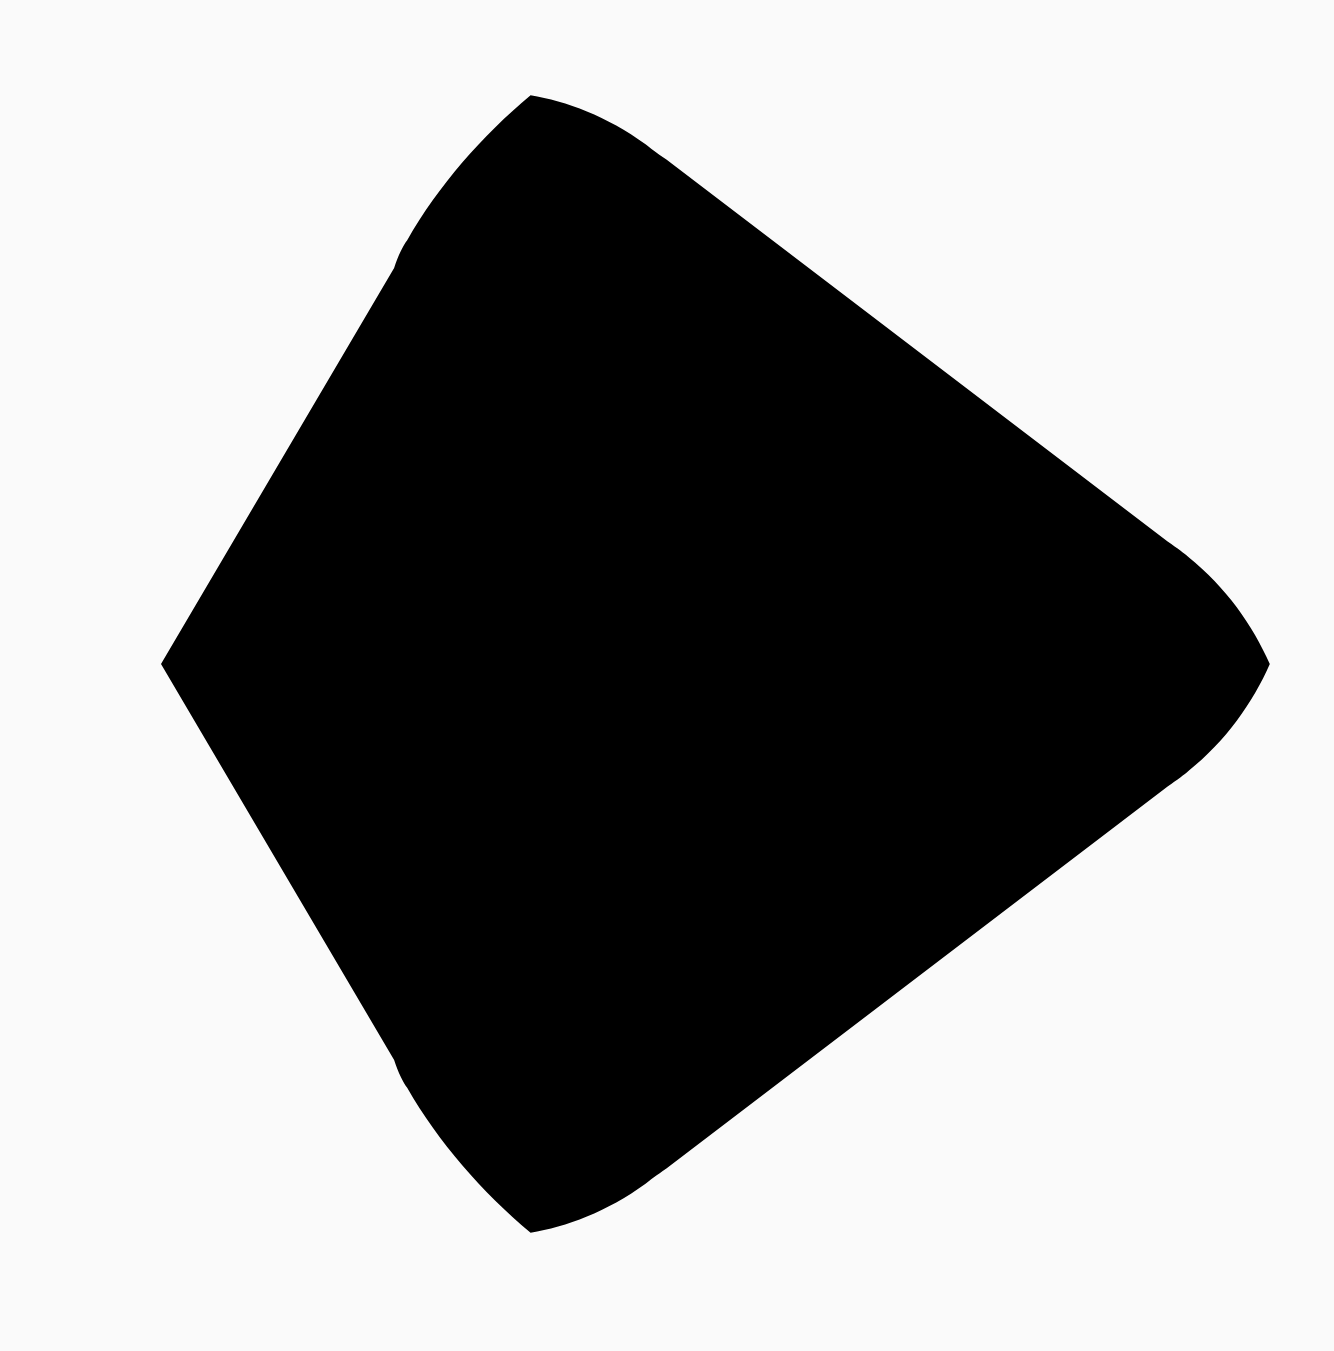
예를 들어 아래 스니펫은 평활화를 0으로 설정하는 것과 1로 설정하는 것의 미묘한 차이를 보여줍니다.
Box( modifier = Modifier .drawWithCache { val roundedPolygon = RoundedPolygon( numVertices = 3, radius = size.minDimension / 2, centerX = size.width / 2, centerY = size.height / 2, rounding = CornerRounding( size.minDimension / 10f, smoothing = 0.1f ) ) val roundedPolygonPath = roundedPolygon.toPath().asComposePath() onDrawBehind { drawPath(roundedPolygonPath, color = Color.Black) } } .size(100.dp) )

크기 및 위치
기본적으로 도형은 중심 (0, 0) 주위에 반지름이 1인 도형으로 만들어집니다. 이 반지름은 도형이 기반으로 하는 다각형의 중심과 외부 꼭짓점 사이의 거리를 나타냅니다. 모서리를 둥글게 만들면 둥근 모서리가 둥글게 되는 꼭짓점보다 중심에 더 가까우므로 도형이 작아집니다. 다각형의 크기를 조정하려면 radius 값을 조정합니다. 위치를 조정하려면 다각형의 centerX 또는 centerY를 변경합니다.
또는 객체를 변환하여 크기, 위치, 회전을 변경합니다.
표준 DrawScope 변환 함수를 사용하여
DrawScope#translate().
도형 모핑
Morph 객체는 두 개의 다각형 도형 간의 애니메이션을 나타내는 새로운 도형입니다. 두 도형 간에 모핑하려면 두 개의 RoundedPolygons와 이러한 두 도형을 사용하는 Morph 객체를 만듭니다. 시작 도형과 종료 도형 사이의 도형을 계산하려면 0과 1 사이의 progress 값을 제공하여 시작 (0) 및 종료 (1) 도형 간의 형태를 결정합니다.
Box( modifier = Modifier .drawWithCache { val triangle = RoundedPolygon( numVertices = 3, radius = size.minDimension / 2f, centerX = size.width / 2f, centerY = size.height / 2f, rounding = CornerRounding( size.minDimension / 10f, smoothing = 0.1f ) ) val square = RoundedPolygon( numVertices = 4, radius = size.minDimension / 2f, centerX = size.width / 2f, centerY = size.height / 2f ) val morph = Morph(start = triangle, end = square) val morphPath = morph .toPath(progress = 0.5f).asComposePath() onDrawBehind { drawPath(morphPath, color = Color.Black) } } .fillMaxSize() )
위의 예에서 진행률은 두 도형(둥근 삼각형과 정사각형)의 정확히 중간에 있으며 다음과 같은 결과를 생성합니다.
대부분의 시나리오에서 모핑은 정적 렌더링이 아니라 애니메이션의 일부로 실행됩니다. 이 두 가지 도형 간에 애니메이션을 적용하려면 Compose의 표준 애니메이션 API를 사용하여 시간이 지남에 따라 진행률 값을 변경하면 됩니다. 예를 들어 다음과 같이 두 도형 간의 모핑을 무한히 애니메이션으로 처리할 수 있습니다.
val infiniteAnimation = rememberInfiniteTransition(label = "infinite animation") val morphProgress = infiniteAnimation.animateFloat( initialValue = 0f, targetValue = 1f, animationSpec = infiniteRepeatable( tween(500), repeatMode = RepeatMode.Reverse ), label = "morph" ) Box( modifier = Modifier .drawWithCache { val triangle = RoundedPolygon( numVertices = 3, radius = size.minDimension / 2f, centerX = size.width / 2f, centerY = size.height / 2f, rounding = CornerRounding( size.minDimension / 10f, smoothing = 0.1f ) ) val square = RoundedPolygon( numVertices = 4, radius = size.minDimension / 2f, centerX = size.width / 2f, centerY = size.height / 2f ) val morph = Morph(start = triangle, end = square) val morphPath = morph .toPath(progress = morphProgress.value) .asComposePath() onDrawBehind { drawPath(morphPath, color = Color.Black) } } .fillMaxSize() )
다각형을 클립으로 사용
Compose에서
clip
수정자를 사용하여 컴포저블이 렌더링되는 방식을 변경하고 클리핑 영역 주위에 그려지는 그림자를
활용하는 것이 일반적입니다.
fun RoundedPolygon.getBounds() = calculateBounds().let { Rect(it[0], it[1], it[2], it[3]) } class RoundedPolygonShape( private val polygon: RoundedPolygon, private var matrix: Matrix = Matrix() ) : Shape { private var path = Path() override fun createOutline( size: Size, layoutDirection: LayoutDirection, density: Density ): Outline { path.rewind() path = polygon.toPath().asComposePath() matrix.reset() val bounds = polygon.getBounds() val maxDimension = max(bounds.width, bounds.height) matrix.scale(size.width / maxDimension, size.height / maxDimension) matrix.translate(-bounds.left, -bounds.top) path.transform(matrix) return Outline.Generic(path) } }
그런 다음 다음 스니펫과 같이 다각형을 클립으로 사용할 수 있습니다.
val hexagon = remember { RoundedPolygon( 6, rounding = CornerRounding(0.2f) ) } val clip = remember(hexagon) { RoundedPolygonShape(polygon = hexagon) } Box( modifier = Modifier .clip(clip) .background(MaterialTheme.colorScheme.secondary) .size(200.dp) ) { Text( "Hello Compose", color = MaterialTheme.colorScheme.onSecondary, modifier = Modifier.align(Alignment.Center) ) }
그러면 다음과 같은 결과가 나타납니다.
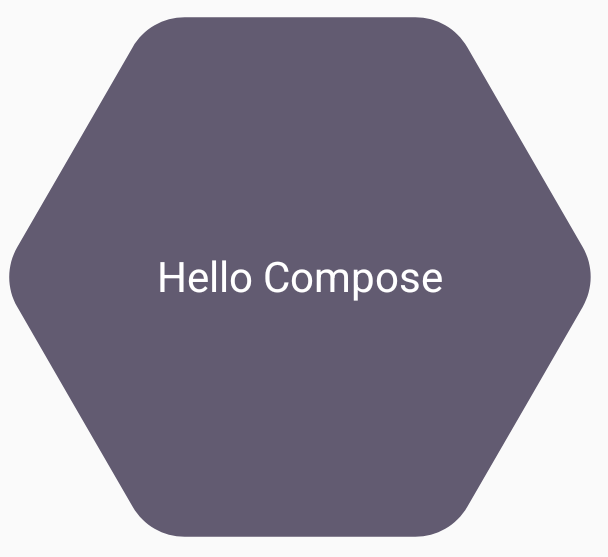
이전 렌더링과 크게 다르지 않을 수 있지만 Compose의 다른 기능을 활용할 수 있습니다. 예를 들어 이 기법을 사용하여 이미지를 클리핑하고 클리핑된 영역 주위에 그림자를 적용할 수 있습니다.
val hexagon = remember { RoundedPolygon( 6, rounding = CornerRounding(0.2f) ) } val clip = remember(hexagon) { RoundedPolygonShape(polygon = hexagon) } Box( modifier = Modifier.fillMaxSize(), contentAlignment = Alignment.Center ) { Image( painter = painterResource(id = R.drawable.dog), contentDescription = "Dog", contentScale = ContentScale.Crop, modifier = Modifier .graphicsLayer { this.shadowElevation = 6.dp.toPx() this.shape = clip this.clip = true this.ambientShadowColor = Color.Black this.spotShadowColor = Color.Black } .size(200.dp) ) }

클릭 시 버튼 모핑
graphics-shape 라이브러리를 사용하여 누를 때 두 도형 간에 모핑되는 버튼을 만들 수 있습니다. 먼저 MorphPolygonShape를 확장하는 Shape를 만들고,
적절하게 맞도록 확장하고 변환합니다. 도형에 애니메이션을 적용할 수 있도록 진행률 전달에 유의하세요.
class MorphPolygonShape( private val morph: Morph, private val percentage: Float ) : Shape { private val matrix = Matrix() override fun createOutline( size: Size, layoutDirection: LayoutDirection, density: Density ): Outline { // Below assumes that you haven't changed the default radius of 1f, nor the centerX and centerY of 0f // By default this stretches the path to the size of the container, if you don't want stretching, use the same size.width for both x and y. matrix.scale(size.width / 2f, size.height / 2f) matrix.translate(1f, 1f) val path = morph.toPath(progress = percentage).asComposePath() path.transform(matrix) return Outline.Generic(path) } }
이 모핑 도형을 사용하려면 두 개의 다각형 shapeA와 shapeB를 만듭니다. Morph를 만들고 기억합니다. 그런 다음 누를 때 interactionSource를 애니메이션의 원동력으로 사용하여 모핑을 버튼에 클립 윤곽선으로 적용합니다.
val shapeA = remember { RoundedPolygon( 6, rounding = CornerRounding(0.2f) ) } val shapeB = remember { RoundedPolygon.star( 6, rounding = CornerRounding(0.1f) ) } val morph = remember { Morph(shapeA, shapeB) } val interactionSource = remember { MutableInteractionSource() } val isPressed by interactionSource.collectIsPressedAsState() val animatedProgress = animateFloatAsState( targetValue = if (isPressed) 1f else 0f, label = "progress", animationSpec = spring(dampingRatio = 0.4f, stiffness = Spring.StiffnessMedium) ) Box( modifier = Modifier .size(200.dp) .padding(8.dp) .clip(MorphPolygonShape(morph, animatedProgress.value)) .background(Color(0xFF80DEEA)) .size(200.dp) .clickable(interactionSource = interactionSource, indication = null) { } ) { Text("Hello", modifier = Modifier.align(Alignment.Center)) }
그러면 상자를 탭할 때 다음과 같은 애니메이션이 생성됩니다.

도형 모핑을 무한히 애니메이션으로 처리
모핑 도형을 무한히 애니메이션으로 처리하려면
rememberInfiniteTransition을 사용합니다.
아래는 시간이 지남에 따라 도형이 무한히 변경 (및 회전)되는 프로필 사진의 예입니다. 이 접근 방식은 위에 표시된 MorphPolygonShape를 약간 조정합니다.
class CustomRotatingMorphShape( private val morph: Morph, private val percentage: Float, private val rotation: Float ) : Shape { private val matrix = Matrix() override fun createOutline( size: Size, layoutDirection: LayoutDirection, density: Density ): Outline { // Below assumes that you haven't changed the default radius of 1f, nor the centerX and centerY of 0f // By default this stretches the path to the size of the container, if you don't want stretching, use the same size.width for both x and y. matrix.scale(size.width / 2f, size.height / 2f) matrix.translate(1f, 1f) matrix.rotateZ(rotation) val path = morph.toPath(progress = percentage).asComposePath() path.transform(matrix) return Outline.Generic(path) } } @Preview @Composable private fun RotatingScallopedProfilePic() { val shapeA = remember { RoundedPolygon( 12, rounding = CornerRounding(0.2f) ) } val shapeB = remember { RoundedPolygon.star( 12, rounding = CornerRounding(0.2f) ) } val morph = remember { Morph(shapeA, shapeB) } val infiniteTransition = rememberInfiniteTransition("infinite outline movement") val animatedProgress = infiniteTransition.animateFloat( initialValue = 0f, targetValue = 1f, animationSpec = infiniteRepeatable( tween(2000, easing = LinearEasing), repeatMode = RepeatMode.Reverse ), label = "animatedMorphProgress" ) val animatedRotation = infiniteTransition.animateFloat( initialValue = 0f, targetValue = 360f, animationSpec = infiniteRepeatable( tween(6000, easing = LinearEasing), repeatMode = RepeatMode.Reverse ), label = "animatedMorphProgress" ) Box( modifier = Modifier.fillMaxSize(), contentAlignment = Alignment.Center ) { Image( painter = painterResource(id = R.drawable.dog), contentDescription = "Dog", contentScale = ContentScale.Crop, modifier = Modifier .clip( CustomRotatingMorphShape( morph, animatedProgress.value, animatedRotation.value ) ) .size(200.dp) ) } }
이 코드는 다음과 같은 재미있는 결과를 제공합니다.
맞춤 다각형
일반 다각형으로 만든 도형이 사용 사례를 다루지 않는 경우 꼭짓점 목록을 사용하여 더 맞춤 도형을 만들 수 있습니다. 예를 들어 다음과 같은 하트 도형을 만들 수 있습니다.

x, y 좌표의 부동 소수점 배열을 사용하는 RoundedPolygon 오버로드를 사용하여 이 도형의 개별 꼭짓점을 지정할 수 있습니다.
하트 다각형을 분석하려면 점을 지정하는 극좌표계가 직교 (x,y) 좌표계를 사용하는 것보다 더 쉽다는 점에 유의하세요. 여기서 0°는 오른쪽에 있고 시계 방향으로 진행되며 270°는 12시 방향에 있습니다.
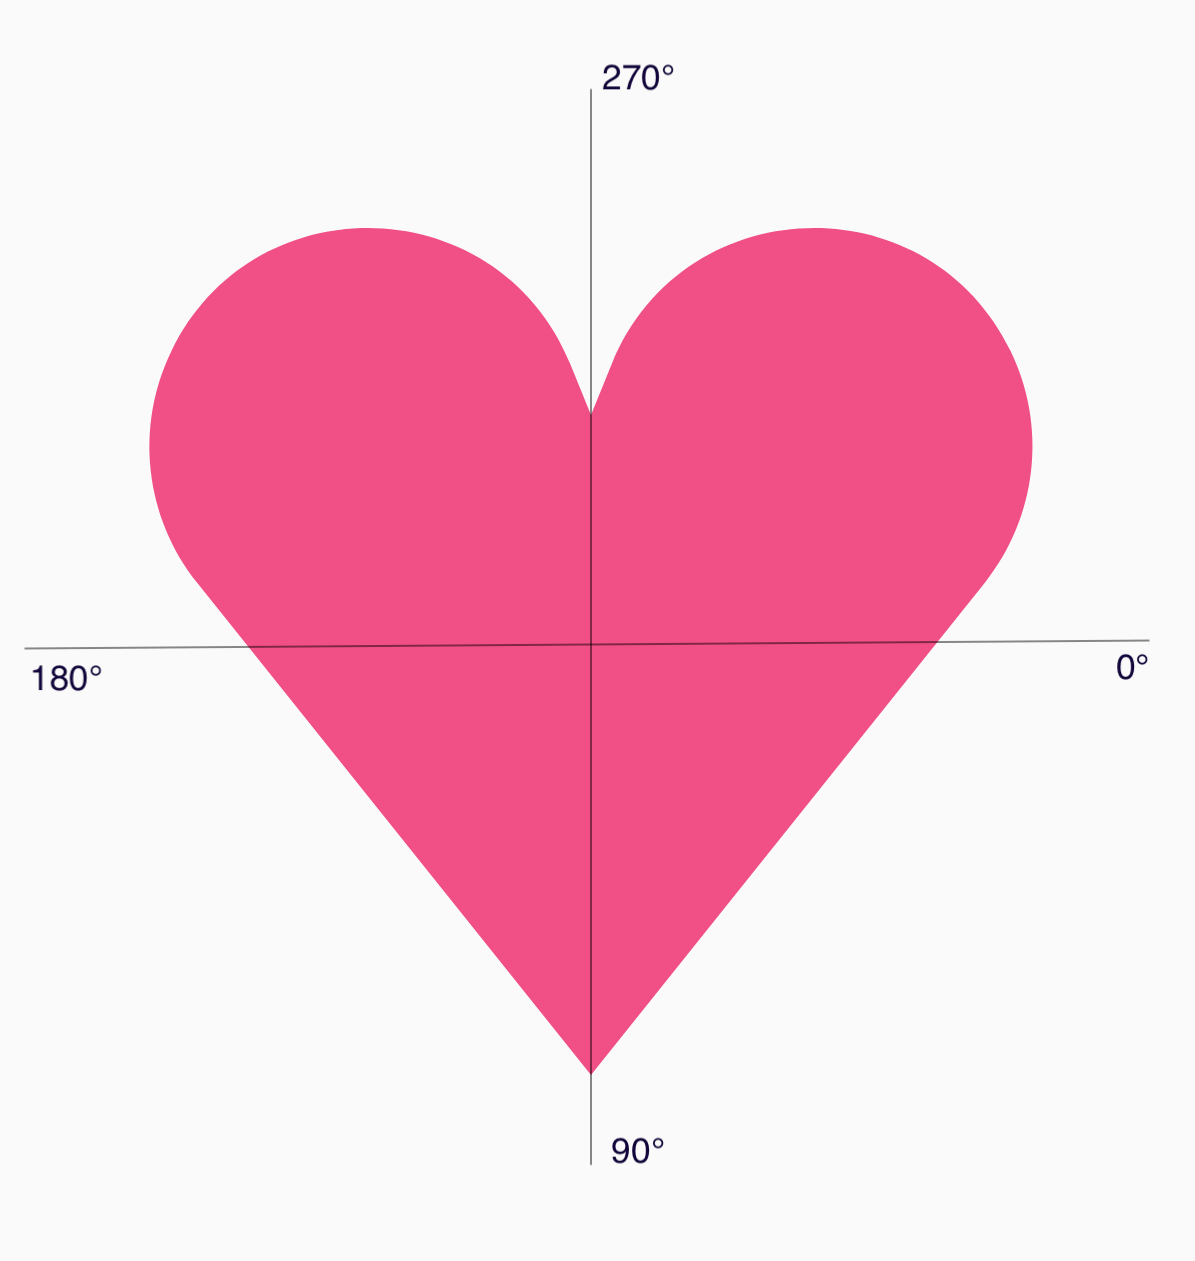
이제 각 지점에서 중심으로부터의 각도 (𝜭)와 반지름을 지정하여 도형을 더 쉽게 정의할 수 있습니다.
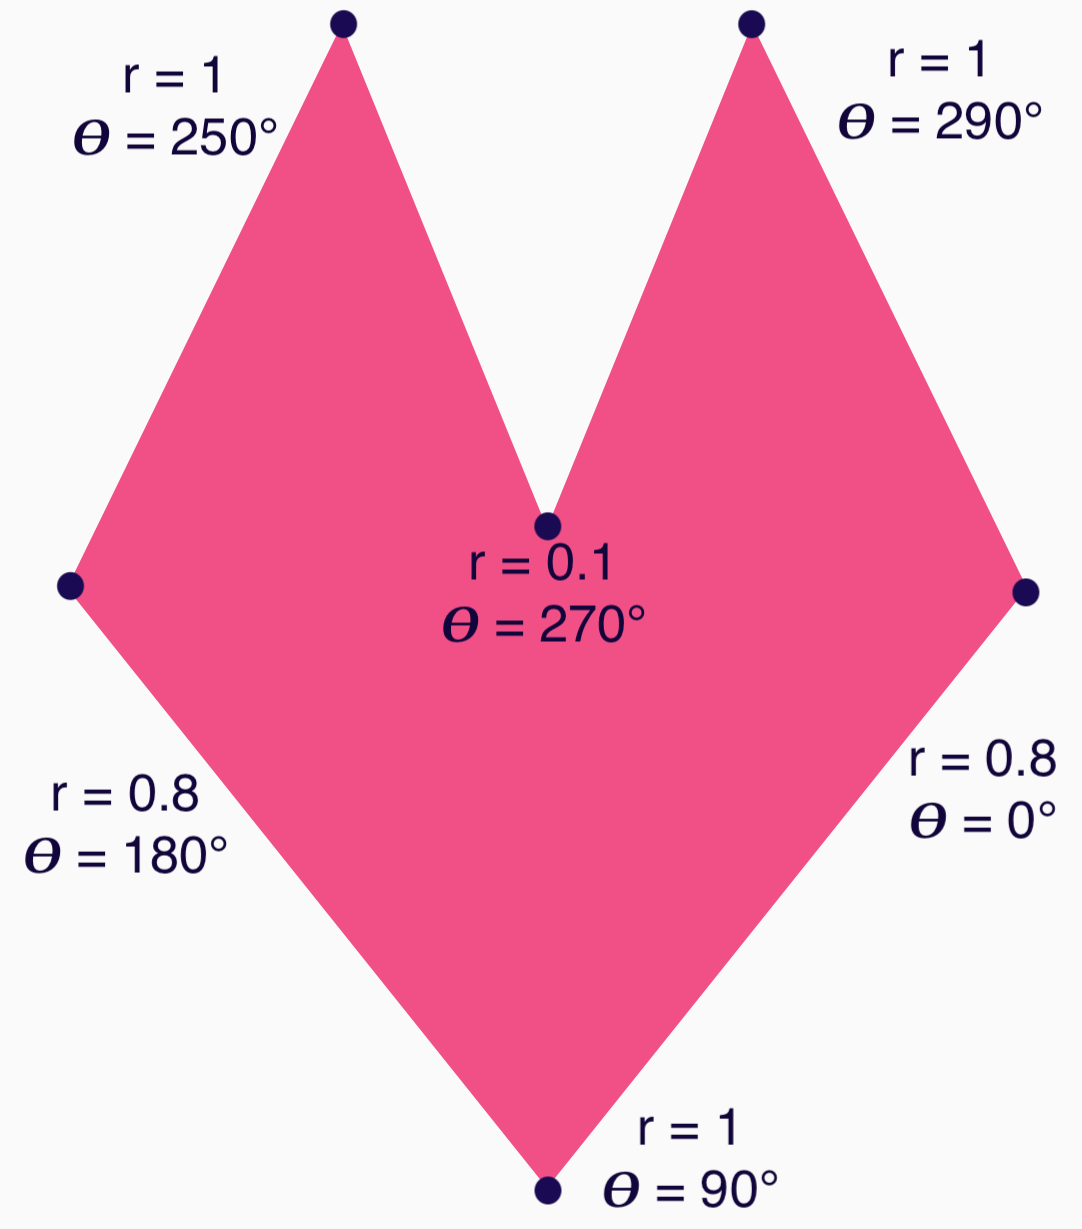
이제 꼭짓점을 만들고 RoundedPolygon 함수에 전달할 수 있습니다.
val vertices = remember { val radius = 1f val radiusSides = 0.8f val innerRadius = .1f floatArrayOf( radialToCartesian(radiusSides, 0f.toRadians()).x, radialToCartesian(radiusSides, 0f.toRadians()).y, radialToCartesian(radius, 90f.toRadians()).x, radialToCartesian(radius, 90f.toRadians()).y, radialToCartesian(radiusSides, 180f.toRadians()).x, radialToCartesian(radiusSides, 180f.toRadians()).y, radialToCartesian(radius, 250f.toRadians()).x, radialToCartesian(radius, 250f.toRadians()).y, radialToCartesian(innerRadius, 270f.toRadians()).x, radialToCartesian(innerRadius, 270f.toRadians()).y, radialToCartesian(radius, 290f.toRadians()).x, radialToCartesian(radius, 290f.toRadians()).y, ) }
이 radialToCartesian 함수를 사용하여 꼭짓점을 직교 좌표로 변환해야 합니다.
internal fun Float.toRadians() = this * PI.toFloat() / 180f internal val PointZero = PointF(0f, 0f) internal fun radialToCartesian( radius: Float, angleRadians: Float, center: PointF = PointZero ) = directionVectorPointF(angleRadians) * radius + center internal fun directionVectorPointF(angleRadians: Float) = PointF(cos(angleRadians), sin(angleRadians))
앞의 코드는 하트의 원시 꼭짓점을 제공하지만 선택한 하트 도형을 얻으려면 특정 모서리를 둥글게 만들어야 합니다. 90° 및 270°의 모서리는 둥글게 만들지 않지만 다른 모서리는 둥글게 만듭니다. 개별 모서리에 맞춤 둥근을 적용하려면 perVertexRounding 매개변수를 사용합니다.
val rounding = remember { val roundingNormal = 0.6f val roundingNone = 0f listOf( CornerRounding(roundingNormal), CornerRounding(roundingNone), CornerRounding(roundingNormal), CornerRounding(roundingNormal), CornerRounding(roundingNone), CornerRounding(roundingNormal), ) } val polygon = remember(vertices, rounding) { RoundedPolygon( vertices = vertices, perVertexRounding = rounding ) } Box( modifier = Modifier .drawWithCache { val roundedPolygonPath = polygon.toPath().asComposePath() onDrawBehind { scale(size.width * 0.5f, size.width * 0.5f) { translate(size.width * 0.5f, size.height * 0.5f) { drawPath(roundedPolygonPath, color = Color(0xFFF15087)) } } } } .size(400.dp) )
그러면 분홍색 하트가 생성됩니다.
이전 도형이 사용 사례를 다루지 않는 경우 Path
클래스를 사용하여 맞춤
도형을그리거나 디스크에서
ImageVector 파일을 로드하는 것이 좋습니다. graphics-shapes 라이브러리는 임의의 도형에 사용하기 위한 것이 아니라 둥근 다각형과 그 사이의 모핑 애니메이션을 간소화하기 위한 것입니다.
추가 리소스
자세한 내용과 예시는 다음 리소스를 참조하세요.