
Some apps, such as password managers, can fill out the components in other apps with data provided by the user. Apps that fill out other apps' components are called autofill services. The autofill framework manages the communication between an app and an autofill service.
Filling out credentials and forms is a time-consuming and error-prone task. Autofill allows users to save time spent filling in fields and minimizes user input errors.
With only a few lines of code, you can implement Autofill in Compose. This feature provides the following benefits to users:
Fill credentials
Autofill allows users to populate their credentials in the following ways:
- The system displays Autofill suggestions for the user when they tap into a field where Autofill semantics are set.
- The system displays Autofill suggestions for the user and filters them based on what the user types in.
Save credentials
Users can save credentials through Autofill in the following ways:
- The system triggers a save dialog, which prompts the user to save information
when they input new or updated information into an Autofill-enabled field.
Saving can be done in two ways:
- Explicitly, by committing information (for example, through a button click)
- Implicitly, when a user navigates away from the page
- Depending on your credential provider, the system may suggest a strong
password to the user when a field has
ContentType.NewPasswordset.
You can use Autofill in your app to streamline the retrieval of saved data for
users. Autofill supports text components through
BasicTextField and all Material text fields that build on that component.
Set up Autofill
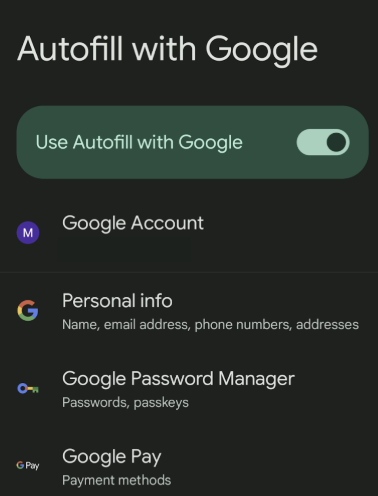
Before using the Autofill APIs on your device or emulator, you must activate Autofill in Settings. There, you can specify a credential provider for Autofill to store your credentials.
Add Autofill to your text field using content type
To indicate that a TextField is Autofill-enabled, set the ContentType
semantics with the types that the field can accept. This indicates to
Autofill services what kind of user data might be relevant to this specific
field. Use ContentType.Username to set a TextField that users can fill in
with their username.
By setting the ContentType semantics, your users can access Autofill
information already saved in their device's credential provider. For example,
if a user has already signed into your app
through the Chrome browser on their laptop and saved their password through a
credential provider, then their credentials are served to them through Autofill.
Value-based text field
TextField( value = textFieldValue.value, onValueChange = { textFieldValue.value = it }, modifier = Modifier.semantics { contentType = ContentType.Username } )
State-based text field
TextField( state = rememberTextFieldState(), modifier = Modifier.semantics { contentType = ContentType.Username } )
Add Autofill fields with multiple types
In some cases, you may want your TextField to take on more than one
ContentType. For example, a login field may accept either an email address or
a username. You can add multiple content types to your TextField with the +
operator.
For all the types of data available to save with Autofill, see the
ContentType reference.
Value-based text field
TextField( value = textFieldValue.value, onValueChange = { textFieldValue.value = it }, modifier = Modifier.semantics { contentType = ContentType.Username + ContentType.EmailAddress } )
State-based text field
TextField( state = rememberTextFieldState(), modifier = Modifier.semantics { contentType = ContentType.Username + ContentType.EmailAddress } )
Fill data with Autofill
When you add a ContentType in a TextField, you won't need to do anything
else for users to be able to fill credentials.
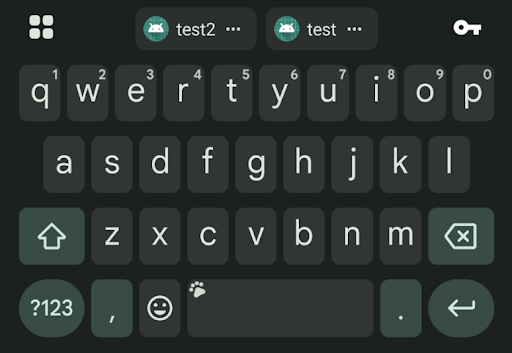
When a user clicks into an Autofill-enabled field, if there is relevant data stored, they see a chip in the toolbar above the keyboard that prompts them to fill in credentials.
Save data with Autofill through navigation
Compose automatically tries to determine when a user navigates from a page and commits the inputted credentials. Once a field is Autofill-enabled, it will automatically save credential information when a user navigates away from the page without requiring any additional code.
Save data explicitly with Autofill
To explicitly save new credentials through text fields with Autofill, the
Autofill context should be committed (or canceled) by the Autofill manager. The
local Autofill manager then communicates with the Autofill framework whenever
necessary. If you want to remove credentials that the user has inputted, call
AutofillManager.cancel to delete any pending data without saving it.
The following snippets show how to save data with Autofill explicitly using a button:
Create a local variable to hold the Autofill manager, which can be retrieved in the following way:
val autofillManager = LocalAutofillManager.current
In your
TextField(s), add your chosen content type throughModifier.semantics:With value-based text fields:
val autofillManager = LocalAutofillManager.current Column { TextField( value = textFieldValue.value, onValueChange = { textFieldValue.value = it }, modifier = Modifier.semantics { contentType = ContentType.NewUsername } ) Spacer(modifier = Modifier.height(16.dp)) TextField( value = textFieldValue.value, onValueChange = { textFieldValue.value = it }, modifier = Modifier.semantics { contentType = ContentType.NewPassword } ) }
With state-based text fields:
val autofillManager = LocalAutofillManager.current Column { TextField( state = rememberTextFieldState(), modifier = Modifier.semantics { contentType = ContentType.NewUsername } ) Spacer(modifier = Modifier.height(16.dp)) TextField( state = rememberTextFieldState(), modifier = Modifier.semantics { contentType = ContentType.NewPassword } ) }
Commit the Autofill context as needed through a button click:
With value-based text fields:
val autofillManager = LocalAutofillManager.current Column { TextField( value = usernameTextFieldValue.value, onValueChange = { usernameTextFieldValue.value = it }, modifier = Modifier.semantics { contentType = ContentType.NewUsername }, ) Spacer(modifier = Modifier.height(16.dp)) TextField( value = passwordTextFieldValue.value, onValueChange = { passwordTextFieldValue.value = it }, modifier = Modifier.semantics { contentType = ContentType.NewPassword }, ) // Submit button Button(onClick = { autofillManager?.commit() }) { Text("Reset credentials") } }
With state-based text fields:
val autofillManager = LocalAutofillManager.current Column { TextField( state = rememberTextFieldState(), modifier = Modifier.semantics { contentType = ContentType.NewUsername }, ) Spacer(modifier = Modifier.height(16.dp)) TextField( state = rememberTextFieldState(), modifier = Modifier.semantics { contentType = ContentType.NewPassword }, ) // Submit button Button(onClick = { autofillManager?.commit() }) { Text("Reset credentials") } }
Commit is called whenever a user navigates away from the screen. If a Submit button is linked to navigation, then Commit does not need to be called. If you still want clicking a Submit to trigger the save dialog, add Commit here.
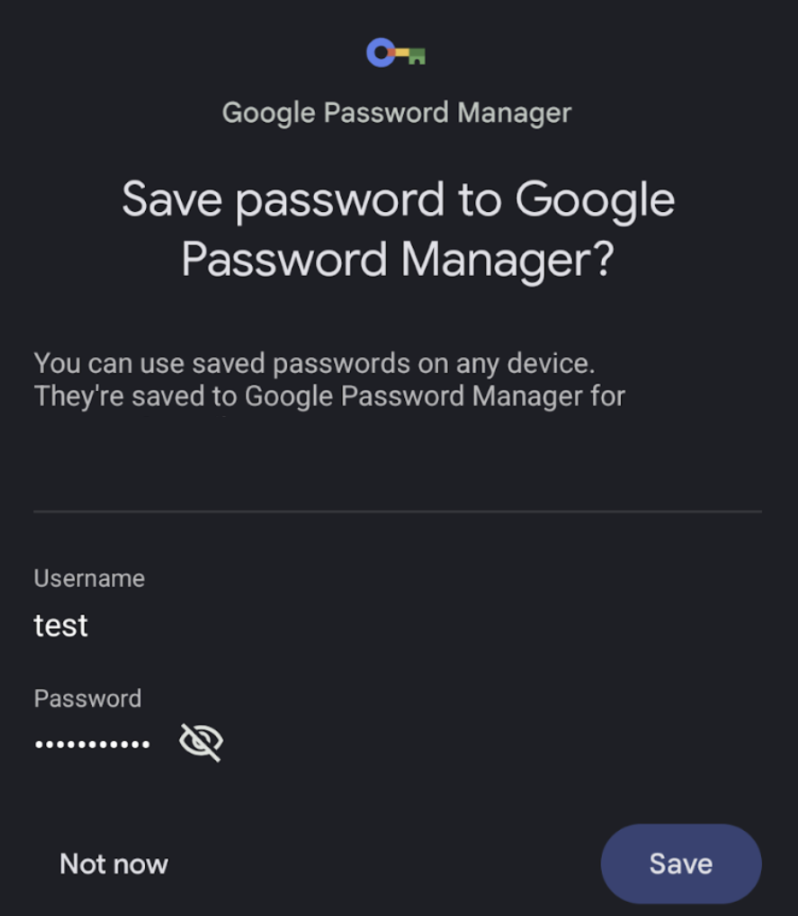
When the user clicks the button, they'll see this bottom sheet prompting them to save the credentials to the selected credential provider:

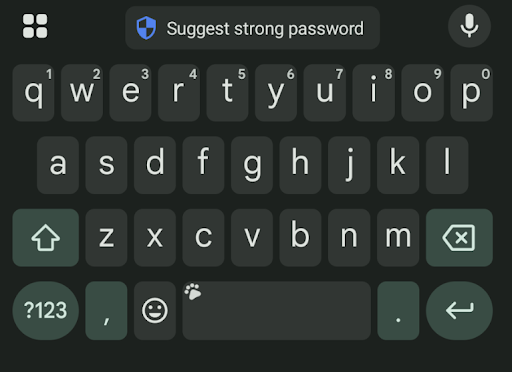
Save data with Autofill through suggest strong password
Depending on your credential provider, when you're using the NewUsername and
NewPassword content types, users may see a button in the keyboard to
Suggest strong password. When they click this, a bottom sheet appears,
which allows them to save their credentials. You don't need to implement
anything else for users to have this experience.

Troubleshooting
When invoking the "saving" user journey, if you click "Not now" more than once, your credential provider may no longer display the bottom sheet. To re-enable it and have it appear once more, you need to remove specific apps that have blocked the "Remember this password?".
Further customize Autofill
In a typical Autofill user journey, when an Autofill-enabled component has been populated with credentials, it changes color and becomes highlighted to signal to the user that Autofill has successfully completed.
To customize this highlight color, use CompositionLocal and provide
whichever color you'd like. The default Autofill highlight color is defined as
Color(0x4dffeb3b).
Value-based text fields
val customHighlightColor = Color.Red CompositionLocalProvider(LocalAutofillHighlightColor provides customHighlightColor) { TextField( value = textFieldValue.value, onValueChange = { textFieldValue.value = it }, modifier = Modifier.semantics { contentType = ContentType.Username } ) }
State-based text fields
val customHighlightColor = Color.Red CompositionLocalProvider(LocalAutofillHighlightColor provides customHighlightColor) { TextField( state = rememberTextFieldState(), modifier = Modifier.semantics { contentType = ContentType.Username } ) }