
Android Studio includes a tool called Vector Asset Studio that helps you add material icons and import Scalable Vector Graphic (SVG) and Adobe Photoshop Document (PSD) files into your project as vector drawable resources. Using vector drawables instead of bitmaps reduces the size of your APK because the same file can be resized for different screen densities without loss of image quality. For older versions of Android that don't support vector drawables, Vector Asset Studio can, at build time, turn your vector drawables into different bitmap sizes for each screen density.
About Vector Asset Studio
Vector Asset Studio adds a vector graphic to the project as an XML file that describes the image. Maintaining one XML file can be easier than updating multiple raster graphics at various resolutions.
Android 4.4 (API level 20) and lower doesn't support vector drawables. If your minimum API level is set at one of these API levels, you have two options when using Vector Asset Studio: generate Portable Network Graphic (PNG) files (the default) or use the Support Library.
For backward-compatibility, Vector Asset Studio generates
raster images of the vector drawable. The vector and raster drawables are
packaged together in the APK. You can refer to vector drawables as
Drawable
in Java code or
@drawable in XML code; when your app runs, the corresponding vector
or raster image displays automatically depending on the API level.
If you want to use vector drawables only, you can use Android Support Library 23.2 or
higher. This technique requires a change to your build.gradle file
before you run Vector Asset Studio, as described in
Support Library Backward Compatibility.
The VectorDrawableCompat
class in the Support Library allows you to support VectorDrawable in
Android 2.1 (API level 7) and higher.
Supported vector graphic types
The Google Material Design specification provides material icons that you can use in your Android apps. Vector Asset Studio helps you choose, import, and size material icons, as well as define opacity and the Right-to-Left (RTL) mirroring setting.
Vector Asset Studio also lets you import your own SVG and PSD files. SVG is an XML-based open
standard of the World Wide Web Consortium (W3C). The PSD file format supports Adobe Photoshop
features. Vector Asset Studio supports the essential standards, but not all SVG and PSD features.
When you specify an SVG or PSD file, Vector Asset Studio gives immediate feedback about whether the
graphics code is supported or not. It converts the file into an XML file containing
VectorDrawable
code. If you receive errors, you should verify that your vector drawable appears as intended.
For more information about allowed PSD features, see
Support and restrictions for PSD files.
For Android 5.0 (API level 21) and higher, you can use the
AnimatedVectorDrawable
class to animate the properties of the
VectorDrawable
class. With the Support Library, you can use the
AnimatedVectorDrawableCompat
class to animate the VectorDrawable class for Android 3.0 (API level 11) and higher.
For more information, see
Animate vector drawables.
Considerations for SVG and PSD files
A vector drawable is appropriate for simple icons. The material icons provide good examples of the types of images that work well as vector drawables in an app. In contrast, many app launch icons do have many details, so they work better as raster images.
The initial loading of a vector drawable can cost more CPU cycles than the corresponding raster image. Afterward, memory use and performance are similar between the two. We recommend that you limit a vector image to a maximum of 200 x 200 dp; otherwise, it can take too long to draw.
Although vector drawables do support one or more colors, in many cases it makes sense to color
icons black (android:fillColor="#FF000000"). Using this approach, you can add a
tint to the vector drawable
that you placed in a layout, and the icon color changes to the tint color. If the icon color
isn't black, the icon color might instead blend with the tint color.
Vector drawable backward-compatibility solutions
The following table summarizes the two techniques that you can use for backward-compatibility:
| Technique | Drawables in APK | VectorDrawable XML elements | Version | Build flags | App code |
|---|---|---|---|---|---|
| PNG generation | Vector and raster | Subset supported | SVG: Android plugin for Gradle 1.5.0 or higher PSD: Android Studio 2.2 or higher |
Default | Variety of coding techniques supported |
| Support Library 23.2 or higher | Vector | Full support | Android plugin for Gradle 2.0 or higher | Support Library statements required | Subset of coding techniques supported |
Using vector drawables can produce a smaller APK, but the initial loading of vector drawables can take longer.
PNG generation
Android 5.0 (API level 21) and higher provides vector drawable support. If your app has a
minimum API level that's lower, Vector Asset Studio adds the vector drawable file to your
project; also, at build time, Gradle creates PNG raster images at various
resolutions. Gradle generates the PNG densities specified by the Domain Specific Language (DSL)
generatedDensities property
in a build.gradle file.
For Android 5.0 (API level 21) and higher, Vector Asset Studio supports all of the
VectorDrawable
elements. For backward compatibility with Android 4.4 (API
level 20) and lower, Vector Asset Studio supports the following XML elements:
<vector>
android:widthandroid:heightandroid:viewportWidthandroid:viewportHeightandroid:alpha
<group>
android:rotationandroid:pivotXandroid:pivotYandroid:scaleXandroid:scaleYandroid:translateXandroid:translateY
<path>
android:pathDataandroid:fillColorandroid:strokeColorandroid:strokeWidthandroid:strokeAlphaandroid:fillAlphaandroid:strokeLineCapandroid:strokeLineJoinandroid:strokeMiterLimit
You can change the XML code that Vector Asset Studio generates, although it’s not a best practice. Changing the values in the code should not cause any issues, as long as they’re valid and static. If you want to add XML elements, you need to make sure that they’re supported based on your minimum API level.
Support Library
This technique requires Android Support Library 23.2 or higher and Android
Plugin for Gradle 2.0 or higher, and uses vector drawables only. The
VectorDrawableCompat
class in the Support Library allows you to support VectorDrawable in
Android 2.1 (API level 7) and higher.
Before using
Vector Asset Studio, you must add a statement to your
build.gradle file:
Groovy
android {
    defaultConfig {
        vectorDrawables.useSupportLibrary = true
    }
}

dependencies {
    implementation 'com.android.support:appcompat-v7:23.2.0'
}
Kotlin
android {
    defaultConfig {
        vectorDrawables.useSupportLibrary = true
    }
}

dependencies {
    implementation("com.android.support:appcompat-v7:23.2.0")
}
You must also use coding techniques that are compatible with the Support
Library, such as using the app:srcCompat attribute instead of the
android:src attribute for vector drawables. For more information, see
Android Support Library 23.2.
Running Vector Asset Studio
To start Vector Asset Studio:
- In Android Studio, open an Android app project.
- In the Project window, select the Android view.
- Right-click the res folder and select New > Vector Asset.
- If a Need Newer Android Plugin for Gradle dialog appears instead, correct your Gradle version as follows:
- Select File > Project Structure.
- In the Project Structure dialog, select Project.
- In the Android Plugin Version field, change the Android Plugin for Gradle version to 1.5.0 or higher, and click OK.
- In the Android view of the Project window, right-click the res folder and select New > Vector Asset.
- Continue with Importing a Vector Graphic.
Some other project views and folders have this menu item as well.
Vector Asset Studio appears.

Figure 1. Vector Asset Studio.
Gradle syncs the project.
Vector Asset Studio appears.
Importing a vector graphic
Vector Asset Studio helps you to import a vector graphics file into your app project. Follow one of the following procedures:
Adding a material icon
After you open Vector Asset Studio, you can add a material icon as follows:
- In Vector Asset Studio, select Material Icon.
- In the Icon field, click the button.
The Select Icon dialog appears. You can filter which icons are visible by selecting an icon category from the list on the left or typing in the search field as shown in figure 2.
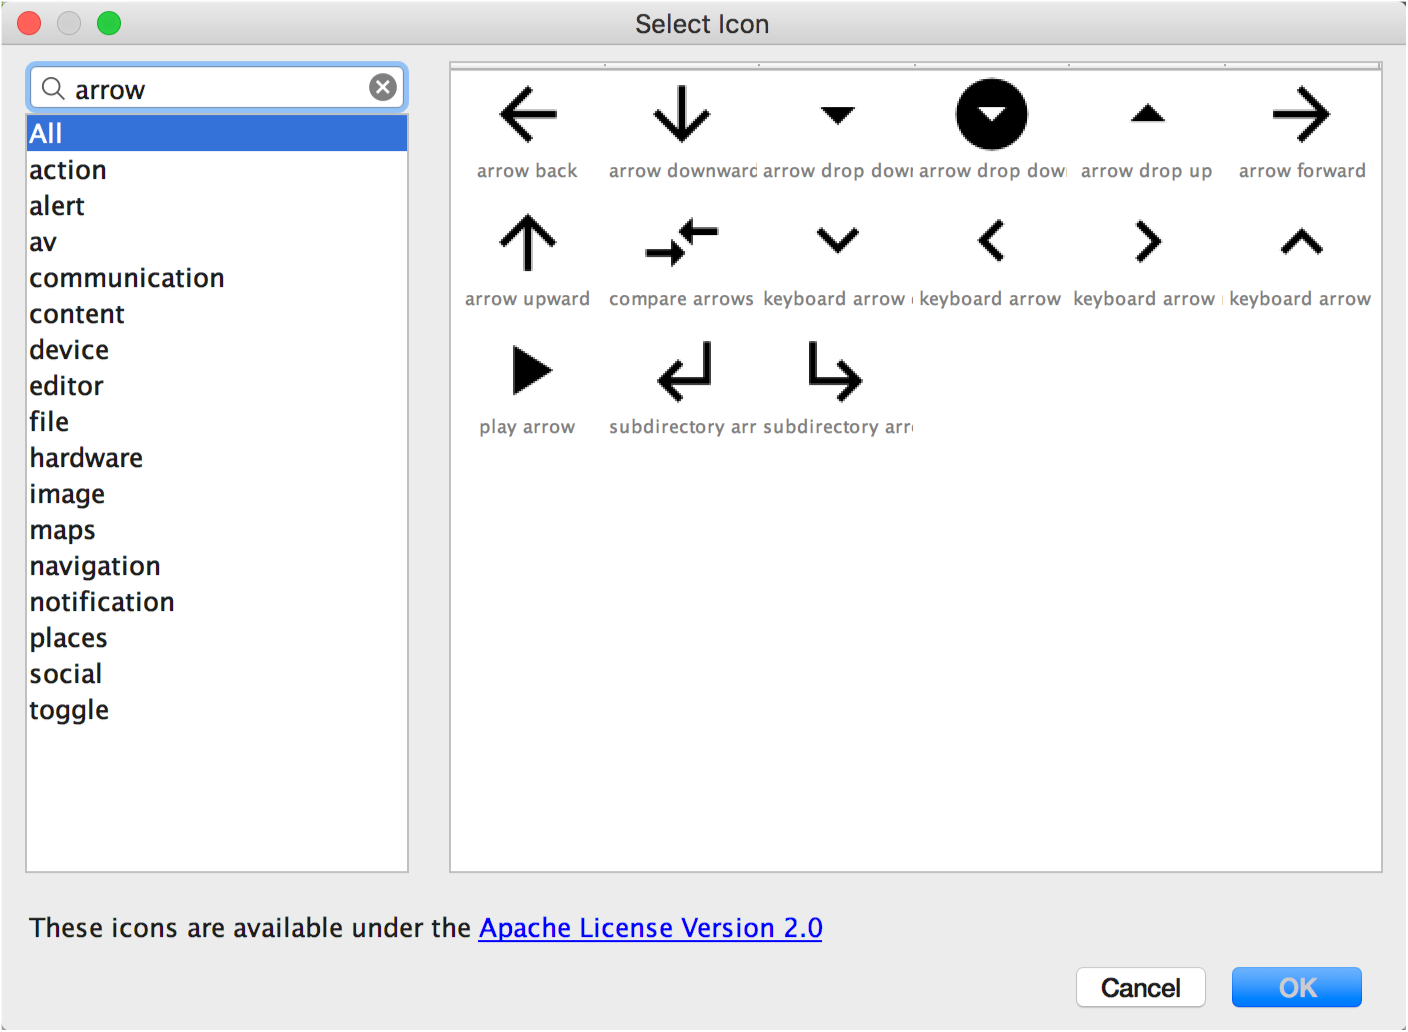
Figure 2. Filtering material icons in the Vector Asset Studio.
- Optionally change the resource name, size, opacity, and Right-To-Left (RTL) mirroring setting:
- Name - Type a new name if you don’t want to use the default name. Vector Asset Studio automatically creates a unique name (adds a number to the end of the name) if that resource name already exists in the project. The name can contain lowercase characters, underscores, and digits only.
- Override - Select this option if you want to adjust the size of the image. When you type a new size, the change appears in the preview area.
- Opacity - Use the slider to adjust the opacity of the image. The change appears in the preview area.
- Enable auto mirroring for RTL layout - Select this option if you want a
mirror image to display when the layout is right to left, instead of left to right. For
example, some languages are read right to left; if you have an arrow icon, you might want to
display a mirror image of it in this case. Note that if you’re working with an older project,
you might also
need to add
android:supportsRtl="true"to your app manifest. Auto-mirroring is supported on Android 5.0 (API level 21) and higher, and with the Support Library.
The default is 24 x 24 dp, which is defined in the material design specification. Deselect the checkbox to return to the default.
- Click Next.
- Optionally change the module and resource directory:
- Res Directory - Select the resource source set where you want to add the
vector drawable:
src/main/res,src/debug/res,src/release/res, or a user-defined source set. The main source set applies to all build variants, including debug and release. The debug and release source sets override the main source set and apply to one version of a build. The debug source set is for debugging only. To define a new source set, select File > Project Structure > app > Build Types. For example, you could define a beta source set and create a version of an icon that includes the text "BETA" in the bottom right corner. For more information, see Configure Build Variants. - Click Finish.
- Build the project.
Select a material icon and click OK. The icon appears in the Vector Drawable Preview.
The Output Directories area displays the vector drawable and the directory where it will appear.
Vector Asset Studio adds an XML file defining the vector drawable to the project in the
app/src/main/res/drawable/ folder. From the
Android view of the
Project
window, you can view the generated vector XML file in the drawable folder.
If the minimum API level is Android 4.4 (API level 20) and lower, and you
haven't enabled the Support Library technique, Vector Asset Studio generates
PNG files. From the
Project Files view
of the Project window, you can view the generated PNG and XML files in the
app/build/generated/res/pngs/debug/ folder.
You should not edit these generated raster files, but instead work with the vector XML file. The build system regenerates the raster files automatically when needed so you don’t need to maintain them.
Importing an SVG or PSD file
After you open Vector Asset Studio, you can import an SVG or PSD file as follows:
- In Vector Asset Studio, select Local file.
- Specify an Image file by clicking … .
- Optionally change the resource name, size, opacity, and Right-To-Left (RTL) mirroring setting:
- Name - Type a new name if you don’t want to use the default name. Vector Asset Studio automatically creates a unique name (adds a number to the end of the name) if that resource name already exists in the project. The name can contain lowercase characters, underscores, and digits only.
- Override - Select this option if you want to adjust the size of the image. After you select it, the size changes to the size of the image itself. Whenever you change the size, the change appears in the preview area. The default is 24 x 24 dp, which is defined in the material design specification.
- Opacity - Use the slider to adjust the opacity of the image. The change appears in the preview area.
- Enable auto mirroring for RTL layout - Select this option if you want a
mirror image to display when the layout is right to left, instead of left to right. For
example, some languages are read right to left; if you have an arrow icon, you might want to
display a mirror image of it in this case. Note that if you’re working with an older project,
you might
need to add
android:supportsRtl="true"to your app manifest. Auto-mirroring is supported by Android 5.0 (API level 21) and higher, and the Support Library. - Click Next.
- Optionally change the resource directory:
- Res Directory - Select the resource source set where you want to add the
vector drawable:
src/main/res,src/debug/res,src/release/res, or a user-defined source set. The main source set applies to all build variants, including debug and release. The debug and release source sets override the main source set and apply to one version of a build. The debug source set is for debugging only. To define a new source set, select File > Project Structure > app > Build Types. For example, you could define a beta source set and create a version of an icon that includes the text "BETA" in the bottom right corner. For more information, see Configure Build Variants. - Click Finish.
- Build the project.
The file must be on a local drive. If it’s located on the network, for example, you need to download it to a local drive first.
The image appears in the Vector Drawable Preview.
If the SVG or PSD file contains unsupported features, an error appears at the bottom of Vector Asset Studio, as shown in figure 3.
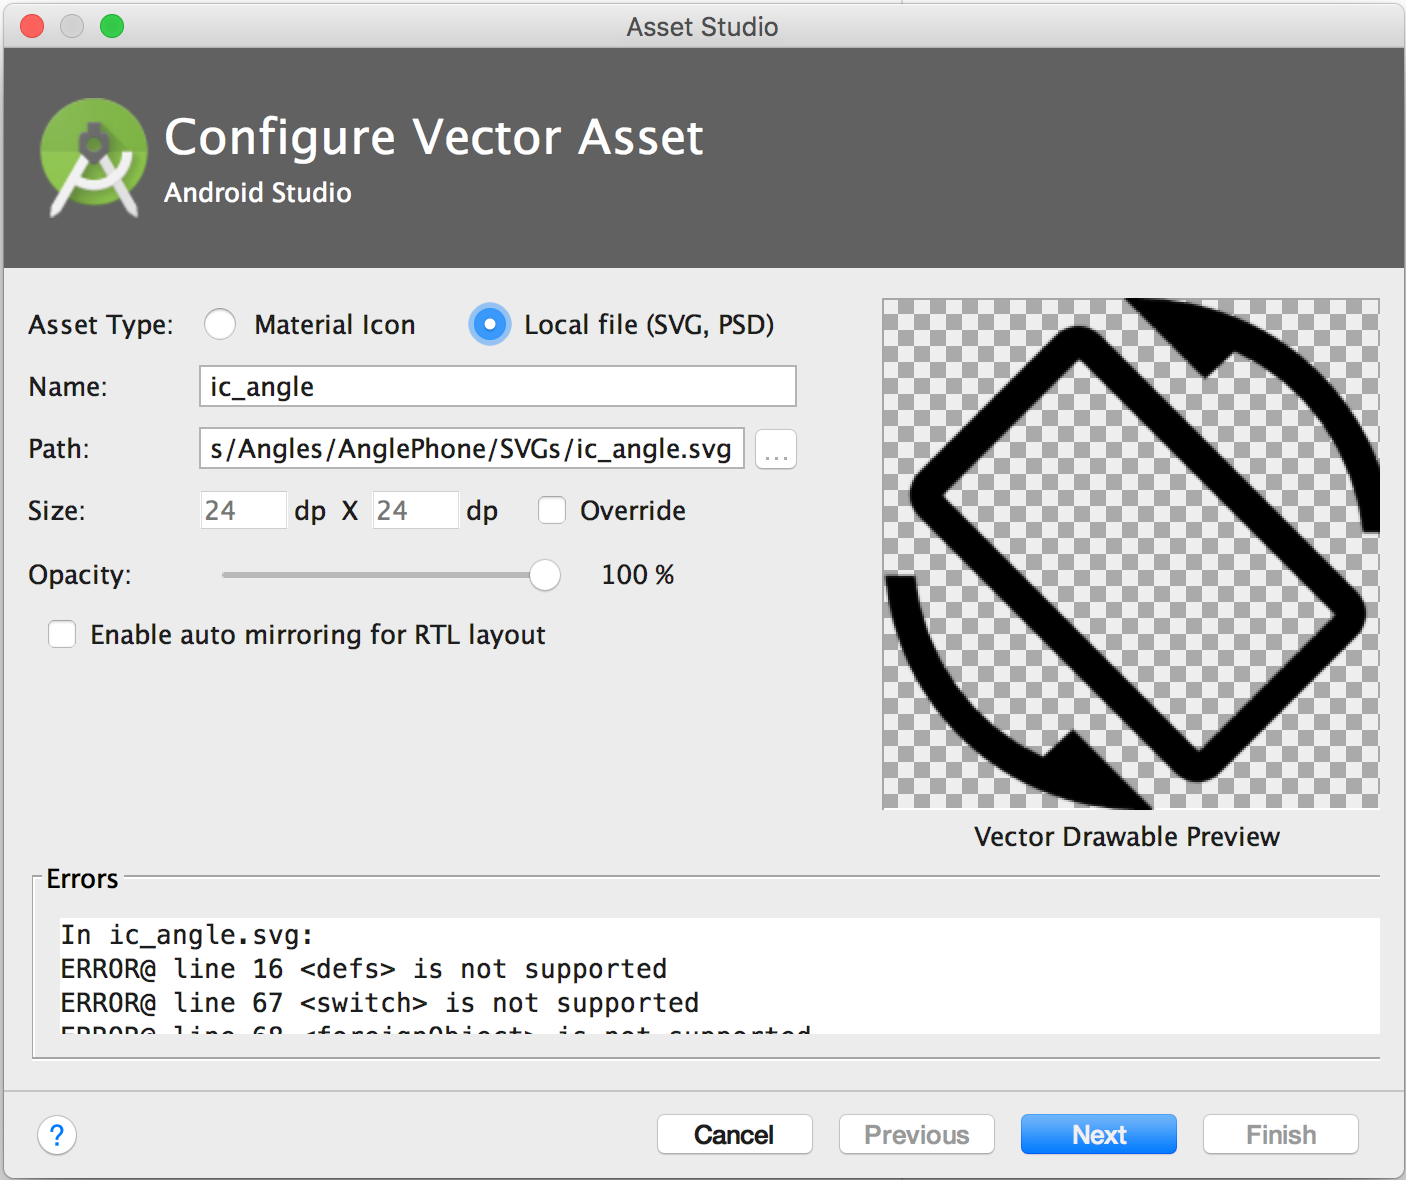
Figure 3. Vector Asset Studio displaying some errors.
If you see errors, you need to make sure that the imported vector drawable renders properly. Scroll through the list to view the errors.
For a list of supported elements, see Vector Drawable Backward-Compatibility Solutions. For more information about allowed PSD files, see Support and Restrictions for PSD Files.
The Output Directories area displays the vector drawable and the directory where it will appear.
Vector Asset Studio adds an XML file defining the vector drawable to the project in the
app/src/main/res/drawable/ folder. From the
Android view of the
Project
window, you can view the generated vector XML file in the drawable folder.
If the minimum API level is Android 4.4 (API level 20) and lower, and you
haven't enabled the Support Library technique, Vector Asset Studio generates
PNG files. From the
Project Files view
of the Project window, you can view the generated PNG and XML files in the
app/build/generated/res/pngs/debug/ folder.
You should not edit these generated raster files, but instead work with the vector XML file. The build system regenerates the raster files automatically when needed so you don’t need to maintain them.
Adding a vector drawable to a layout
In a layout file, you can set any icon-related widget, such as
ImageButton,
ImageView, and so on,
to point to a vector drawable. For example, the following
layout shows a vector drawable displayed on a button:
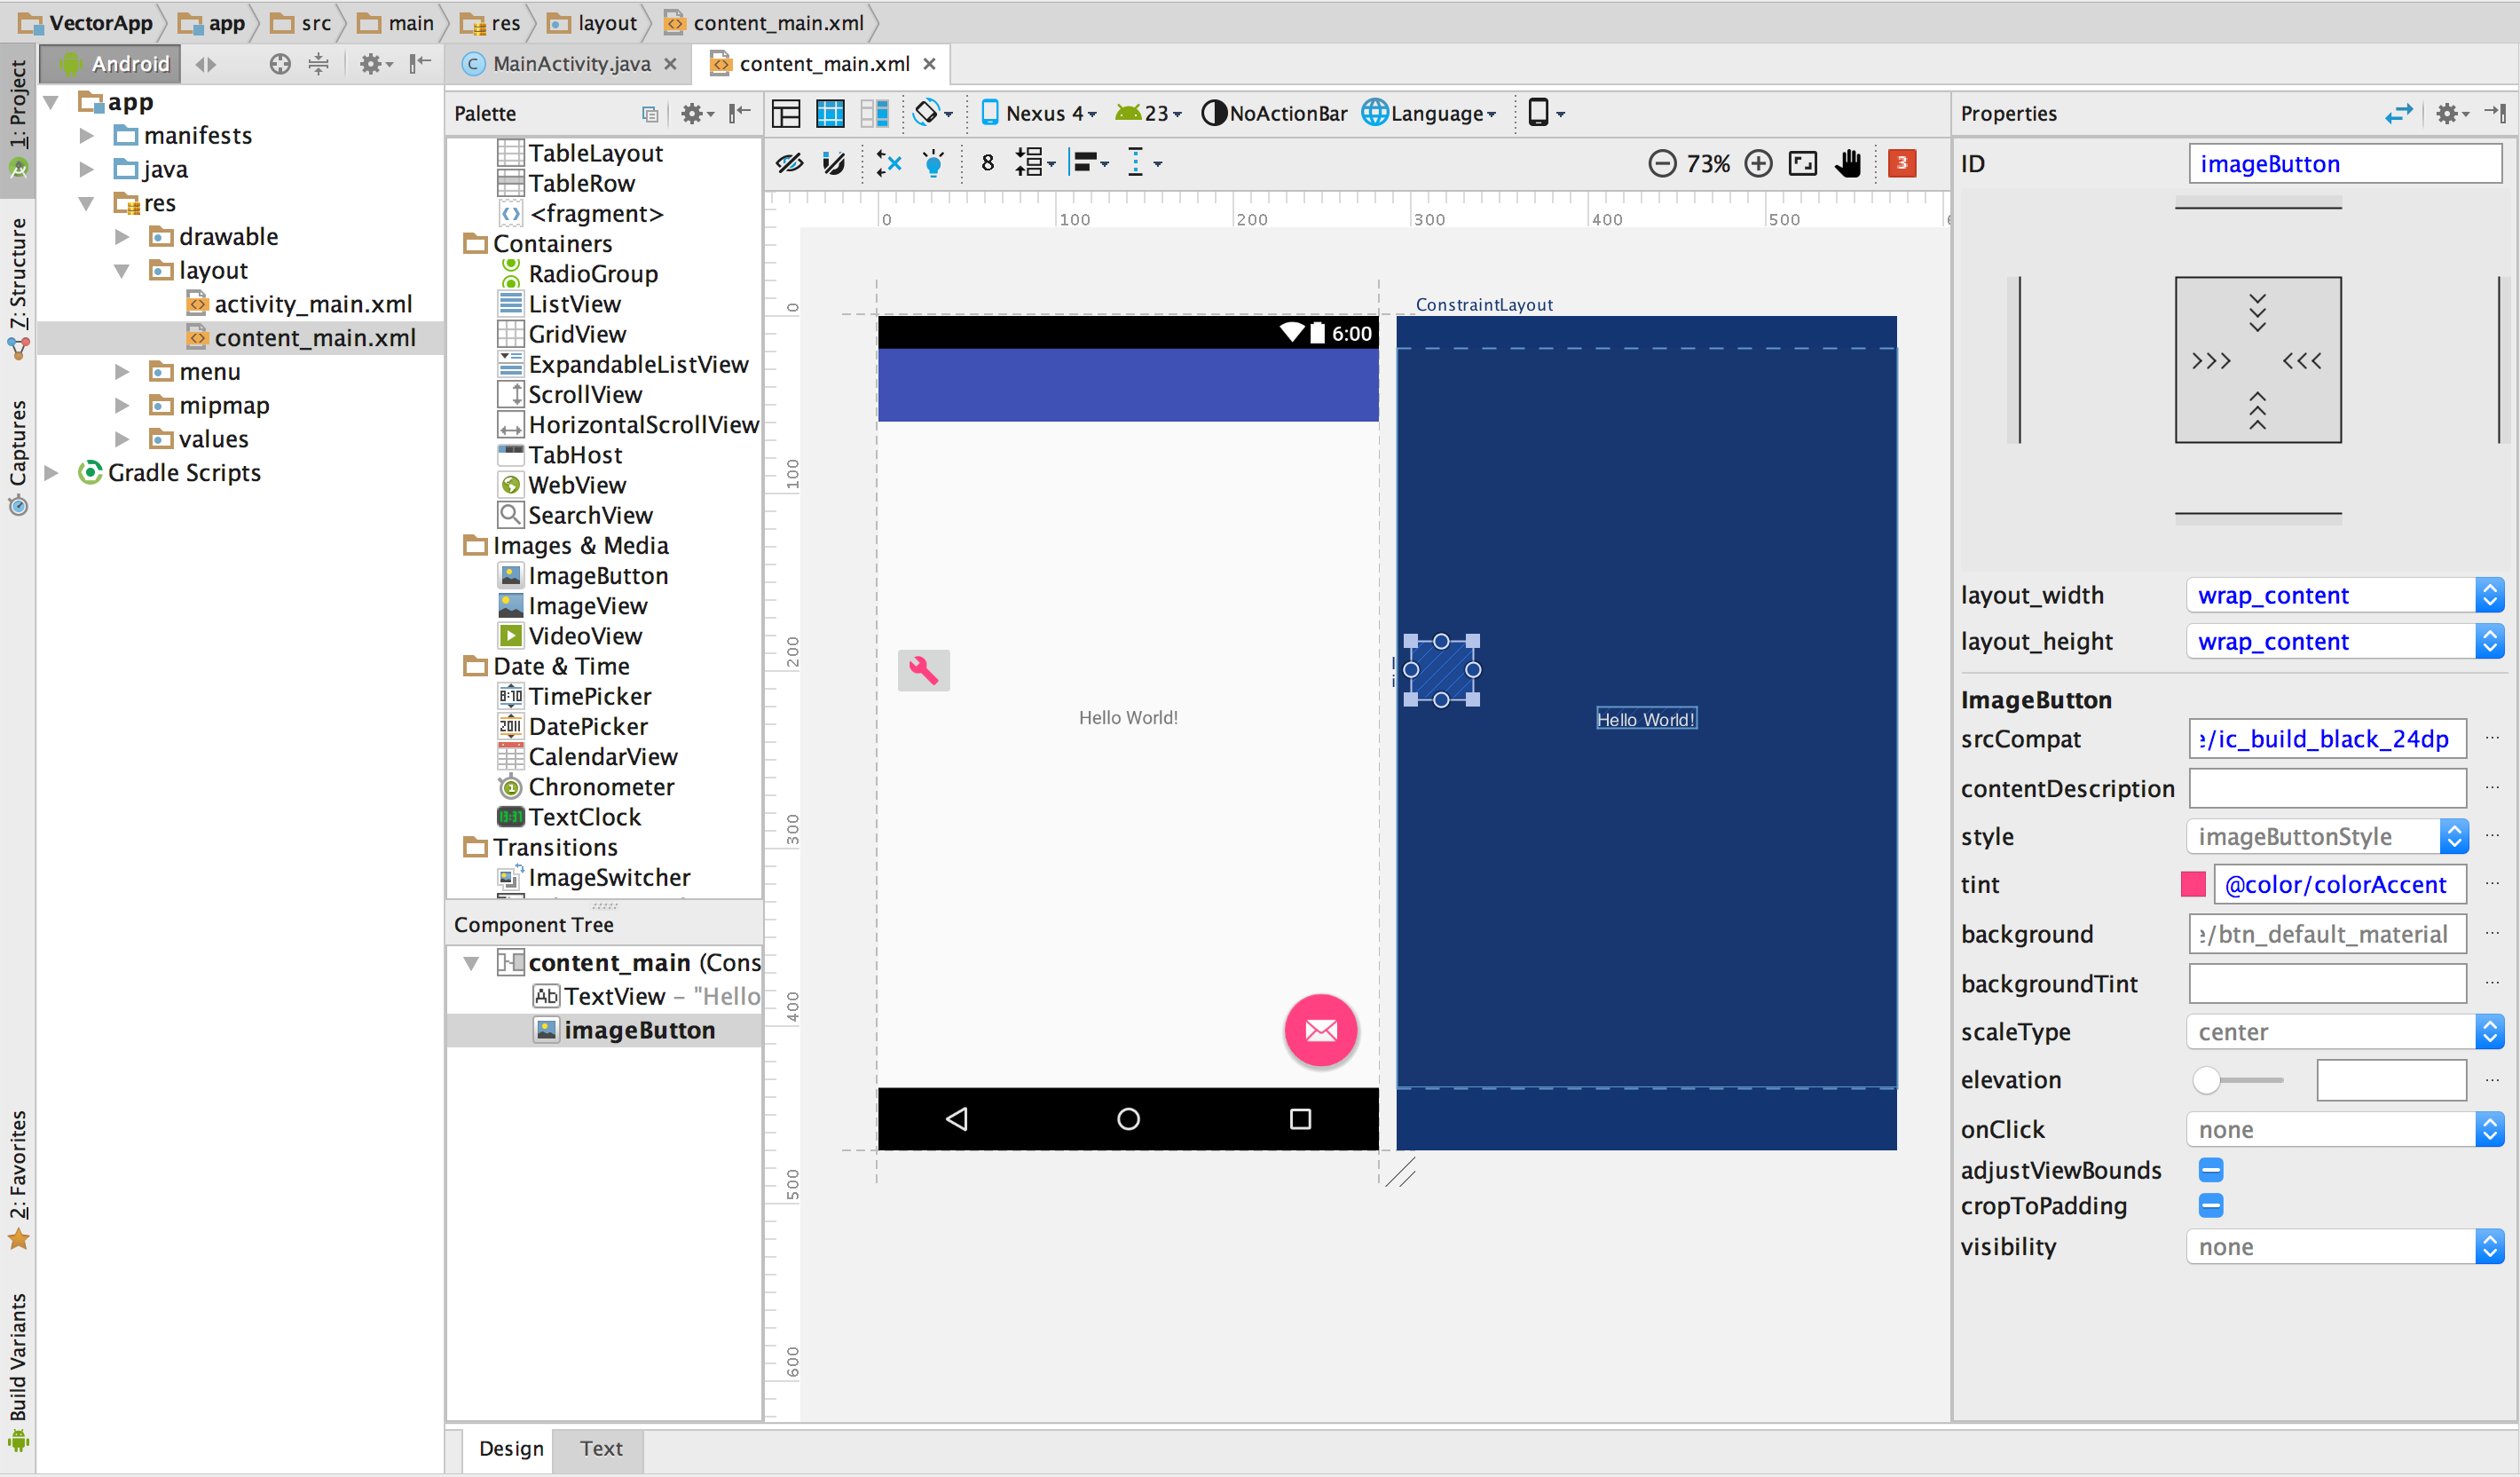
Figure 4. A vector drawable displayed on a button in a layout.
To display a vector drawable on a widget, as shown in the figure:
- Open a project and import a vector drawable.
- In the Android view of
the Project window, double-click a layout XML file, such as
content_main.xml. - Click the Design tab to display the Layout Editor.
- Drag the
ImageButtonwidget from the Palette window onto the Layout Editor. - In the Resources dialog, select Drawable in the left pane, and then select the vector drawable you imported. Click OK.
- To change the color of the image to the accent color defined in the theme, in the Properties window, locate the tint property and click … .
- In the Resources dialog, select Color in the left pane, and then select colorAccent. Click OK.
This example uses a Phone/Tablet project generated with the New Project Wizard.
The vector drawable appears on the ImageButton in the layout.
The color of the image changes to the accent color in the layout.
If the project uses the Support Library, the ImageButton code should be
similar to the following:
<ImageButton
  android:layout_width="wrap_content"
  android:layout_height="wrap_content"
  app:srcCompat="@drawable/ic_build_black_24dp"
  tools:layout_editor_absoluteX="11dp"
  tools:layout_editor_absoluteY="225dp"
  android:id="@+id/imageButton"
  android:tint="@color/colorAccent" />
If the project doesn't use the Support Library, the vector drawable code would instead be
android:src="@drawable/ic_build_black_24dp".
Referring to a vector drawable in code
You can normally refer to a vector drawable resource in a generic way in your code, and when your app runs, the corresponding vector or raster image displays automatically depending on the API level:
- In most cases, you can refer to vector drawables as
@drawablein XML code orDrawablein Java code. - If your app uses the Support Library at all (even if you don't have a
vectorDrawables.useSupportLibrary = truestatement in yourbuild.gradlefile), you can also refer to a vector drawable with anapp:srcCompatstatement. For example: - Occasionally, you might need to typecast the drawable resource to its exact class, such as
when you need to use specific features of the
VectorDrawableclass. To do so, you could use Java code such as the following:
For example, the following layout XML code applies the image to a view:
<ImageView
    android:layout_height="wrap_content"
    android:layout_width="wrap_content"
    android:src="@drawable/myimage" />
The following Java code retrieves the image as a
Drawable:
Kotlin
val drawable = resources.getDrawable(R.drawable.myimage, theme)
Java
Resources res = getResources();
Drawable drawable = res.getDrawable(R.drawable.myimage, getTheme());
The getResources()
method resides in the Context
class, which applies to UI objects, such as
activities, fragments, layouts, views, and so on.
<ImageView
    android:layout_height="wrap_content"
    android:layout_width="wrap_content"
    app:srcCompat="@drawable/myimage" />
Kotlin
if (Build.VERSION.SDK_INT >= Build.VERSION_CODES.LOLLIPOP) {
    val vectorDrawable = drawable as VectorDrawable
} else {
    val bitmapDrawable = drawable as BitmapDrawable
}
Java
if (Build.VERSION.SDK_INT >= Build.VERSION_CODES.LOLLIPOP) {
   VectorDrawable vectorDrawable = (VectorDrawable) drawable;
} else {
   BitmapDrawable bitmapDrawable = (BitmapDrawable) drawable;
}
You can access vector drawable resources from the main thread only.
For the Support Library technique, you must use coding techniques that are compatible with the Support Library. For more information, see Android Support Library 23.2.
Modifying XML code generated by Vector Asset Studio
You can modify the vector drawable XML code, but not the PNGs and corresponding XML code generated at build time. However, we don't recommend it.
When using the PNG generation technique, Vector Asset Studio makes sure that the vector drawable and the PNGs match, and that the manifest contains the proper code. If you add code that's not supported on Android 4.4 (API level 20) and lower, your vector and PNG images might differ. You also need to make sure that the manifest contains the code to support your changes.
To modify the vector XML file when you're not using the Support Library technique:
- In the Project window, double-click the generated vector XML file in the drawable folder.
- Edit the XML code based on what’s supported by the minimum API level:
- Android 5.0 (API level 21) and higher - Vector Asset Studio supports all of the
DrawableandVectorDrawableelements. You can add XML elements and change values. - Android 4.4 (API level 20) and lower - Vector Asset Studio supports all of the
Drawableelements and a subset of theVectorDrawableelements. See Vector Drawable Backward-Compatibility Solutions for a list. You can change values in the generated code and add XML elements that are supported. - Build the project and check that the vector drawable and corresponding raster images look the same.
The XML file appears in the editor and Preview windows.

Figure 5. A vector XML file displayed in the Code Editor and the Preview window.
Remember that the generated PNGs could display differently in the Preview window than in the app due to different rendering engines and any changes made to the vector drawable before a build. If you add code to the vector XML file created by Vector Asset Studio, any features unsupported in Android 4.4 (API level 20) and lower don't appear in the generated PNG files. As a result, when you add code, you should always check that the generated PNGs match the vector drawable. To do so, you could double-click the PNG in the Project Files view of the Project window; the left margin of the Code Editor also displays the PNG image when your code refers to the drawable, as shown in figure 6.
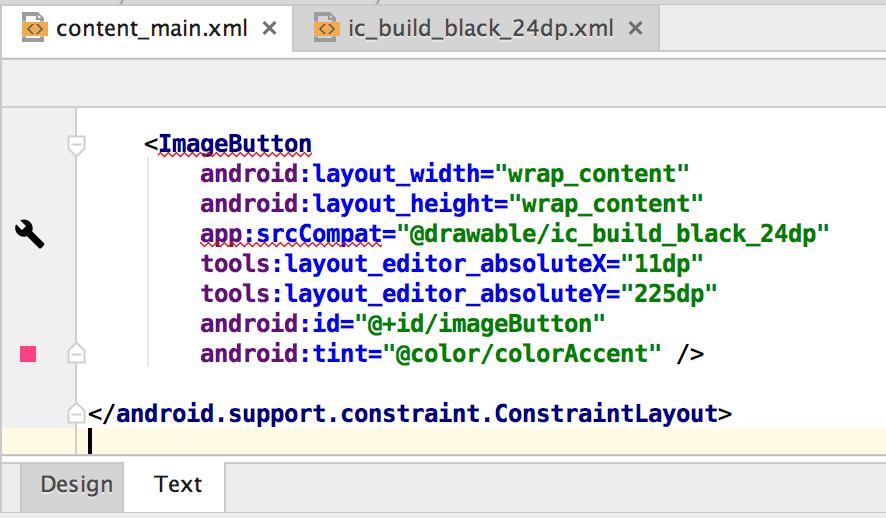
Figure 6. A PNG image displayed in the left margin of the Code Editor.
Deleting a vector drawable from a project
To remove a vector drawable from a project:
- In the Project window, delete the generated vector XML file by selecting the file and pressing the Delete key (or select Edit > Delete).
- Optionally select options to find where the file is used in the project, and click OK.
- Select Build > Clean Project.
The Safe Delete dialog appears.
Android Studio deletes the file from the project and the drive. However, if you chose to search for places in the project where the file is used and some usages are found, you can view them and decide whether to delete the file.
Any auto-generated PNG and XML files corresponding to the deleted vector drawable are removed from the project and the drive.
Delivering an app Containing vector drawables
If you used the Support Library technique or your minimum API level is Android 5.0 (API level 21) or higher, your APK will contain the vector drawables that you added with Vector Asset Studio. These APKs will be smaller than if the vector images were converted to PNGs.
When your minimum API level includes Android 4.4 (API level 20) or lower, and you have corresponding vector drawables and raster images in your project, you have two options for delivering your APK files:
- Create one APK that includes both the vector drawables and the corresponding raster representations. This solution is the simplest to implement.
- Create separate APKs for different API levels. When you don’t include the corresponding raster images in the APK for Android 5.0 (API level 21) and higher, the APK can be much smaller in size. For more information, see Multiple APK Support.
Support and restrictions for PSD files
Vector Asset Studio doesn't support all PSD file features. The following list summarizes supported and unsupported PSD characteristics, as well as some conversion details.
Document
Supported:
- A PSD color mode of bitmap, grayscale, indexed, RGB, Lab, or CMYK.
- A color depth of 8, 16, or 32 bits.
Conversion details:
- PSD document dimensions become the vector drawable and viewport dimensions.
Not supported:
- A PSD color mode of duotone or multichannel.
Shapes
Supported:
- Clipping masks, if the clipping base is another shape.
- Shape operations, including merge/add, intersect, subtract, and exclude.
Not supported:
- Even-odd fill rule used by Photoshop shapes. In Android 6.0 (API level 23)
and lower, vector drawables support the nonzero fill rule only. In
self-intersecting shapes, this limitation can lead to rendering differences
between the PSD and the resulting vector drawable. To fix this issue, add
android:fillType="evenOdd"on the shape in the vector drawable. For example:<vector xmlns:android="https://schemas.android.com/apk/res/android" android:viewportHeight="168" android:height="24dp" android:viewportWidth="209" android:width="24dp"> <path android:fillAlpha="1.0" android:fillColor="#000000" android:fillType="evenOdd" android:pathData="M24,58 L24,167 L114,167 L114,66 M64,1 L64,96 L208,96 L208,8 M1,97 L146,139 L172,47"/> </vector>
Strokes and fills
Supported:
- Strokes, including color, opacity, width, join, cap, dashes, and alignment.
- Solid color fills and strokes.
- Stroke and fill colors specified as RGB, Lab, or CMYK.
Conversion details:
- If a stroke is dashed, clipped using a clipping base, or uses an alignment different from center, Vector Asset Studio converts it into a fill shape in the vector drawable.
Not supported:
- Color fills and strokes other than solid, such as gradients.
Opacity
Supported:
- Shape layers with an opacity of 0.
Conversion details:
- Vector Asset Studio multiplies the fill opacity with the layer opacity to compute the fill alpha.
- The tool multiplies the opacity of the clipping base (if there is a clipping base) with the fill alpha to compute the final fill alpha.
- The tool multiplies the stroke opacity with the layer opacity to compute the stroke alpha.
- The tool multiplies the opacity of the clipping base (if there is a clipping base) with the stroke alpha to compute the final stroke alpha.
Layers
Supported:
- Any visible shape layer.
Conversion details:
- Vector Asset Studio preserves the name of the layers in the vector drawable file.
Not supported:
- Layer effects.
- Adjustment and text layers.
- Blending modes (ignored).
Support and restrictions for SVG files
Vector Asset Studio doesn't support all SVG file features. The following section summarizes
supported and unsupported features when the tool converts an SVG file to a
VectorDrawable,
along with additional conversion details.
Supported features
VectorDrawable supports all features from
Tiny SVG 1.2 except for
text.
Shapes
VectorDrawable supports
SVG paths.
The tool converts primitive shapes such as circles, squares, and polygons to paths.
Transformations
The tool supports transformation matrices and applies them directly to child paths.
Groups
The tool supports group elements for translation, scaling, and rotation. Groups do not support an opacity property.
The tool also applies any group styling or opacity to child paths.
Fills and strokes
Paths can be filled and stroked using solid colors or gradients (linear, radial, or angular). Only centered strokes are supported. Blend modes are not supported. Dashed paths are not supported.
Masks
The tool supports one clipping mask per group.
Features not supported by the SVG importer
Any feature not listed in the Supported features section above is unsupported. Notable unsupported features include the following:
- Filter effects: effects such as drop shadows, blurs, and color matrix are not supported.
- Text: conversion of text to shapes using other tools is recommended.
- Pattern fills