
Android Studio ช่วยให้สร้างแอป Android สำหรับรูปแบบของอุปกรณ์ต่างๆ เช่น โทรศัพท์ แท็บเล็ต ทีวี และอุปกรณ์ Wear ได้ง่าย หน้านี้จะอธิบายวิธีเริ่มโปรเจ็กต์แอป Android ใหม่หรือนำเข้าโปรเจ็กต์ที่มีอยู่
หากไม่ได้เปิดโปรเจ็กต์ไว้ ให้สร้างโปรเจ็กต์ใหม่โดยคลิกโปรเจ็กต์ใหม่ ในหน้าจอเริ่มต้นของ Android Studio
หากเปิดโปรเจ็กต์ไว้ ให้สร้างโปรเจ็กต์ใหม่โดยเลือกไฟล์ > ใหม่ > โปรเจ็กต์ใหม่ จากเมนูหลัก
เลือกประเภทโปรเจ็กต์
ในหน้าจอโปรเจ็กต์ใหม่ ที่ปรากฏขึ้น คุณสามารถเลือกประเภทโปรเจ็กต์ที่ต้องการสร้างจากหมวดหมู่รูปแบบของอุปกรณ์ที่แสดงในบานหน้าต่างเทมเพลต ตัวอย่างเช่น รูปที่ 1 แสดงเทมเพลตโปรเจ็กต์สำหรับโทรศัพท์และแท็บเล็ต
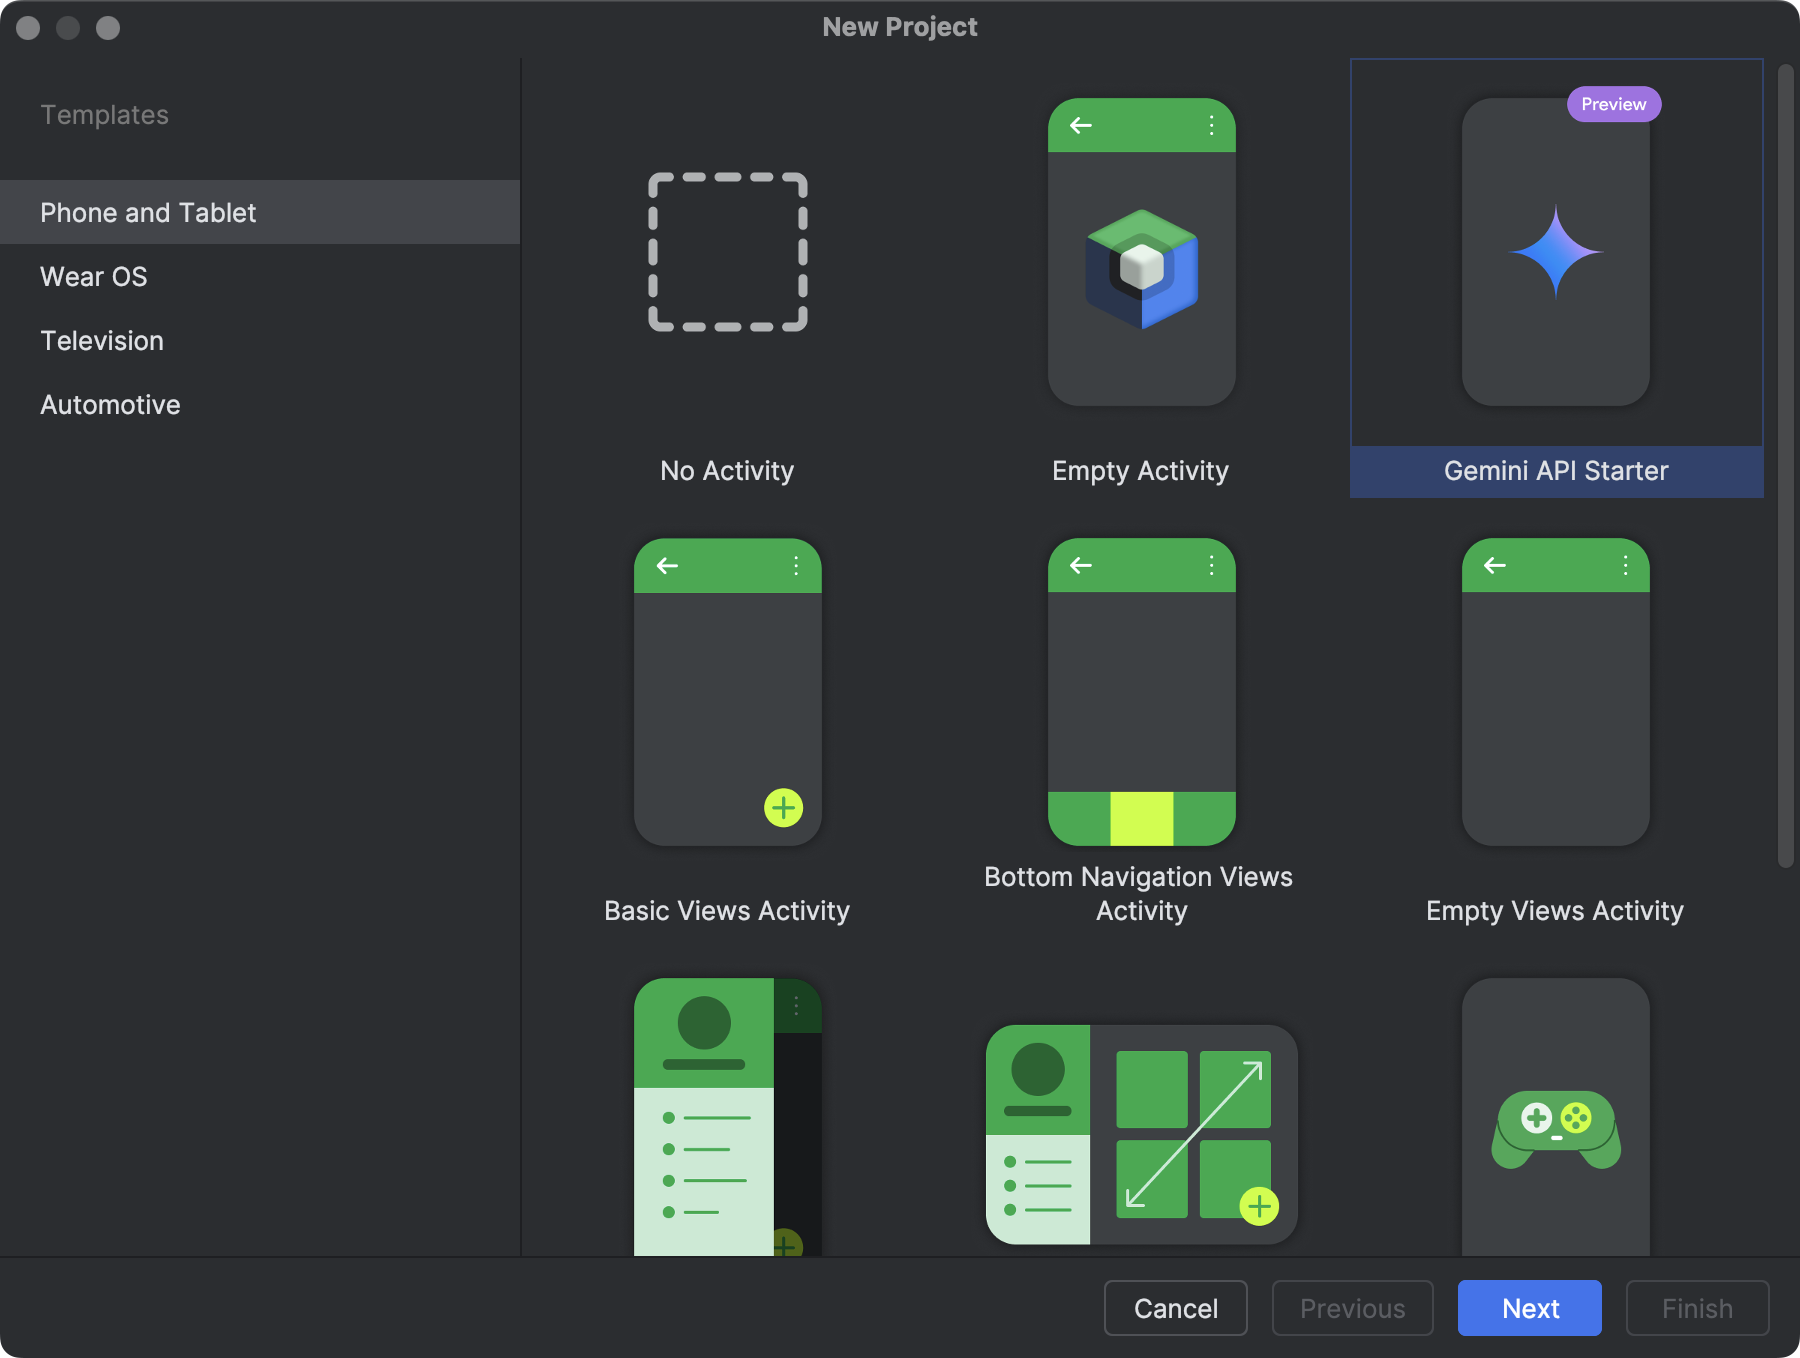
การเลือกประเภทโปรเจ็กต์ที่ต้องการสร้างจะช่วยให้ Android Studio รวมโค้ดตัวอย่างและทรัพยากรไว้ในโปรเจ็กต์เพื่อช่วยให้คุณเริ่มต้นใช้งานได้
สำหรับโปรเจ็กต์ Compose Empty Activity เป็นจุดเริ่มต้นที่แนะนำสำหรับโปรเจ็กต์ใหม่ทั้งหมด โดยมีทรัพยากร Dependency ของ Compose และการตั้งค่า Material Design ซึ่งเป็นรากฐานที่ทันสมัยและประกาศได้ ให้ใช้เทมเพลตอื่นๆ ก็ต่อเมื่อคุณดูแลรักษาหรือย้ายข้อมูลฐานของโค้ดเดิม
เมื่อเลือกประเภทโปรเจ็กต์แล้ว ให้คลิกถัดไป
กำหนดค่าโปรเจ็กต์
ขั้นตอนถัดไปในการสร้างโปรเจ็กต์คือการกำหนดค่าการตั้งค่าบางอย่าง ดังที่แสดงในรูปที่ 2 หากคุณกำลังสร้างโปรเจ็กต์ Native C++ โปรดอ่านหัวข้อ สร้างโปรเจ็กต์ใหม่ที่รองรับ C/C++ เพื่อดูข้อมูลเพิ่มเติมเกี่ยวกับตัวเลือกที่คุณต้องกำหนดค่า
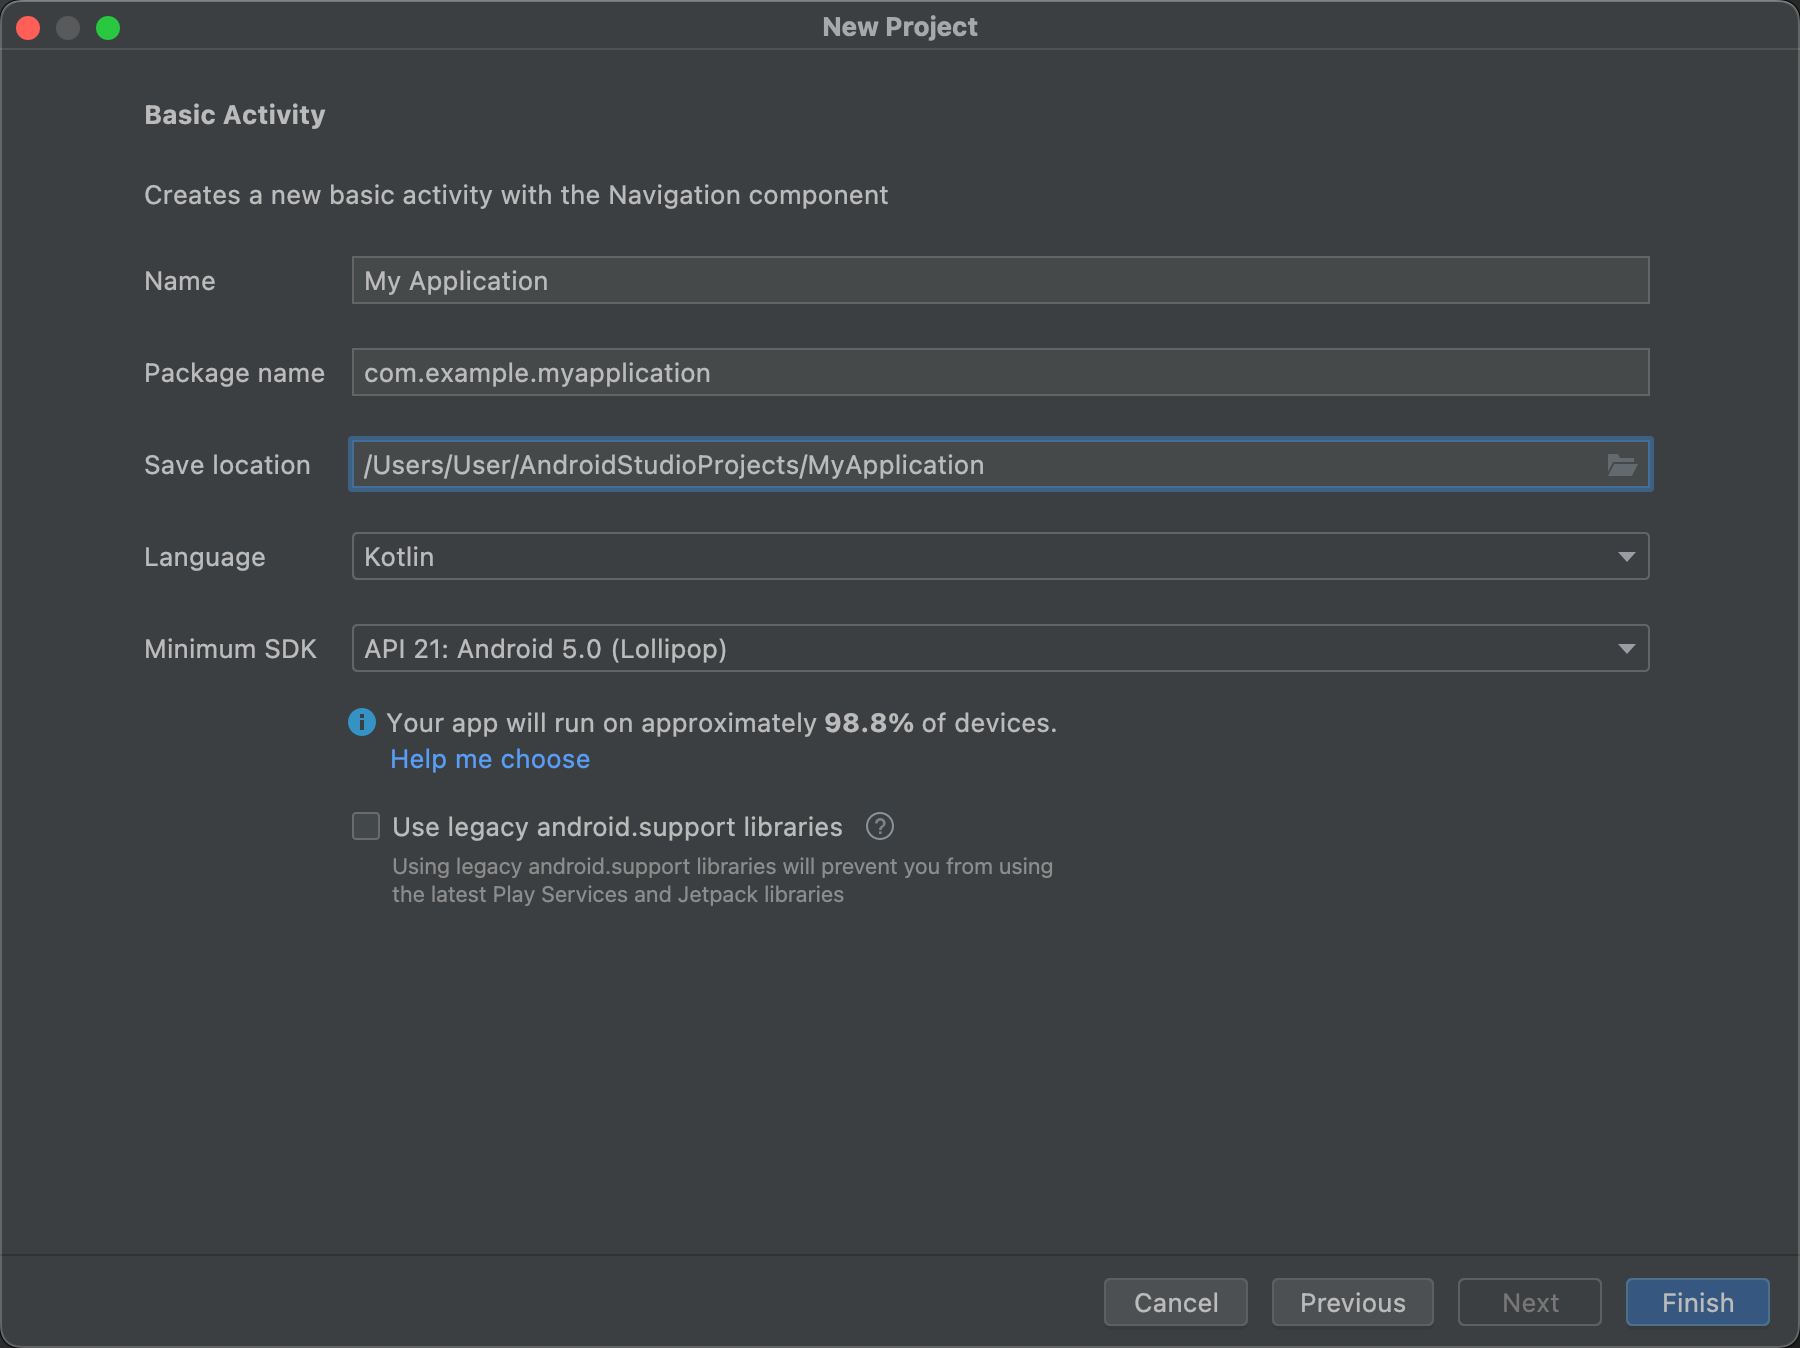
- ระบุชื่อ โปรเจ็กต์
- ระบุชื่อแพ็กเกจ โดยค่าเริ่มต้น ชื่อแพ็กเกจนี้จะกลายเป็นเนมสเปซของโปรเจ็กต์ (ใช้เพื่อเข้าถึงทรัพยากรของโปรเจ็กต์) และรหัสแอปพลิเคชันของโปรเจ็กต์ (ใช้เป็นรหัสสำหรับการเผยแพร่) ดูข้อมูลเพิ่มเติมได้ที่ กำหนดค่าโมดูลแอป
ระบุตำแหน่งที่จะบันทึก ที่คุณต้องการจัดเก็บโปรเจ็กต์ในเครื่อง
เลือกภาษา ที่ต้องการให้ Android Studio ใช้เมื่อสร้างโค้ดตัวอย่างสำหรับโปรเจ็กต์ใหม่ Kotlin เป็นภาษาที่แนะนำ และจำเป็นสำหรับเฟรมเวิร์กที่ทันสมัยอย่าง Jetpack Compose ระบบรองรับ Java แต่ไม่แนะนำให้ใช้กับโปรเจ็กต์ใหม่
เลือกระดับ API ขั้นต่ำ ที่ต้องการให้แอปของคุณรองรับ เมื่อเลือกระดับ API ที่ต่ำกว่า แอปของคุณจะไม่สามารถใช้ API Android ที่ทันสมัยได้มากนัก อย่างไรก็ตาม อุปกรณ์ Android จำนวนมากขึ้นจะสามารถเรียกใช้แอปของคุณได้ และในทางกลับกันเมื่อเลือกระดับ API ที่สูงขึ้น
หากต้องการดูข้อมูลเพิ่มเติมเพื่อช่วยในการตัดสินใจ ให้คลิกช่วยฉันเลือก ซึ่งจะแสดงกล่องโต้ตอบที่แสดงการกระจายสะสมสำหรับระดับ API ที่คุณเลือก และช่วยให้คุณเห็นผลกระทบของการใช้ระดับ API ขั้นต่ำที่แตกต่างกัน
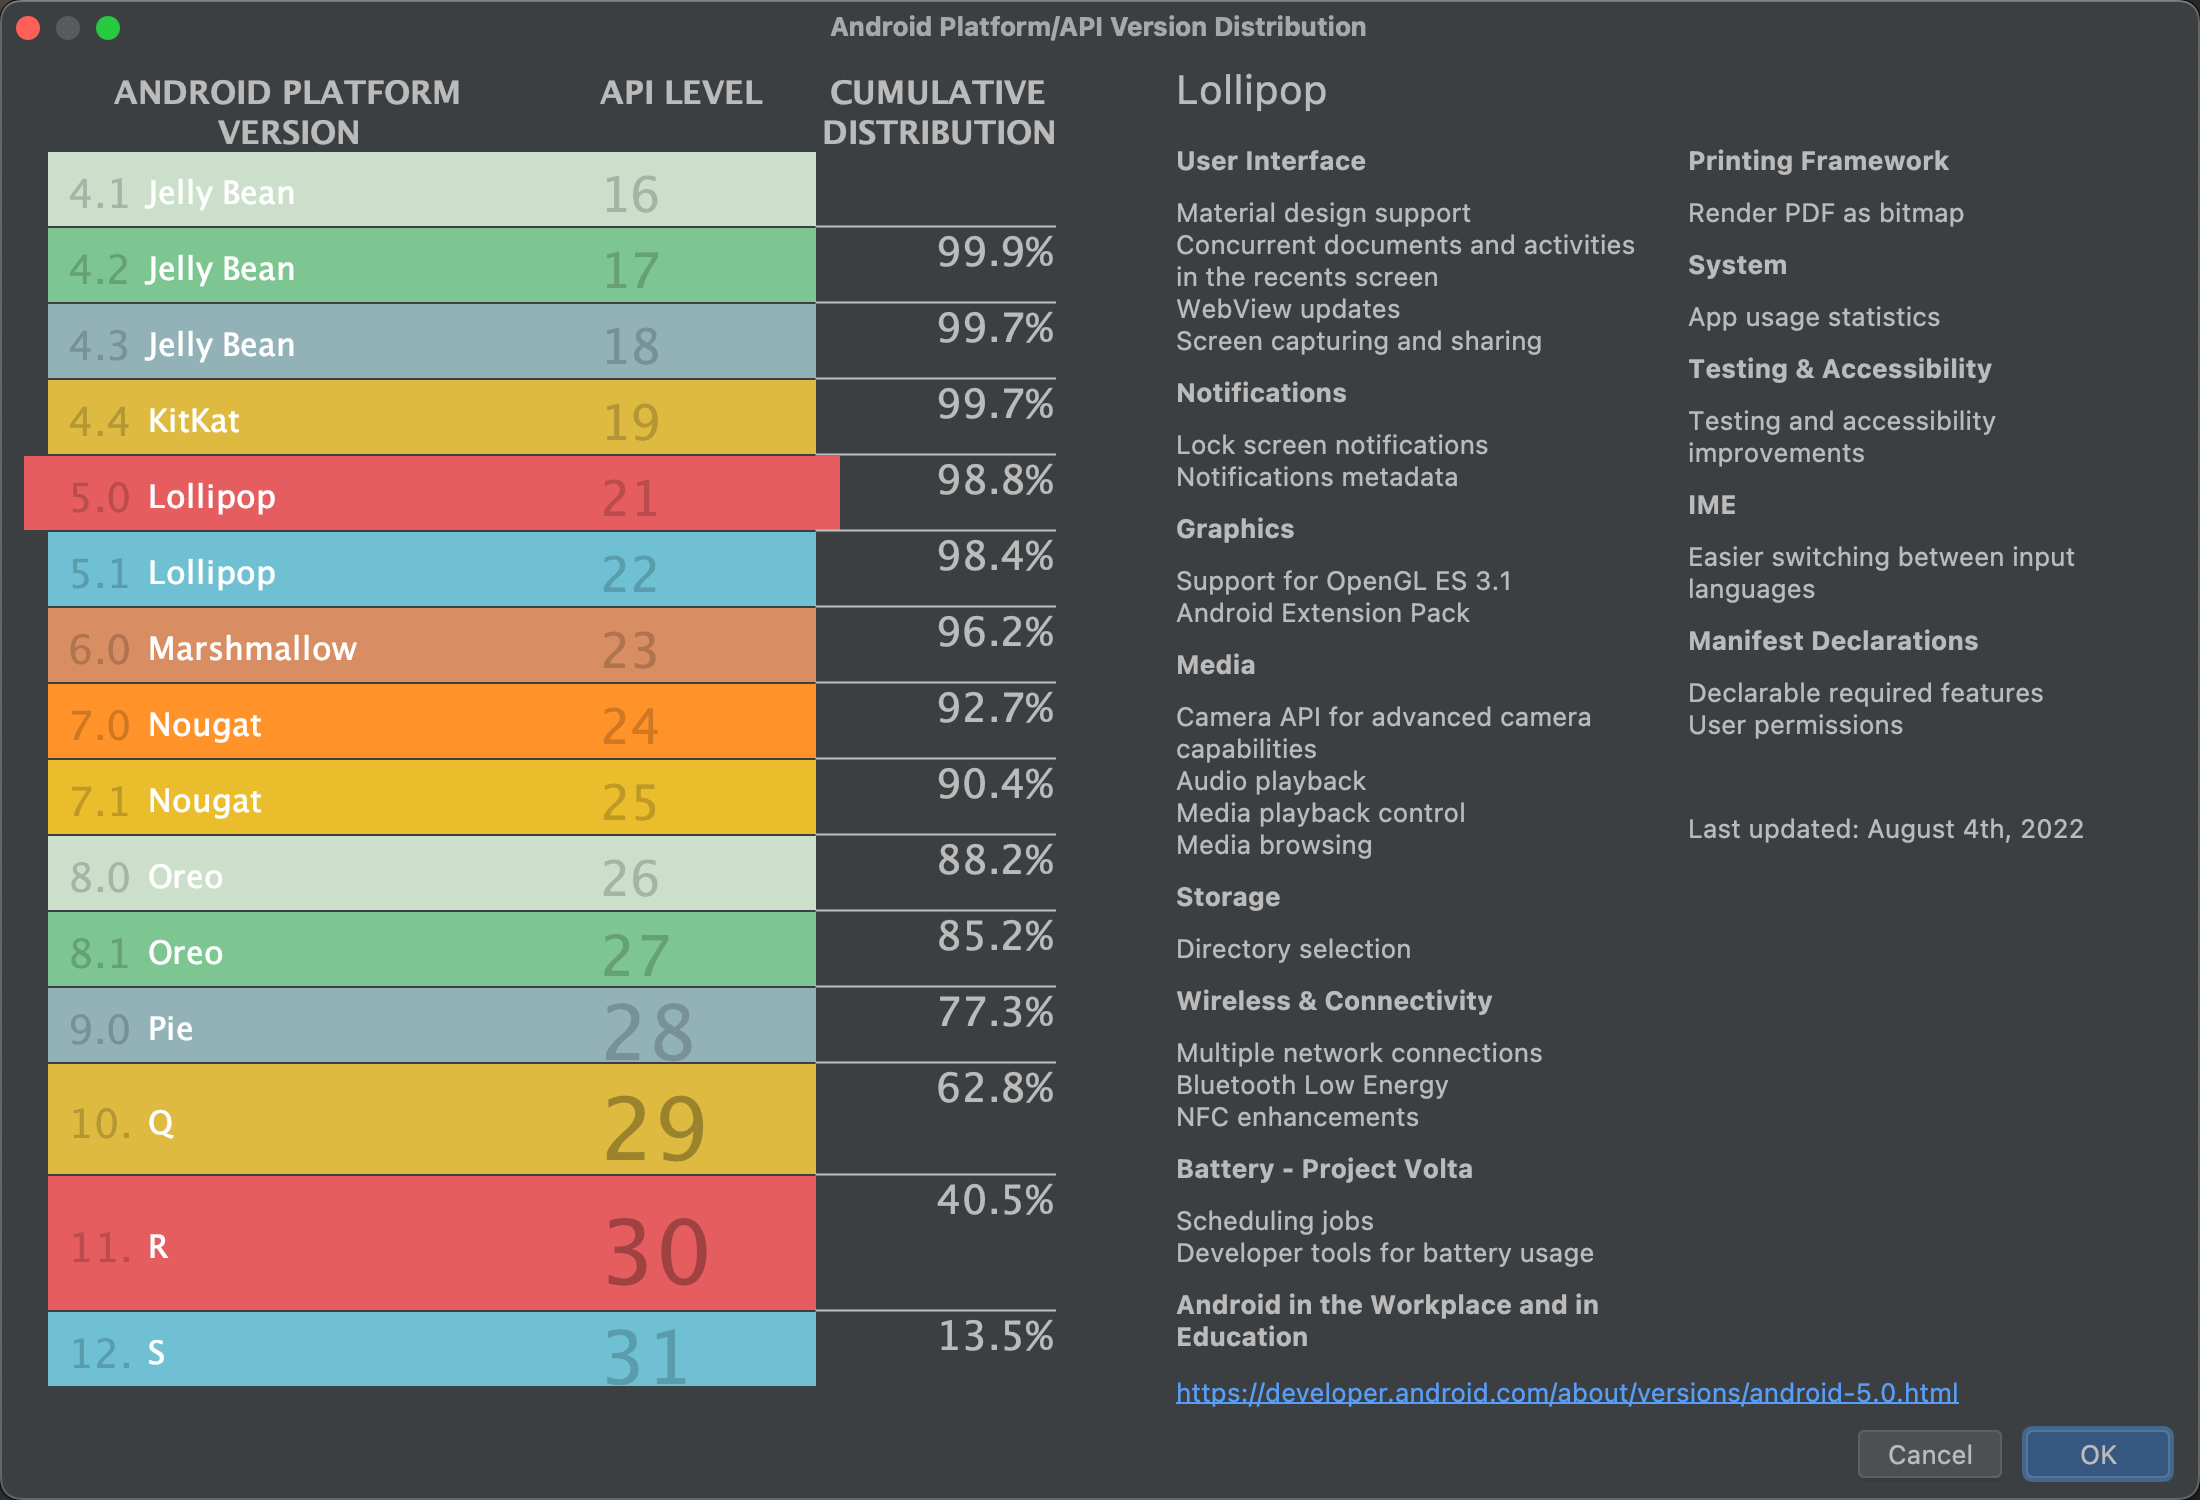
รูปที่ 3 หน้าจอความช่วยเหลือที่แสดงการกระจายสะสมของระดับ API ต่างๆ โปรเจ็กต์ของคุณได้รับการกำหนดค่าให้ใช้ไลบรารี AndroidX โดยค่าเริ่มต้น ซึ่งจะแทนที่ไลบรารี Android Support หากต้องการใช้ไลบรารี Support เวอร์ชันเก่าแทน ให้เลือกใช้ไลบรารี android.support เวอร์ชันเก่า อย่างไรก็ตาม เราไม่แนะนำให้ทำเช่นนี้เนื่องจากไลบรารี Support เวอร์ชันเก่าไม่ได้รับการรองรับอีกต่อไป ดูข้อมูลเพิ่มเติมได้ที่ ภาพรวมของ AndroidX
เมื่อพร้อมที่จะสร้างโปรเจ็กต์แล้ว ให้คลิกเสร็จสิ้น
Android Studio จะสร้างโปรเจ็กต์ใหม่ด้วยโค้ดและทรัพยากรพื้นฐานบางอย่างเพื่อช่วยให้คุณเริ่มต้นใช้งานได้ หากตัดสินใจเพิ่มการรองรับรูปแบบของอุปกรณ์อื่น ในภายหลัง คุณสามารถเพิ่มโมดูลลงในโปรเจ็กต์ได้ และหากต้องการแชร์โค้ด และทรัพยากรระหว่างโมดูล คุณสามารถทำได้โดยสร้างไลบรารี Android
ดูข้อมูลเพิ่มเติมเกี่ยวกับโครงสร้างโปรเจ็กต์ Android และประเภทโมดูลได้ที่ ภาพรวมของโปรเจ็กต์ หากคุณเพิ่งเริ่มพัฒนาแอป Android โปรดดูหัวข้อ เริ่มต้นใช้งาน Android
นำเข้าโปรเจ็กต์ที่มีอยู่
หากต้องการนำเข้าโปรเจ็กต์ที่อยู่ในเครื่องที่มีอยู่ลงใน Android Studio ให้ทำดังนี้
- คลิกไฟล์ > ใหม่ > นำเข้าโปรเจ็กต์
- ในหน้าต่างที่ปรากฏขึ้น ให้ไปที่ไดเรกทอรีรากของโปรเจ็กต์ ที่ต้องการนำเข้า
- คลิกตกลง
Android Studio จะเปิดโปรเจ็กต์ในหน้าต่าง IDE ใหม่และจัดทำดัชนีเนื้อหา
หากนำเข้าโปรเจ็กต์จากการควบคุมเวอร์ชัน ให้เลือกไฟล์ > ใหม่ > โปรเจ็กต์จากการควบคุมเวอร์ชัน ดูข้อมูลเพิ่มเติมเกี่ยวกับการนำเข้าโปรเจ็กต์จากการควบคุมเวอร์ชันได้ที่ข้อมูลเกี่ยวกับ การควบคุมเวอร์ชันของ IntelliJ
สร้างและเรียกใช้แอป
เมื่อสร้างโปรเจ็กต์แล้ว ขั้นตอนถัดไปคือการสร้างและเรียกใช้โปรเจ็กต์ในอุปกรณ์เสมือนหรืออุปกรณ์จริง Android Studio จะตั้งค่าการกำหนดค่าการเรียกใช้เริ่มต้นเพื่อช่วยให้คุณเริ่มต้นใช้งานได้
ดูข้อมูลเพิ่มเติมได้ที่สร้างและเรียกใช้แอป รวมถึงคำแนะนำที่ครอบคลุม การเรียกใช้ใน โปรแกรมจำลองของ Android และใน อุปกรณ์ฮาร์ดแวร์จริง