
پنجره اصلی اندروید استودیو از چندین قسمت منطقی تشکیل شده است که در شکل 1 نشان داده شده است.
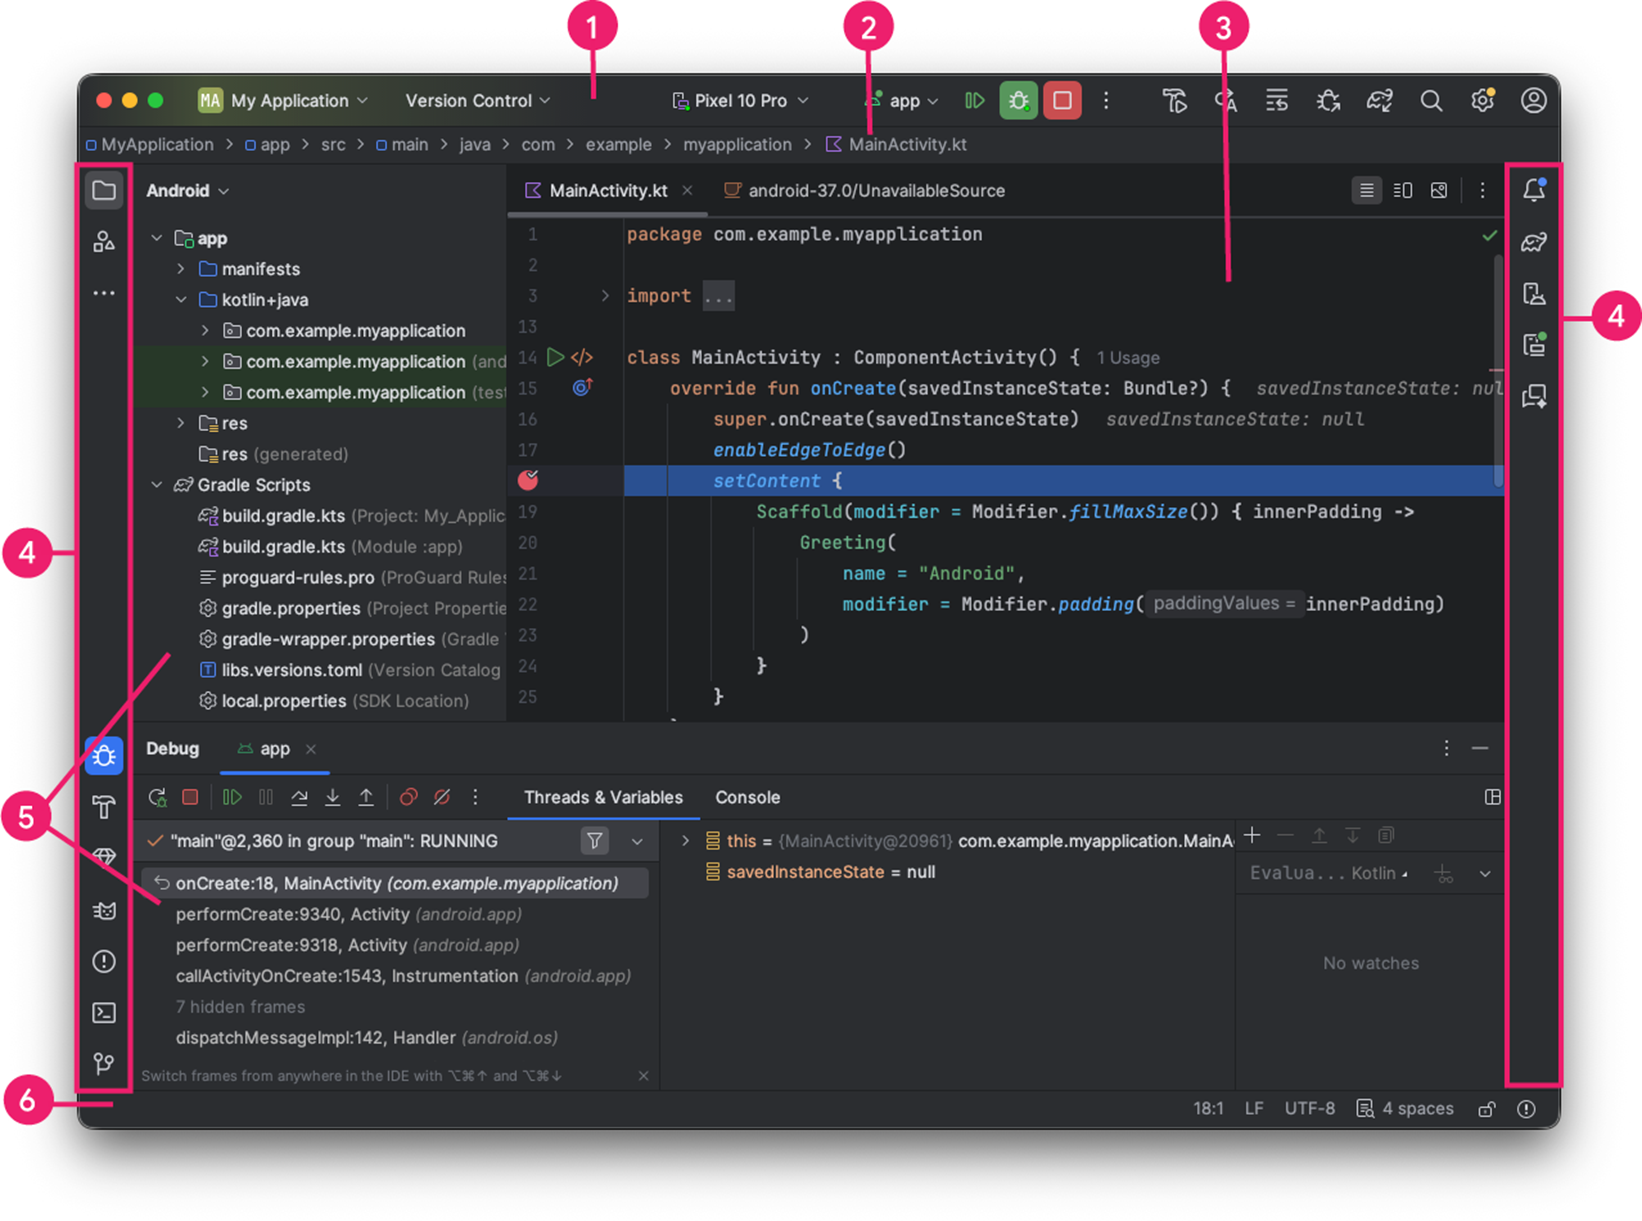
شکل ۱. پنجره اصلی اندروید استودیو.
- نوار ابزار: انجام طیف گستردهای از اقدامات، از جمله اجرای برنامه شما و راهاندازی ابزارهای اندروید.
- نوار ناوبری: در پروژه خود حرکت کنید و فایلها را برای ویرایش باز کنید. این نوار، نمای فشردهتری از ساختار قابل مشاهده در پنجره پروژه را ارائه میدهد.
- پنجره ویرایشگر: ایجاد و اصلاح کد. بسته به نوع فایل فعلی، ویرایشگر میتواند تغییر کند. برای مثال، هنگام ویرایش فایلهای Kotlin با توابع قابل ترکیب، ویرایشگر، ویرایشگر طرحبندی (Layout Editor) را نمایش میدهد.
- نوار پنجره ابزار: از دکمههای بیرونی پنجره IDE برای باز یا بسته کردن پنجرههای ابزار استفاده کنید.
- پنجرههای ابزار: به وظایف خاصی مانند مدیریت پروژه، جستجو، کنترل نسخه و موارد دیگر دسترسی پیدا کنید. میتوانید آنها را باز و بسته کنید.
- نوار وضعیت: وضعیت پروژه و خود IDE و همچنین هرگونه هشدار یا پیام را نمایش میدهد.
برای سازماندهی پنجره اصلی و افزایش فضای صفحه نمایش، نوار ابزارها و پنجرههای ابزار را پنهان یا جابجا کنید. همچنین میتوانید از میانبرهای صفحه کلید برای دسترسی به اکثر ویژگیهای IDE استفاده کنید.
برای جستجو در کد منبع، پایگاههای داده، اکشنها، عناصر رابط کاربری و موارد دیگر، یکی از موارد زیر را انجام دهید:
- کلید Shift را دو بار فشار دهید.
- روی ذرهبین در گوشه سمت راست بالای پنجره اندروید استودیو کلیک کنید.
این میتواند بسیار مفید باشد اگر، برای مثال، در تلاش برای یافتن یک اقدام خاص در IDE هستید که نحوهی اجرای آن را فراموش کردهاید.
پنجرههای ابزار
به جای استفاده از پرسپکتیوهای از پیش تعیینشده، اندروید استودیو از زمینه شما پیروی میکند و به طور خودکار پنجرههای ابزار مرتبط را هنگام کار شما نمایش میدهد. به طور پیشفرض، پنجرههای ابزار پرکاربرد به نوار پنجره ابزار در لبههای پنجره برنامه پین شدهاند.
با استفاده از موارد زیر، پنجره ابزار را پیمایش کنید:
- برای باز یا بسته کردن یک پنجره ابزار، روی نماد ابزار در نوار پنجره ابزار کلیک کنید. همچنین میتوانید پنجرههای ابزار را بکشید، پین کنید، از پین خارج کنید، پیوست کنید و جدا کنید.
- برای بازگشت به طرحبندی پیشفرض پنجره ابزار فعلی، روی Window > Layouts > Default کلیک کنید. برای سفارشیسازی طرحبندی پیشفرض خود، روی Window > Layouts > Save Current Layout as New کلیک کنید.
- برای نمایش یا پنهان کردن تمام پنجرههای ابزار موجود، روی نماد سرریز کلیک کنید
 در سمت چپ پنجره اندروید استودیو.
 - برای پیدا کردن یک پنجره ابزار خاص، آیکون سرریز را انتخاب کنید و پنجره ابزار را از منو انتخاب کنید.
همچنین میتوانید از میانبرهای صفحه کلید برای باز کردن پنجرههای ابزار استفاده کنید. جدول 1 میانبرهای رایجترین پنجرههای ابزار را فهرست میکند.
جدول ۱. میانبرهای صفحه کلید برای پنجرههای ابزار
| پنجره ابزار | ویندوز و لینوکس | مکاواس |
|---|---|---|
| پروژه | آلت+۱ | دستور+1 |
| کنترل نسخه | آلت+۹ | دستور+9 |
| اجرا کنید | شیفت+F10 | کنترل+R |
| اشکالزدایی | شیفت+F9 | کنترل+دی |
| مشکلات | آلت+۶ | دستور+۶ |
| بازگشت به ویرایشگر | اسک | اسک |
| مخفی کردن تمام پنجرههای ابزار | کنترل+شیفت+F12 | فرمان + شیفت + F12 |
برای مخفی کردن همه نوار ابزارها، پنجرههای ابزار و تبهای ویرایشگر، روی View > Appearance > Enter Distraction Free Mode کلیک کنید. برای خروج از Distraction Free Mode، روی View > Exit Distraction Free Mode کلیک کنید.
از جستجوی سریع (Speed Search) برای جستجو و فیلتر کردن در اکثر پنجرههای ابزار در اندروید استودیو استفاده کنید. برای استفاده از جستجوی سریع، پنجره ابزار را انتخاب کنید و سپس عبارت جستجوی خود را تایپ کنید.
تکمیل کد
اندروید استودیو سه نوع تکمیل کد دارد که میتوانید با استفاده از میانبرهای صفحه کلید به آنها دسترسی پیدا کنید.
جدول ۲. میانبرهای صفحه کلید برای تکمیل کد
| نوع | توضیحات | ویندوز و لینوکس | مکاواس |
|---|---|---|---|
| تکمیل اولیه | پیشنهادهای اولیه برای متغیرها، انواع، متدها، عبارات و غیره را نمایش میدهد. اگر تابع basic completion را دو بار پشت سر هم فراخوانی کنید، نتایج بیشتری از جمله اعضای خصوصی و اعضای استاتیک غیر وارد شده را مشاهده خواهید کرد. | کنترل + فضا | کنترل + فضا |
| تکمیل هوشمند | گزینههای مرتبط را بر اساس زمینه نمایش میدهد. تکمیل هوشمند از نوع و جریانهای داده مورد انتظار آگاه است. اگر تکمیل هوشمند را دو بار پشت سر هم فراخوانی کنید، نتایج بیشتری از جمله زنجیرهها را مشاهده خواهید کرد. | کنترل+شیفت+فاصله | کنترل+شیفت+فاصله |
| تکمیل بیانیه | دستور فعلی را برای شما کامل میکند، پرانتزها، براکتها، آکولادهای جا افتاده، قالببندی و غیره را اضافه میکند. | کنترل+شیفت+اینتر | فرمان + شیفت + اینتر |
برای انجام اصلاحات سریع و نمایش اقدامات هدفمند، Alt+Enter ( Option+Enter در macOS) را فشار دهید.
اندروید استودیو همچنین با فعال کردن ویژگیهای Gemini ، قابلیت تکمیل خودکار با هوش مصنوعی را ارائه میدهد.
کد نمونه را پیدا کنید
مرورگر نمونه کد در اندروید استودیو به شما کمک میکند تا نمونههای کد اندروید با کیفیت بالا و ارائه شده توسط گوگل را بر اساس نماد هایلایت شده فعلی در پروژه خود پیدا کنید. برای اطلاعات بیشتر، به بخش «یافتن کد نمونه» مراجعه کنید.
ناوبری
در اینجا چند نکته برای کمک به شما در استفاده از اندروید استودیو آورده شده است.
از اکشن Recent Files برای جابجایی بین فایلهای اخیراً مشاهدهشده استفاده کنید:
برای نمایش عملکرد فایلهای اخیر ، کلیدهای Control+E (در macOS، Command+E ) را فشار دهید. به طور پیشفرض، آخرین فایلی که به آن دسترسی داشتهاید انتخاب میشود. با این عملکرد، میتوانید از طریق ستون سمت چپ به هر پنجره ابزاری نیز دسترسی داشته باشید.
از اکشن ساختار فایل (File Structure) برای مشاهده ساختار فایل فعلی و پیمایش سریع به هر بخش از فایل فعلی خود استفاده کنید:
برای نمایش عملکرد ساختار فایل (File Structure)، کلیدهای Control+F12 (در macOS کلیدهای Command+F12 ) را فشار دهید.
از اکشن Navigate to Class برای جستجو و پیمایش به یک کلاس خاص در پروژه خود استفاده کنید. Navigate to Class از عبارات پیچیدهای پشتیبانی میکند، از جمله camel humps (که به شما امکان میدهد با حروف بزرگ در نام یک عنصر با حروف شتری جستجو کنید)، مسیرها، line navigation to (که به شما امکان میدهد به یک خط خاص در فایل پیمایش کنید)، تطبیق نام میانی (که به شما امکان میدهد بخشی از نام کلاس را جستجو کنید) و بسیاری موارد دیگر. اگر دو بار پشت سر هم آن را فراخوانی کنید، نتایج حاصل از کلاسهای پروژه را به شما نشان میدهد.
برای نمایش اکشن «رفتن به کلاس» (Navigate to Class )، کلیدهای Control+N (در macOS کلیدهای Command+O ) را فشار دهید.
برای رفتن به یک فایل یا پوشه از اکشن Navigate to File استفاده کنید:
برای نمایش عملکرد «پیمایش به فایل» ، کلیدهای Control+Shift+N (در macOS کلیدهای Command+Shift+O ) را فشار دهید. برای جستجوی پوشهها به جای فایلها، در انتهای عبارت خود علامت «/» اضافه کنید.
از اکشن «نقل به نماد» برای رفتن به یک متد یا فیلد بر اساس نام آن استفاده کنید:
برای نمایش عملکرد «پیمایش به نماد» ، کلیدهای Control+Shift+Alt+N (در macOS کلیدهای Command+Option+O ) را فشار دهید.
برای یافتن تمام بخشهای کد که به کلاس، متد، فیلد، پارامتر یا دستور در موقعیت فعلی مکاننما ارجاع میدهند، کلیدهای Alt+F7 (در macOS، Option+F7 ) را فشار دهید.
سبک و قالببندی
همانطور که ویرایش میکنید، اندروید استودیو به طور خودکار قالببندی و سبکها را همانطور که در تنظیمات سبک کد شما مشخص شده است، اعمال میکند. میتوانید تنظیمات سبک کد را بر اساس زبان برنامهنویسی، از جمله تعیین قراردادهای مربوط به تبها و تورفتگیها، فاصلهها، چینش و پرانتزها و خطوط خالی، سفارشی کنید.
برای سفارشیسازی تنظیمات سبک کد خود، روی File > Settings > Editor > Code Style (در macOS، اندروید استودیو > Settings > Editor > Code Style ) کلیک کنید.
اگرچه IDE به طور خودکار قالببندی را هنگام کار شما اعمال میکند، میتوانید به طور صریح اکشن Reformat Code را نیز فراخوانی کنید. برای فراخوانی این اکشن، Control+Alt+L (در macOS، Opt+Command+L ) را فشار دهید. برای ایجاد تورفتگی خودکار در تمام خطوط، Control+Alt+I (در macOS، Control+Option+I ) را فشار دهید.
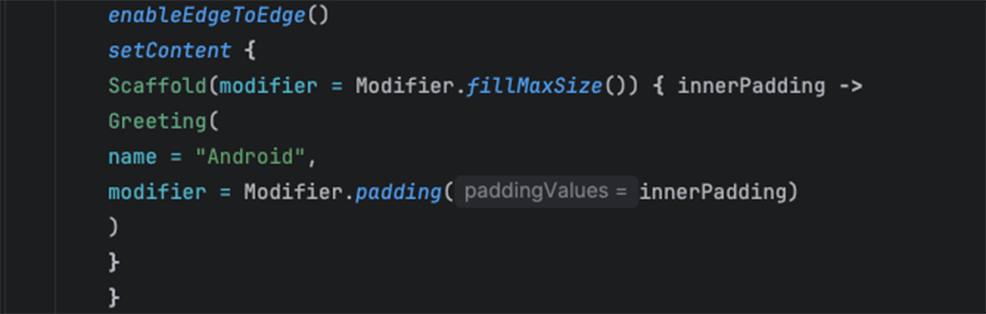
شکل ۲. کد قبل از قالببندی.
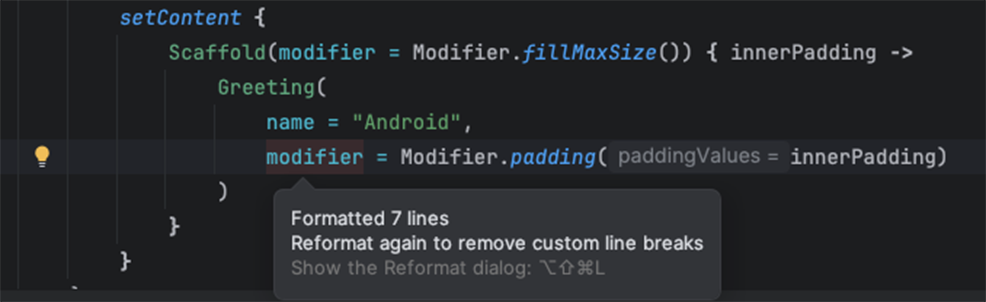
شکل ۳. کد پس از قالببندی.