
Span 是十分強大的標記物件,可用來設定字元或段落層級的文字樣式。您可以將 Span 附加到文字物件中,以各種方式來改變文字呈現方式,包括新增顏色、使文字可點擊、調整文字大小,以及透過自訂的方式繪製文字。Span 也可以用來變更 TextPaint 屬性、在 Canvas 上繪圖,以及變更文字版面配置。
Android 提供多種包含各式常見文字樣式模式的 Span。您也可以建立專屬 Span 以套用自訂樣式。
網誌文章。建立與套用 Span
如要建立 Span,可以使用下表所列的任一類別。 這些類別的差異在於文字本身是否可變動、文字標記是否可變動,以及包含 Span 資料的基礎資料結構。
| 類別 | 可變動文字 | 可變動標記 | 資料結構 |
|---|---|---|---|
SpannedString |
否 | 否 | 線性陣列 |
SpannableString |
否 | 是 | 線性陣列 |
SpannableStringBuilder |
是 | 是 | 區間樹 |
這三個類別都會擴充 Spanned 介面。SpannableString 和 SpannableStringBuilder 也會擴充 Spannable 介面。
以下說明如何決定要使用哪一種:
- 如果您在建立文字或標記後不會予以修改,請使用
SpannedString。 - 如果您需要在單一文字物件中附加少量 Span,而文字本身是唯讀狀態,請使用
SpannableString。 - 如果您需要在建立後修改文字,且需要將 Span 附加到文字,請使用
SpannableStringBuilder。 - 如果您需要在文字物件中附加大量 Span (無論文字本身是否為唯讀狀態),請使用
SpannableStringBuilder。
如要套用 Span,請在 Spannable 物件上呼叫 setSpan(Object _what_, int _start_, int _end_, int
_flags_)。what 參數是指要套用至文字的 Span,而 start 和 end 參數會指出要套用 Span 的文字部分。
如果您在 Span 邊界內插入文字,Span 就會自動擴展以包含插入的文字。將文字插入 Span 邊界 (也就是 start 或 end 索引) 時,flags 參數會決定 Span 是否應擴充以包含插入的文字。使用 Spannable.SPAN_EXCLUSIVE_INCLUSIVE 旗標以包含插入的文字,並使用 Spannable.SPAN_EXCLUSIVE_EXCLUSIVE 排除插入的文字。
以下範例說明如何將 ForegroundColorSpan 附加至字串:
Kotlin
val spannable = SpannableStringBuilder("Text is spantastic!")
spannable.setSpan(
    ForegroundColorSpan(Color.RED),
    8, // start
    12, // end
    Spannable.SPAN_EXCLUSIVE_INCLUSIVE
)
Java
SpannableStringBuilder spannable = new SpannableStringBuilder("Text is spantastic!");
spannable.setSpan(
    new ForegroundColorSpan(Color.RED),
    8, // start
    12, // end
    Spannable.SPAN_EXCLUSIVE_INCLUSIVE
);
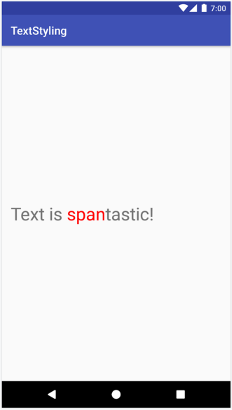
ForegroundColorSpan。因為使用 Spannable.SPAN_EXCLUSIVE_INCLUSIVE 設定 Span,因此 Span 會擴展以包含在 Span 邊界插入的文字,如以下範例所示:
Kotlin
val spannable = SpannableStringBuilder("Text is spantastic!")
spannable.setSpan(
    ForegroundColorSpan(Color.RED),
    8, // start
    12, // end
    Spannable.SPAN_EXCLUSIVE_INCLUSIVE
)
spannable.insert(12, "(& fon)")
Java
SpannableStringBuilder spannable = new SpannableStringBuilder("Text is spantastic!");
spannable.setSpan(
    new ForegroundColorSpan(Color.RED),
    8, // start
    12, // end
    Spannable.SPAN_EXCLUSIVE_INCLUSIVE
);
spannable.insert(12, "(& fon)");
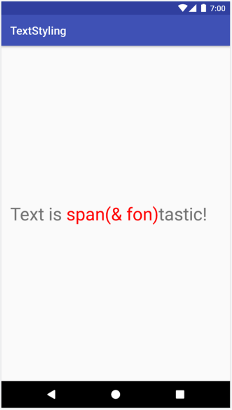
Spannable.SPAN_EXCLUSIVE_INCLUSIVE 時,Span 會擴展以包含其他文字。您可以在相同的文字中附加多個 Span。以下範例說明如何建立粗體的紅字:
Kotlin
val spannable = SpannableString("Text is spantastic!")
spannable.setSpan(ForegroundColorSpan(Color.RED), 8, 12, Spannable.SPAN_EXCLUSIVE_EXCLUSIVE)
spannable.setSpan(
    StyleSpan(Typeface.BOLD),
    8,
    spannable.length,
    Spannable.SPAN_EXCLUSIVE_EXCLUSIVE
)
Java
SpannableString spannable = new SpannableString("Text is spantastic!");
spannable.setSpan(
    new ForegroundColorSpan(Color.RED),
    8, 12,
    Spannable.SPAN_EXCLUSIVE_EXCLUSIVE
);
spannable.setSpan(
    new StyleSpan(Typeface.BOLD),
    8, spannable.length(),
    Spannable.SPAN_EXCLUSIVE_EXCLUSIVE
);
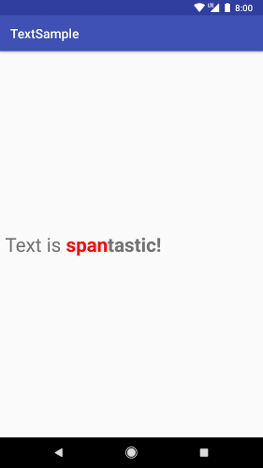
ForegroundColorSpan(Color.RED) 和
StyleSpan(BOLD)。
Android Span 類型
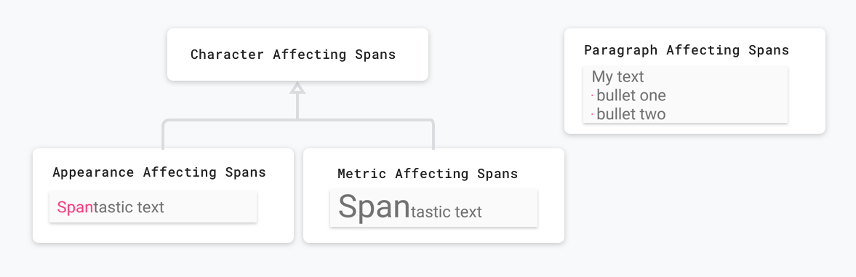
Android 在 android.text.style 套件中提供超過 20 種 Span 類型。Android 主要以兩種方式來分類 Span:
- Span 如何影響文字:Span 會影響文字外觀或文字指標。
- Span 範圍:某些 Span 可以套用到個別的半形字元,而有些則必須套用到整個段落上。
以下各節將詳細介紹這些類別。
會影響文字外觀的 Span
部分在字元層級套用的 Span 會影響文字外觀,例如改變文字或背景的顏色和加底線或刪除線。這些 Span 會擴充 CharacterStyle 類別。
以下程式碼範例說明如何套用 UnderlineSpan 來為文字加上底線:
Kotlin
val string = SpannableString("Text with underline span")
string.setSpan(UnderlineSpan(), 10, 19, Spanned.SPAN_EXCLUSIVE_EXCLUSIVE)
Java
SpannableString string = new SpannableString("Text with underline span");
string.setSpan(new UnderlineSpan(), 10, 19, Spanned.SPAN_EXCLUSIVE_EXCLUSIVE);

UnderlineSpan 為文字加上底線。僅影響文字外觀的 Span 會在不觸發重新計算版面配置的情況下,重新繪製文字。這些 Span 會實作 UpdateAppearance 並擴充 CharacterStyle。CharacterStyle 子類別會提供更新 TextPaint 的權限,藉此定義如何繪製文字。
會影響文字指標的 Span
其他在半型字元層級套用的 Span 會影響文字指標,例如行高和文字大小。這些 Span 會擴充 MetricAffectingSpan 類別。
以下程式碼範例會建立 RelativeSizeSpan,將文字加大 50%:
Kotlin
val string = SpannableString("Text with relative size span")
string.setSpan(RelativeSizeSpan(1.5f), 10, 24, Spanned.SPAN_EXCLUSIVE_EXCLUSIVE)
Java
SpannableString string = new SpannableString("Text with relative size span");
string.setSpan(new RelativeSizeSpan(1.5f), 10, 24, Spanned.SPAN_EXCLUSIVE_EXCLUSIVE);

RelativeSizeSpan 放大文字。
套用會影響文字指標的 Span 會使得觀察物件重新評估文字的正確版面配置和顯示方式。舉例來說,變更文字大小可能導致文字出現在不同行。套用上述 Span,系統就會觸發重新測量、重新計算文字版面配置以及重新繪製文字。
影響文字指標的 Span 會擴充 MetricAffectingSpan 類別,這是一種抽象類別,可讓子類別透過提供 TextPaint 的存取權,定義 Span 如何影響文字測量。由於 MetricAffectingSpan 會擴充 CharacterStyle,因此子類別會影響半型字元層級的文字外觀。
會影響段落的 Span
Span 也會影響段落層級的文字,例如變更文字區塊的對齊方式或邊界。影響整個文字段落的 Span 會實作 ParagraphStyle。如要使用這些 Span,請將其附加到整個段落,但不包括結尾的換行半型字元。如果您嘗試將段落 Span 套用到整個段落外的位置,則 Android 並不會套用 Span。
圖 8 說明 Android 如何分隔文字中的段落。
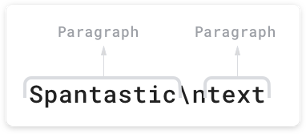
\n) 半型字元結尾。以下程式碼範例會將 QuoteSpan 套用至段落。請注意,如果您將 Span 附加至段落開頭和結尾以外的位置,則 Android 就完全不會套用該樣式。
Kotlin
spannable.setSpan(QuoteSpan(color), 8, text.length, Spannable.SPAN_EXCLUSIVE_EXCLUSIVE)
Java
spannable.setSpan(new QuoteSpan(color), 8, text.length, Spannable.SPAN_EXCLUSIVE_EXCLUSIVE);
QuoteSpan。建立自訂 Span
如果您需要的功能超過現有 Android Span 所能提供的功能,您可以實作自訂 Span。實作自己的 Span 時,請決定 Span 是否會影響半型字元或段落層級的文字,以及是否會影響文字的版面配置或外觀。這有助於您決定可以擴充哪些基本類別,以及可能需要實作的介面。請參考下表:
| 情境 | 類別或介面 |
|---|---|
| 您的 Span 會影響半型字元層級的文字。 | CharacterStyle |
| 您的 Span 會影響文字外觀。 | UpdateAppearance |
| 您的 Span 會影響文字指標。 | UpdateLayout |
| 您的 Span 會影響段落層級的文字。 | ParagraphStyle |
舉例來說,如果您需要實作可修改文字大小和顏色的自訂 Span,請擴充 RelativeSizeSpan。透過繼承,RelativeSizeSpan 會擴充 CharacterStyle,並實作兩個 Update 介面。這個類別已經為 updateDrawState 和 updateMeasureState 提供回呼,因此您可以覆寫這些回呼來實作自訂行為。以下程式碼會建立擴充 RelativeSizeSpan 的自訂 Span,並覆寫 updateDrawState 回呼以設定 TextPaint 的顏色:
Kotlin
class RelativeSizeColorSpan(
    size: Float,
    @ColorInt private val color: Int
) : RelativeSizeSpan(size) {
    override fun updateDrawState(textPaint: TextPaint) {
        super.updateDrawState(textPaint)
        textPaint.color = color
    }
}
Java
public class RelativeSizeColorSpan extends RelativeSizeSpan {
    private int color;
    public RelativeSizeColorSpan(float spanSize, int spanColor) {
        super(spanSize);
        color = spanColor;
    }
    @Override
    public void updateDrawState(TextPaint textPaint) {
        super.updateDrawState(textPaint);
        textPaint.setColor(color);
    }
}
這個範例說明如何建立自訂 Span。只要將 RelativeSizeSpan 和 ForegroundColorSpan 套用至文字,就能達成同樣的效果。
測試 Span 用法
Spanned 介面可讓您設定 Span,並從文字中擷取 Span。測試時,請實作 Android JUnit 測試,確認是否已在正確的位置新增正確的 Span。文字樣式範例應用程式包含會將 BulletPointSpan 附加至文字,使標記套用到項目符號的 Span。以下程式碼範例說明如何測試項目符號是否會正常顯示:
Kotlin
@Test fun textWithBulletPoints() {
   val result = builder.markdownToSpans("Points\n* one\n+ two")

   // Check whether the markup tags are removed.
   assertEquals("Points\none\ntwo", result.toString())

   // Get all the spans attached to the SpannedString.
   val spans = result.getSpans<Any>(0, result.length, Any::class.java)

   // Check whether the correct number of spans are created.
   assertEquals(2, spans.size.toLong())

   // Check whether the spans are instances of BulletPointSpan.
   val bulletSpan1 = spans[0] as BulletPointSpan
   val bulletSpan2 = spans[1] as BulletPointSpan

   // Check whether the start and end indices are the expected ones.
   assertEquals(7, result.getSpanStart(bulletSpan1).toLong())
   assertEquals(11, result.getSpanEnd(bulletSpan1).toLong())
   assertEquals(11, result.getSpanStart(bulletSpan2).toLong())
   assertEquals(14, result.getSpanEnd(bulletSpan2).toLong())
}
Java
@Test
public void textWithBulletPoints() {
    SpannedString result = builder.markdownToSpans("Points\n* one\n+ two");

    // Check whether the markup tags are removed.
    assertEquals("Points\none\ntwo", result.toString());

    // Get all the spans attached to the SpannedString.
    Object[] spans = result.getSpans(0, result.length(), Object.class);

    // Check whether the correct number of spans are created.
    assertEquals(2, spans.length);

    // Check whether the spans are instances of BulletPointSpan.
    BulletPointSpan bulletSpan1 = (BulletPointSpan) spans[0];
    BulletPointSpan bulletSpan2 = (BulletPointSpan) spans[1];

    // Check whether the start and end indices are the expected ones.
    assertEquals(7, result.getSpanStart(bulletSpan1));
    assertEquals(11, result.getSpanEnd(bulletSpan1));
    assertEquals(11, result.getSpanStart(bulletSpan2));
    assertEquals(14, result.getSpanEnd(bulletSpan2));
}
如需更多測試範例,請參閱 GitHub 上的 MarkdownBuilderTest。
測試自訂 Span
測試 Span 時,請確認 TextPaint 包含預期的修改項目,且 Canvas 上也會顯示正確的元素。例如,假設要實作一個在部分文字前加上項目符號的自訂 Span。項目符號含有指定的大小和顏色,而且在可繪製區域的左邊界和項目符號之間留有間隔。
您可以實作 AndroidJUnit 測試來檢查這個類別的行為,以確認下列事項:
- 如果正確套用 Span,畫布上會顯示指定大小和顏色的項目符號,並在左側邊界和項目符號之間留有適當的空間。
- 如果您未套用 Span,則不會出現任何自訂行為。
如要查看這些測試的實作方式,請參閱 GitHub 上的 TextStyling 範例。
您可以模擬畫布、將模擬的物件傳遞至 drawLeadingMargin() 方法,並使用正確的參數呼叫正確的方法,藉此測試 Canvas 互動。
BulletPointSpanTest 中有更多 Span 測試範例。
使用 Span 的最佳做法
視您的需求而定,在 TextView 中設定文字有幾種能節省記憶體的方法。
在不變更基礎文字的情況下附加或移除 Span
TextView.setText()
內含多個以不同方式處理 Span 的重載。舉例來說,您可以使用以下程式碼設定 Spannable 文字物件:
Kotlin
textView.setText(spannableObject)
Java
textView.setText(spannableObject);
在呼叫此 setText() 重載時,TextView 會將 Spannable 的副本建立為 SpannedString,並以 CharSequence 形式儲存在記憶體中。這表示文字和 Span 無法變更,因此當您需要更新文字或 Span 時,就必須建立新的 Spannable 物件,並再次呼叫 setText(),如此一來也會觸發版面配置的重新測量及重新繪製。
如要表示 Span 必須可變動,請改用 setText(CharSequence text, TextView.BufferType
type),如下列範例所示:
Kotlin
textView.setText(spannable, BufferType.SPANNABLE)
val spannableText = textView.text as Spannable
spannableText.setSpan(
     ForegroundColorSpan(color),
     8, spannableText.length,
     SPAN_INCLUSIVE_INCLUSIVE
)
Java
textView.setText(spannable, BufferType.SPANNABLE);
Spannable spannableText = (Spannable) textView.getText();
spannableText.setSpan(
     new ForegroundColorSpan(color),
     8, spannableText.getLength(),
     SPAN_INCLUSIVE_INCLUSIVE);
在這個範例中,BufferType.SPANNABLE 參數會導致 TextView 建立 SpannableString,且 TextView 保留的 CharSequence 物件現在含有可變動的標記和不可變動的文字。如要更新 Span,請將文字擷取為 Spannable,然後視需要更新 Span。
附加、移除 Span 或調整 Span 位置時,TextView 會自動更新,以反映文字的變更。如果您變更了現有 Span 的內部屬性,請呼叫 invalidate() 進行外觀相關變更,或呼叫 requestLayout() 進行指標相關變更。
在 TextView 中多次設定文字
在某些情況下,例如在使用 RecyclerView.ViewHolder 時,建議您重複使用 TextView,並多次設定文字。根據預設,無論您是否設定 BufferType,TextView 都會建立 CharSequence 物件副本,並將該物件保留在記憶體中。這可確保所有 TextView 更新都符合意圖。您不能只更新原始 CharSequence 物件來更新文字。這表示每次設定新文字時,TextView 都會建立新的物件。
如要進一步掌控這個流程並避免建立額外的物件,您可以實作自己的 Spannable.Factory 並覆寫 newSpannable()。您可以將現有的 CharSequence 進行層級轉換,並以 Spannable 傳回,而非建立新的文字物件,如下所示:
Kotlin
val spannableFactory = object : Spannable.Factory() {
    override fun newSpannable(source: CharSequence?): Spannable {
        return source as Spannable
    }
}
Java
Spannable.Factory spannableFactory = new Spannable.Factory(){
    @Override
    public Spannable newSpannable(CharSequence source) {
        return (Spannable) source;
    }
};
設定文字時必須使用 textView.setText(spannableObject, BufferType.SPANNABLE)。否則,系統會將來源 CharSequence 建立為 Spanned 例項,但無法將層級轉換為 Spannable,使 newSpannable() 擲回 ClassCastException。
覆寫 newSpannable() 後,請指示 TextView 使用新的 Factory:
Kotlin
textView.setSpannableFactory(spannableFactory)
Java
textView.setSpannableFactory(spannableFactory);
取得 TextView 的參照後,請立即設定 Spannable.Factory 物件。如果您使用 RecyclerView,請在首次加載檢視畫面時設定 Factory 物件。這能避免在 RecyclerView 將新項目繫結至 ViewHolder 時建立額外的物件。
變更內部 Span 屬性
如果只需要變更可變動 Span 的內部屬性 (例如自訂項目符號 Span 中的項目符號顏色),只要在建立 Span 時保留參照,即可避免經常重複呼叫 setText()。如要修改 Span,您可以修改參照,然後依據您變更的屬性類型在 TextView 上呼叫 invalidate() 或 requestLayout()。
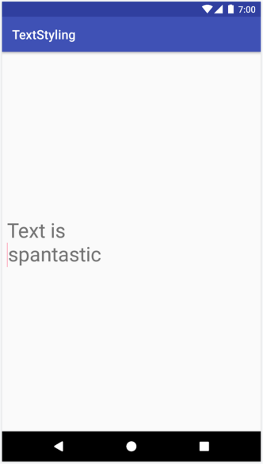
在下方程式碼範例中,自訂項目符號實作的預設顏色為紅色,在輕觸按鈕時變成灰色:
Kotlin
class MainActivity : AppCompatActivity() {

    // Keeping the span as a field.
    val bulletSpan = BulletPointSpan(color = Color.RED)

    override fun onCreate(savedInstanceState: Bundle?) {
        ...
        val spannable = SpannableString("Text is spantastic")
        // Setting the span to the bulletSpan field.
        spannable.setSpan(
            bulletSpan,
            0, 4,
            Spanned.SPAN_INCLUSIVE_INCLUSIVE
        )
        styledText.setText(spannable)
        button.setOnClickListener {
            // Change the color of the mutable span.
            bulletSpan.color = Color.GRAY
            // Color doesn't change until invalidate is called.
            styledText.invalidate()
        }
    }
}
Java
public class MainActivity extends AppCompatActivity {

    private BulletPointSpan bulletSpan = new BulletPointSpan(Color.RED);

    @Override
    protected void onCreate(Bundle savedInstanceState) {
        ...
        SpannableString spannable = new SpannableString("Text is spantastic");
        // Setting the span to the bulletSpan field.
        spannable.setSpan(bulletSpan, 0, 4, Spanned.SPAN_INCLUSIVE_INCLUSIVE);
        styledText.setText(spannable);
        button.setOnClickListener(new View.OnClickListener() {
            @Override
            public void onClick(View view) {
                // Change the color of the mutable span.
                bulletSpan.setColor(Color.GRAY);
                // Color doesn't change until invalidate is called.
                styledText.invalidate();
            }
        });
    }
}
使用 Android KTX 擴充功能函式
Android KTX 也包含擴充功能函式,可讓您更輕鬆地使用 Span。詳情請參閱 androidx.core.text 套件的文件。