重點
- 向量可繪項目是 XML 檔案中定義的向量圖形,由一組點、線、曲線以及相關色彩資訊所組成。
- 向量可繪項目可擴充,也就是說,調整大小時不會影響顯示品質。 因此非常適合用於 Android 應用程式,有助於縮減 APK 檔案大小及提升效能。
- 如要在 Android Studio 中建立向量可繪項目,請在專案中對可繪項目資料夾按一下滑鼠右鍵,然後選取「New」>「Vector Asset」。您也可以將 SVG 檔案匯入 Android Studio 做為向量可繪項目。
簡介
VectorDrawable 是 XML 檔案中定義的向量圖形,由一組點、線、曲線以及相關色彩資訊所組成。使用向量可繪項目的主要優點是圖片可縮放。向量可繪項目可以任意縮放,而不會減損圖像品質。也就是說,系統可根據不同的螢幕密度重新調整同一檔案的尺寸,既不會造成影像品質下降,這樣一來,APK 檔案會變小,開發人員維護作業也會減少。您也可以使用向量圖片製作動畫,方法是使用多個 XML 檔案,而非針對每個螢幕解析度使用多張圖片。
本頁面和下方影片將概略說明如何使用 XML 建立向量可繪項目。 Android Studio 也可以將 SVG 檔案轉換為向量可繪項目格式,詳情請參閱「新增多種密度的向量圖形」。
Android 5.0 (API 級別 21) 是第一個正式支援向量可繪項目的版本,並提供 VectorDrawable 和 AnimatedVectorDrawable,但您可以使用 Android 支援資料庫支援舊版,該資料庫提供 VectorDrawableCompat 和 AnimatedVectorDrawableCompat 類別。
關於 VectorDrawable 類別
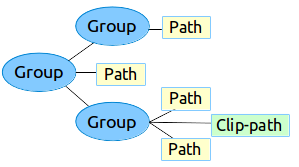
VectorDrawable 定義靜態可繪項目物件。與 SVG 格式類似,每個向量圖形都會定義為樹狀結構階層,由 path 和 group 物件組成。每個 path 都包含物件輪廓的幾何圖形,而 group 則包含轉換的詳細資料。所有路徑的繪製順序都與 XML 檔案中的顯示順序相同。

圖 1. 向量可繪項目素材資源的階層範例
Vector Asset Studio 工具提供簡單的方式,可將向量圖形以 XML 檔案的形式新增至專案。
XML 範例
以下是 VectorDrawable XML 檔案範例,可顯示充電模式下的電池圖片。
<!-- res/drawable/battery_charging.xml -->
<vector xmlns:android="http://schemas.android.com/apk/res/android"
    android:height="24dp"
    android:width="24dp"
    android:viewportWidth="24.0"
    android:viewportHeight="24.0">
   <group
         android:name="rotationGroup"
         android:pivotX="10.0"
         android:pivotY="10.0"
         android:rotation="15.0" >
      <path
        android:name="vect"
        android:fillColor="#FF000000"
        android:pathData="M15.67,4H14V2h-4v2H8.33C7.6,4 7,4.6 7,5.33V9h4.93L13,7v2h4V5.33C17,4.6 16.4,4 15.67,4z"
        android:fillAlpha=".3"/>
      <path
        android:name="draw"
        android:fillColor="#FF000000"
        android:pathData="M13,12.5h2L11,20v-5.5H9L11.93,9H7v11.67C7,21.4 7.6,22 8.33,22h7.33c0.74,0 1.34,-0.6 1.34,-1.33V9h-4v3.5z"/>
   </group>
</vector>
這個 XML 會算繪下列圖片:

關於 AnimatedVectorDrawable 類別
AnimatedVectorDrawable 可為向量圖像的屬性新增動畫。您可以將動畫向量圖形定義為三個獨立的資源檔案,也可以定義為單一 XML 檔案,其中包含整個可繪項目。讓我們看看這兩種方法,以便進一步瞭解:多個 XML 檔案和單一 XML 檔案。
多個 XML 檔案
使用這種方法,您可以定義三個獨立的 XML 檔案:
VectorDrawableXML 檔案。-
AnimatedVectorDrawableXML 檔案,用於定義目標VectorDrawable、要加入動畫效果的目標路徑和群組、屬性,以及定義為ObjectAnimator物件或AnimatorSet物件的動畫。 - 動畫師 XML 檔案。
多個 XML 檔案的範例
下列 XML 檔案示範向量圖形的動畫。
- VectorDrawable 的 XML 檔案:
vd.xml -
<vector xmlns:android="http://schemas.android.com/apk/res/android"
   android:height="64dp"
   android:width="64dp"
   android:viewportHeight="600"
   android:viewportWidth="600" >
   <group
      android:name="rotationGroup"
      android:pivotX="300.0"
      android:pivotY="300.0"
      android:rotation="45.0" >
      <path
         android:name="vectorPath"
         android:fillColor="#000000"
         android:pathData="M300,70 l 0,-70 70,70 0,0 -70,70z" />
   </group>
</vector>
- AnimatedVectorDrawable 的 XML 檔案:
avd.xml -
<animated-vector xmlns:android="http://schemas.android.com/apk/res/android"
   android:drawable="@drawable/vd" >
     <target
         android:name="rotationGroup"
         android:animation="@anim/rotation" />
     <target
         android:name="vectorPath"
         android:animation="@anim/path_morph" />
</animated-vector>
- Animator XML 檔案,用於 AnimatedVectorDrawable 的 XML 檔案:
rotation.xml和path_morph.xml -
<objectAnimator
   android:duration="6000"
   android:propertyName="rotation"
   android:valueFrom="0"
   android:valueTo="360" />
<set xmlns:android="http://schemas.android.com/apk/res/android">
   <objectAnimator
      android:duration="3000"
      android:propertyName="pathData"
      android:valueFrom="M300,70 l 0,-70 70,70 0,0   -70,70z"
      android:valueTo="M300,70 l 0,-70 70,0  0,140 -70,0 z"
      android:valueType="pathType"/>
</set>
單一 XML 檔案
使用這種方法,您就能透過 XML 組合格式,將相關 XML 檔案合併為單一 XML 檔案。建構應用程式時,aapt 標記會建立個別資源,並在動畫向量中參照這些資源。這種做法需要使用 Build Tools 24 以上版本,且輸出內容可回溯相容。
單一 XML 檔案範例
<animated-vector
    xmlns:android="http://schemas.android.com/apk/res/android"
    xmlns:aapt="http://schemas.android.com/aapt">
    <aapt:attr name="android:drawable">
        <vector
            android:width="24dp"
            android:height="24dp"
            android:viewportWidth="24"
            android:viewportHeight="24">
            <path
                android:name="root"
                android:strokeWidth="2"
                android:strokeLineCap="square"
                android:strokeColor="?android:colorControlNormal"
                android:pathData="M4.8,13.4 L9,17.6 M10.4,16.2 L19.6,7" />
        </vector>
    </aapt:attr>
    <target android:name="root">
        <aapt:attr name="android:animation">
            <objectAnimator
                android:propertyName="pathData"
                android:valueFrom="M4.8,13.4 L9,17.6 M10.4,16.2 L19.6,7"
                android:valueTo="M6.4,6.4 L17.6,17.6 M6.4,17.6 L17.6,6.4"
                android:duration="300"
                android:interpolator="@android:interpolator/fast_out_slow_in"
                android:valueType="pathType" />
        </aapt:attr>
    </target>
</animated-vector>
向量可繪項目的回溯相容解決方案
如要在搭載 Android 5.0 (API 級別 21) 以下平台版本的裝置上支援向量可繪項目和動畫向量可繪項目,或在 Android 7.0 (API 級別 24) 以下版本使用 fillColor、fillType 和 strokeColor 功能,可透過兩個支援程式庫 (support-vector-drawable 和 animated-vector-drawable) 分別使用 VectorDrawableCompat 和 AnimatedVectorDrawableCompat。
Android Studio 1.4 推出有限的向量可繪項目相容性支援,可在建構時產生 PNG 檔案。不過,向量可繪項目和動畫向量可繪項目支援程式庫兼具彈性和廣泛相容性,而且是支援程式庫,因此您可以在所有 Android 平台版本 (包括 Android 2.1 以上版本) 中使用。如要設定應用程式使用向量支援程式庫,請在應用程式模組的 build.gradle 檔案中新增 vectorDrawables 元素。
請使用下列程式碼片段設定 vectorDrawables 元素:
Groovy
// For Gradle Plugin 2.0+
android {
    defaultConfig {
        vectorDrawables.useSupportLibrary = true
    }
}
Kotlin
// For Gradle Plugin 2.0+
android {
    defaultConfig {
        vectorDrawables.useSupportLibrary = true
    }
}
Groovy
// For Gradle Plugin 1.5 or below
android {
    defaultConfig {
        // Stops the Gradle plugin’s automatic rasterization of vectors
        generatedDensities = []
    }
    // Flag notifies aapt to keep the attribute IDs around
    aaptOptions {
        additionalParameters "--no-version-vectors"
    }
}
Kotlin
// For Gradle Plugin 1.5 or below
android {
    defaultConfig {
        // Stops the Gradle plugin’s automatic rasterization of vectors
        generatedDensities()
    }
    // Flag notifies aapt to keep the attribute IDs around
    aaptOptions {
        additionalParameters("--no-version-vectors")
    }
}
在搭載 Android 4.0 (API 級別 14) 以上版本的裝置上,您可以在所有裝置上使用 VectorDrawableCompat 和 AnimatedVectorDrawableCompat。Android 載入可繪項目的方式,並非所有接受可繪項目 ID 的位置 (例如 XML 檔案中) 都支援載入向量可繪項目。android.support.v7.appcompat 套件新增了多項功能,讓您輕鬆使用向量可繪項目。首先,當您搭配 ImageView 或子類別 (例如 ImageButton 和 FloatingActionButton) 使用 android.support.v7.appcompat 套件時,可以透過新的 app:srcCompat 屬性參照向量可繪項目,以及 android:src 提供的任何其他可繪項目:
<ImageView
  android:layout_width="wrap_content"
  android:layout_height="wrap_content"
  app:srcCompat="@drawable/ic_add" />
如要在執行階段變更可繪項目,可以照常使用 setImageResource() 方法。使用 AppCompat 和 app:srcCompat 是將向量可繪項目整合至應用程式最萬無一失的方法。
支援程式庫 25.4.0 以上版本支援下列功能:
- 路徑變形 (PathType 評估工具):用於將一個路徑變形為另一個路徑。
- 路徑插補:用於定義彈性插補器 (以路徑表示),而非系統定義的插補器,例如 LinearInterpolator。
支援資料庫 26.0.0-beta1 以上版本支援下列功能:
- 沿路徑移動:幾何物件可以沿著任意路徑移動,成為動畫的一部分。
使用支援資料庫的多個 XML 檔案範例
下列 XML 檔案示範如何使用多個 XML 檔案,為向量圖形製作動畫。
- VectorDrawable 的 XML 檔案:
vd.xml -
<vector xmlns:android="http://schemas.android.com/apk/res/android"
   android:height="64dp"
   android:width="64dp"
   android:viewportHeight="600"
   android:viewportWidth="600" >
   <group
      android:name="rotationGroup"
      android:pivotX="300.0"
      android:pivotY="300.0"
      android:rotation="45.0" >
      <path
         android:name="vectorPath"
         android:fillColor="#000000"
         android:pathData="M300,70 l 0,-70 70,70 0,0 -70,70z" />
   </group>
</vector>
- AnimatedVectorDrawable 的 XML 檔案:
avd.xml -
<animated-vector xmlns:android="http://schemas.android.com/apk/res/android"
   android:drawable="@drawable/vd" >
     <target
         android:name="rotationGroup"
         android:animation="@anim/rotation" />
</animated-vector>
- 用於 AnimatedVectorDrawable 的 XML 檔案中的 Animator XML 檔案:
rotation.xml -
<objectAnimator
   android:duration="6000"
   android:propertyName="rotation"
   android:valueFrom="0"
   android:valueTo="360" />
單一 XML 檔案
下列 XML 檔案示範如何使用單一 XML 檔案,為向量圖像製作動畫。建構應用程式時,aapt 標記會建立個別資源,並在動畫向量中參照這些資源。這種做法需要使用 Build Tools 24 以上版本,且輸出內容可回溯相容。
使用支援程式庫的單一 XML 檔案範例
<animated-vector
    xmlns:android="http://schemas.android.com/apk/res/android"
    xmlns:aapt="http://schemas.android.com/aapt">
    <aapt:attr name="android:drawable">
        <vector xmlns:android="http://schemas.android.com/apk/res/android"
            android:width="64dp"
            android:height="64dp"
            android:viewportWidth="600"
            android:viewportHeight="600">
            <group
                android:name="rotationGroup"
                android:pivotX="300"
                android:pivotY="300"
                android:rotation="45.0" >
                <path
                    android:name="vectorPath"
                    android:fillColor="#000000"
                    android:pathData="M300,70 l 0,-70 70,70 0,0 -70,70z" />
            </group>
        </vector>
    </aapt:attr>
    <target android:name="rotationGroup">
        <aapt:attr name="android:animation">
            <objectAnimator
                android:propertyName="rotation"
                android:valueFrom="0"
                android:valueTo="360"
                android:duration="6000"
                android:interpolator="@android:interpolator/fast_out_slow_in" />
        </aapt:attr>
    </target>
</animated-vector>

