
Carousel 是動作輔助物件,用於建構自訂輪轉介面檢視畫面,顯示使用者可瀏覽的元素清單。相較於其他實作這類檢視區塊的方法,這個輔助程式可讓您利用 MotionLayout,快速為 Carousel 建立複雜的動作和尺寸變化。
Carousel 範例。Carousel 小工具支援有開頭和結尾的清單,以及環繞式清單。
採用 MotionLayout 的輪轉介面運作方式
假設您想建構水平 Carousel 檢視畫面,並放大中央項目:
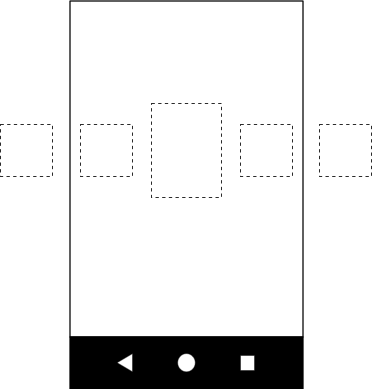
Carousel 顯示中央的放大圖片。
這個基本版面配置包含多個檢視區塊,代表 Carousel 項目:
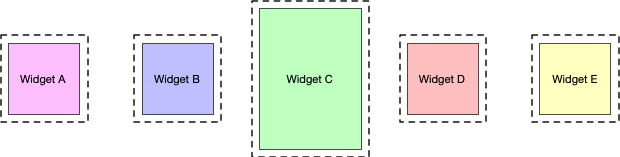
建立具有下列三種狀態的 MotionLayout,並為這些狀態提供 ID:
- 上一個
- start
- 下一步
如果 start 狀態對應至基本版面配置,則在 previous 狀態和 next 狀態中,Carousel 項目會分別向左和向右移動一個位置。
舉例來說,假設圖 3 中的五個檢視區塊在 start 狀態下,檢視區塊 B、C 和 D 可見,而 A 和 E 則位於螢幕外。設定先前狀態,讓 A、B、C 和 D 的位置與 B、C、D 和 E 的位置相同,且檢視畫面從左向右移動。在下一個狀態中,則需要反向操作,讓 B、C、D 和 E 移到 A、B、C 和 D 的位置,並將檢視畫面從右向左移動。如下方圖 4 所示:
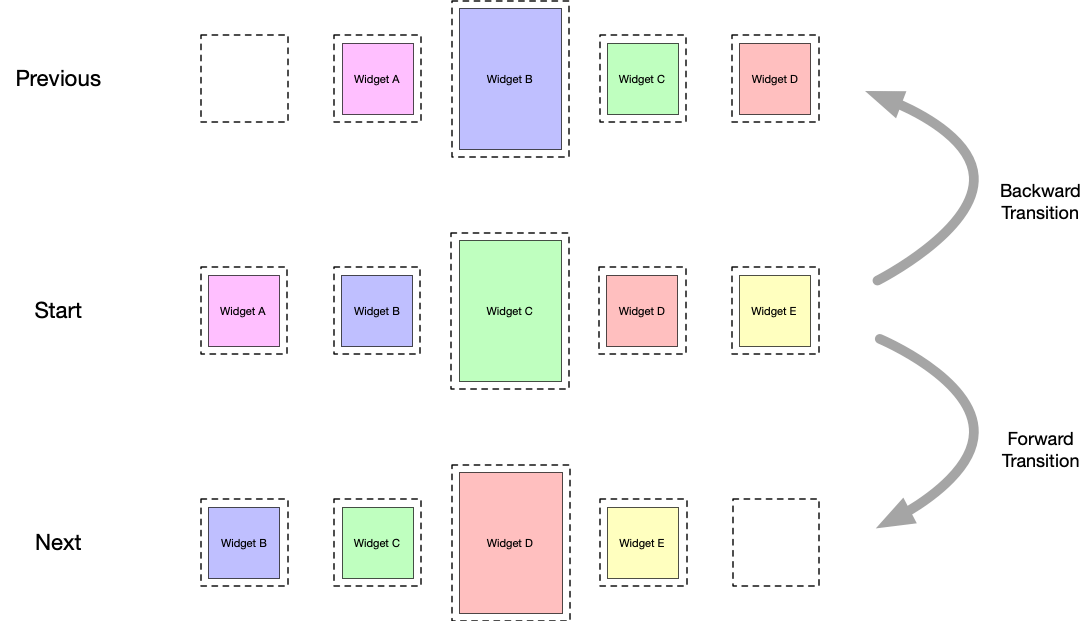
Carousel 輕觸
轉換。
請務必確保檢視區塊的結尾位置與原始檢視區塊的開頭位置完全相同。
Carousel 會將實際檢視區塊移回原位,但會使用新的相符內容重新初始化,藉此營造出無限元素集合的錯覺。下圖說明瞭這項機制。請注意「項目編號」值:
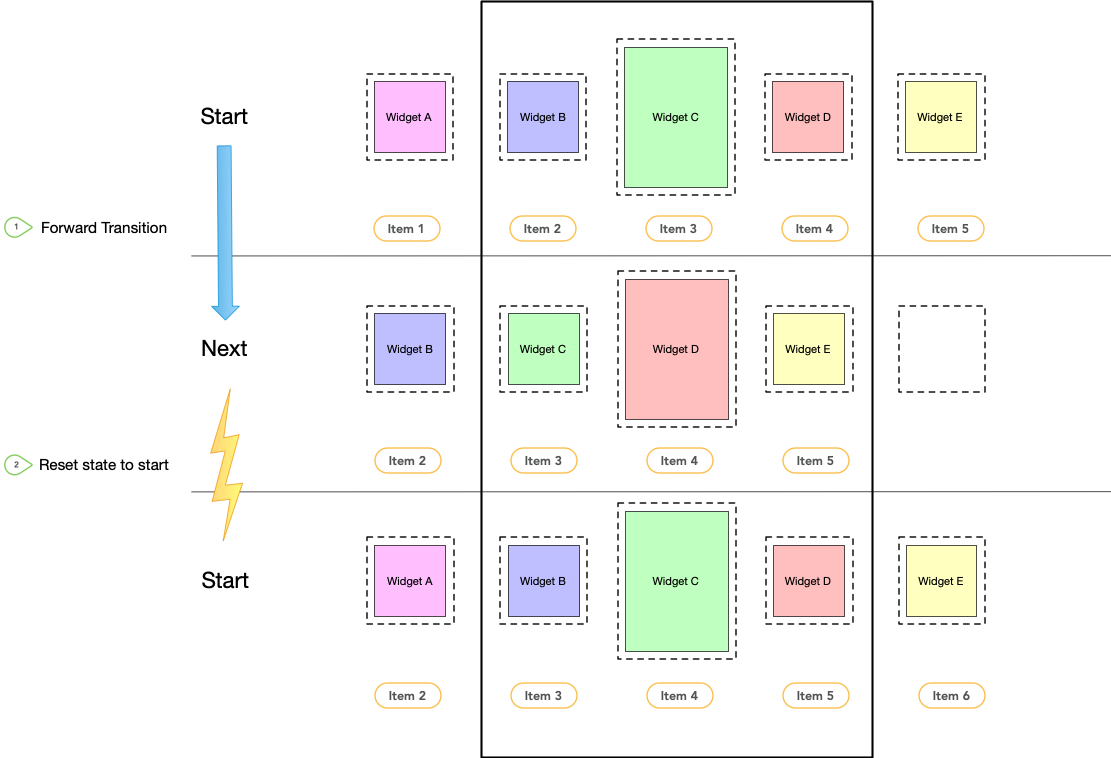
Carousel 滑動
轉場效果和狀態重設。
轉場
在動作場景檔案中定義這三組限制條件後,請在 start 和 next 狀態之間,以及 start 和 previous 狀態之間,建立兩個轉場效果 (向前和向後)。新增 OnSwipe 處理常式,在手勢觸發時啟動轉場效果,如下列範例所示:
    <Transition
        motion:constraintSetStart="@id/start"
        motion:constraintSetEnd="@+id/next"
        motion:duration="1000"
        android:id="@+id/forward">
        <OnSwipe
            motion:dragDirection="dragLeft"
            motion:touchAnchorSide="left" />
    </Transition>

    <Transition
        motion:constraintSetStart="@+id/start"
        motion:constraintSetEnd="@+id/previous"
        android:id="@+id/backward">
        <OnSwipe
            motion:dragDirection="dragRight"
            motion:touchAnchorSide="right" />
    </Transition>
新增輪轉介面
建立這個基本動作場景後,請在版面配置中新增 Carousel 輔助程式,並按照實作上一個和下一個動畫時的順序參照檢視區塊。
為 Carousel 輔助程式設定下列屬性:
app:carousel_firstView:代表Carousel第一個元素的檢視區塊,在本例中為 C。app:carousel_previousState:先前狀態的ConstraintSetID。app:carousel_nextState:下一個狀態的ConstraintSetID。app:carousel_backwardTransition:在「開始」和「上一個」狀態之間套用的TransitionID。app:carousel_forwardTransition:在「開始」和「下一個」狀態之間套用的TransitionID。
舉例來說,版面配置 XML 檔案中包含類似下列的內容:
    <androidx.constraintlayout.motion.widget.MotionLayout ... >

        <ImageView  android:id="@+id/imageView0" .. />
        <ImageView  android:id="@+id/imageView1" .. />
        <ImageView  android:id="@+id/imageView2" .. />
        <ImageView  android:id="@+id/imageView3" .. />
        <ImageView  android:id="@+id/imageView4" .. />

        <androidx.constraintlayout.helper.widget.Carousel
            android:id="@+id/carousel"
            android:layout_width="wrap_content"
            android:layout_height="wrap_content"
            app:carousel_forwardTransition="@+id/forward"
            app:carousel_backwardTransition="@+id/backward"
            app:carousel_previousState="@+id/previous"
            app:carousel_nextState="@+id/next"
            app:carousel_infinite="true"
            app:carousel_firstView="@+id/imageView2"
            app:constraint_referenced_ids="imageView0,imageView1,imageView2,imageView3,imageView4" />

    </androidx.constraintlayout.motion.widget.MotionLayout>
在程式碼中設定 Carousel 轉接程式:
Kotlin
carousel.setAdapter(object : Carousel.Adapter {
            override fun count(): Int {
              // Return the number of items in the Carousel.
            }

            override fun populate(view: View, index: Int) {
                // Implement this to populate the view at the given index.
            }

            override fun onNewItem(index: Int) {
                // Called when an item is set.
            }
        })
Java
carousel.setAdapter(new Carousel.Adapter() {
            @Override
            public int count() {
                // Return the number of items in the Carousel.
            }

            @Override
            public void populate(View view, int index) {
                // Populate the view at the given index.
            }

            @Override
            public void onNewItem(int index) {
                 // Called when an item is set.
            }
        });
其他注意事項
視 Carousel 中「選取」的目前項目而定,可能需要隱藏代表前後項目的檢視畫面,才能正確計算 Carousel 的開始和結束。Carousel 輔助程式會自動處理這項作業。根據預設,系統會在這些情況下將檢視區塊標示為 View.INVISIBLE,因此整體版面配置不會變更。
您也可以使用替代模式,讓 Carousel 輔助程式將這些檢視區塊標示為 View.GONE。您可以使用下列屬性設定這個模式:
app:carousel_emptyViewsBehavior="gone"
範例
如需使用 Carousel 輔助程式的更多範例,請參閱 GitHub 上的範例專案。