
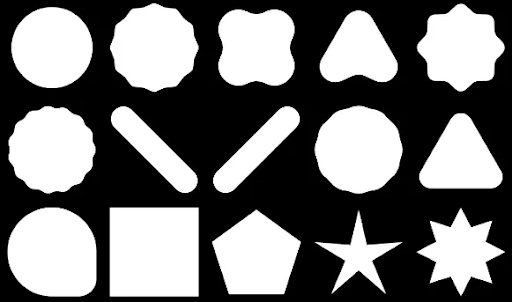
Compose ช่วยให้คุณสร้างรูปร่างที่ทำจากรูปหลายเหลี่ยมได้ เช่น คุณสามารถสร้างรูปร่างประเภทต่อไปนี้ได้
หากต้องการสร้างรูปหลายเหลี่ยมแบบมีมุมโค้งมนที่กำหนดเองใน Compose ให้เพิ่มทรัพยากร Dependency
graphics-shapes ลงใน
app/build.gradle ดังนี้
implementation "androidx.graphics:graphics-shapes:1.0.1"
ไลบรารีนี้ช่วยให้คุณสร้างรูปร่างที่ทำจากรูปหลายเหลี่ยมได้ แม้ว่ารูปร่างหลายเหลี่ยมจะมีเฉพาะขอบตรงและมุมแหลม แต่รูปร่างเหล่านี้ก็มีมุมโค้งมนให้เลือกได้ ซึ่งทำให้การเปลี่ยนรูปร่างระหว่างรูปร่าง 2 แบบเป็นเรื่องง่าย การเปลี่ยนรูปร่างระหว่างรูปร่างที่กำหนดเองนั้นทำได้ยากและมักเป็นปัญหาในระหว่างการออกแบบ แต่ไลบรารีนี้ทำให้การเปลี่ยนรูปร่างเป็นเรื่องง่ายด้วยการเปลี่ยนรูปร่างระหว่างรูปร่างที่มีโครงสร้างหลายเหลี่ยมคล้ายกัน
สร้างรูปหลายเหลี่ยม
ข้อมูลโค้ดต่อไปนี้จะสร้างรูปร่างหลายเหลี่ยมพื้นฐานที่มี 6 จุดตรงกลางพื้นที่วาด
Box( modifier = Modifier .drawWithCache { val roundedPolygon = RoundedPolygon( numVertices = 6, radius = size.minDimension / 2, centerX = size.width / 2, centerY = size.height / 2 ) val roundedPolygonPath = roundedPolygon.toPath().asComposePath() onDrawBehind { drawPath(roundedPolygonPath, color = Color.Blue) } } .fillMaxSize() )
ในตัวอย่างนี้ ไลบรารีจะสร้าง RoundedPolygon ซึ่งเก็บข้อมูลทางเรขาคณิตที่แสดงรูปร่างที่ขอ หากต้องการวาดรูปร่างดังกล่าวในแอป Compose คุณต้องรับออบเจ็กต์ Path จากรูปร่างนั้นเพื่อให้รูปร่างอยู่ในรูปแบบที่ Compose ทราบวิธีวาด
ทำให้มุมของรูปหลายเหลี่ยมโค้งมน
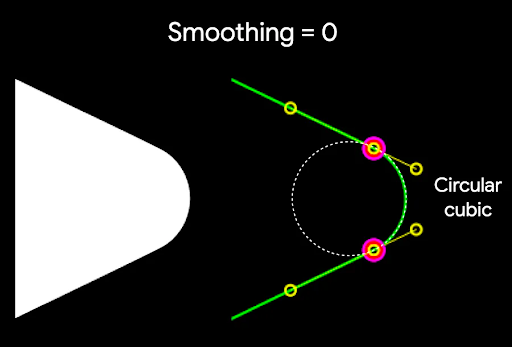
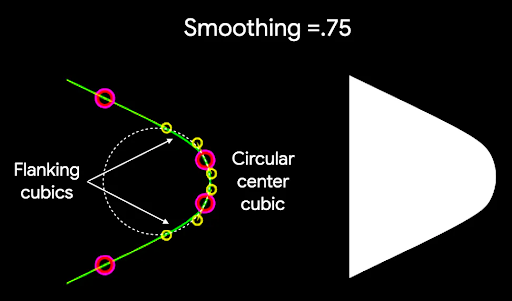
หากต้องการทำให้มุมของรูปหลายเหลี่ยมโค้งมน ให้ใช้พารามิเตอร์ CornerRounding ซึ่งใช้พารามิเตอร์ 2 รายการ ได้แก่ radius และ smoothing มุมโค้งมนแต่ละมุมประกอบด้วยเส้นโค้งคิวบิก 1-3 เส้น โดยตรงกลางมีรูปร่างเป็นส่วนโค้งของวงกลม ขณะที่เส้นโค้งด้านข้าง 2 เส้น ("เส้นโค้งที่อยู่ด้านข้าง") จะเปลี่ยนจากขอบของรูปร่างเป็นเส้นโค้งตรงกลาง
รัศมี
radius คือรัศมีของวงกลมที่ใช้ทำให้จุดยอดโค้งมน
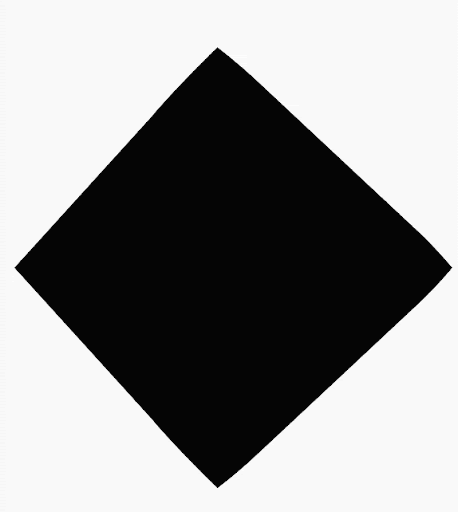
ตัวอย่างเช่น สามเหลี่ยมที่มีมุมโค้งมนต่อไปนี้สร้างขึ้นดังนี้

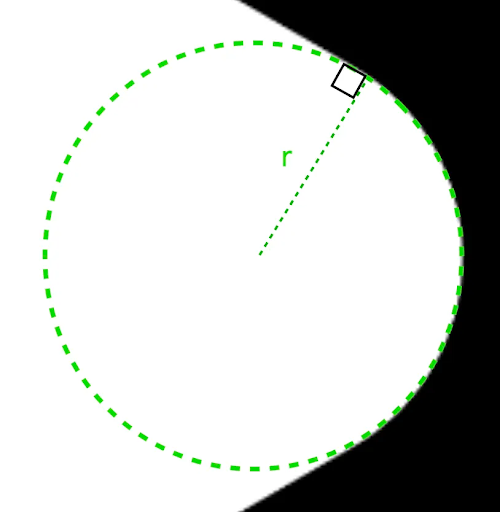
r ของการทำให้โค้งมนจะเป็นตัวกำหนดขนาดการทำให้โค้งมนเป็นวงกลมของมุมโค้งมนการทำให้เรียบ
การทำให้เรียบเป็นปัจจัยที่กำหนดระยะเวลาที่ใช้ในการเปลี่ยนจากส่วนการทำให้โค้งมนเป็นวงกลมของมุมไปยังขอบ ปัจจัยการทำให้เรียบเป็น 0 (ไม่ทำให้เรียบ ซึ่งเป็นค่าเริ่มต้นของ CornerRounding) จะทำให้มุมโค้งมนเป็นวงกลมอย่างเดียว ปัจจัยการทำให้เรียบที่ไม่เป็น 0 (สูงสุด 1.0) จะทำให้มุมโค้งมนด้วยเส้นโค้ง 3 เส้นแยกกัน
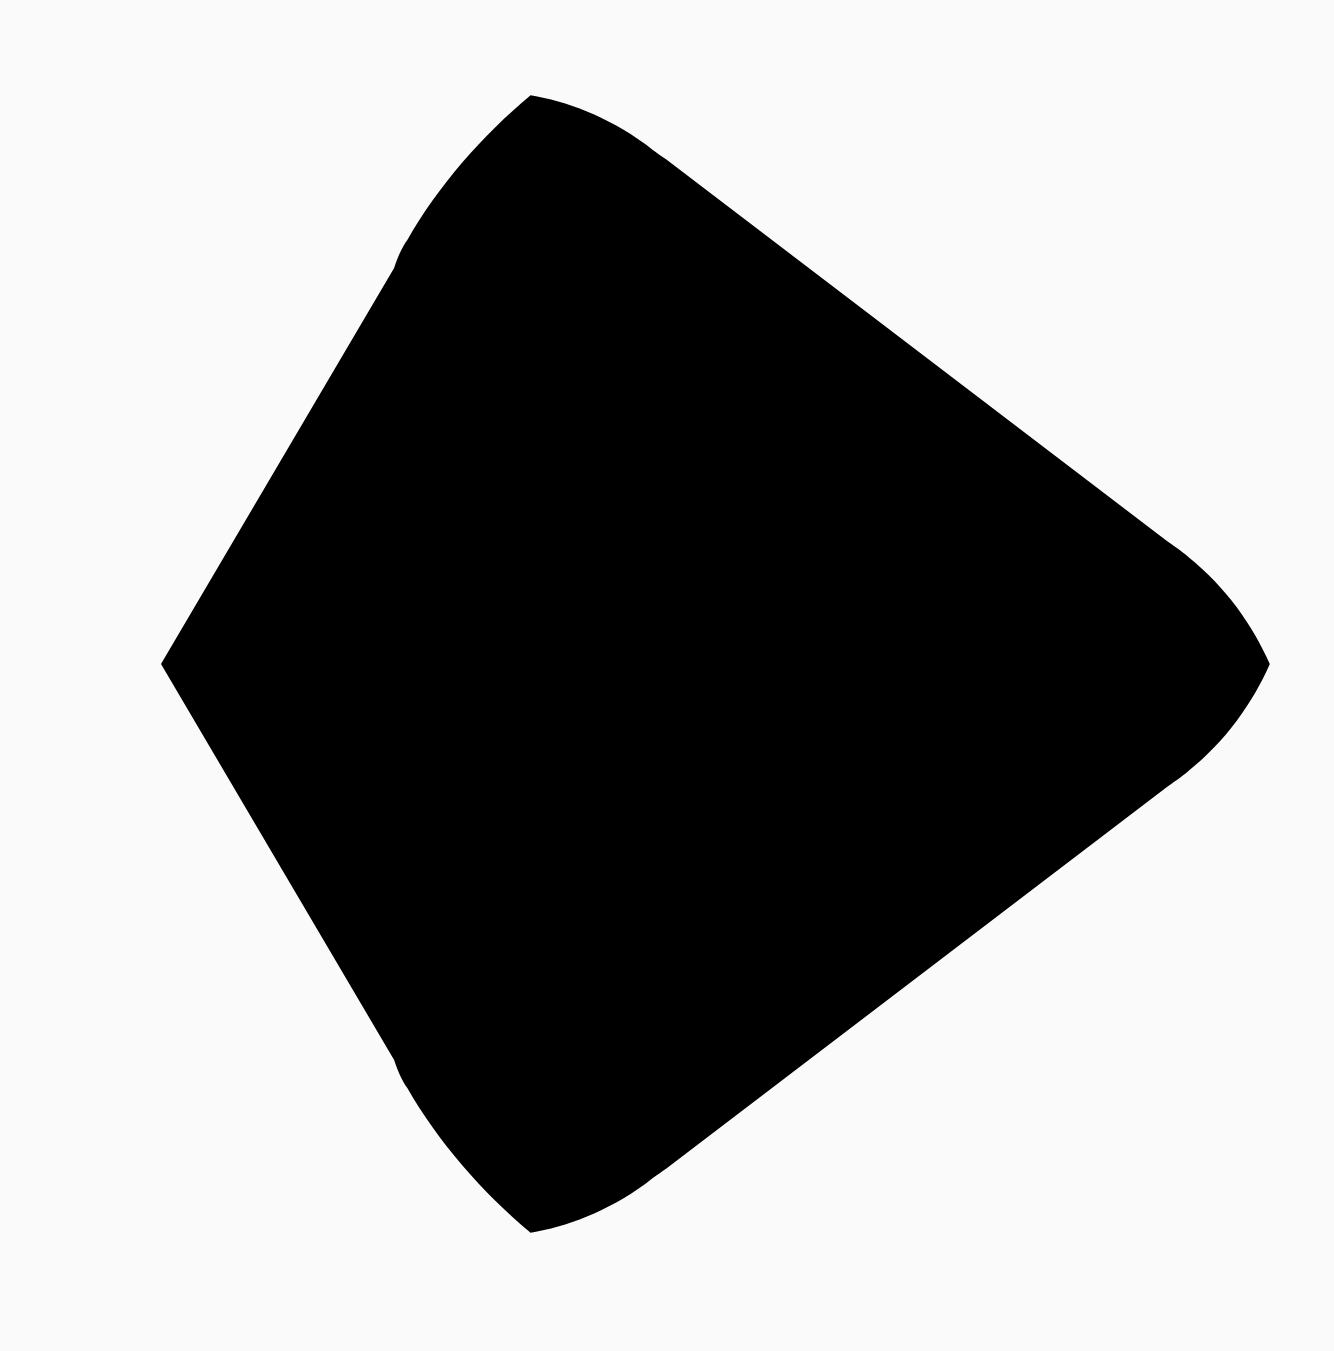
ตัวอย่างเช่น ข้อมูลโค้ดด้านล่างแสดงความแตกต่างเล็กน้อยในการตั้งค่าการทำให้เรียบเป็น 0 เทียบกับ 1
Box( modifier = Modifier .drawWithCache { val roundedPolygon = RoundedPolygon( numVertices = 3, radius = size.minDimension / 2, centerX = size.width / 2, centerY = size.height / 2, rounding = CornerRounding( size.minDimension / 10f, smoothing = 0.1f ) ) val roundedPolygonPath = roundedPolygon.toPath().asComposePath() onDrawBehind { drawPath(roundedPolygonPath, color = Color.Black) } } .size(100.dp) )

ขนาดและตำแหน่ง
โดยค่าเริ่มต้น ระบบจะสร้างรูปร่างที่มีรัศมี 1 รอบจุดกึ่งกลาง (0, 0) รัศมีนี้แสดงถึงระยะห่างระหว่างจุดกึ่งกลางกับจุดยอดภายนอกของรูปหลายเหลี่ยมที่ใช้เป็นฐานของรูปร่าง โปรดทราบว่าการทำให้มุมโค้งมนจะทำให้รูปร่างเล็กลงเนื่องจากมุมโค้งมนจะอยู่ใกล้จุดกึ่งกลางมากกว่าจุดยอดที่ทำให้โค้งมน หากต้องการปรับขนาดรูปหลายเหลี่ยม ให้ปรับค่า radius หากต้องการปรับตำแหน่ง ให้เปลี่ยน centerX หรือ centerY ของรูปหลายเหลี่ยม
หรือจะแปลงออบเจ็กต์เพื่อเปลี่ยนขนาด ตำแหน่ง และการหมุน
โดยใช้ฟังก์ชันการแปลง DrawScopeมาตรฐาน เช่น
DrawScope#translate()ก็ได้
เปลี่ยนรูปร่าง
ออบเจ็กต์ Morph เป็นรูปร่างใหม่ที่แสดงภาพเคลื่อนไหวระหว่างรูปร่างหลายเหลี่ยม 2 แบบ หากต้องการเปลี่ยนรูปร่างระหว่างรูปร่าง 2 แบบ ให้สร้าง RoundedPolygons 2 แบบและออบเจ็กต์ Morph
ที่ใช้รูปร่าง 2 แบบนี้ หากต้องการคำนวณรูปร่างระหว่างรูปร่างเริ่มต้นและรูปร่างสิ้นสุด ให้ระบุค่า progress ระหว่าง 0 ถึง 1 เพื่อกำหนดรูปแบบระหว่างรูปร่างเริ่มต้น (0) และรูปร่างสิ้นสุด (1) ดังนี้
Box( modifier = Modifier .drawWithCache { val triangle = RoundedPolygon( numVertices = 3, radius = size.minDimension / 2f, centerX = size.width / 2f, centerY = size.height / 2f, rounding = CornerRounding( size.minDimension / 10f, smoothing = 0.1f ) ) val square = RoundedPolygon( numVertices = 4, radius = size.minDimension / 2f, centerX = size.width / 2f, centerY = size.height / 2f ) val morph = Morph(start = triangle, end = square) val morphPath = morph .toPath(progress = 0.5f).asComposePath() onDrawBehind { drawPath(morphPath, color = Color.Black) } } .fillMaxSize() )
ในตัวอย่างข้างต้น ความคืบหน้าจะอยู่กึ่งกลางระหว่างรูปร่าง 2 แบบ (สามเหลี่ยมที่มีมุมโค้งมนและสี่เหลี่ยมจัตุรัส) ซึ่งจะให้ผลลัพธ์ต่อไปนี้
ในสถานการณ์ส่วนใหญ่ การเปลี่ยนรูปร่างจะดำเนินการเป็นส่วนหนึ่งของภาพเคลื่อนไหว ไม่ใช่แค่การแสดงผลแบบคงที่ หากต้องการสร้างภาพเคลื่อนไหวระหว่างรูปร่าง 2 แบบนี้ คุณสามารถใช้ API ภาพเคลื่อนไหวมาตรฐานใน Compose เพื่อเปลี่ยนค่าความคืบหน้าเมื่อเวลาผ่านไป ตัวอย่างเช่น คุณสามารถสร้างภาพเคลื่อนไหวการเปลี่ยนรูปร่างระหว่างรูปร่าง 2 แบบนี้แบบไม่มีที่สิ้นสุดได้ดังนี้
val infiniteAnimation = rememberInfiniteTransition(label = "infinite animation") val morphProgress = infiniteAnimation.animateFloat( initialValue = 0f, targetValue = 1f, animationSpec = infiniteRepeatable( tween(500), repeatMode = RepeatMode.Reverse ), label = "morph" ) Box( modifier = Modifier .drawWithCache { val triangle = RoundedPolygon( numVertices = 3, radius = size.minDimension / 2f, centerX = size.width / 2f, centerY = size.height / 2f, rounding = CornerRounding( size.minDimension / 10f, smoothing = 0.1f ) ) val square = RoundedPolygon( numVertices = 4, radius = size.minDimension / 2f, centerX = size.width / 2f, centerY = size.height / 2f ) val morph = Morph(start = triangle, end = square) val morphPath = morph .toPath(progress = morphProgress.value) .asComposePath() onDrawBehind { drawPath(morphPath, color = Color.Black) } } .fillMaxSize() )
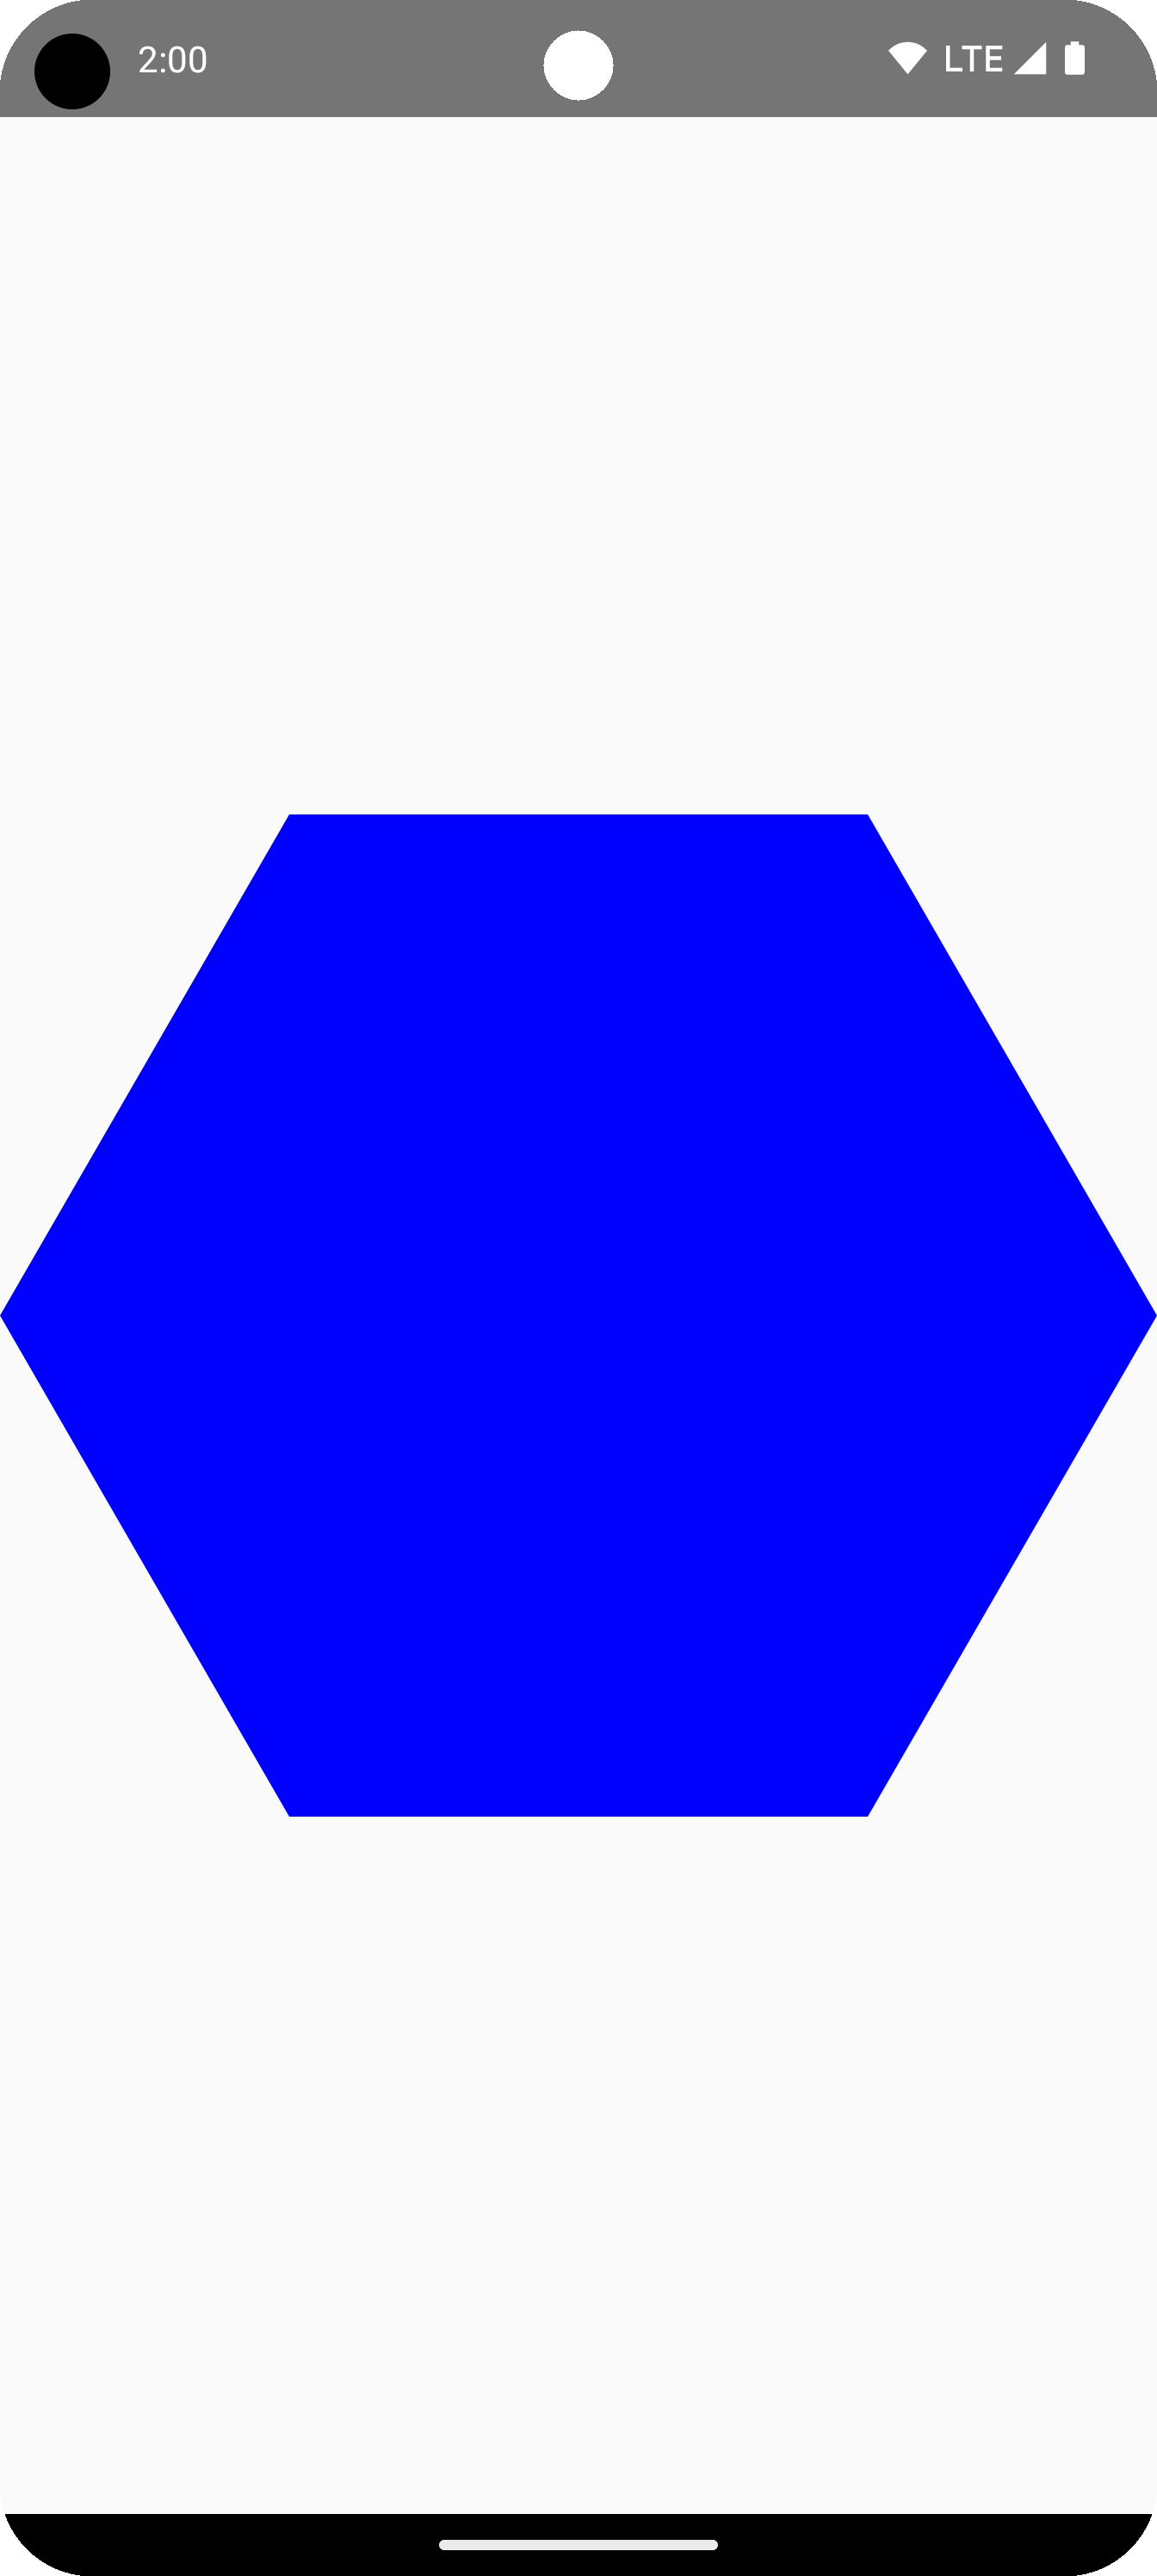
ใช้รูปหลายเหลี่ยมเป็นคลิป
โดยทั่วไปแล้ว เราจะใช้ตัวปรับแต่ง
clip
ใน Compose เพื่อเปลี่ยนวิธีแสดงผลคอมโพสได้ และใช้ประโยชน์จากเงาที่วาดรอบๆ พื้นที่คลิป
fun RoundedPolygon.getBounds() = calculateBounds().let { Rect(it[0], it[1], it[2], it[3]) } class RoundedPolygonShape( private val polygon: RoundedPolygon, private var matrix: Matrix = Matrix() ) : Shape { private var path = Path() override fun createOutline( size: Size, layoutDirection: LayoutDirection, density: Density ): Outline { path.rewind() path = polygon.toPath().asComposePath() matrix.reset() val bounds = polygon.getBounds() val maxDimension = max(bounds.width, bounds.height) matrix.scale(size.width / maxDimension, size.height / maxDimension) matrix.translate(-bounds.left, -bounds.top) path.transform(matrix) return Outline.Generic(path) } }
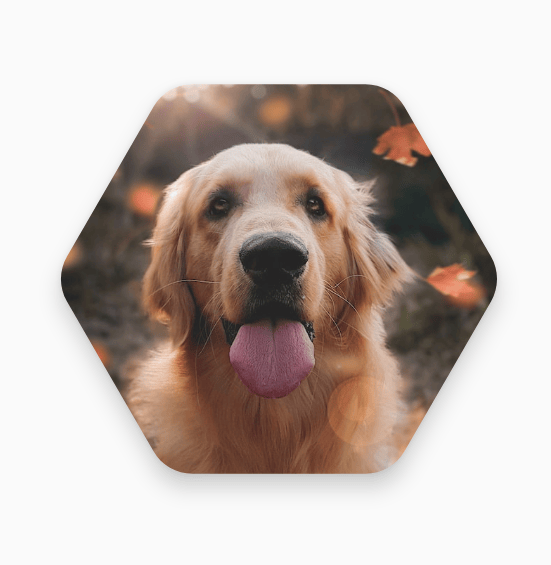
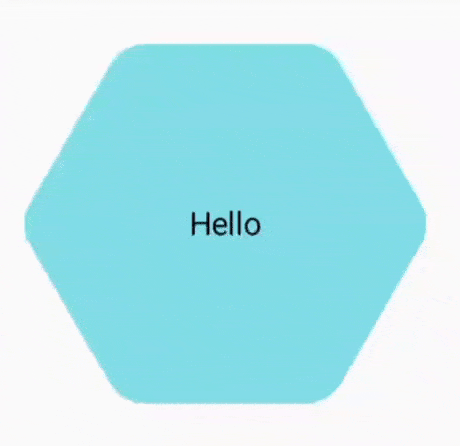
จากนั้นคุณสามารถใช้รูปหลายเหลี่ยมเป็นคลิปได้ดังที่แสดงในข้อมูลโค้ดต่อไปนี้
val hexagon = remember { RoundedPolygon( 6, rounding = CornerRounding(0.2f) ) } val clip = remember(hexagon) { RoundedPolygonShape(polygon = hexagon) } Box( modifier = Modifier .clip(clip) .background(MaterialTheme.colorScheme.secondary) .size(200.dp) ) { Text( "Hello Compose", color = MaterialTheme.colorScheme.onSecondary, modifier = Modifier.align(Alignment.Center) ) }
ซึ่งจะให้ผลลัพธ์ต่อไปนี้

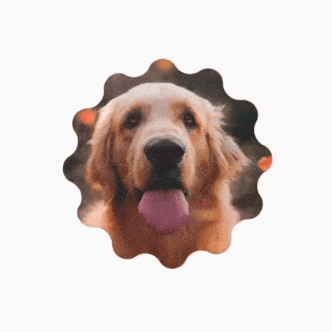
ผลลัพธ์นี้อาจไม่แตกต่างจากสิ่งที่แสดงผลก่อนหน้านี้มากนัก แต่ช่วยให้ใช้ประโยชน์จากฟีเจอร์อื่นๆ ใน Compose ได้ ตัวอย่างเช่น เทคนิคนี้สามารถใช้เพื่อคลิปรูปภาพและใช้เงารอบๆ บริเวณที่คลิปได้
val hexagon = remember { RoundedPolygon( 6, rounding = CornerRounding(0.2f) ) } val clip = remember(hexagon) { RoundedPolygonShape(polygon = hexagon) } Box( modifier = Modifier.fillMaxSize(), contentAlignment = Alignment.Center ) { Image( painter = painterResource(id = R.drawable.dog), contentDescription = "Dog", contentScale = ContentScale.Crop, modifier = Modifier .graphicsLayer { this.shadowElevation = 6.dp.toPx() this.shape = clip this.clip = true this.ambientShadowColor = Color.Black this.spotShadowColor = Color.Black } .size(200.dp) ) }
ปุ่มเปลี่ยนรูปร่างเมื่อคลิก
คุณสามารถใช้ไลบรารี graphics-shape เพื่อสร้างปุ่มที่เปลี่ยนรูปร่างระหว่างรูปร่าง 2 แบบเมื่อกด ขั้นแรก ให้สร้าง MorphPolygonShape ที่ขยาย Shape,
โดยปรับขนาดและแปลให้พอดี โปรดทราบว่าการส่งค่าความคืบหน้าจะช่วยให้สร้างภาพเคลื่อนไหวของรูปร่างได้
class MorphPolygonShape( private val morph: Morph, private val percentage: Float ) : Shape { private val matrix = Matrix() override fun createOutline( size: Size, layoutDirection: LayoutDirection, density: Density ): Outline { // Below assumes that you haven't changed the default radius of 1f, nor the centerX and centerY of 0f // By default this stretches the path to the size of the container, if you don't want stretching, use the same size.width for both x and y. matrix.scale(size.width / 2f, size.height / 2f) matrix.translate(1f, 1f) val path = morph.toPath(progress = percentage).asComposePath() path.transform(matrix) return Outline.Generic(path) } }
หากต้องการใช้รูปร่างที่เปลี่ยนรูปร่างได้นี้ ให้สร้างรูปหลายเหลี่ยม 2 แบบ ได้แก่ shapeA และ shapeB สร้างและจดจำ Morph จากนั้นใช้การเปลี่ยนรูปร่างกับปุ่มเป็นเส้นขอบคลิป โดยใช้ interactionSource เมื่อกดเป็นแรงขับเคลื่อนเบื้องหลังภาพเคลื่อนไหว
val shapeA = remember { RoundedPolygon( 6, rounding = CornerRounding(0.2f) ) } val shapeB = remember { RoundedPolygon.star( 6, rounding = CornerRounding(0.1f) ) } val morph = remember { Morph(shapeA, shapeB) } val interactionSource = remember { MutableInteractionSource() } val isPressed by interactionSource.collectIsPressedAsState() val animatedProgress = animateFloatAsState( targetValue = if (isPressed) 1f else 0f, label = "progress", animationSpec = spring(dampingRatio = 0.4f, stiffness = Spring.StiffnessMedium) ) Box( modifier = Modifier .size(200.dp) .padding(8.dp) .clip(MorphPolygonShape(morph, animatedProgress.value)) .background(Color(0xFF80DEEA)) .size(200.dp) .clickable(interactionSource = interactionSource, indication = null) { } ) { Text("Hello", modifier = Modifier.align(Alignment.Center)) }
ซึ่งจะทำให้เกิดภาพเคลื่อนไหวต่อไปนี้เมื่อแตะกล่อง
สร้างภาพเคลื่อนไหวการเปลี่ยนรูปร่างแบบไม่มีที่สิ้นสุด
หากต้องการสร้างภาพเคลื่อนไหวรูปร่างที่เปลี่ยนรูปร่างได้แบบไม่มีที่สิ้นสุด ให้ใช้
rememberInfiniteTransition
ด้านล่างนี้เป็นตัวอย่างรูปโปรไฟล์ที่เปลี่ยนรูปร่าง (และหมุน) แบบไม่มีที่สิ้นสุดเมื่อเวลาผ่านไป แนวทางนี้ใช้การปรับ MorphPolygonShape เล็กน้อยดังที่แสดงด้านบน
class CustomRotatingMorphShape( private val morph: Morph, private val percentage: Float, private val rotation: Float ) : Shape { private val matrix = Matrix() override fun createOutline( size: Size, layoutDirection: LayoutDirection, density: Density ): Outline { // Below assumes that you haven't changed the default radius of 1f, nor the centerX and centerY of 0f // By default this stretches the path to the size of the container, if you don't want stretching, use the same size.width for both x and y. matrix.scale(size.width / 2f, size.height / 2f) matrix.translate(1f, 1f) matrix.rotateZ(rotation) val path = morph.toPath(progress = percentage).asComposePath() path.transform(matrix) return Outline.Generic(path) } } @Preview @Composable private fun RotatingScallopedProfilePic() { val shapeA = remember { RoundedPolygon( 12, rounding = CornerRounding(0.2f) ) } val shapeB = remember { RoundedPolygon.star( 12, rounding = CornerRounding(0.2f) ) } val morph = remember { Morph(shapeA, shapeB) } val infiniteTransition = rememberInfiniteTransition("infinite outline movement") val animatedProgress = infiniteTransition.animateFloat( initialValue = 0f, targetValue = 1f, animationSpec = infiniteRepeatable( tween(2000, easing = LinearEasing), repeatMode = RepeatMode.Reverse ), label = "animatedMorphProgress" ) val animatedRotation = infiniteTransition.animateFloat( initialValue = 0f, targetValue = 360f, animationSpec = infiniteRepeatable( tween(6000, easing = LinearEasing), repeatMode = RepeatMode.Reverse ), label = "animatedMorphProgress" ) Box( modifier = Modifier.fillMaxSize(), contentAlignment = Alignment.Center ) { Image( painter = painterResource(id = R.drawable.dog), contentDescription = "Dog", contentScale = ContentScale.Crop, modifier = Modifier .clip( CustomRotatingMorphShape( morph, animatedProgress.value, animatedRotation.value ) ) .size(200.dp) ) } }
โค้ดนี้จะให้ผลลัพธ์ที่สนุกสนานดังนี้
รูปหลายเหลี่ยมแบบกำหนดเอง
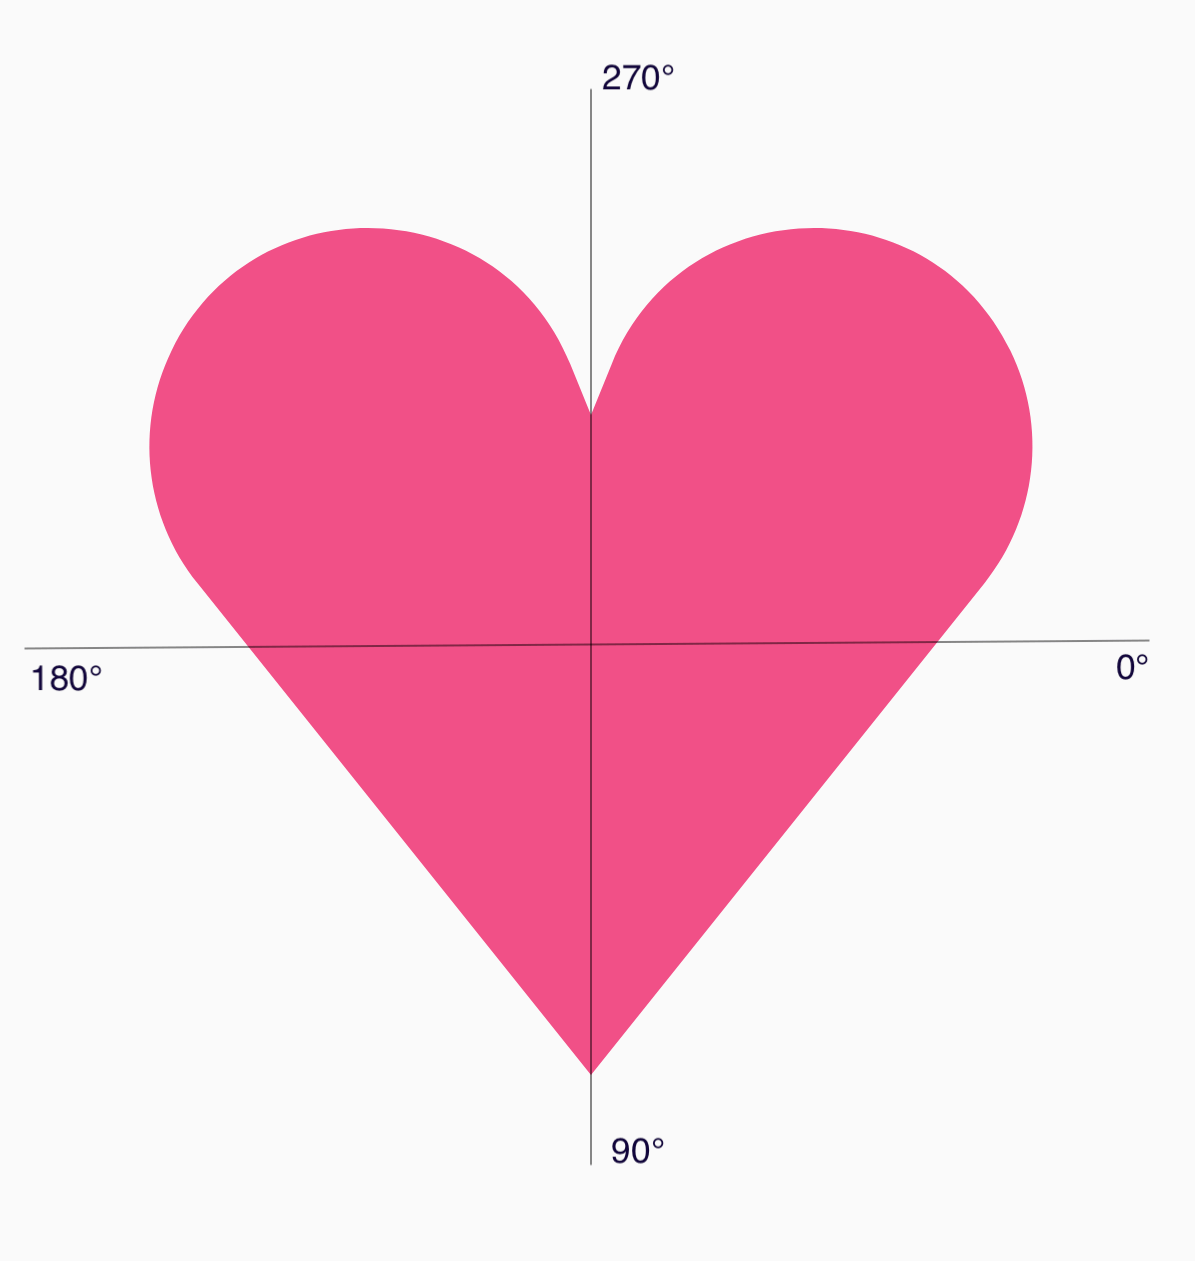
หากรูปร่างที่สร้างจากรูปหลายเหลี่ยมปกติไม่ครอบคลุมกรณีการใช้งานของคุณ คุณสามารถสร้างรูปร่างที่กำหนดเองมากขึ้นด้วยรายการจุดยอด ตัวอย่างเช่น คุณอาจต้องการสร้างรูปร่างหัวใจดังนี้

คุณสามารถระบุจุดยอดแต่ละจุดของรูปร่างนี้ได้โดยใช้การโอเวอร์โหลด RoundedPolygon ที่ใช้อาร์เรย์ทศนิยมของพิกัด x, y
หากต้องการแยกรูปหลายเหลี่ยมหัวใจ โปรดทราบว่าระบบพิกัดเชิงขั้วสำหรับการระบุจุดจะทำให้การดำเนินการนี้ง่ายกว่าการใช้ระบบพิกัดคาร์ทีเซียน (x,y) โดย 0° จะเริ่มต้นทางด้านขวาและดำเนินการตามเข็มนาฬิกา โดย 270° จะอยู่ที่ตำแหน่ง 12 นาฬิกา:
ตอนนี้คุณสามารถกำหนดรูปร่างได้ง่ายขึ้นโดยการระบุมุม (𝜭) และรัศมีจากจุดกึ่งกลางที่แต่ละจุด
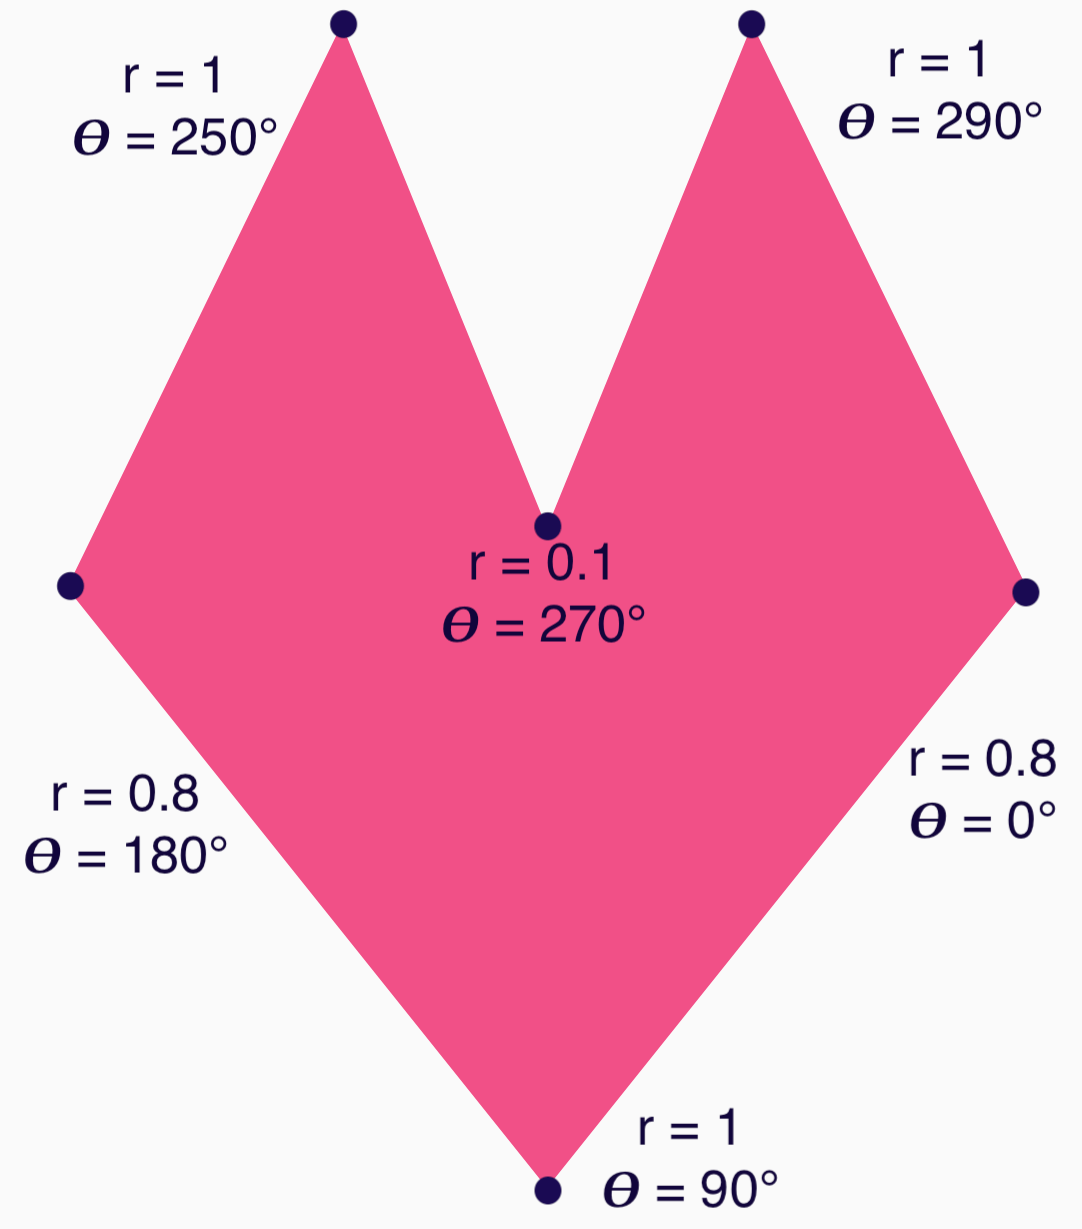
ตอนนี้คุณสามารถสร้างจุดยอดและส่งไปยังฟังก์ชัน RoundedPolygon ได้แล้ว
val vertices = remember { val radius = 1f val radiusSides = 0.8f val innerRadius = .1f floatArrayOf( radialToCartesian(radiusSides, 0f.toRadians()).x, radialToCartesian(radiusSides, 0f.toRadians()).y, radialToCartesian(radius, 90f.toRadians()).x, radialToCartesian(radius, 90f.toRadians()).y, radialToCartesian(radiusSides, 180f.toRadians()).x, radialToCartesian(radiusSides, 180f.toRadians()).y, radialToCartesian(radius, 250f.toRadians()).x, radialToCartesian(radius, 250f.toRadians()).y, radialToCartesian(innerRadius, 270f.toRadians()).x, radialToCartesian(innerRadius, 270f.toRadians()).y, radialToCartesian(radius, 290f.toRadians()).x, radialToCartesian(radius, 290f.toRadians()).y, ) }
คุณต้องแปลจุดยอดเป็นพิกัดคาร์ทีเซียนโดยใช้ฟังก์ชัน radialToCartesian นี้
internal fun Float.toRadians() = this * PI.toFloat() / 180f internal val PointZero = PointF(0f, 0f) internal fun radialToCartesian( radius: Float, angleRadians: Float, center: PointF = PointZero ) = directionVectorPointF(angleRadians) * radius + center internal fun directionVectorPointF(angleRadians: Float) = PointF(cos(angleRadians), sin(angleRadians))
โค้ดก่อนหน้าจะให้จุดยอดดิบสำหรับหัวใจ แต่คุณต้องทำให้มุมบางมุมโค้งมนเพื่อให้ได้รูปร่างหัวใจที่เลือก มุมที่ 90° และ 270° จะไม่โค้งมน แต่มุมอื่นๆ จะโค้งมน หากต้องการทำให้มุมแต่ละมุมโค้งมนแบบกำหนดเอง ให้ใช้พารามิเตอร์ perVertexRounding
val rounding = remember { val roundingNormal = 0.6f val roundingNone = 0f listOf( CornerRounding(roundingNormal), CornerRounding(roundingNone), CornerRounding(roundingNormal), CornerRounding(roundingNormal), CornerRounding(roundingNone), CornerRounding(roundingNormal), ) } val polygon = remember(vertices, rounding) { RoundedPolygon( vertices = vertices, perVertexRounding = rounding ) } Box( modifier = Modifier .drawWithCache { val roundedPolygonPath = polygon.toPath().asComposePath() onDrawBehind { scale(size.width * 0.5f, size.width * 0.5f) { translate(size.width * 0.5f, size.height * 0.5f) { drawPath(roundedPolygonPath, color = Color(0xFFF15087)) } } } } .size(400.dp) )
ซึ่งจะให้ผลลัพธ์เป็นหัวใจสีชมพู
หากรูปร่างก่อนหน้าไม่ครอบคลุมกรณีการใช้งานของคุณ ให้ลองใช้Path คลาสเพื่อวาดรูปร่างที่กำหนดเอง หรือโหลดไฟล์ImageVectorจาก ดิสก์ ไลบรารี graphics-shapes ไม่ได้มีไว้สำหรับใช้กับรูปร่างที่กำหนดเอง แต่มีไว้เพื่อลดความซับซ้อนในการสร้างรูปหลายเหลี่ยมแบบมีมุมโค้งมนและภาพเคลื่อนไหวการเปลี่ยนรูปร่างระหว่างรูปหลายเหลี่ยมเหล่านั้นโดยเฉพาะ
แหล่งข้อมูลเพิ่มเติม
ดูข้อมูลและตัวอย่างเพิ่มเติมได้จากแหล่งข้อมูลต่อไปนี้
- บล็อก: The Shape of Things to Come - Shapes
- บล็อก: Shape morphing in Android
- การสาธิตรูปร่างใน Github