สร้างคลาสหรือประเภท Java
จัดทุกอย่างให้เป็นระเบียบอยู่เสมอด้วยคอลเล็กชัน
บันทึกและจัดหมวดหมู่เนื้อหาตามค่ากำหนดของคุณ
กล่องโต้ตอบสร้างคลาสใหม่และเทมเพลตไฟล์ของ Android Studio ช่วยให้คุณสร้างคลาสและประเภทใหม่ๆ ต่อไปนี้ได้อย่างรวดเร็ว
- คลาส Java
- คลาสการแจงนับและคลาส Singleton
- ประเภทอินเทอร์เฟซและคำอธิบายประกอบ
หลังจากกรอกข้อมูลในช่องของกล่องโต้ตอบสร้างคลาสใหม่และคลิกตกลงแล้ว Android Studio จะสร้าง.java
ไฟล์ที่มี
โค้ดโครงสร้าง ซึ่งรวมถึงคำสั่งแพ็กเกจ การนำเข้าที่จำเป็น ส่วนหัว
และการประกาศคลาสหรือประเภท จากนั้นคุณจะเพิ่มโค้ดลงในไฟล์นี้ได้
เทมเพลตไฟล์จะระบุวิธีที่ Android Studio สร้างโค้ดโครงร่าง คุณสามารถใช้เทมเพลตไฟล์ที่มาพร้อมกับ Android Studio ตามที่เป็นอยู่ หรือปรับแต่งให้เหมาะกับกระบวนการพัฒนาของคุณก็ได้
การดูและปรับแต่งเทมเพลตไฟล์
Android Studio มีเทมเพลตไฟล์ที่กำหนดวิธีสร้างคลาสและประเภท Java ใหม่ด้วยกล่องโต้ตอบสร้างคลาสใหม่ คุณ
ปรับแต่งเทมเพลตเหล่านี้ได้
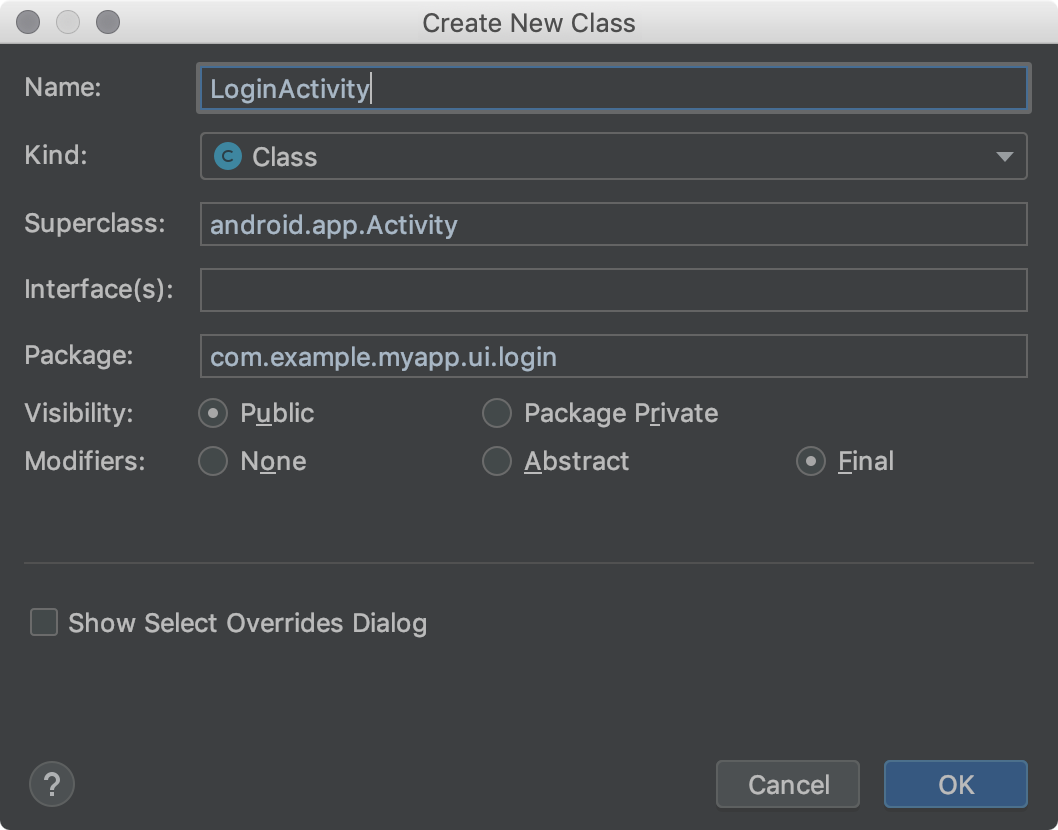
รูปที่ 1 กล่องโต้ตอบสร้างชั้นเรียนใหม่
เทมเพลตไฟล์ Android Studio มีโค้ด Velocity Template Language (VTL)
และตัวแปรที่จัดการตัวเลือกเพิ่มเติมเหล่านี้
กล่องโต้ตอบสร้างคลาสใหม่ใช้เทมเพลตไฟล์ AnnotationType,
Class,
Enum, Interface และ Singleton
หากต้องการดูเทมเพลต ค้นหาการปรับแต่ง และแก้ไขเทมเพลต ให้ทำตามขั้นตอนต่อไปนี้
ทำสิ่งใดสิ่งหนึ่งต่อไปนี้
- สำหรับ Windows หรือ Linux ให้เลือกไฟล์ > การตั้งค่า > เอดิเตอร์ > เทมเพลตไฟล์และโค้ด > ไฟล์
- สำหรับ macOS ให้เลือก Android Studio > ค่ากำหนด > เอดิเตอร์ > เทมเพลตไฟล์และโค้ด > ไฟล์
ในรายการเทมเพลต
ชื่อเทมเพลตภายในจะอยู่ในรูปแบบตัวหนา ชื่อเทมเพลตที่กำหนดเองจะ
แสดงในสีไฮไลต์ เช่น สีน้ำเงิน
ปรับแต่งเทมเพลตไฟล์ตามต้องการ
หากต้องการใช้ช่องในกล่องโต้ตอบสร้างคลาสใหม่ ให้ตรวจสอบว่าการเปลี่ยนแปลงเป็นไปตามโค้ดเทมเพลตไฟล์ Android Studio
ดูข้อมูลเพิ่มเติมเกี่ยวกับเทมเพลตไฟล์ รวมถึง VTL ได้ที่เทมเพลต
ไฟล์และโค้ดและกล่องโต้ตอบเทมเพลต
ไฟล์และโค้ด
การสร้างคลาสหรือประเภท Java
Android Studio ช่วยคุณสร้างคลาส Java ใหม่ การแจงนับและคลาส Singleton รวมถึงประเภทอินเทอร์เฟซและคำอธิบายประกอบตามเทมเพลตไฟล์
หากต้องการสร้างคลาสหรือประเภท Java ใหม่ ให้ทำตามขั้นตอนต่อไปนี้
- ในหน้าต่างโปรเจ็กต์ ให้คลิกขวาที่ไฟล์หรือโฟลเดอร์ Java
แล้วเลือกใหม่ > คลาส Java
หรือจะเลือกไฟล์หรือโฟลเดอร์ Java ในหน้าต่างโปรเจ็กต์
หรือคลิกในไฟล์ Java ในโปรแกรมแก้ไขโค้ดก็ได้ จากนั้นเลือกไฟล์ > ใหม่ > คลาส Java
รายการที่คุณเลือกจะเป็นตัวกำหนดแพ็กเกจเริ่มต้นสำหรับชั้นเรียนหรือประเภทใหม่
- ในกล่องโต้ตอบสร้างชั้นเรียนใหม่ ให้กรอกข้อมูลในช่องต่อไปนี้
- ชื่อ - ชื่อของชั้นเรียนหรือประเภทใหม่ ต้องเป็นไปตาม
ข้อกำหนดชื่อ Java อย่าพิมพ์นามสกุลไฟล์
- ประเภท - เลือกหมวดหมู่ของชั้นเรียนหรือประเภท
- Superclass - ชั้นเรียนที่ชั้นเรียนใหม่ของคุณรับค่ามาจาก
คุณสามารถพิมพ์ชื่อแพ็กเกจและชื่อคลาส หรือพิมพ์เฉพาะชื่อคลาส แล้วดับเบิลคลิกรายการในรายการแบบเลื่อนลงเพื่อเติมข้อความอัตโนมัติ
- อินเทอร์เฟซ - อินเทอร์เฟซอย่างน้อย 1 รายการที่คลาสหรือประเภทใหม่
ใช้ หากมีหลายอินเทอร์เฟซ ให้คั่นด้วยคอมมาแล้วตามด้วย
ช่องว่าง (ไม่บังคับ) คุณสามารถพิมพ์ชื่อแพ็กเกจและอินเทอร์เฟซ หรือพิมพ์เฉพาะชื่ออินเทอร์เฟซ แล้วดับเบิลคลิกรายการในรายการแบบเลื่อนลงเพื่อเติมข้อความอัตโนมัติได้
การเติมข้อความอัตโนมัติจะใช้ได้กับชื่ออินเทอร์เฟซแรกเท่านั้น โปรดทราบว่าแม้ว่า
เครื่องหมายคอมมาและชื่ออินเทอร์เฟซที่ตามมาอาจทำให้เกิดข้อผิดพลาดในเคล็ดลับเครื่องมือ แต่คุณก็
ไม่ต้องสนใจข้อผิดพลาดดังกล่าวเนื่องจากไม่มีผลต่อโค้ดที่สร้างขึ้น
- แพ็กเกจ - แพ็กเกจที่คลาสหรือประเภทจะอยู่ในนั้น
ค่าเริ่มต้นจะปรากฏในช่องโดยอัตโนมัติ หากคุณพิมพ์ชื่อแพ็กเกจ
ในช่อง ระบบจะไฮไลต์ส่วนใดก็ตามของตัวระบุแพ็กเกจที่ไม่มีอยู่เป็นสีแดง
ในกรณีนี้ Android Studio จะสร้างแพ็กเกจหลังจากที่คุณคลิกตกลง ฟิลด์นี้ต้องมีค่า ไม่เช่นนั้นไฟล์ Java
จะไม่มีคำสั่ง
package
และระบบจะไม่วางคลาสหรือประเภท
ไว้ในแพ็กเกจในโปรเจ็กต์
โดยค่าเริ่มต้นจะขึ้นอยู่กับวิธีที่คุณ
เปิดกล่องโต้ตอบสร้างชั้นเรียนใหม่ หากคุณเลือกไฟล์หรือโฟลเดอร์ Java ในหน้าต่างโปรเจ็กต์ก่อน ค่าเริ่มต้นจะเป็น
แพ็กเกจสำหรับรายการที่คุณเลือก หากคุณคลิกในไฟล์ Java ในตัวแก้ไขโค้ดก่อน ค่าเริ่มต้นจะเป็นแพ็กเกจที่มีไฟล์นี้
- ระดับการแชร์ - เลือกว่าจะให้ชั้นเรียนหรือประเภทดังกล่าวแสดงต่อ
ทุกชั้นเรียน หรือเฉพาะชั้นเรียนในแพ็กเกจของชั้นเรียนนั้น
- ตัวแก้ไข - เลือกตัวแก้ไข Abstract หรือ
Final สำหรับ Class หรือไม่เลือกเลย
- แสดงกล่องโต้ตอบเลือกการลบล้าง - สำหรับประเภท
ของคลาส ให้เลือกตัวเลือกนี้เพื่อเปิดเลือก
วิธีการลบล้าง/ใช้กล่องโต้ตอบหลังจากคลิกตกลง ในกล่องโต้ตอบนี้ คุณสามารถเลือกเมธอดที่ต้องการลบล้างหรือ
ใช้ และ Android Studio จะสร้างโค้ดโครงร่างสำหรับเมธอดเหล่านี้
ระบบจะซ่อนช่องที่ไม่มีผลกับประเภท
- คลิกตกลง
Android Studio จะสร้างไฟล์ Java ที่มีโค้ดโครงร่างซึ่งคุณสามารถแก้ไขได้ ซึ่งจะ
เปิดไฟล์ในตัวแก้ไขโค้ด
หมายเหตุ: คุณสร้างคลาส Singleton ได้โดยเลือก
File > New > Singleton หรือ
File > New > Java Class
เทคนิคหลังมีตัวเลือกมากกว่า
เทมเพลตไฟล์ Android Studio
ส่วนนี้แสดงรายการโค้ดเทมเพลตไฟล์ Android Studio ที่เขียนด้วยภาษาสคริปต์ VTL ตามด้วย
คำจำกัดความของตัวแปร ค่าที่คุณระบุในกล่องโต้ตอบสร้างชั้นเรียนใหม่จะกลายเป็นค่าตัวแปรในเทมเพลต
โปรดทราบว่าบรรทัดที่ขึ้นต้นด้วย
#if (${VISIBILITY}
จะขยายไปจนถึงวงเล็บปีกกาเปิด (
{
)
เทมเพลตไฟล์ AnnotationType
#if (${PACKAGE_NAME} != "")package ${PACKAGE_NAME};#end
#if (${IMPORT_BLOCK} != "")${IMPORT_BLOCK}
#end
#parse("File Header.java")
#if (${VISIBILITY} == "PUBLIC")public #end @interface ${NAME} #if (${INTERFACES} != "")extends ${INTERFACES} #end {
}
เทมเพลตไฟล์ชั้นเรียน
#if (${PACKAGE_NAME} != "")package ${PACKAGE_NAME};#end
#if (${IMPORT_BLOCK} != "")${IMPORT_BLOCK}
#end
#parse("File Header.java")
#if (${VISIBILITY} == "PUBLIC")public #end #if (${ABSTRACT} == "TRUE")abstract #end #if (${FINAL} == "TRUE")final #end class ${NAME} #if (${SUPERCLASS} != "")extends ${SUPERCLASS} #end #if (${INTERFACES} != "")implements ${INTERFACES} #end {
}
เทมเพลตไฟล์ Enum
#if (${PACKAGE_NAME} != "")package ${PACKAGE_NAME};#end
#if (${IMPORT_BLOCK} != "")${IMPORT_BLOCK}
#end
#parse("File Header.java")
#if (${VISIBILITY} == "PUBLIC")public #end enum ${NAME} #if (${INTERFACES} != "")implements ${INTERFACES} #end {
}
เทมเพลตไฟล์อินเทอร์เฟซ
#if (${PACKAGE_NAME} != "")package ${PACKAGE_NAME};#end
#if (${IMPORT_BLOCK} != "")${IMPORT_BLOCK}
#end
#parse("File Header.java")
#if (${VISIBILITY} == "PUBLIC")public #end enum ${NAME} #if (${INTERFACES} != "")implements ${INTERFACES} #end {
#end {
}
เทมเพลตไฟล์ Singleton
#if (${PACKAGE_NAME} != "")package ${PACKAGE_NAME};#end
#if (${IMPORT_BLOCK} != "")${IMPORT_BLOCK}
#end
#parse("File Header.java")
#if (${VISIBILITY} == "PUBLIC")public #end class ${NAME} #if (${SUPERCLASS} != "")extends ${SUPERCLASS} #end #if (${INTERFACES} != "")implements ${INTERFACES} #end {
private static final ${NAME} ourInstance = new ${NAME}();
#if (${VISIBILITY} == "PUBLIC")public #end static ${NAME} getInstance() {
return ourInstance;
}
private ${NAME}() {
}
}
ตัวแปรเทมเพลตไฟล์
Android Studio จะแทนที่ตัวแปรเทมเพลตไฟล์ด้วยค่าในไฟล์ Java ที่สร้างขึ้น
คุณป้อนค่าในกล่องโต้ตอบสร้างชั้นเรียนใหม่
เทมเพลตมีตัวแปรต่อไปนี้ที่คุณใช้ได้
IMPORT_BLOCK
- รายการคำสั่ง Java
import
ที่คั่นด้วยบรรทัดใหม่ซึ่งจำเป็นต่อการรองรับคลาสแม่หรือ
อินเทอร์เฟซ หรือสตริงว่าง (""
) เช่น หากคุณใช้เฉพาะอินเทอร์เฟซ Runnable
และไม่ได้ขยายอะไร ตัวแปรนี้จะเป็น "import java.lang.Runnable;\n"
หากคุณใช้
Runnable
อินเทอร์เฟซและขยายคลาส Activity
ระบบจะ
"import android.app.Activity;\nimportjava.lang.Runnable;\n"
VISIBILITY
- ไม่ว่าชั้นเรียนจะมีสิทธิ์เข้าถึงแบบสาธารณะหรือไม่ก็ตาม
โดยมีค่าเป็น PUBLIC
หรือ PACKAGE_PRIVATE
ได้
SUPERCLASS
- ชื่อชั้นเรียนเดียวหรือว่างเปล่า หากมี จะมีextends ${SUPERCLASS}
ข้อความหลังชื่อชั้นเรียนใหม่
INTERFACES
- รายการอินเทอร์เฟซที่คั่นด้วยคอมมา หรือว่าง หากมี
อยู่ จะมีข้อความimplements ${INTERFACES}
หลังจาก
คลาสหลัก หรือหลังจากชื่อคลาสหากไม่มีคลาสหลัก สําหรับอินเทอร์เฟซและ
ประเภทคําอธิบายประกอบ อินเทอร์เฟซจะมีคีย์เวิร์ด extends
ABSTRACT
- ระบุว่าคลาสควรเป็นคลาส Abstract หรือไม่ โดยมีค่าเป็น TRUE
หรือ FALSE
ได้
FINAL
- ควรรวมชั้นเรียนหรือไม่ โดยมีค่าเป็น TRUE
หรือ FALSE
ได้
ตัวอย่างเนื้อหาและโค้ดในหน้าเว็บนี้ขึ้นอยู่กับใบอนุญาตที่อธิบายไว้ในใบอนุญาตการใช้เนื้อหา Java และ OpenJDK เป็นเครื่องหมายการค้าหรือเครื่องหมายการค้าจดทะเบียนของ Oracle และ/หรือบริษัทในเครือ
อัปเดตล่าสุด 2025-08-27 UTC
[[["เข้าใจง่าย","easyToUnderstand","thumb-up"],["แก้ปัญหาของฉันได้","solvedMyProblem","thumb-up"],["อื่นๆ","otherUp","thumb-up"]],[["ไม่มีข้อมูลที่ฉันต้องการ","missingTheInformationINeed","thumb-down"],["ซับซ้อนเกินไป/มีหลายขั้นตอนมากเกินไป","tooComplicatedTooManySteps","thumb-down"],["ล้าสมัย","outOfDate","thumb-down"],["ปัญหาเกี่ยวกับการแปล","translationIssue","thumb-down"],["ตัวอย่าง/ปัญหาเกี่ยวกับโค้ด","samplesCodeIssue","thumb-down"],["อื่นๆ","otherDown","thumb-down"]],["อัปเดตล่าสุด 2025-08-27 UTC"],[],[],null,["With the **Create New Class** dialog and file templates, Android\nStudio helps you to quickly create the following new classes and types:\n\n- Java classes\n- Enumeration and singleton classes\n- Interface and annotation types\n\n\nAfter you fill in the **Create New Class** dialog fields and click\n**OK** , Android Studio creates a `.java` file containing\nskeleton code, including a package statement, any necessary imports, a header,\nand a class or type declaration. Next, you can add your code to this file.\n\n\nFile templates specify how Android Studio generates the skeleton code. You can\nuse the file templates provided with Android Studio as is, or customize them to\nsuit your development process.\n\nViewing and customizing file templates\n\n\nAndroid Studio provides file templates that determine how new Java classes and\ntypes are created with the **Create New Class** dialog. You can\ncustomize these templates.\n\n\n**Figure 1** . The **Create New Class**\ndialog.\n\nThe Android Studio file templates include Velocity Template Language ([VTL](https://velocity.apache.org/engine/)) code\nand variables that handle these additional options.\nThe **Create New Class** dialog uses the **AnnotationType** ,\n**Class** ,\n**Enum** , **Interface** , and **Singleton**\nfile templates.\n\n\nTo view the templates, find customizations, and modify the templates, follow\nthese steps:\n\n1. Do one of the following:\n\n - For Windows or Linux, select **File \\\u003e Settings \\\u003e Editor \\\u003e File and Code\n Templates \\\u003e Files**.\n - For macOS, select **Android Studio \\\u003e Preferences \\\u003e Editor \\\u003e File and Code\n Templates \\\u003e Files**.\n\n In the [template list](https://www.jetbrains.com/help/idea/2025.1/settings-file-and-code-templates.html),\n internal template names are in bold font. Customized template names are\n displayed in a highlight color, such as blue.\n2. Customize the file templates as needed.\n\n If you want to use the **Create New Class** dialog fields, make sure your\n changes comply with the [Android Studio file template code](#templates).\n\n\nFor more information about file templates, including VTL, see [File\nand Code Templates](https://www.jetbrains.com/help/idea/2025.1/file-and-code-templates.html) and [File\nand Code Templates Dialog](https://www.jetbrains.com/help/idea/2025.1/settings-file-and-code-templates.html).\n\nCreating a Java class or type\n\n\nAndroid Studio helps you to create new Java classes; enumeration and singleton\nclasses; and interface and annotation types based on [file templates](#templates).\n\n\nTo create a new Java class or type, follow these steps:\n\n1. In the **Project** window, right-click a Java file or folder, and select **New** \\\u003e **Java Class**.\n2. Alternatively, select a Java file or folder in the **Project** window, or click in a Java file in the Code Editor. Then select **File** \\\u003e **New** \\\u003e **Java Class**.\n3. The item you select determines the default package for the new class or type.\n4. In the **Create New Class** dialog, fill in the fields:\n - **Name** - The name of the new class or type. It must comply with Java name requirements. Don't type a file name extension.\n - **Kind** - Select the category of class or type.\n - **Superclass** - The class that your new class inherits from. You can type the package and class name, or just the class name and then double-click an item in the drop-down list to autocomplete it.\n - **Interface(s)** - One or more interfaces that the new class or type implements. Multiple interfaces should be separated by a comma followed by an optional space. You can type the package and interface name, or just the interface name and then double-click an item in the drop-down list to autocomplete it.\n - Autocomplete works for the first interface name only. Note that while the comma and the following interface name can bring up a tooltip error, you can ignore the error because it doesn't affect the generated code.\n - **Package** - The package that the class or type will reside in. The default automatically appears in the field. If you type a package name in the field, any portions of the package identifier that don't exist are highlighted red; in this case, Android Studio creates the package after you click **OK** . This field must contain a value; otherwise, the Java file won't contain a `package` statement, and the class or type won't be placed within a package in the project.\n - The default depends on how you launched the **Create New Class** dialog. If you first selected a Java file or folder in the **Project** window, the default is the package for the item you selected. If you first clicked in a Java file in the Code Editor, the default is the package that contains this file.\n - **Visibility** - Select whether the class or type is visible to all classes, or just to those in its own package.\n - **Modifiers** - Select the **Abstract** or **Final** modifier for a **Class**, or neither.\n - **Show Select Overrides Dialog** - For a **Kind** of **Class** , check this option to open the [Select\n Methods to Override/Implement dialog](https://www.jetbrains.com/help/idea/2025.1/overriding-methods-of-a-superclass.html) after you click **OK**. In this dialog, you can select methods that you would like to override or implement, and Android Studio will generate skeleton code for these methods.\n5. Any fields that don't apply to the **Kind** are hidden.\n6. Click **OK**.\n7. Android Studio creates a Java file with skeleton code that you can modify. It opens the file in the Code Editor.\n\n\n**Note:** You can create a singleton class by selecting\n**File** \\\u003e **New** \\\u003e **Singleton** or\n**File** \\\u003e **New** \\\u003e **Java Class**; the\nlatter technique offers more options.\n\n\u003cbr /\u003e\n\nAndroid Studio file templates\n\n\nThis section lists the Android Studio file template code written in the [VTL](https://velocity.apache.org/engine/) scripting language, followed\nby definitions of the variables. The values that you provide in the\n**Create New Class** dialog become the variable values in the template.\nNote that the lines that begin with\n`#if (${VISIBILITY}` extend all the way to the open brace (\n`{` ).\n\nAnnotationType file template \n\n```\n#if (${PACKAGE_NAME} != \"\")package ${PACKAGE_NAME};#end\n\n#if (${IMPORT_BLOCK} != \"\")${IMPORT_BLOCK}\n#end\n#parse(\"File Header.java\")\n\n#if (${VISIBILITY} == \"PUBLIC\")public #end @interface ${NAME} #if (${INTERFACES} != \"\")extends ${INTERFACES} #end {\n}\n```\n\nClass file template \n\n```\n#if (${PACKAGE_NAME} != \"\")package ${PACKAGE_NAME};#end\n\n#if (${IMPORT_BLOCK} != \"\")${IMPORT_BLOCK}\n#end\n#parse(\"File Header.java\")\n\n#if (${VISIBILITY} == \"PUBLIC\")public #end #if (${ABSTRACT} == \"TRUE\")abstract #end #if (${FINAL} == \"TRUE\")final #end class ${NAME} #if (${SUPERCLASS} != \"\")extends ${SUPERCLASS} #end #if (${INTERFACES} != \"\")implements ${INTERFACES} #end {\n}\n```\n\nEnum file template \n\n```\n#if (${PACKAGE_NAME} != \"\")package ${PACKAGE_NAME};#end\n\n#if (${IMPORT_BLOCK} != \"\")${IMPORT_BLOCK}\n#end\n#parse(\"File Header.java\")\n\n#if (${VISIBILITY} == \"PUBLIC\")public #end enum ${NAME} #if (${INTERFACES} != \"\")implements ${INTERFACES} #end {\n}\n```\n\nInterface file template \n\n```\n#if (${PACKAGE_NAME} != \"\")package ${PACKAGE_NAME};#end\n\n#if (${IMPORT_BLOCK} != \"\")${IMPORT_BLOCK}\n#end\n#parse(\"File Header.java\")\n\n#if (${VISIBILITY} == \"PUBLIC\")public #end enum ${NAME} #if (${INTERFACES} != \"\")implements ${INTERFACES} #end {\n#end {\n}\n```\n\nSingleton file template \n\n```\n#if (${PACKAGE_NAME} != \"\")package ${PACKAGE_NAME};#end\n\n#if (${IMPORT_BLOCK} != \"\")${IMPORT_BLOCK}\n#end\n#parse(\"File Header.java\")\n\n#if (${VISIBILITY} == \"PUBLIC\")public #end class ${NAME} #if (${SUPERCLASS} != \"\")extends ${SUPERCLASS} #end #if (${INTERFACES} != \"\")implements ${INTERFACES} #end {\n private static final ${NAME} ourInstance = new ${NAME}();\n\n #if (${VISIBILITY} == \"PUBLIC\")public #end static ${NAME} getInstance() {\n return ourInstance;\n }\n\n private ${NAME}() {\n }\n}\n```\n\nFile template variables\n\n\u003cbr /\u003e\n\n\nAndroid Studio replaces file template variables with values in the generated\nJava file. You enter the values in the **Create New Class** dialog.\nThe template has the following variables that you can use:\n\n- `IMPORT_BLOCK` - A newline-delimited list of Java `import` statements necessary to support any superclass or interfaces, or an empty string (`\"\"`). For example, If you only implement the `Runnable` interface and extend nothing, this variable will be `\"import java.lang.Runnable;\\n\"`. If you implement the `Runnable` interface and extend the `Activity` class, it will be `\"import android.app.Activity;\\nimportjava.lang.Runnable;\\n\"`.\n- `VISIBILITY` - Whether the class will have public access or not. It can have a value of `PUBLIC` or `PACKAGE_PRIVATE`.\n- `SUPERCLASS` - A single class name, or empty. If present, there will be an `extends ${SUPERCLASS}` clause after the new class name.\n- `INTERFACES` - A comma-separated list of interfaces, or empty. If present, there will be an `implements ${INTERFACES}` clause after the superclass, or after the class name if there's no superclass. For interfaces and annotation types, the interfaces have the `extends` keyword.\n- `ABSTRACT` - Whether the class should be abstract or not. It can have a value of `TRUE` or `FALSE`.\n- `FINAL` - Whether the class should be final or not. It can have a value of `TRUE` or `FALSE`.\n\n\u003cbr /\u003e"]]