Mantenha tudo organizado com as coleções
Salve e categorize o conteúdo com base nas suas preferências.
Para compilar e depurar código nativo para um app, serão necessários os seguintes componentes:
Kit de desenvolvimento nativo do Android (NDK, na sigla em inglês): um conjunto de ferramentas que permitem
usar códigos C e C++ com o Android.
CMake: uma ferramenta de build externa que funciona com o Gradle para criar bibliotecas
nativas. Esse componente não é necessário se você pretende usar apenas o ndk-build.
LLDB: o depurador usado pelo Android Studio para depurar códigos nativos. Por padrão, o LLDB
será instalado com o Android Studio.
Esta página descreve como instalar esses componentes automaticamente ou usando
o Android Studio ou a ferramenta sdkmanager para fazer o download e a instalação manualmente.
Instalar o NDK e o CMake automaticamente
O Plug-in do Android para Gradle 4.2.0 e versões mais recentes poderão instalar automaticamente o NDK e o CMake necessários
na primeira vez que você criar o projeto se as licenças deles tiverem sido aceitas antes da instalação.
Se você já leu e concorda com os termos de licença, é possível pré-aceitar
as licenças em scripts com o comando a seguir:
Quando você instala o NDK, o Android Studio seleciona o NDK mais recente disponível. Para
a maioria dos projetos, a instalação dessa versão padrão do NDK é o suficiente.
No entanto, caso seu projeto precise de uma ou mais versões específicas do NDK, você poderá
fazer o download e a configuração de versões específicas. Isso ajuda
a garantir a criação de builds reproduzíveis em projetos que dependem de uma versão
específica do NDK. O Android Studio instala todas as versões do NDK no diretório
android-sdk/ndk/.
Para instalar o CMake e o NDK padrão no Android Studio, siga estas etapas:
Com um projeto aberto, clique em Tools > SDK Manager.
Clique na guia SDK Tools.
Marque as caixas de seleção NDK (Side by side) e CMake.
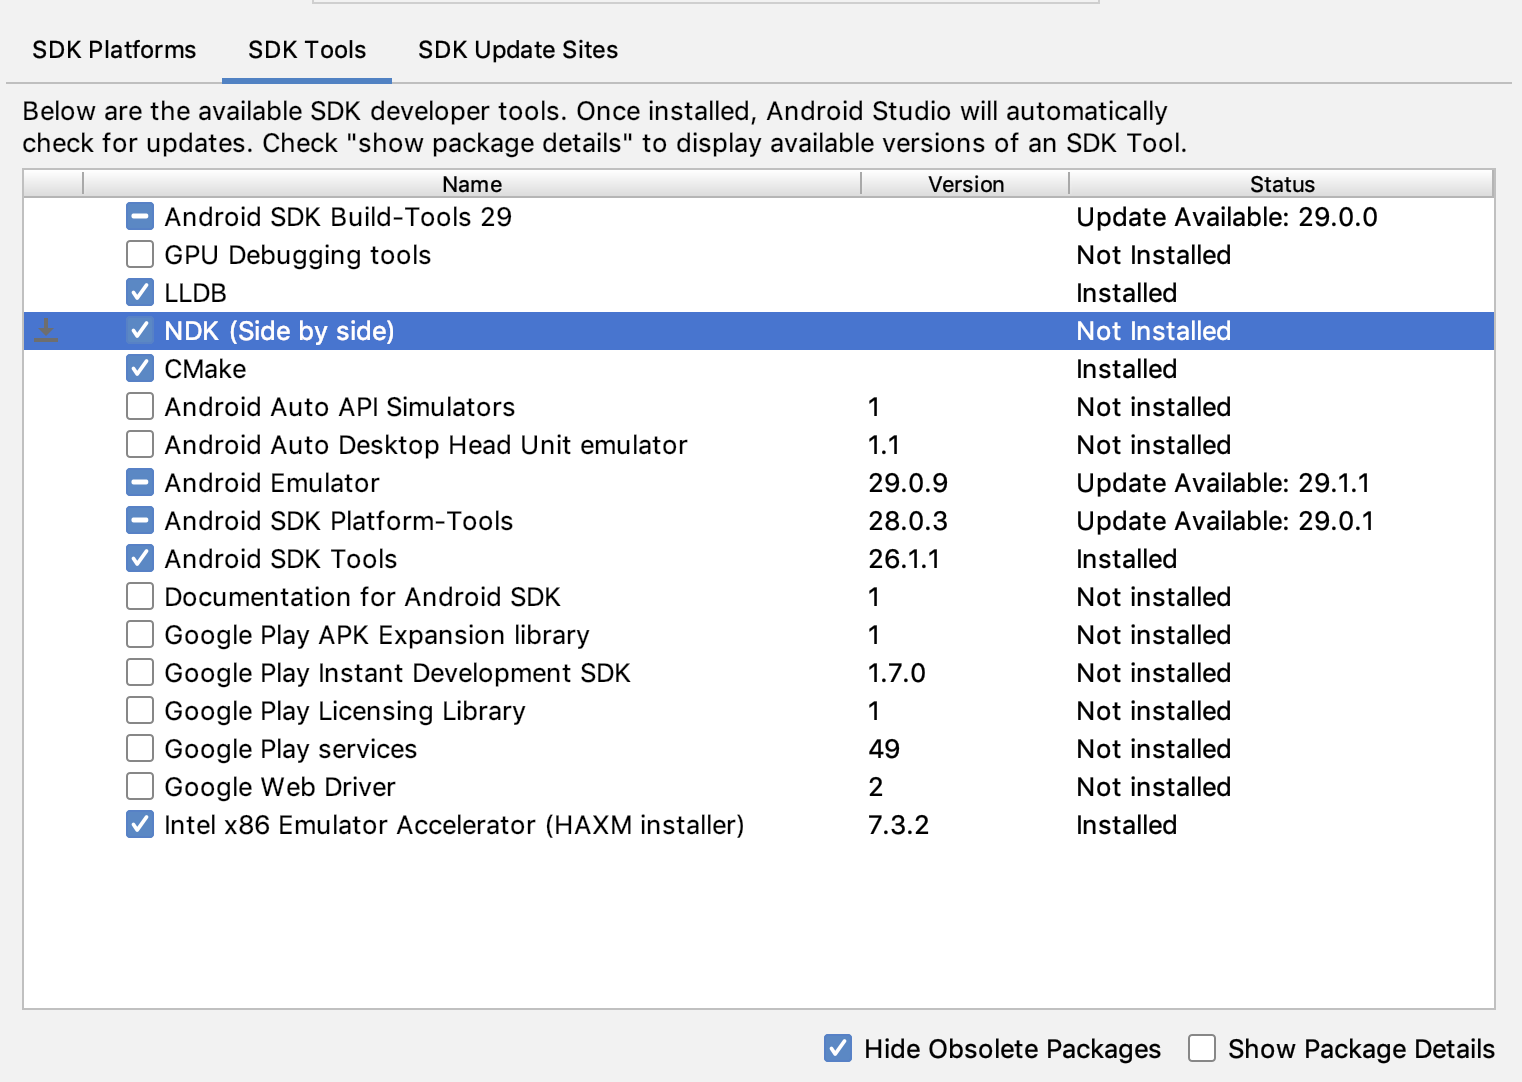
Figura 1. A janela SDK Tools mostrando a opção
NDK (Side by side).
Clique em OK.
Uma caixa de diálogo informará quanto espaço o pacote NDK consome no disco.
Clique em OK.
Quando a instalação estiver concluída, clique em Finish.
Seu projeto vai sincronizar automaticamente o arquivo do build e criar um novo build.
Resolva os erros que ocorrerem.
Configurar uma versão específica do CMake
O SDK Manager inclui a versão ramificada 3.6.0 do
CMake, além da versão 3.10.2. Os projetos que não definem uma
versão específica do CMake são criados com o CMake 3.10.2. Para
escolher a versão do CMake, adicione o seguinte ao arquivo build.gradle do seu módulo:
Se você quiser usar uma versão do CMake que não esteja incluída no
SDK Manager, siga estas etapas:
Faça o download e instale o CMake
no site oficial do CMake.
Especifique a versão do CMake que você quer que o Gradle use no arquivo
build.gradle do módulo.
Adicione o caminho para a instalação do CMake na variável de ambiente
PATH ou inclua-o no arquivo local.properties do projeto, conforme
mostrado abaixo. Se o Gradle não encontrar a versão do CMake especificada no
arquivo build.gradle, você vai receber um erro de build.
# If you set this property, Gradle no longer uses PATH to find CMake.
cmake.dir = "path-to-cmake"</pre>
Se você ainda não tem o sistema de build Ninja instalado na sua
estação de trabalho, acesse o site oficial do Ninja (em inglês),
faça o download da versão mais recente disponível para seu sistema operacional e instale-a.
Não se esqueça de adicionar o caminho para a instalação do Ninja na sua variável de ambiente
PATH.
Instalar uma versão específica do NDK
Para instalar uma versão específica do NDK, siga estas etapas:
Com um projeto aberto, clique em Tools > SDK Manager.
Clique na guia SDK Tools.
Marque a caixa de seleção Show Package Details.
Marque a caixa de seleção NDK (Side by side) e as caixas de seleção abaixo que
corresponderem às versões do NDK que você quer instalar. O Android Studio instala
todas as versões do NDK no diretório
android-sdk/ndk/.
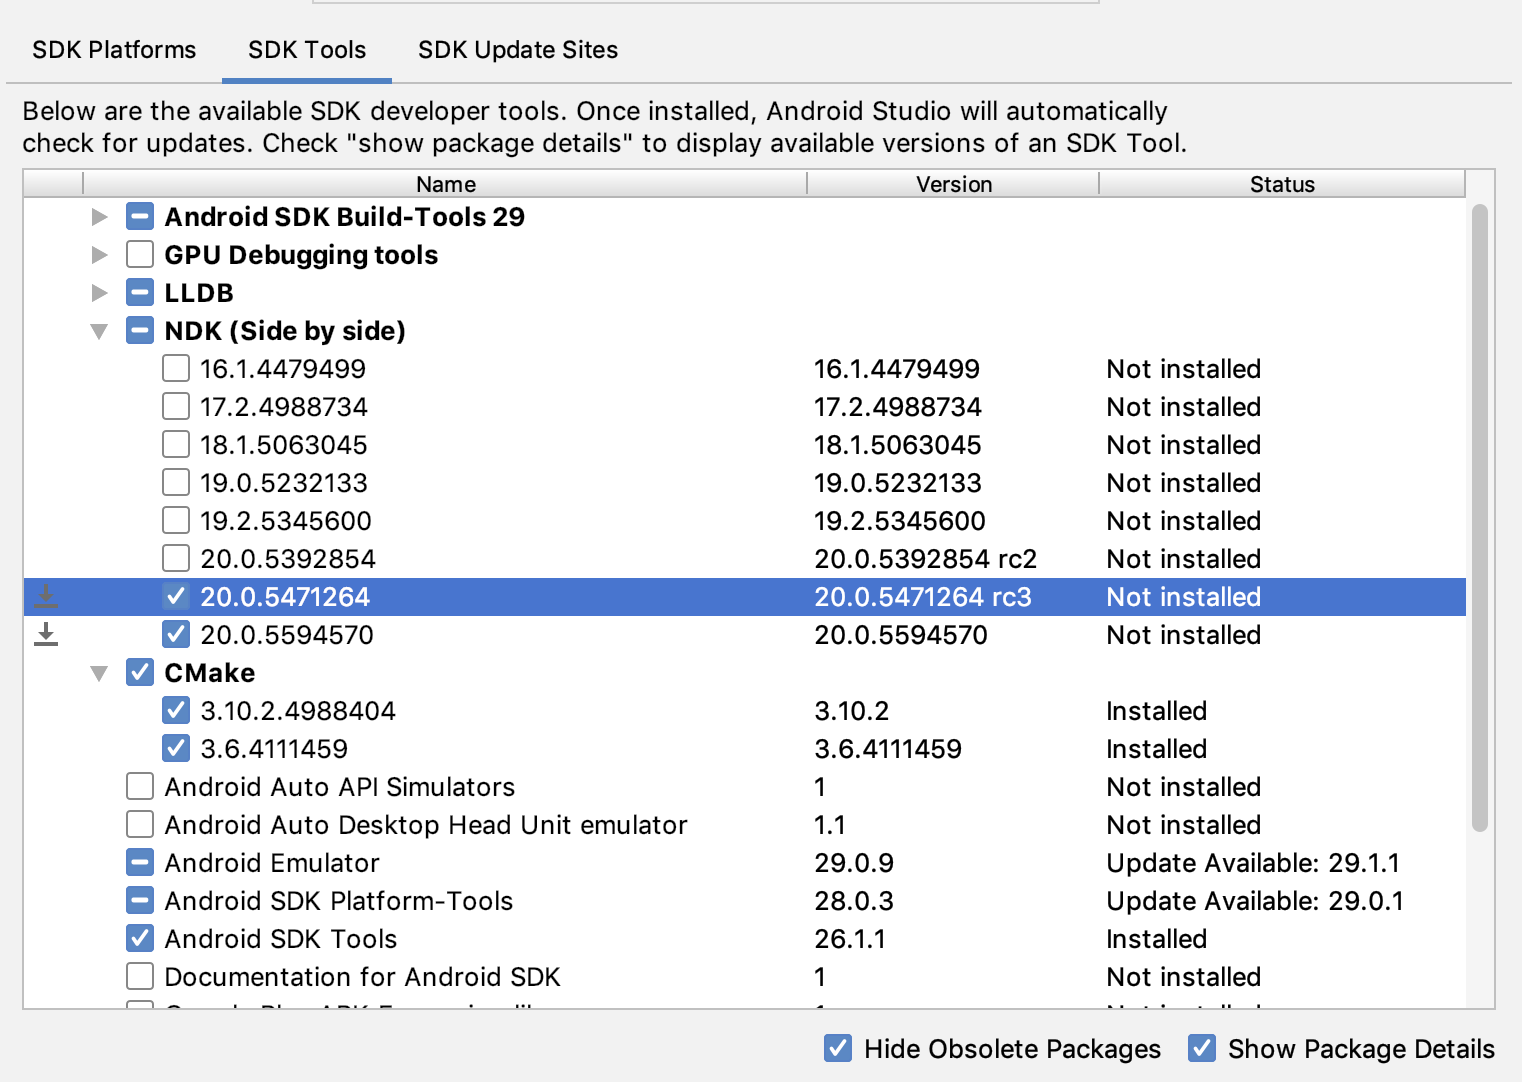
Figura 2. A janela SDK Tools mostrando as opções de
NDK (Side by side).
Clique em OK.
Uma caixa de diálogo informará quanto espaço os pacotes NDK consomem no disco.
Clique em OK.
Quando a instalação estiver concluída, clique em Finish.
Seu projeto vai sincronizar automaticamente o arquivo do build e criar um novo build.
Resolva os erros que ocorrerem.
Configure cada módulo com a versão do NDK
que você quer que o projeto use. Se estiver usando o Android Studio 3.6 ou versões mais recentes, o Plug-in do Android Gradle vai escolher uma versão compatível caso ela não seja especificada.
Configurar versões específicas do NDK no projeto
Se uma das seguintes condições
for verdadeira, talvez seja necessário configurar a versão do NDK no seu projeto:
Seu projeto é herdado, e você precisa usar versões específicas do NDK
e do Plug-in do Android para Gradle (AGP, na sigla em inglês). Para ver mais informações, consulte
Configurar o NDK para o Plug-in do Android para Gradle.
Você tem várias versões do NDK instaladas e quer usar uma
específica. Nesse caso, especifique a versão usando a propriedade android.ndkVersion
no arquivo build.gradle do módulo, conforme mostrado no exemplo
de código a seguir.
Antes do lançamento, cada versão do AGP é totalmente testada com a versão estável mais recente do NDK
naquele momento. Essa versão do NDK é usada para criar seus projetos se você
não especificar uma versão do NDK no arquivo build.gradle. As versões padrão do NDK
para diferentes versões do AGP estão documentadas nas
notas da versão do AGP e
notas da versão anteriores do AGP.
O conteúdo e os exemplos de código nesta página estão sujeitos às licenças descritas na Licença de conteúdo. Java e OpenJDK são marcas registradas da Oracle e/ou suas afiliadas.
Última atualização 2025-08-21 UTC.
[[["Fácil de entender","easyToUnderstand","thumb-up"],["Meu problema foi resolvido","solvedMyProblem","thumb-up"],["Outro","otherUp","thumb-up"]],[["Não contém as informações de que eu preciso","missingTheInformationINeed","thumb-down"],["Muito complicado / etapas demais","tooComplicatedTooManySteps","thumb-down"],["Desatualizado","outOfDate","thumb-down"],["Problema na tradução","translationIssue","thumb-down"],["Problema com as amostras / o código","samplesCodeIssue","thumb-down"],["Outro","otherDown","thumb-down"]],["Última atualização 2025-08-21 UTC."],[],[],null,["To compile and debug native code for your app, you need the following components:\n\n- The Android Native Development Kit (NDK): a set of tools that allows you to use C and C++ code with Android.\n- CMake: an external build tool that works alongside Gradle to build your native library. You do not need this component if you only plan to use ndk-build.\n- LLDB: the debugger Android Studio uses to debug native code. By default, LLDB will be installed alongside Android Studio.\n\nThis page describes how to install these components automatically, or by using\nAndroid Studio or the `sdkmanager` tool to download and install them manually.\n\nInstall NDK and CMake automatically\n\nAndroid Gradle Plugin 4.2.0+ can automatically install the required NDK and CMake\nthe first time you build your project if their licenses have been accepted in advance.\nIf you've already read and agree to the license terms, then you can pre-accept\nthe licenses in scripts with the following command: \n\n yes | ${sdk}/cmdline-tools/latest/bin/sdkmanager --licenses\n\nInstall the NDK and CMake\n\nWhen you install the NDK, Android Studio selects the latest available NDK. For\nmost projects, installing this default version of the NDK is sufficient.\nIf your project needs one or more specific versions of the NDK, though, you can\n[download and configure specific versions](#specific-version). Doing so helps\nyou ensure reproducible builds across projects that each depend on a specific\nversion of the NDK. Android Studio installs all versions of the NDK in the\n\u003cvar translate=\"no\"\u003eandroid-sdk\u003c/var\u003e`/ndk/` directory.\n\nTo install CMake and the default NDK in Android Studio, do the following:\n\n1. With a project open, click **Tools \\\u003e SDK Manager**.\n\n2. Click the **SDK Tools** tab.\n\n3. Select the **NDK (Side by side)** and **CMake** checkboxes.\n\n\n **Figure 1.** The **SDK Tools** window showing the **NDK (Side by side)**\n option\n | **Note:** If you have an NDK installed in the `ndk-bundle` folder, it appears in the list with the label **NDK** . If you are using Android Gradle plugin 3.5.0 or later, you can select this checkbox or clear it. Clearing the checkbox uninstalls the NDK, freeing up disk space, and causes the checkbox to disappear from the list. If you uninstall the legacy NDK, remove the `ndk.dir` value, which is now deprecated, from your projects' `local.properties` files.\n4. Click **OK**.\n\n A dialog box tells you how much space the NDK package consumes on disk.\n5. Click **OK**.\n\n6. When the installation is complete, click **Finish**.\n\n7. Your project automatically syncs the build file and performs a build.\n Resolve any errors that occur.\n\nConfigure a specific version of CMake\n\nThe SDK Manager includes the 3.6.0 forked version of\nCMake and version 3.10.2. Projects that don't set a\nspecific CMake version are built with CMake 3.10.2. To\nset the CMake version, add the following to your module's `build.gradle` file: \n\nGroovy \n\n```groovy\nandroid {\n ...\n externalNativeBuild {\n cmake {\n ...\n version \"\u003cvar translate=\"no\"\u003ecmake-version\u003c/var\u003e\"\n }\n }\n}\n```\n\nKotlin \n\n```kotlin\nandroid {\n ...\n externalNativeBuild {\n cmake {\n ...\n version = \"\u003cvar translate=\"no\"\u003ecmake-version\u003c/var\u003e\"\n }\n }\n}\n```\n\nIf you want to use a CMake version that is not included by the\nSDK Manager, follow these steps:\n\n1. Download and install [CMake](https://cmake.org/download/) from the official CMake website.\n2. Specify the CMake version you want Gradle to use in your module's `build.gradle` file.\n3. Either add the path to the CMake installation to your `PATH` environment\n variable or include it in your project's `local.properties` file, as\n shown. If Gradle is unable to find the version of CMake you specified in\n your `build.gradle` file, you get a build error.\n\n # If you set this property, Gradle no longer uses PATH to find CMake.\n cmake.dir = \"\u003cvar translate=\"no\"\u003epath-to-cmake\u003c/var\u003e\"\u003c/pre\u003e\n\n4. If you don't already have the Ninja build system installed on your\n workstation, go to the [official Ninja website](https://ninja-build.org/),\n and download and install the latest version of Ninja available for your OS.\n Make sure to also add the path to the Ninja installation to your\n `PATH` environment variable.\n\nInstall a specific version of the NDK\n\nTo install a specific version of the NDK, do the following:\n\n1. With a project open, click **Tools \\\u003e SDK Manager**.\n\n2. Click the **SDK Tools** tab.\n\n3. Select the **Show Package Details** checkbox.\n\n4. Select the **NDK (Side by side)** checkbox and the checkboxes below it that\n correspond to the NDK versions you want to install. Android Studio installs\n all versions of the NDK in the \u003cvar translate=\"no\"\u003eandroid-sdk\u003c/var\u003e`/ndk/`\n directory.\n\n | **Note:** Preview releases (for example, canary and beta) of the NDK do not show up in this list unless you [change the update channel](/studio/preview/install-preview#change_your_update_channel) for Android Studio. You can [install an Android Studio preview](/studio/preview/install-preview) side-by-side with the stable version.\n\n\n **Figure 2.** The **SDK Tools** window showing the **NDK (Side by side)**\n options\n | **Note:** If you have an NDK installed in the `ndk-bundle` folder, it appears in the list with the label **NDK** . If you are using Gradle version 3.5 or later, you can select this checkbox or clear it. Clearing it uninstalls the NDK installed, freeing up disk space, and cause the checkbox to disappear from the list. If you uninstall the legacy NDK, remove the `ndk.dir` value, which is now deprecated, from your projects' `local.properties` files.\n5. Click **OK**.\n\n A dialog box tells you how much space the NDK package(s) consumes.\n6. Click **OK**.\n\n7. When the installation is complete, click **Finish**.\n\n8. Your project automatically syncs the build file and performs a build.\n Resolve any errors that occur.\n\n9. [Configure each module](#apply-specific-version) with the version of the NDK\n you want it to use. When using Android Studio 3.6 or higher, if you do not\n specify the version, the Android Gradle plugin chooses a version that it is\n known to be compatible with.\n\nConfigure specific versions of the NDK in your project\n\nYou may need to configure the version of the NDK in your project if one of the\nfollowing is true:\n\n- Your project is inherited and you need to use specific versions of the NDK and the Android Gradle plugin (AGP). For more information, see [Configure the NDK for the Android Gradle plugin](/studio/projects/configure-agp-ndk).\n- You have multiple versions of the NDK installed and you want to use a specific\n one. In this case, specify the version using the `android.ndkVersion`\n property in the module's `build.gradle` file, as shown in the following code\n sample.\n\n Groovy \n\n ```groovy\n android {\n ndkVersion \"\u003cvar translate=\"no\"\u003emajor\u003c/var\u003e.\u003cvar translate=\"no\"\u003eminor\u003c/var\u003e.\u003cvar translate=\"no\"\u003ebuild\u003c/var\u003e\" // e.g., ndkVersion \"21.3.6528147\"\n }\n ```\n\n Kotlin \n\n ```kotlin\n android {\n ndkVersion = \"\u003cvar translate=\"no\"\u003emajor\u003c/var\u003e.\u003cvar translate=\"no\"\u003eminor\u003c/var\u003e.\u003cvar translate=\"no\"\u003ebuild\u003c/var\u003e\" // e.g., ndkVersion \"21.3.6528147\"\n }\n ```\n\nDefault NDK version per AGP version\n\nBefore release, each AGP version is thoroughly tested with the latest stable NDK\nrelease at that time. This NDK version is used to build your projects if you\ndon't specify an NDK version in the `build.gradle` file. The default NDK version\nfor different versions of AGP are documented in the\n[AGP release notes](/build/releases/gradle-plugin#compatibility) and\n[AGP past release notes](/build/releases/past-releases)."]]