
レスポンシブ UI とナビゲーション
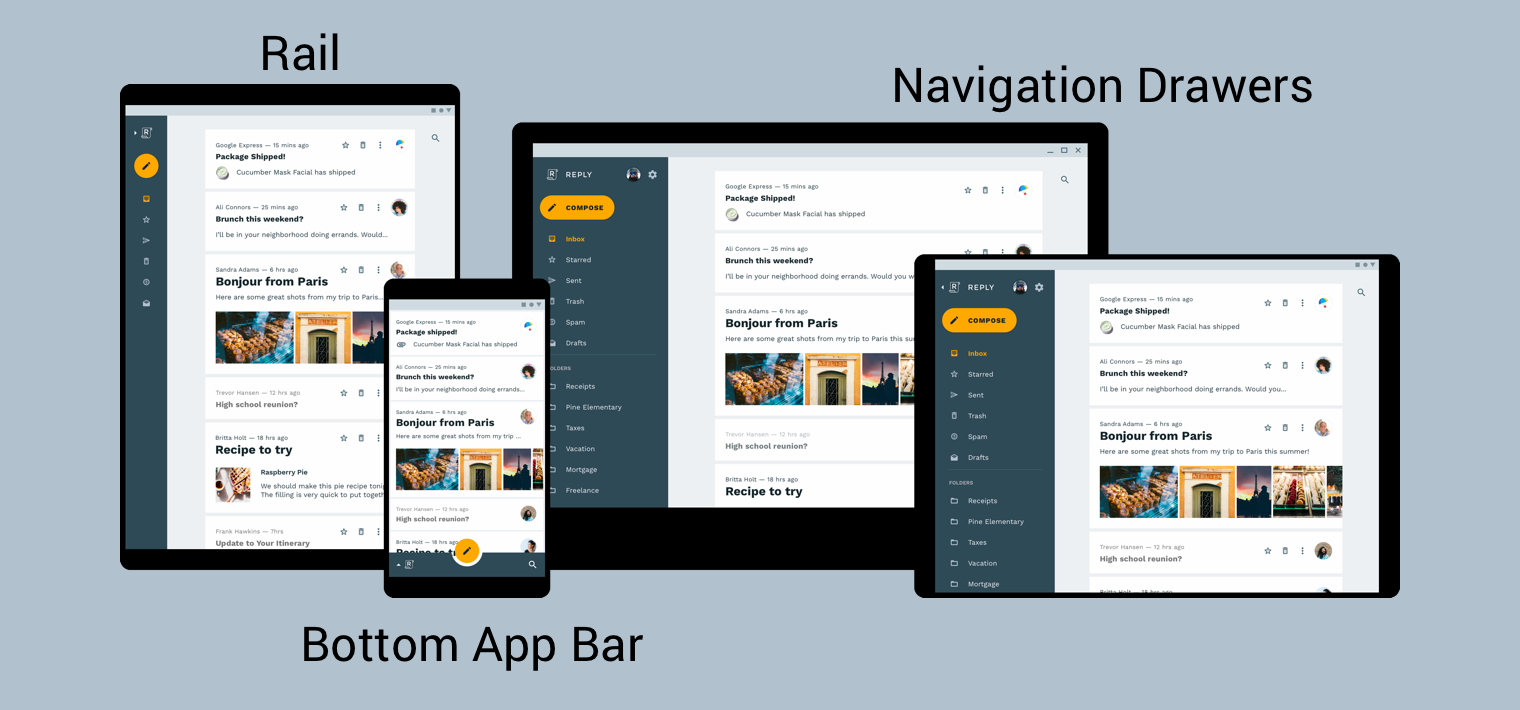
できる限り最良のナビゲーション エクスペリエンスを実現するには、デバイスの幅、高さ、最小幅に合わせてナビゲーション UI を提供する必要があります。そのため、ボトム アプリバー、常時表示または折りたたみ可能なナビゲーション ドロワー、レールの使用をおすすめします。または、利用可能な画面スペースやアプリ独自のスタイルに応じてまったく新しい要素を使用することもできます。
マテリアル デザインのプロダクト アーキテクチャのガイドでは、レスポンシブ UI(環境の変化に動的に適応する UI)をビルドするための追加のコンテキストと考慮事項について説明しています。環境の変化の例としては、幅、高さ、向き、ユーザー言語の設定の調整が挙げられます。これらの環境プロパティは、デバイスの設定と総称されます。
ランタイムにこれらのプロパティのいずれかが変更されると、Android OS はアプリのアクティビティとフラグメントを破棄して再作成することで対応します。そのため、Android でレスポンシブ UI をサポートするには、必要に応じてリソース構成修飾子を使用することと、ハードコードされたレイアウト サイズを使用しないことが最善の方法です。
レスポンシブ UI でグローバル ナビゲーションを実装する
レスポンシブ UI の一部としてグローバル ナビゲーションを実装するには、まず、ナビゲーション グラフをホストしているアクティビティを実装します。ハンズオンの例については、ナビゲーション コードラボをご覧ください。図 2 に示すように、コードラボは NavigationView を使用してナビゲーション メニューを表示します。960 dp 以上の幅でレンダリングするデバイスで実行する場合、この NavigationView は常に画面上に表示されます。
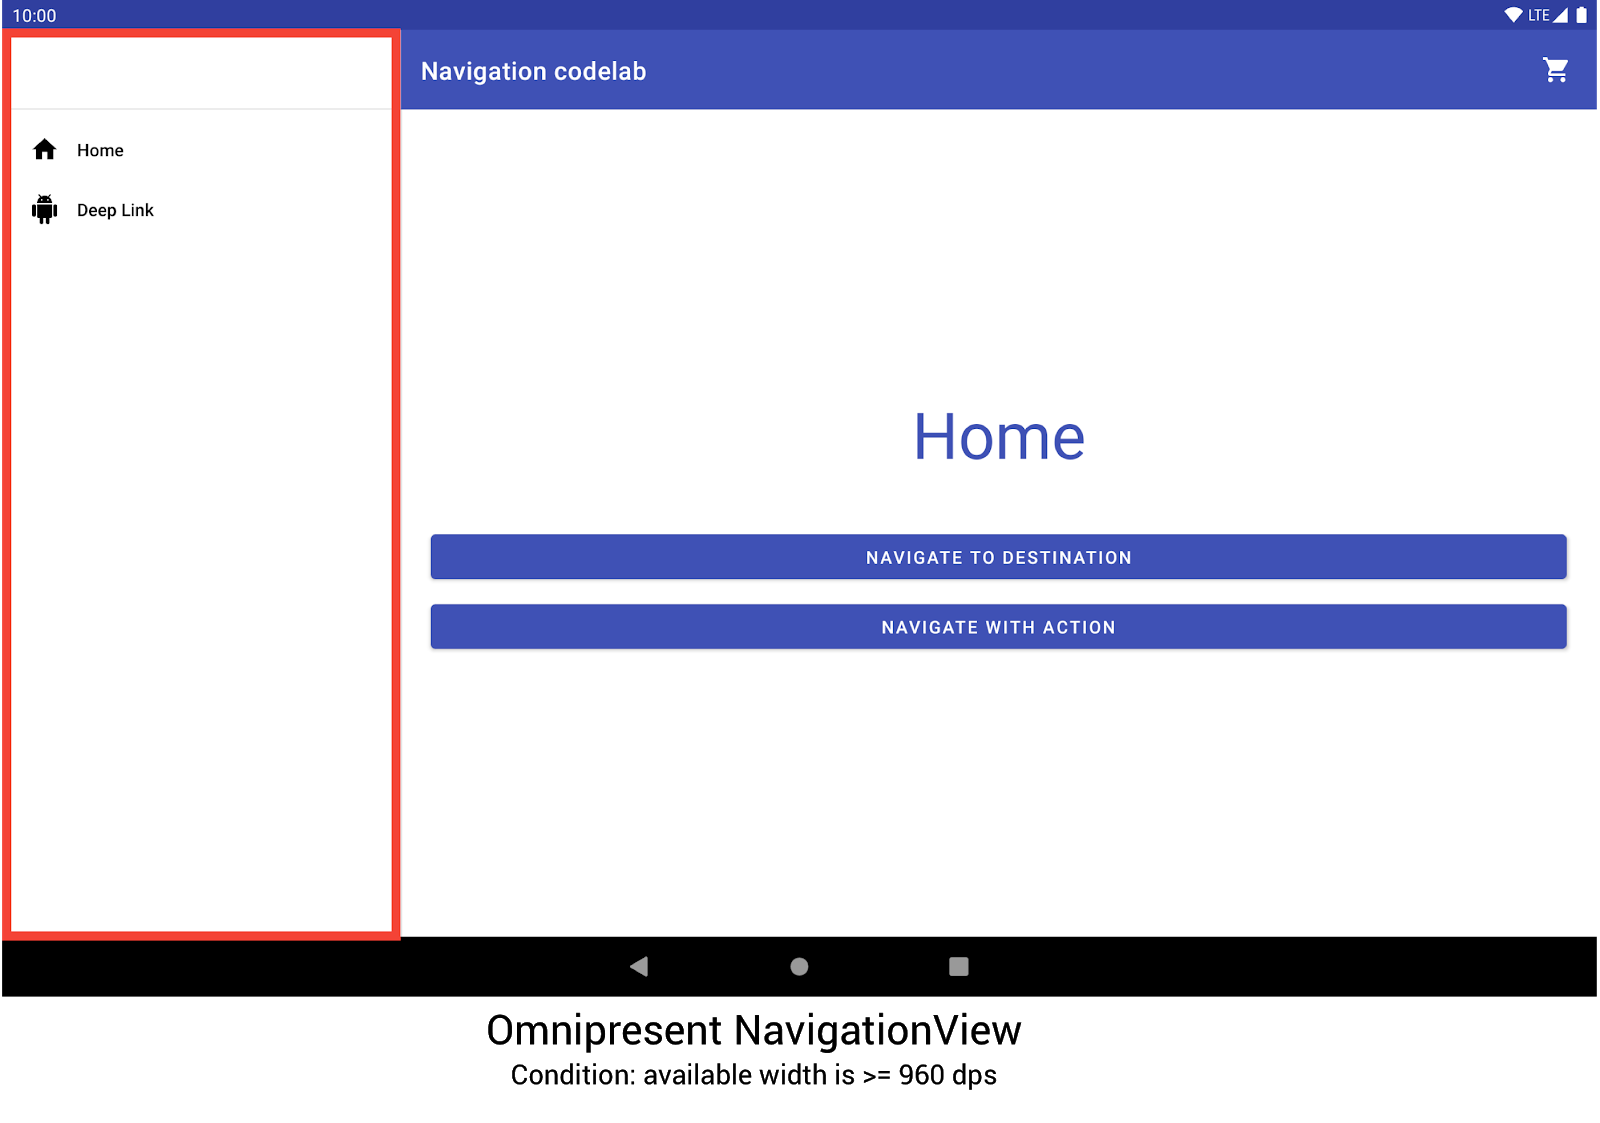
NavigationView を使用してナビゲーション メニューを表示するナビゲーション コードラボ。他のデバイスのサイズおよび向きの場合は、必要に応じて DrawerLayout または BottomNavigationView に動的に切り替えられます。
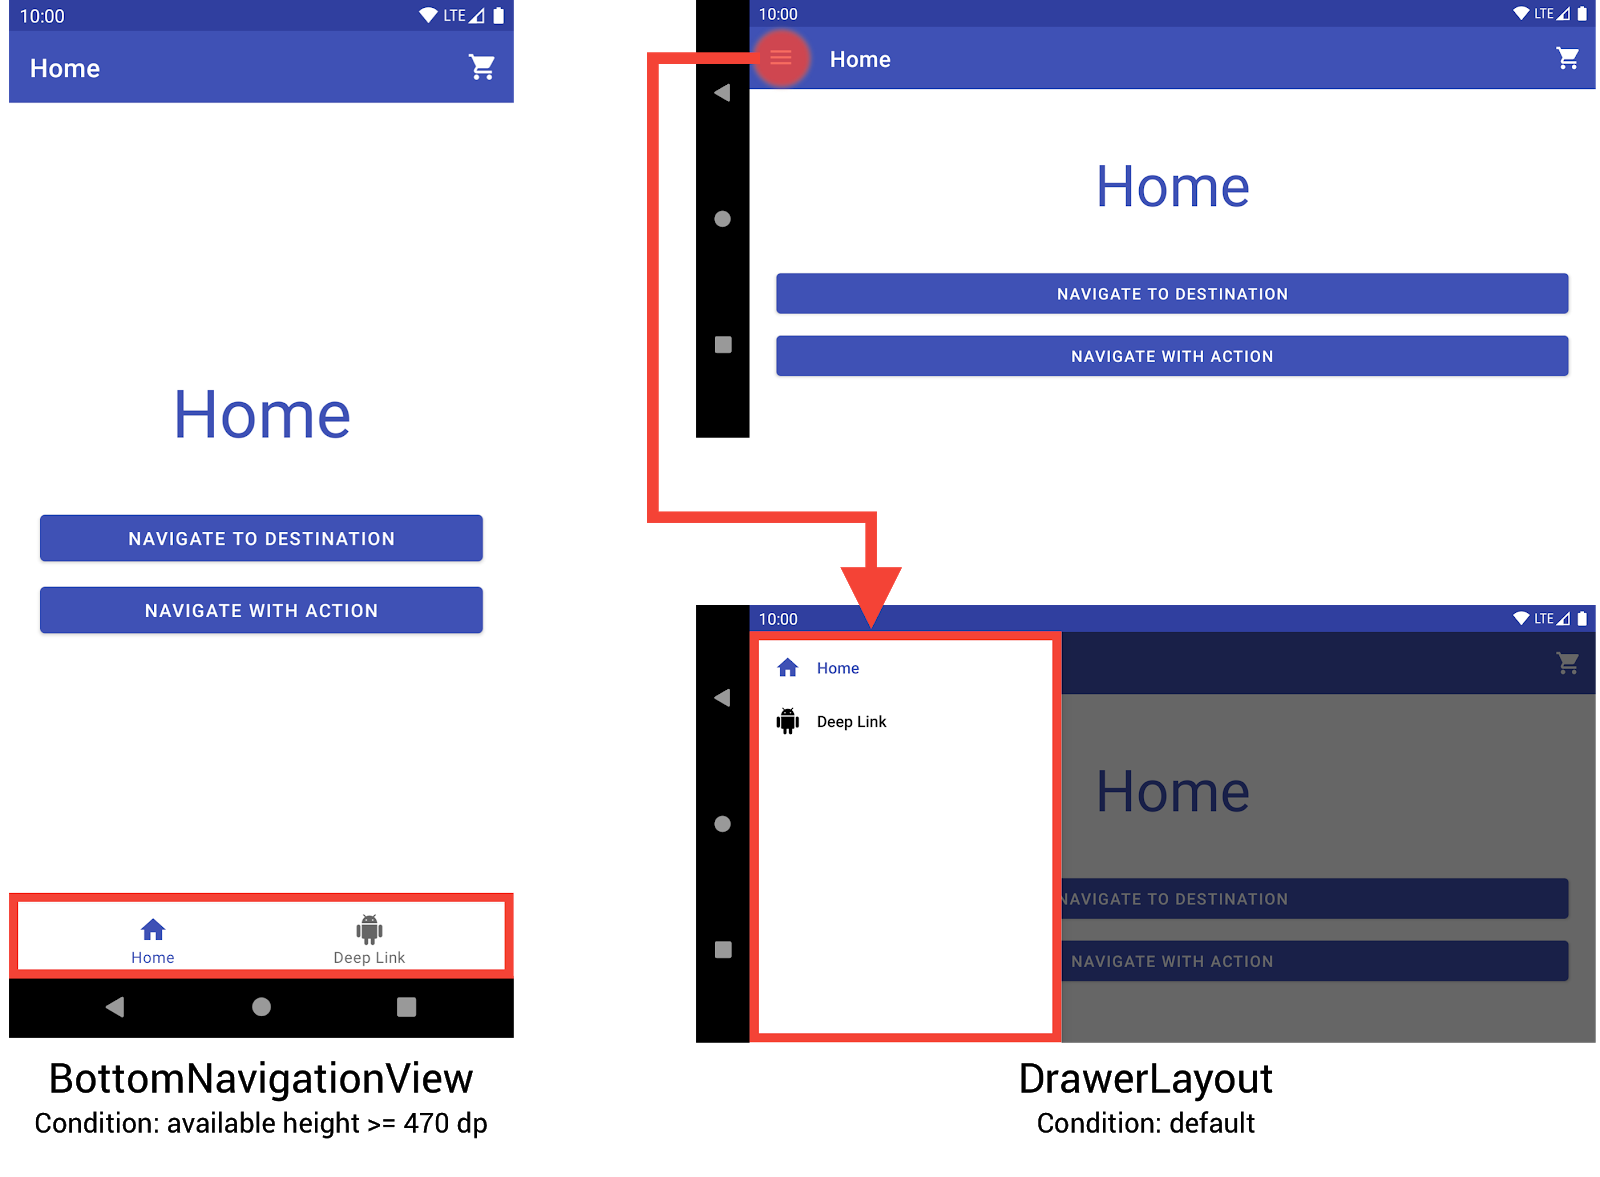
BottomNavigationView と DrawerLayout を使用して、小さなデバイスにナビゲーション メニューを表示するナビゲーション コードラボ。この動作を実装するには、3 つの異なるレイアウトを作成します。各レイアウトにより、現在のデバイス設定に基づいて必要なナビゲーション要素とビュー階層が定義されます。
各レイアウトが適用される設定は、レイアウト ファイルが配置されているディレクトリ構造によって決まります。たとえば、NavigationView レイアウト ファイルは res/layout-w960dp ディレクトリにあります。
<!-- res/layout-w960dp/navigation_activity.xml -->
<RelativeLayout
   xmlns:android="http://schemas.android.com/apk/res/android"
   xmlns:app="http://schemas.android.com/apk/res-auto"
   xmlns:tools="http://schemas.android.com/tools"
   android:layout_width="match_parent"
   android:layout_height="match_parent"
   tools:context="com.example.android.codelabs.navigation.MainActivity">

   <com.google.android.material.navigation.NavigationView
       android:id="@+id/nav_view"
       android:layout_width="wrap_content"
       android:layout_height="match_parent"
       android:layout_alignParentStart="true"
       app:elevation="0dp"
       app:headerLayout="@layout/nav_view_header"
       app:menu="@menu/nav_drawer_menu" />

   <View
       android:layout_width="1dp"
       android:layout_height="match_parent"
       android:layout_toEndOf="@id/nav_view"
       android:background="?android:attr/listDivider" />

   <androidx.appcompat.widget.Toolbar
       android:id="@+id/toolbar"
       android:layout_width="match_parent"
       android:layout_height="wrap_content"
       android:layout_alignParentTop="true"
       android:layout_toEndOf="@id/nav_view"
       android:background="@color/colorPrimary"
       android:theme="@style/ThemeOverlay.MaterialComponents.Dark.ActionBar" />

   <androidx.fragment.app.FragmentContainerView
       android:id="@+id/my_nav_host_fragment"
       android:name="androidx.navigation.fragment.NavHostFragment"
       android:layout_width="match_parent"
       android:layout_height="match_parent"
       android:layout_below="@id/toolbar"
       android:layout_toEndOf="@id/nav_view"
       app:defaultNavHost="true"
       app:navGraph="@navigation/mobile_navigation" />
</RelativeLayout>
ボトム ナビゲーション ビューは、res/layout-h470dp ディレクトリにあります。
<!-- res/layout-h470dp/navigation_activity.xml -->
<LinearLayout
   xmlns:android="http://schemas.android.com/apk/res/android"
   xmlns:app="http://schemas.android.com/apk/res-auto"
   xmlns:tools="http://schemas.android.com/tools"
   android:layout_width="match_parent"
   android:layout_height="match_parent"
   android:orientation="vertical"
   tools:context="com.example.android.codelabs.navigation.MainActivity">

   <androidx.appcompat.widget.Toolbar
       android:id="@+id/toolbar"
       android:layout_width="match_parent"
       android:layout_height="wrap_content"
       android:background="@color/colorPrimary"
       android:theme="@style/ThemeOverlay.MaterialComponents.Dark.ActionBar" />

   <androidx.fragment.app.FragmentContainerView
       android:id="@+id/my_nav_host_fragment"
       android:name="androidx.navigation.fragment.NavHostFragment"
       android:layout_width="match_parent"
       android:layout_height="0dp"
       android:layout_weight="1"
       app:defaultNavHost="true"
       app:navGraph="@navigation/mobile_navigation" />

   <com.google.android.material.bottomnavigation.BottomNavigationView
       android:id="@+id/bottom_nav_view"
       android:layout_width="match_parent"
       android:layout_height="wrap_content"
       app:menu="@menu/bottom_nav_menu" />
</LinearLayout>
ドロワーのレイアウトは res/layout ディレクトリにあります。このディレクトリは、設定固有の修飾子のないデフォルトのレイアウトに使用します。
<!-- res/layout/navigation_activity.xml -->
<androidx.drawerlayout.widget.DrawerLayout
   xmlns:android="http://schemas.android.com/apk/res/android"
   xmlns:app="http://schemas.android.com/apk/res-auto"
   xmlns:tools="http://schemas.android.com/tools"
   android:id="@+id/drawer_layout"
   android:layout_width="match_parent"
   android:layout_height="match_parent"
   tools:context="com.example.android.codelabs.navigation.MainActivity">

   <LinearLayout
       android:layout_width="match_parent"
       android:layout_height="match_parent"
       android:orientation="vertical">

       <androidx.appcompat.widget.Toolbar
           android:id="@+id/toolbar"
           android:layout_width="match_parent"
           android:layout_height="wrap_content"
           android:background="@color/colorPrimary"
           android:theme="@style/ThemeOverlay.MaterialComponents.Dark.ActionBar" />

       <androidx.fragment.app.FragmentContainerView
           android:id="@+id/my_nav_host_fragment"
           android:name="androidx.navigation.fragment.NavHostFragment"
           android:layout_width="match_parent"
           android:layout_height="match_parent"
           app:defaultNavHost="true"
           app:navGraph="@navigation/mobile_navigation" />
   </LinearLayout>

   <com.google.android.material.navigation.NavigationView
       android:id="@+id/nav_view"
       android:layout_width="wrap_content"
       android:layout_height="match_parent"
       android:layout_gravity="start"
       app:menu="@menu/nav_drawer_menu" />
</androidx.drawerlayout.widget.DrawerLayout>
Android は、適用するリソースを決定する際に、優先順位に従います。この例では、-w960dp(すなわち 960 dp 以上の可能な幅)が -h470dp(すなわち 470 dp 以下の可能な高さ)よりも優先されます。デバイス設定がこれらの条件のいずれにも一致しない場合、デフォルトのレイアウト リソース(res/layout/navigation_activity.xml)が使用されます。
ナビゲーション イベントを処理する場合、次の例に示すように、現在表示されているウィジェットに対応するイベントのみを接続する必要があります。
Kotlin
class MainActivity : AppCompatActivity() {

   private lateinit var appBarConfiguration : AppBarConfiguration

   override fun onCreate(savedInstanceState: Bundle?) {
      super.onCreate(savedInstanceState)
      setContentView(R.layout.navigation_activity)
      val drawerLayout : DrawerLayout? = findViewById(R.id.drawer_layout)
      appBarConfiguration = AppBarConfiguration(
                  setOf(R.id.home_dest, R.id.deeplink_dest),
                  drawerLayout)

      ...

      // Initialize the app bar with the navigation drawer if present.
      // If the drawerLayout is not null here, a Navigation button will be added
      // to the app bar whenever the user is on a top-level destination.
      setupActionBarWithNavController(navController, appBarConfig)

      // Initialize the NavigationView if it is present,
      // so that clicking an item takes
      // the user to the appropriate destination.
      val sideNavView = findViewById<NavigationView>(R.id.nav_view)
      sideNavView?.setupWithNavController(navController)

      // Initialize the BottomNavigationView if it is present,
      // so that clicking an item takes
      // the user to the appropriate destination.
      val bottomNav = findViewById<BottomNavigationView>(R.id.bottom_nav_view)
      bottomNav?.setupWithNavController(navController)

      ...
    }

    ...
}
Java
public class MainActivity extends AppCompatActivity {

   private AppBarConfiguration appBarConfiguration;

   @Override
   protected void onCreate(@Nullable Bundle savedInstanceState) {
       super.onCreate(savedInstanceState);
       setContentView(R.layout.navigation_activity);
       NavHostFragment host = (NavHostFragment) getSupportFragmentManager()
               .findFragmentById(R.id.my_nav_host_fragment);
       NavController navController = host.getNavController();

       DrawerLayout drawerLayout = findViewById(R.id.drawer_layout);
       appBarConfiguration = new AppBarConfiguration.Builder(
               R.id.home_dest, R.id.deeplink_dest)
               .setDrawerLayout(drawerLayout)
               .build();

       // Initialize the app bar with the navigation drawer if present.
       // If the drawerLayout is not null here, a Navigation button will be added to
       // the app bar whenever the user is on a top-level destination.
       NavigationUI.setupActionBarWithNavController(
               this, navController, appBarConfiguration);


       // Initialize the NavigationView if it is present,
       // so that clicking an item takes
       // the user to the appropriate destination.
       NavigationView sideNavView = findViewById(R.id.nav_view);
       if(sideNavView != null) {
           NavigationUI.setupWithNavController(sideNavView, navController);
       }

       // Initialize the BottomNavigationView if it is present,
       // so that clicking an item takes
       // the user to the appropriate destination.
       BottomNavigationView bottomNav = findViewById(R.id.bottom_nav_view);
       if(bottomNav != null) {
           NavigationUI.setupWithNavController(bottomNav, navController);
       }

   }
}
デバイス設定が変更された場合、明示的に設定されていない限り、Android は関連するビューとともに以前の設定のアクティビティを破棄します。次に、新しい設定用に設計されたリソースでアクティビティを再作成します。アクティビティが破棄され、再作成されると、適切なグローバル ナビゲーション要素が onCreate() に自動的に送信されます。
分割ビュー レイアウトに代わるものを検討する
分割ビュー レイアウト(マスター / ディテール レイアウト)は、タブレットなどの大画面デバイス向けの、非常に人気のある推奨レイアウトでした。
Android タブレットの登場以来、デバイスのエコシステムは急速に成長しています。大画面のデバイスのデザイン スペースに大きく影響した要素の一つは、マルチ ウィンドウ モード(特に、ChromeOS デバイス上のウィンドウなど、自由にサイズ変更可能なフリーフォーム ウィンドウ)の導入です。これにより、画面サイズに基づいてナビゲーション構造を変更するのではなく、アプリのすべての画面がレスポンシブであることが非常に重視されるようになりました。
ナビゲーション ライブラリを使用して、分割ビュー レイアウト インターフェースを実装できますが、他の方法も検討する必要があります。
デスティネーション名
android:label 属性を使用してグラフにデスティネーション名を指定する場合は、必ずリソース値を使用して、コンテンツのローカライズを維持できるようにしてください。
<navigation ...>
    <fragment
        android:id="@+id/my_dest"
        android:name="com.example.MyFragment"
        android:label="@string/my_dest_label"
        tools:layout="@layout/my_fragment" />
    ...
リソース値を指定すると、設定変更のたびに、デスティネーションに最も適したリソースが自動的に適用されます。