
資訊清單、中繼資料
以下各節說明如何使用 Glance 建立基本應用程式小工具。
在資訊清單中宣告 AppWidget
完成設定步驟後,請在應用程式中宣告 AppWidget 及其
中繼資料。
從
GlanceAppWidgetReceiver擴充AppWidget接收器:class MyAppWidgetReceiver : GlanceAppWidgetReceiver() { override val glanceAppWidget: GlanceAppWidget = TODO("Create GlanceAppWidget") }
在
AndroidManifest.xml檔案和相關聯的中繼資料檔案中,註冊應用程式小工具的供應商:<receiver android:name=".glance.MyReceiver" android:exported="true"> <intent-filter> <action android:name="android.appwidget.action.APPWIDGET_UPDATE" /> </intent-filter> <meta-data android:name="android.appwidget.provider" android:resource="@xml/my_app_widget_info" /> </receiver>
新增 AppWidgetProviderInfo 中繼資料
接著,請按照「建立小工具」指南操作,在 @xml/my_app_widget_info 檔案中建立及定義應用程式小工具資訊。
Glance 的唯一差異在於沒有 initialLayout XML,但您必須定義一個。您可以使用程式庫提供的預先定義載入版面配置:
<appwidget-provider xmlns:android="http://schemas.android.com/apk/res/android"
android:initialLayout="@layout/glance_default_loading_layout">
</appwidget-provider>
宣告 AppWidgetProviderInfo XML
AppWidgetProviderInfo 物件會定義小工具的基本特質。在 XML 中繼資料資源檔案 (res/xml/my_app_widget_info.xml) 內的 <appwidget-provider> 元素中定義 AppWidgetProviderInfo:
<appwidget-provider xmlns:android="http://schemas.android.com/apk/res/android"
    android:minWidth="40dp"
    android:minHeight="40dp"
    android:targetCellWidth="1"
    android:targetCellHeight="1"
    android:maxResizeWidth="250dp"
    android:maxResizeHeight="120dp"
    android:updatePeriodMillis="86400000"
    android:description="@string/example_appwidget_description"
    android:previewLayout="@layout/example_appwidget_preview"
    android:initialLayout="@layout/glance_default_loading_layout"
    android:configure="com.example.android.ExampleAppWidgetConfigurationActivity"
    android:resizeMode="horizontal|vertical"
    android:widgetCategory="home_screen"
    android:widgetFeatures="reconfigurable|configuration_optional">
</appwidget-provider>
小工具大小屬性
預設主畫面會根據定義高度和寬度的儲存格格線,將小工具放置在視窗中。大多數主畫面只允許小工具採用格線儲存格的整數倍數大小,例如水平兩個儲存格,垂直三個儲存格。
小工具大小屬性可讓您指定小工具的預設大小,並提供小工具大小的下限和上限。在此情況下,小工具的預設大小是指小工具首次新增至主畫面時的大小。
下表說明與小工具大小相關的 <appwidget-provider> 屬性:
| 屬性和說明 | |
|---|---|
targetCellWidth 和
targetCellHeight (Android 12)、
minWidth 和 minHeight |
targetCellWidth 和
targetCellHeight,以及 minWidth 和
minHeight),這樣一來,如果使用者的裝置不支援 targetCellWidth 和
targetCellHeight,應用程式就能改用 minWidth 和 minHeight。如果支援,targetCellWidth 和 targetCellHeight 屬性的優先順序會高於 minWidth 和 minHeight 屬性。 |
minResizeWidth 和
minResizeHeight |
指定小工具的絕對最小尺寸。這些值指定小工具無法辨識或無法使用的尺寸。使用這些屬性,使用者可將小工具縮小至小於預設大小。如果 minResizeWidth 屬性大於 minWidth,或未啟用水平大小調整功能,系統就會忽略該屬性。詳情請參閱 resizeMode。同樣地,如果 minResizeHeight 屬性大於 minHeight,或未啟用垂直大小調整功能,系統就會忽略該屬性。 |
maxResizeWidth 和
maxResizeHeight |
指定小工具的建議大小上限。如果值不是格線儲存格尺寸的倍數,系統會無條件進位至最接近的儲存格大小。如果 maxResizeWidth 屬性小於 minWidth,或未啟用水平大小調整功能,系統會忽略該屬性。詳情請參閱 resizeMode。同樣地,如果 maxResizeHeight 屬性小於 minHeight,或未啟用垂直大小調整功能,系統就會忽略該屬性。這項功能已在 Android 12 推出。 |
resizeMode |
指定小工具可調整大小的規則。你可以使用這項屬性,讓主畫面小工具在水平、垂直或兩個軸向上調整大小。使用者按住小工具即可顯示大小調整控點,
然後拖曳水平或垂直控點,即可在版面配置格線中變更小工具大小。resizeMode 屬性的值包括 horizontal、vertical 和 none。如要將小工具宣告為可水平和垂直調整大小,請使用 horizontal|vertical。 |
範例
如要說明上表中的屬性如何影響小工具大小,請假設下列規格:
- 格線儲存格的寬度為 30 dp,高度為 50 dp。
- 以下提供屬性規格:
<appwidget-provider xmlns:android="http://schemas.android.com/apk/res/android"
    android:minWidth="80dp"
    android:minHeight="80dp"
    android:targetCellWidth="2"
    android:targetCellHeight="2"
    android:minResizeWidth="40dp"
    android:minResizeHeight="40dp"
    android:maxResizeWidth="120dp"
    android:maxResizeHeight="120dp"
    android:resizeMode="horizontal|vertical" />
Android 12 以上版本:
請使用 targetCellWidth 和 targetCellHeight 屬性做為小工具的預設大小。
小工具的預設大小為 2x2。小工具可縮小至 2x1,或放大至 4x3。
Android 11 以下版本:
使用 minWidth 和 minHeight 屬性計算小工具的預設大小。
預設寬度 = Math.ceil(80 / 30) = 3
預設高度 = Math.ceil(80 / 50) = 2
小工具的預設大小為 3x2。小工具可縮小至 2x1,或放大至全螢幕。
其他小工具屬性
下表說明與小工具大小以外的品質相關的 <appwidget-provider> 屬性。
| 屬性和說明 | |
|---|---|
updatePeriodMillis |
定義小工具架構向 GlanceAppWidgetReceiver 要求更新的頻率,方法是呼叫 onUpdate() 回呼方法。建議您盡可能減少更新頻率 (每小時最多更新一次),以節省電池電力。詳情請參閱「Glance 狀態管理」一文的「更新小工具的時機」一節。 |
initialLayout |
指向版面配置資源,定義 Glance UI 組合算繪前的小工具載入版面配置。您可以使用程式庫中預先定義的載入版面配置:@layout/glance_default_loading_layout。 |
configure |
定義使用者新增小工具時啟動的設定活動。請參閱本頁的「實作小工具設定活動」一節。 |
description |
指定小工具挑選器要顯示的小工具說明。這項功能已在 Android 12 推出。 |
previewLayout (Android 12)
和 previewImage (Android 11 以下版本) |
|
autoAdvanceViewId |
指定小工具子檢視區塊的檢視區塊 ID,該子檢視區塊會由小工具主機自動前進。 |
widgetCategory |
宣告小工具是否可顯示在主畫面 (home_screen)、螢幕鎖定畫面 (keyguard) 或兩者。如果是 Android 5.0 以上版本,只有 home_screen 適用。 |
widgetFeatures |
聲明小工具支援的功能。舉例來說,如果小工具的設定為選用,請同時指定 configuration_optional 和 reconfigurable。 |
定義「GlanceAppWidget」
建立從
GlanceAppWidget擴充的新類別,並覆寫provideGlance方法。這個方法可載入小工具的算繪作業所需資料:class MyAppWidget : GlanceAppWidget() { override suspend fun provideGlance(context: Context, id: GlanceId) { // In this method, load data needed to render the AppWidget. // Use `withContext` to switch to another thread for long running // operations. provideContent { // create your AppWidget here Text("Hello World") } } }
在
GlanceAppWidgetReceiver的glanceAppWidget中建立例項:class MyAppWidgetReceiver : GlanceAppWidgetReceiver() { // Let MyAppWidgetReceiver know which GlanceAppWidget to use override val glanceAppWidget: GlanceAppWidget = MyAppWidget() }
您已使用 Glance 設定 AppWidget。
使用 AppWidgetProvider 類別處理小工具廣播
GlanceAppWidgetReceiver 座標小工具會擴充基礎 AppWidgetProvider,藉此廣播和更新平台狀態。當小工具更新、刪除、啟用或停用時,這個類別會接收平台事件,並將這些事件轉換為 Compose 生命週期要求。
在資訊清單中宣告小工具
在 AndroidManifest.xml 檔案中,將 GlanceAppWidgetReceiver 類別子類別宣告為廣播接收器:
<receiver android:name="ExampleAppWidgetReceiver"
          android:exported="false">
    <intent-filter>
        <action android:name="android.appwidget.action.APPWIDGET_UPDATE" />
    </intent-filter>
    <meta-data android:name="android.appwidget.provider"
               android:resource="@xml/my_app_widget_info" />
</receiver>
<receiver> 元素需要 android:name 屬性,用於指定接收器類別。接收器必須在 <intent-filter> 內接受ACTION_APPWIDGET_UPDATE廣播動作。
<meta-data> 元素必須將名稱識別為 android.appwidget.provider,且 android:resource 屬性必須指向您的 AppWidgetProviderInfo XML 中繼資料資源 (@xml/my_app_widget_info)。
實作 AppWidgetProvider 類別
在 Glance 中,您會擴充 GlanceAppWidgetReceiver,而不是直接擴充 AppWidgetProvider。如要實作這項功能,請將接收器連結至 GlanceAppWidget 執行個體。GlanceAppWidgetReceiver 中提供的主要回呼運作方式如下:
onUpdate():Glance 會自動覆寫此值,以執行組合更新。如果手動覆寫onUpdate,則必須呼叫super.onUpdate,Glance 才能順利啟動組合執行緒。onAppWidgetOptionsChanged():在首次放置或調整小工具大小時呼叫。Glance 讀取選項會在幕後將項目組合在一起,因此版面配置會根據執行階段維度順暢調整。onDeleted(Context, IntArray):每當使用者刪除特定小工具例項時,系統就會叫用這個函式。onEnabled(Context):在成功建立小工具的第一個執行個體時觸發。非常適合執行全域遷移作業。onDisabled(Context):移除供應器最後一個有效執行個體時呼叫。onReceive(Context, Intent):在特定回呼方法之前,攔截每個平台廣播。請務必確保您編寫的任何自訂接收器邏輯都會呼叫super.onReceive(context, intent),且絕不會自行呼叫goAsync,因為 Glance 會自動非同步地將工作路徑。
接收小工具廣播意圖
在幕後,GlanceAppWidgetReceiver 會篩選及處理下列基礎平台小工具的廣播意圖:
ACTION_APPWIDGET_UPDATEACTION_APPWIDGET_DELETEDACTION_APPWIDGET_ENABLEDACTION_APPWIDGET_DISABLEDACTION_APPWIDGET_OPTIONS_CHANGED
建立 UI
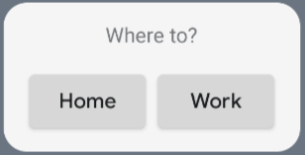
下列程式碼片段示範如何建立 UI:
/* Import Glance Composables In the event there is a name clash with the Compose classes of the same name, you may rename the imports per https://kotlinlang.org/docs/packages.html#imports using the `as` keyword. import androidx.glance.Button import androidx.glance.layout.Column import androidx.glance.layout.Row import androidx.glance.text.Text */ class MyAppWidget : GlanceAppWidget() { override suspend fun provideGlance(context: Context, id: GlanceId) { // Load data needed to render the AppWidget. // Use `withContext` to switch to another thread for long running // operations. provideContent { // create your AppWidget here MyContent() } } @Composable private fun MyContent() { Column( modifier = GlanceModifier.fillMaxSize(), verticalAlignment = Alignment.Top, horizontalAlignment = Alignment.CenterHorizontally ) { Text(text = "Where to?", modifier = GlanceModifier.padding(12.dp)) Row(horizontalAlignment = Alignment.CenterHorizontally) { Button( text = "Home", onClick = actionStartActivity<MyActivity>() ) Button( text = "Work", onClick = actionStartActivity<MyActivity>() ) } } } }
上述程式碼範例會執行下列作業:
- 在頂層
Column中,項目會垂直排列。 Column會擴展大小以配合可用空間 (透過GlanceModifier),並將內容對齊頂端 (verticalAlignment) 並水平置中 (horizontalAlignment)。Column的內容是使用 lambda 定義。順序很重要。
您可以變更對齊值或套用不同的修飾符值 (例如邊框間距),藉此變更元件的放置位置和大小。如需元件、參數和每個類別可用修飾符的完整清單,請參閱參考說明文件。
實作圓角
Android 12 導入系統參數,可動態自訂應用程式小工具的圓角半徑:
system_app_widget_background_radius: 指定小工具背景容器的圓角半徑 (不得大於 28 dp)。- 內半徑:為避免內容遭到裁剪,請根據系統背景外框,計算內側內容的比例半徑:
systemRadiusValue - widgetPadding
在 Glance 中,您可以使用 GlanceModifier.cornerRadius(android.R.dimen.system_app_widget_background_radius),在組合中動態套用圓角半徑大小屬性。
如要在搭載 Android 11 (API 級別 30) 以下版本的裝置上支援回溯相容性,請實作自訂屬性和自訂主題資源備援:
/values/attrs.xml<resources> <attr name="backgroundRadius" format="dimension" /> </resources>/values/styles.xml<resources> <style name="MyWidgetTheme"> <item name="backgroundRadius">@dimen/my_background_radius_dimen</item> </style> </resources>/values-31/styles.xml<resources> <style name="MyWidgetTheme" parent="@android:style/Theme.DeviceDefault.DayNight"> <item name="backgroundRadius">@android:dimen/system_app_widget_background_radius</item> </style> </resources>/drawable/my_widget_background.xml<shape xmlns:android="http://schemas.android.com/apk/res/android" android:shape="rectangle"> <corners android:radius="?attr/backgroundRadius" /> </shape>