יצירת מפות סיביות שניתן לשנות את הגודל שלהן (קבצים מסוג 9-patch)
קל לארגן דפים בעזרת אוספים
אפשר לשמור ולסווג תוכן על סמך ההעדפות שלך.
הכלי Draw 9-patch הוא עורך WYSIWYG שכלול ב-Android Studio. הכלי מאפשר ליצור תמונות bitmap שמשנות את הגודל שלהן באופן אוטומטי כדי להתאים לתוכן של התצוגה ולגודל המסך. אפשר לשנות את הגודל של חלקים נבחרים בתמונה לרוחב או לאורך על סמך אינדיקטורים שמצוירים בתוך התמונה.
במאמר הזה יש הסבר על גרפיקת NinePatch ואיך היא פועלת.
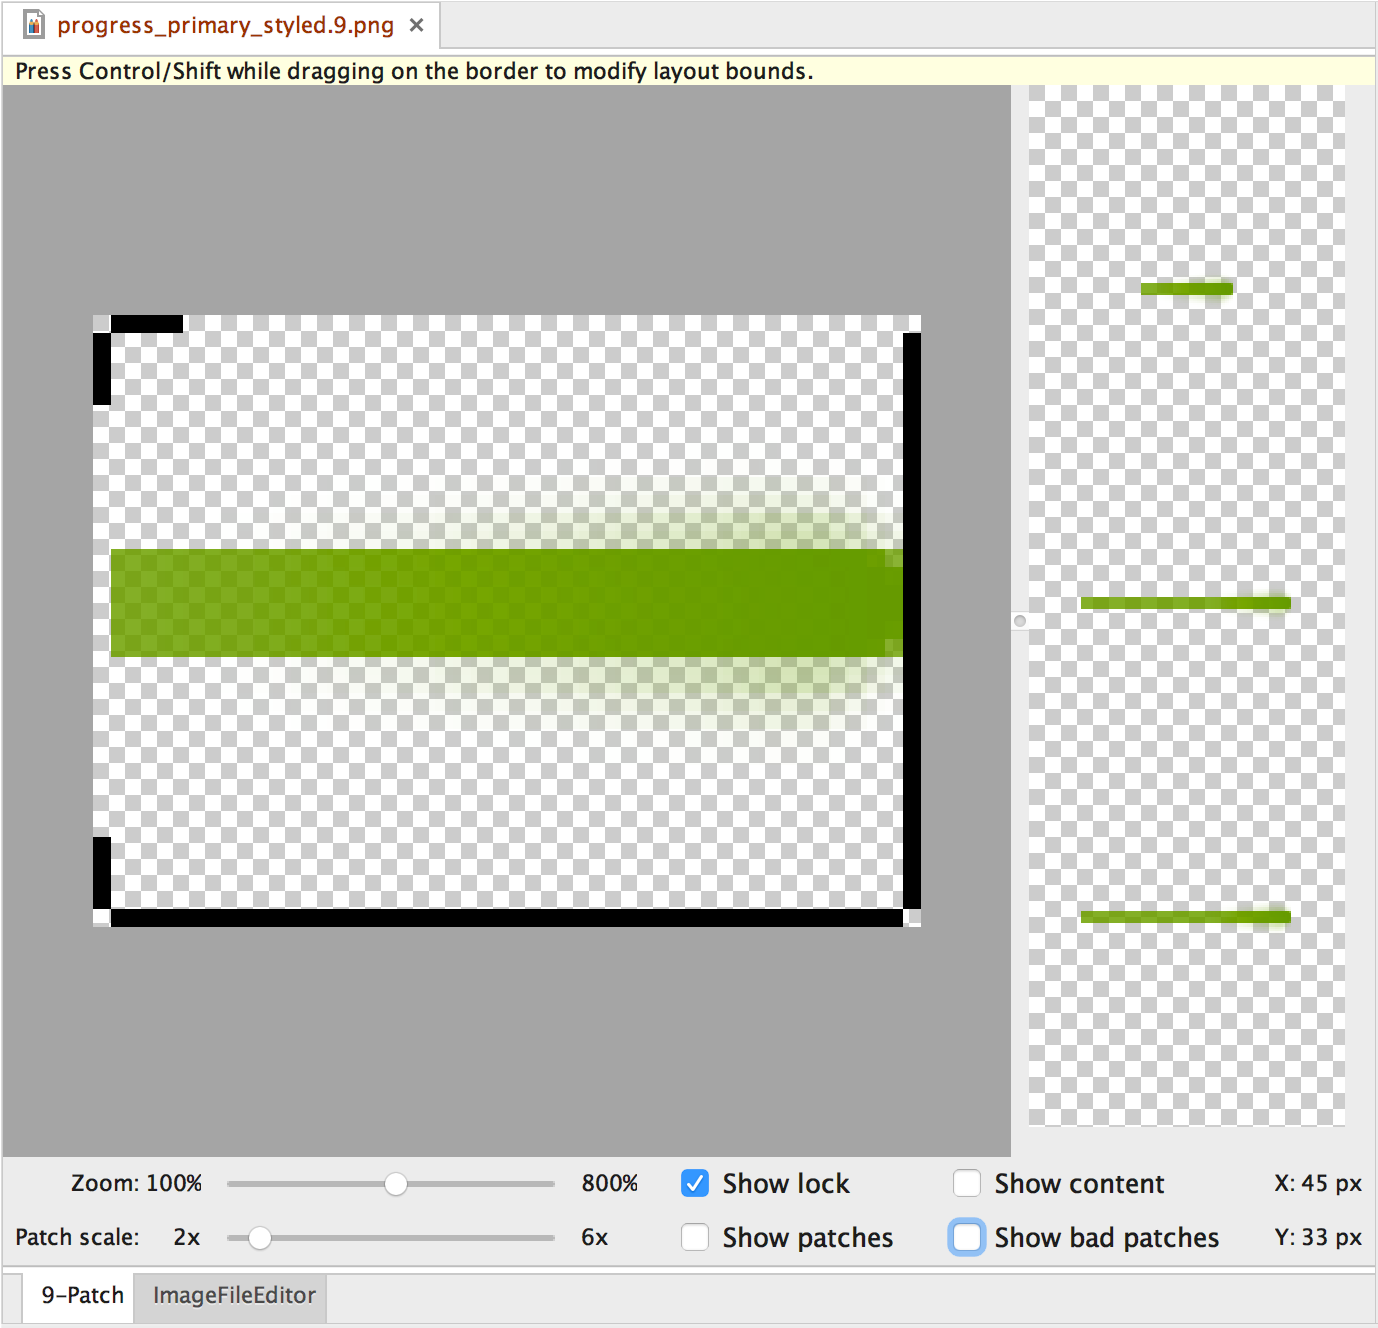
איור 1. כלי Draw 9-patch ב-Android Studio מציג תמונת NinePatch.
כדי ליצור גרפיקת NinePatch באמצעות הכלי Draw 9-patch ב-Android Studio: תצטרכו את תמונת ה-PNG שממנה אתם רוצים ליצור תמונת NinePatch.
- ב-Android Studio, לוחצים לחיצה ימנית על תמונת ה-PNG שרוצים ליצור ממנה תמונת NinePatch, ואז לוחצים על Create 9-patch file (יצירת קובץ NinePatch).
- מזינים שם קובץ לתמונה מסוג NinePatch ולוחצים על אישור. התמונה שלכם תיווצר עם סיומת הקובץ
.9.png
.
- לוחצים לחיצה כפולה על קובץ ה-NinePatch החדש כדי לפתוח אותו ב-Android Studio.
בחלונית הימנית של סביבת העבודה שנפתחת, נמצא אזור הציור שבו אפשר לערוך את הקווים של תיקוני המתיחה ואזור התוכן. בחלונית השמאלית מוצגת תצוגה מקדימה של הגרפיקה כשהיא מתוחה.
- לוחצים בתוך ההיקף של הפיקסל האחד כדי לשרטט את הקווים שמגדירים את הטלאים הניתנים למתיחה ואת אזור התוכן (אופציונלי).
לוחצים לחיצה ימנית כדי למחוק
קווים שצוירו קודם (ב-Mac, מחזיקים את Shift ולוחצים).
- בסיום, לוחצים על קובץ > שמירה כדי לשמור את השינויים.
כדי לפתוח קובץ NinePatch קיים ב-Android
Studio, לוחצים עליו לחיצה כפולה.
כדי לוודא שהגרפיקה של NinePatch מוקטנת בצורה נכונה, צריך לוודא שכל האזורים הניתנים למתיחה הם בגודל של 2x2 פיקסלים לפחות.
אחרת, יכול להיות שהאזורים האלה ייעלמו כשמצמצמים את קנה המידה. כדי להימנע מאינטרפולציה במהלך שינוי הגודל
שעלולה לגרום לשינוי הצבע בגבולות, צריך לספק פיקסל אחד של שטח בטוח נוסף
בגרפיקה לפני ואחרי אזורים שניתנים למתיחה.
הערה: קובץ PNG רגיל (*.png
) נטען עם גבול ריק של פיקסל אחד שנוסף מסביב לתמונה. אפשר לצייר את הטלאים שניתנים למתיחה ואת אזור התוכן בתוך הגבול.
קובץ NinePatch שנשמר בעבר (*.9.png
) נטען כמו שהוא,
בלי שנוסף אזור ציור כי הוא כבר קיים.
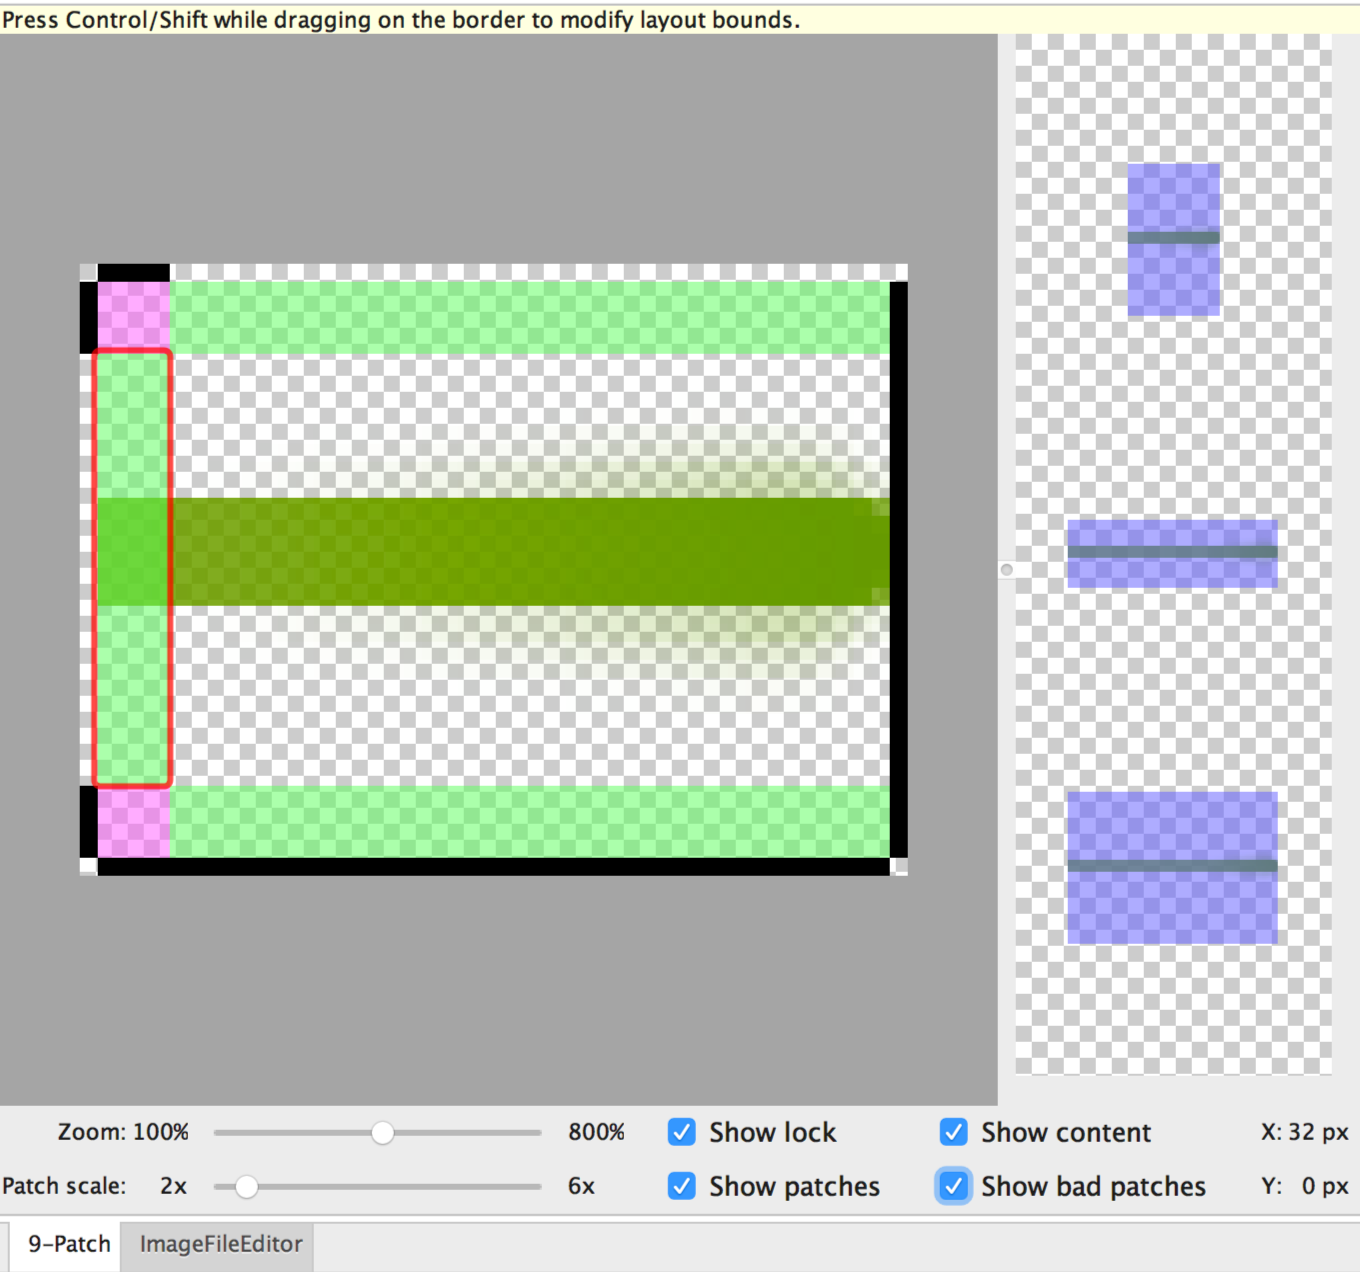
איור 2. תמונה של NinePatch ב-Android Studio
שמציגה תוכן, תיקונים ותיקונים לא טובים.
אמצעי הבקרה האופציונליים כוללים:
- זום: שינוי רמת הזום של הגרפיקה באזור הציור.
- קנה מידה של תיקון: שינוי קנה המידה של התמונות באזור התצוגה המקדימה.
- הצגת נעילה: הצגה חזותית של האזור בגרפיקה שלא ניתן לצייר בו כשמעבירים את העכבר מעל הגרפיקה.
- Show patches (הצגת טלאים): תצוגה מקדימה של הטלאים הוורודים שניתנים למתיחה באזור הציור. ורוד
מציין תיקון שניתן להרחבה, כפי שמוצג באיור 2.
- הצגת התוכן: סימון אזור התוכן בתמונות התצוגה המקדימה. האזור שבו מותר להציג תוכן מסומן בסגול, כמו שמוצג באיור 2.
- הצגת אזורים בעייתיים: מוסיפה גבול אדום מסביב לאזורים של תיקונים שעשויים ליצור ארטיפקטים בגרפיקה כשמגדילים אותה, כמו שמוצג באיור 2. אם תסירו את כל הטלאים הבעייתיים, תשמרו על העקביות החזותית של התמונה המתוחה.
דוגמאות התוכן והקוד שבדף הזה כפופות לרישיונות המפורטים בקטע רישיון לתוכן. Java ו-OpenJDK הם סימנים מסחריים או סימנים מסחריים רשומים של חברת Oracle ו/או של השותפים העצמאיים שלה.
עדכון אחרון: 2025-07-27 (שעון UTC).
[[["התוכן קל להבנה","easyToUnderstand","thumb-up"],["התוכן עזר לי לפתור בעיה","solvedMyProblem","thumb-up"],["סיבה אחרת","otherUp","thumb-up"]],[["חסרים לי מידע או פרטים","missingTheInformationINeed","thumb-down"],["התוכן מורכב מדי או עם יותר מדי שלבים","tooComplicatedTooManySteps","thumb-down"],["התוכן לא עדכני","outOfDate","thumb-down"],["בעיה בתרגום","translationIssue","thumb-down"],["בעיה בדוגמאות/בקוד","samplesCodeIssue","thumb-down"],["סיבה אחרת","otherDown","thumb-down"]],["עדכון אחרון: 2025-07-27 (שעון UTC)."],[],[],null,["# Create resizable bitmaps (9-patch files)\n\nThe Draw 9-patch tool is a WYSIWYG editor included in Android Studio. The tool lets you create\nbitmap images that automatically resize to accommodate the contents of the view and the size of\nthe screen. You can scale selected parts of the image horizontally or vertically based on indicators\ndrawn within the image.\n\nFor an introduction to NinePatch graphics and how they work, read\n[NinePatch drawables](/guide/topics/graphics/2d-graphics#nine-patch).\n\n**Figure 1.** Android Studio's\nDraw 9-patch tool displaying a NinePatch image.\n\nFollow these steps to create a NinePatch graphic using the Draw 9-patch tool in Android\nStudio. You'll need the PNG image that you'd like to create a NinePatch image from.\n\n1. In Android Studio, right-click the PNG image you'd like to create a NinePatch image from, then click **Create 9-patch file**.\n2. Enter a filename for your NinePatch image and click **OK** . Your image will be created with the `.9.png` file extension.\n3. Double-click your new NinePatch file to open it in Android Studio. \n\n In the workspace that opens, the left pane is your drawing area, where you can edit\n the lines for the stretchable patches and content area. The right\n pane is the preview area, where you can preview your graphic when stretched.\n4. Click within the 1-pixel perimeter to draw the lines that define the stretchable patches and (optional) the content area. \n\n Right-click to erase\n previously drawn lines (on Mac, hold Shift and click).\n5. When done, click **File** \\\u003e **Save** to save your changes.\n\nTo open an existing NinePatch file in Android\nStudio, double-click the file.\n\nTo make sure that your NinePatch graphics scale down properly, verify that any\nstretchable regions are at least 2x2 pixels in size.\nOtherwise, those regions may disappear when scaled down. To avoid interpolation during scaling\nthat may cause the color at the boundaries to change, provide 1 pixel of extra safe\nspace in the graphics before and after stretchable regions.\n\n**Note:** A normal PNG file (`*.png`) is\nloaded with an empty 1-pixel border added around the image. You can draw\nthe stretchable patches and content area within the border.\nA previously saved NinePatch file (`*.9.png`) is loaded as-is,\nwith no drawing area added because it already exists.\n\n**Figure 2.** A NinePatch image in Android Studio\nshowing content, patches, and bad patches.\n\nOptional controls include:\n\n- **Zoom**: Adjust the zoom level of the graphic in the drawing area.\n- **Patch scale**: Adjust the scale of the images in the preview area.\n- **Show lock**: Visualize the non-drawable area of the graphic on mouse-over.\n- **Show patches**: Preview the pink stretchable patches in the drawing area. Pink indicates a stretchable patch, as shown in figure 2.\n- **Show content**: Highlight the content area in the preview images. Purple indicates the area where content is allowed, as shown in figure 2.\n- **Show bad patches**: Adds a red border around patch areas that may produce artifacts in the graphic when stretched, as shown in figure 2. If you eliminate all bad patches, you will maintain the visual coherence of your stretched image."]]