
WebP es un formato de archivo de imagen de Google que proporciona compresión con pérdida de información (como JPEG) y transparencia (como PNG), pero puede ofrecer mejor compresión que estos otros dos formatos. Las imágenes WebP con pérdidas se admiten en Android 4.0 (nivel de API 14) y versiones posteriores, mientras que las imágenes WebP transparentes y sin pérdidas se admiten en Android 4.3 (nivel de API 18) y versiones posteriores. En esta página, se muestra cómo convertir imágenes al formato WebP y cómo convertir imágenes WebP al formato PNG.
Si quieres obtener más información para seleccionar el formato de imagen correcto para mejorar la velocidad de descarga, consulta Cómo reducir los tamaños de descarga de imágenes.
Convierte imágenes a WebP
Android Studio puede convertir imágenes PNG, JPG, BMP o GIF estáticas al formato WebP. Puedes convertir imágenes individuales o carpetas de imágenes.
Para ello, haz lo siguiente:
- Haz clic con el botón derecho en un archivo de imagen o en una carpeta que contenga archivos de imagen y, luego, selecciona Convert to WebP.
Se abrirá el diálogo Converting Images to WebP. Las opciones predeterminadas dependen de la configuración de
minSdkVersiondel módulo actual.
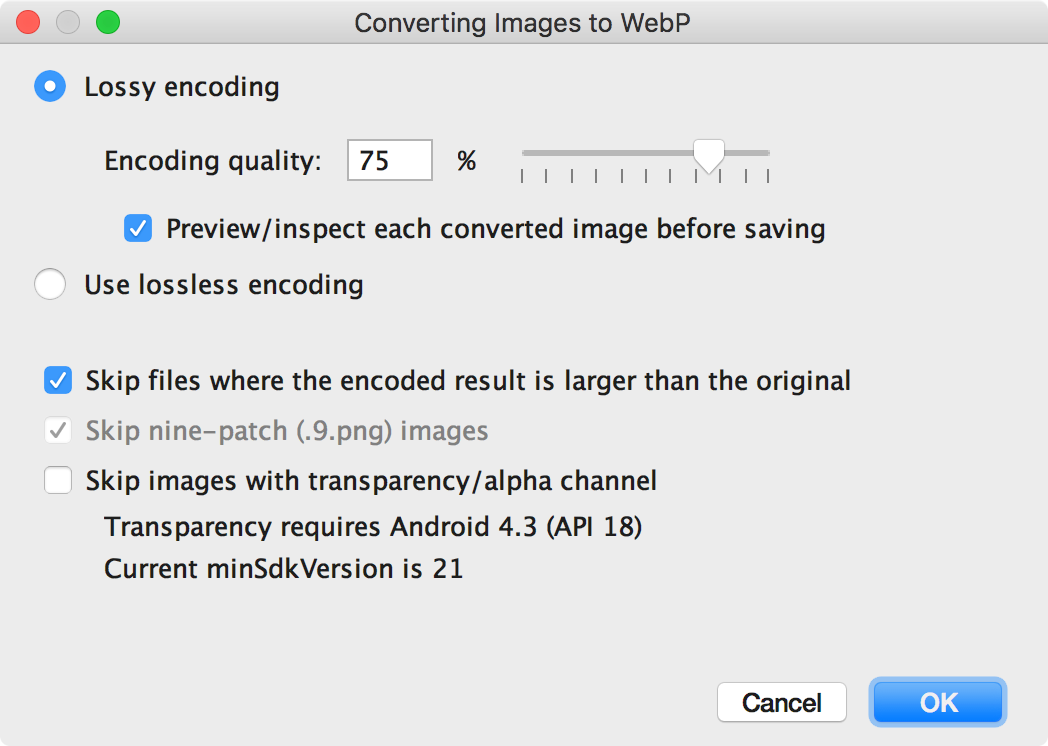
Figura 1: Diálogo Convirtiendo imágenes a formato WebP -
Selecciona la codificación con o sin pérdidas.
La codificación sin pérdidas solo estará disponible si tuminSdkVersionestá configurada en 18 o una versión posterior.Si seleccionas la codificación con pérdidas, deberás configurar la calidad de la codificación y elegir si quieres obtener una vista previa de cada imagen convertida antes de guardarla.
Además, puedes optar por omitir la conversión de archivos en los casos en los que la versión codificada tendría mayor tamaño que la original, o bien cualquier archivo con transparencia o un canal alfa. Como Android Studio solo te permite crear imágenes WebP transparentes si tu
minSdkVersionestá configurada en 18 o una versión posterior, se marcará automáticamente la casilla de verificación Skip images with transparency/alpha channel si tuminSdkVersiones inferior a 18.Nota: No es posible convertir los archivos 9-patch a imágenes WebP. La herramienta que generó una conversión omite las imágenes 9-patch automáticamente.
-
Haz clic en OK (Aceptar) para iniciar la conversión.
Si necesitas convertir más de una imagen, puedes hacerlo en un solo paso, con la posibilidad de deshacerlo para revertir todas las imágenes que se convirtieron a la vez.
Si seleccionaste la conversión sin pérdidas, este proceso se realizará de inmediato. Tus imágenes se convierten en su ubicación original. Si seleccionaste la conversión con pérdidas, ve al siguiente paso.
-
Si seleccionaste la conversión con pérdidas y quieres obtener una vista previa de cada imagen convertida antes de guardarla, Android Studio te mostrará cada imagen durante la conversión de manera que puedas inspeccionar el resultado. Durante el paso de la vista previa, puedes ajustar la configuración de calidad de cada imagen de manera individual, como se muestra en la Figura 2.
Si no obtuviste una vista previa de las imágenes convertidas, Android Studio omitirá este paso y convertirá las imágenes de inmediato.

Figura 2: Vista previa de la conversión de una imagen de formato JPG a WebP al 75% de calidad. En la Figura 2, se muestra la imagen JPG original del lado izquierdo y la imagen WebP codificada con pérdidas del lado derecho. En el diálogo, se muestra el tamaño del archivo de la imagen original y el de la convertida. Puedes arrastrar el control deslizante hacia la izquierda o la derecha para cambiar la configuración de calidad y el efecto se verá reflejado inmediatamente en la imagen codificada y el tamaño de archivo.
En el área central, se muestra la diferencia de píxeles entre la imagen original y la codificada. En la Figura 2, con la calidad configurada en 75%, la diferencia entre ambas imágenes es insignificante. En la Figura 3, se muestra la misma imagen codificada con la calidad configurada en 0%.
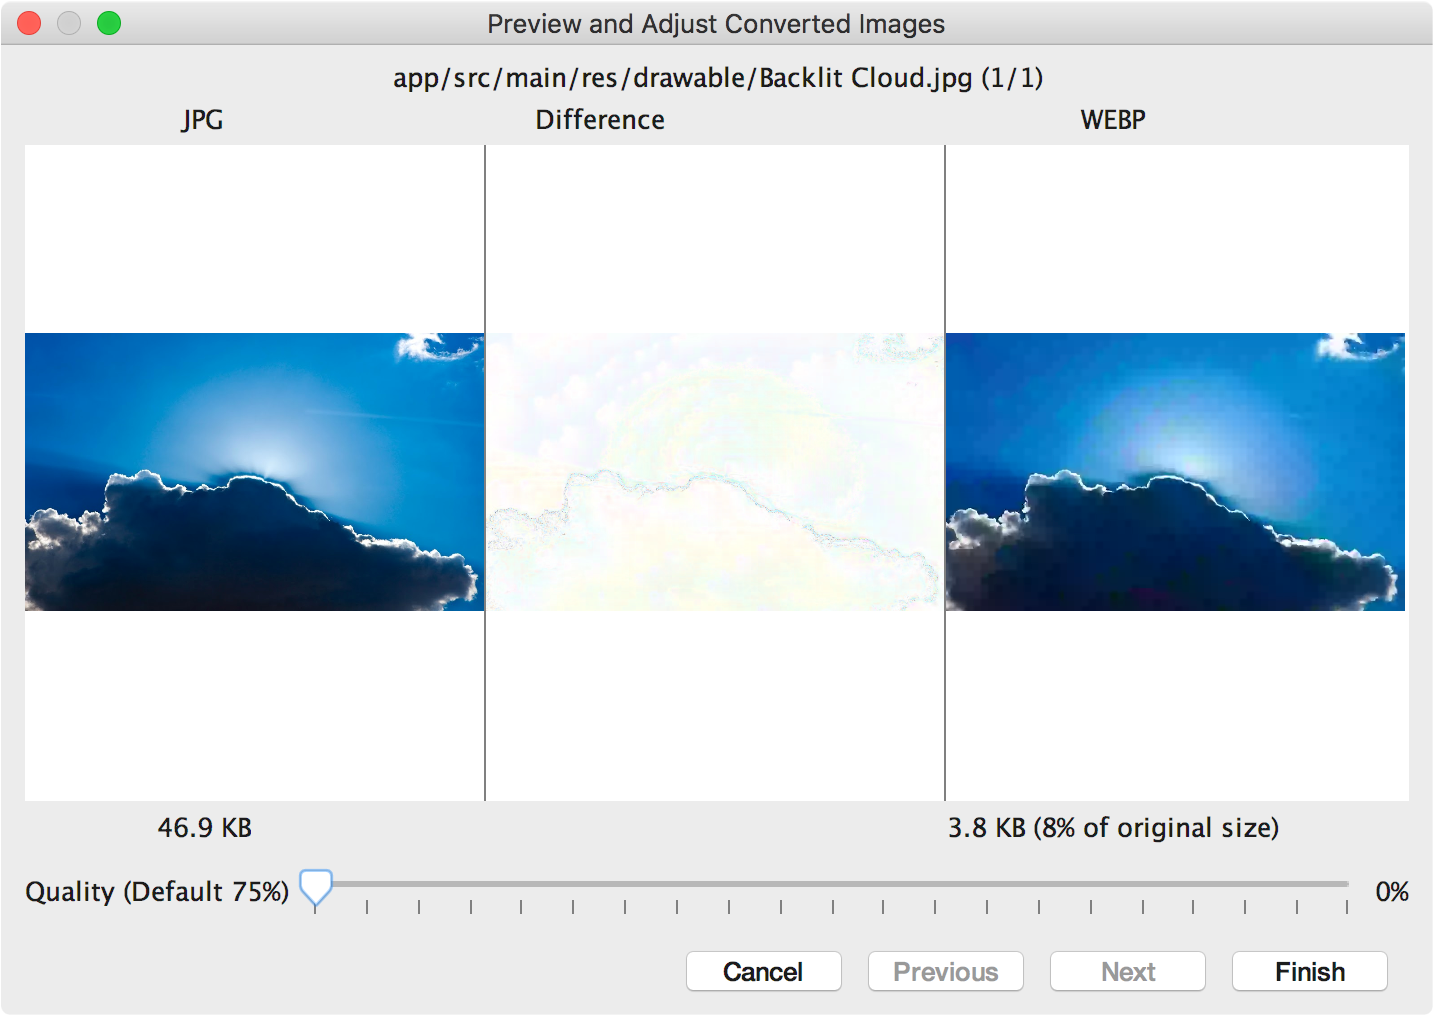
Figura 3: Vista previa de la conversión de una imagen de formato JPG a WebP al 0% de calidad. Nota: Si configuras la calidad en 100% y la
minSdkVersionse establece en 18 o una versión posterior, Android Studio cambiará automáticamente a la codificación sin pérdidas.Selecciona una configuración de calidad para cada imagen que revises. Si quieres convertir más de una imagen, haz clic en Next a fin de pasar a la siguiente imagen.
- Haz clic en Finish. Tus imágenes se convierten en su ubicación original.
Cómo convertir imágenes WebP a PNG
Si quieres usar una imagen WebP de tu proyecto con otros fines (por ejemplo, en una página web que debe mostrar las imágenes correctamente en un navegador que no admite WebP), puedes usar Android Studio para convertir imágenes WebP al formato PNG.
Para ello, haz lo siguiente:
- Haz clic con el botón derecho en una imagen WebP en Android Studio y, luego, selecciona Convert to PNG.
Aparecerá un cuadro de diálogo en el que se te preguntará si deseas borrar el archivo WebP original después de la conversión o conservarlo junto con el nuevo archivo PNG.
Haz clic en Yes para borrar el archivo WebP original o en No si quieres conservar tanto el archivo WebP como el PNG. La imagen se convertirá de inmediato.