
En Cómo realizar pruebas en Android Studio y Cómo realizar pruebas desde la línea de comandos, se explica cómo establecer y ejecutar configuraciones de prueba básicas. Sin embargo, cuando tu app y sus requisitos de prueba se vuelvan más avanzados, es posible que debas adaptar aún más tus configuraciones de prueba. Por ejemplo, es posible que necesites una configuración de prueba avanzada cuando quieras realizar las siguientes acciones:
- Ejecutar pruebas de instrumentación solo para una variante de compilación específica o anula su configuración de manifiesto
- Cambiar el tipo de compilación en el que se ejecutan tus pruebas o configura sus opciones de Gradle
- Extraer tus pruebas de instrumentación en su propio módulo de prueba
- Realizar pruebas más avanzadas como parte de la configuración de la integración continua
En esta página, se describen varias formas de configurar tus pruebas cuando la configuración predeterminada no se ajusta a tus necesidades.
Cómo crear una prueba de instrumentación para una variante de compilación
Si en tu proyecto se incluyen variantes de compilación con conjuntos de orígenes únicos, te recomendamos que incluyas pruebas de instrumentación que correspondan a esos conjuntos de orígenes. Esto mantiene el código de prueba organizado y te permite ejecutar solo las pruebas que se apliquen a una variante de compilación determinada.
Para vincular pruebas de instrumentación a una variante de compilación, colócalas en su propio conjunto de orígenes, ubicado en src/androidTestVariantName.
Se comparten las pruebas de instrumentación en el conjunto de orígenes src/androidTest/ en todas las variantes de compilación. Cuando se compila un APK de prueba para la variante "MyFlavor" de tu app, Gradle combina los conjuntos de orígenes src/androidTest/ y src/androidTestMyFlavor/.
Si deseas agregar un conjunto de orígenes de pruebas para tu variante de compilación en Android Studio, sigue estos pasos:
- En la ventana Project, haz clic en el menú y selecciona la vista Project.
- Dentro de la carpeta de módulo correspondiente, haz clic con el botón derecho en la carpeta src y selecciona New > Directory.
- Como nombre del directorio, escribe "androidTestVariantName". Por ejemplo, si tienes una variante de compilación llamada "MyFlavor", usa el nombre de directorio
androidTestMyFlavor. - Haz clic en OK.
- Haz clic con el botón derecho en el directorio nuevo y selecciona New > Directory.
- Escribe "java" como nombre de directorio y haz clic en OK.
Ahora puedes agregar pruebas a este conjunto de orígenes nuevo siguiendo los pasos para agregar una prueba nueva. Cuando llegues al diálogo Choose Destination Directory, selecciona el conjunto de orígenes de prueba de la variante nueva. Cuando llegues al diálogo Choose Destination Directory, selecciona el conjunto de orígenes de prueba de la variante nueva.
En la siguiente tabla, se muestra un ejemplo de cómo los archivos de prueba de instrumentación pueden residir en conjuntos de orígenes que corresponden a los conjuntos de orígenes de código de la app.
Tabla 1: Código fuente de la app y archivos de prueba de instrumentación correspondientes
| Ruta de acceso a la clase de app | Ruta de acceso para hacer coincidir la clase de prueba de instrumentación |
|---|---|
src/main/kotlin+java/Example.kt
|
src/androidTest/java/AndroidExampleTest.kt
|
src/myFlavor/kotlin+java/Example.kt
|
src/androidTestMyFlavor/java/AndroidExampleTest.kt
|
Del mismo modo en que lo hace para tus conjuntos de orígenes de apps, la compilación de Gradle combina y anula los archivos de diferentes conjuntos de orígenes de prueba. En este caso, el archivo AndroidExampleTest.kt del conjunto de orígenes androidTestMyFlavor anula la versión en el conjunto de orígenes androidTest. Esto se debe a que el conjunto de orígenes de la variante de producto tiene prioridad sobre el conjunto de orígenes principal.
Cuando seleccionas diferentes variantes en el selector de variantes de compilación, se muestran las carpetas androidTest adecuadas en la vista Android para mostrar las carpetas que se usan:
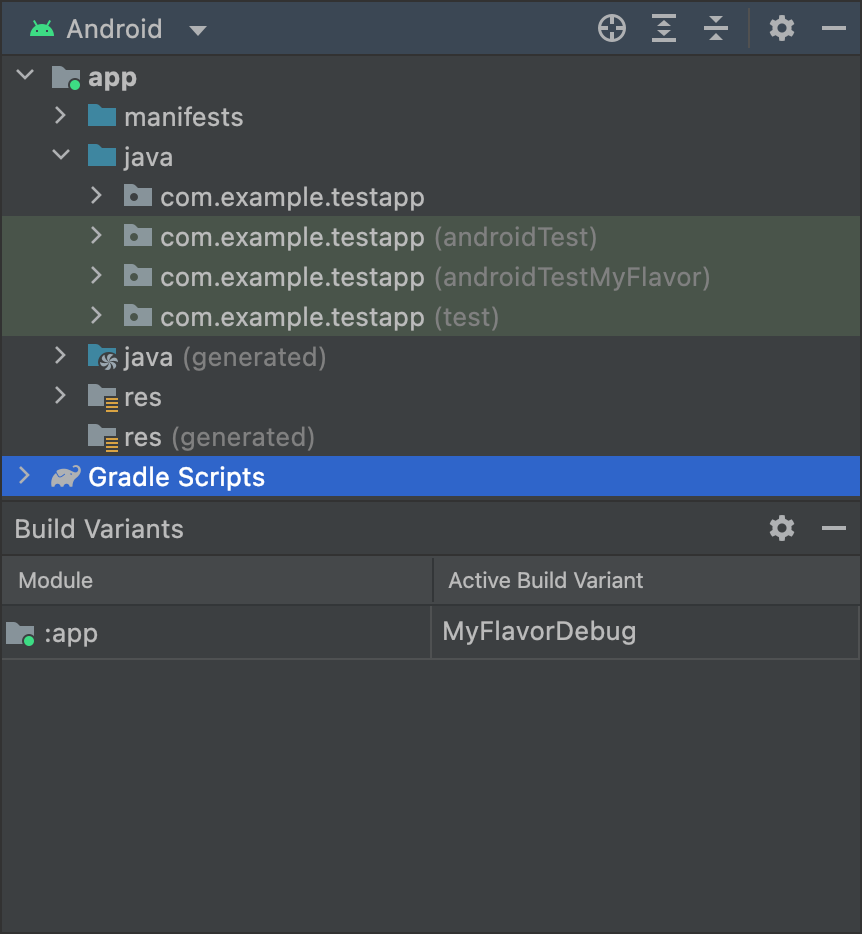
MyFlavor y la carpeta androidTestMyFlavor se muestra en la vista Android.La carpeta androidTestMyFlavor no se muestra cuando se selecciona una variante diferente:
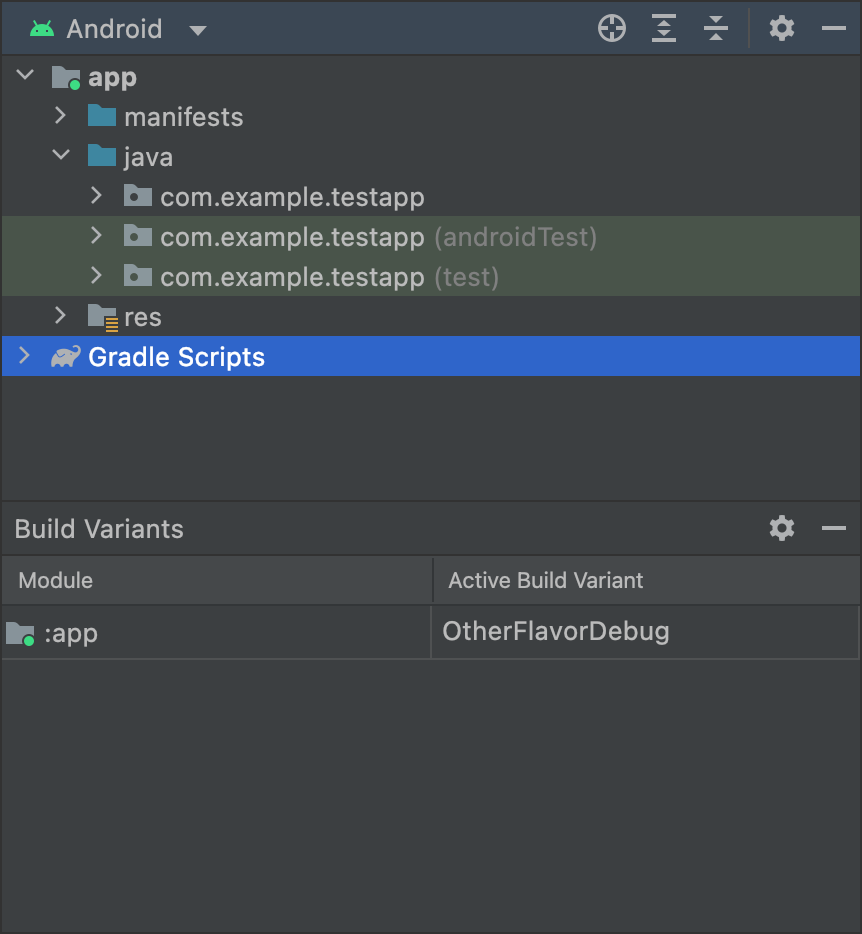
OtherFlavor seleccionada ni la carpeta
androidTestMyFlavor en la vista Android.Esto se ve un poco diferente si usas la vista Project, pero se aplica el mismo principio:
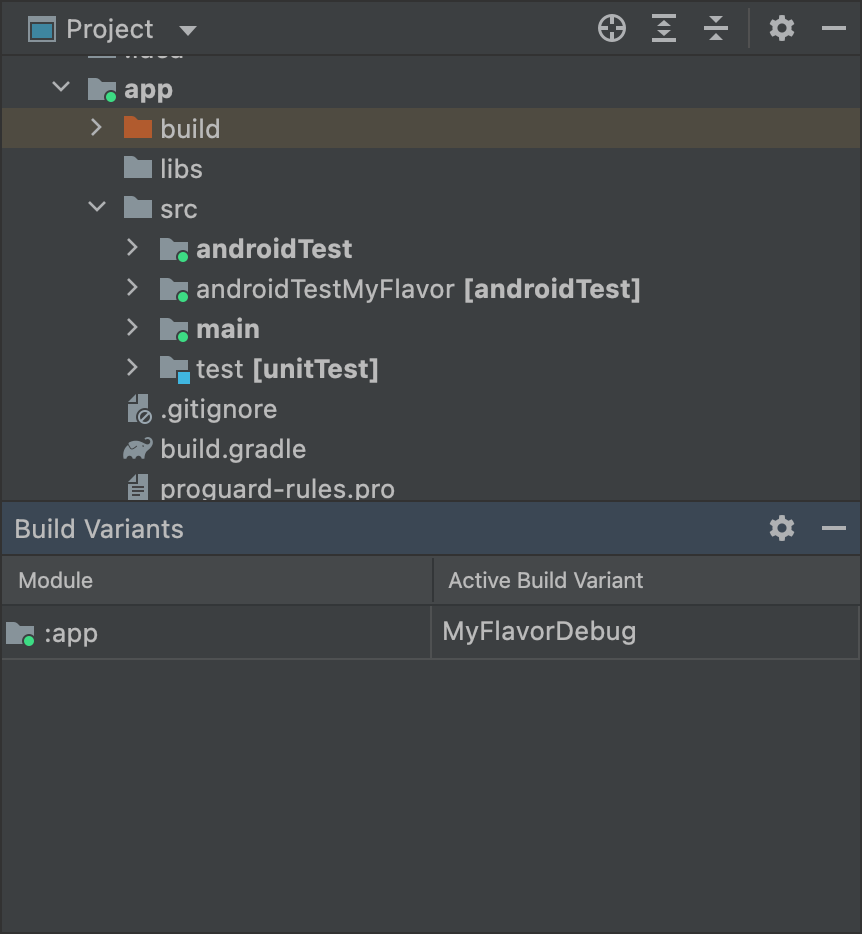
MyFlavor y la carpeta androidTestMyFlavor está activa en la vista Project.Cuando se selecciona una variante diferente, la carpeta androidTestMyFlavor sigue siendo visible, pero no se muestra como activa:
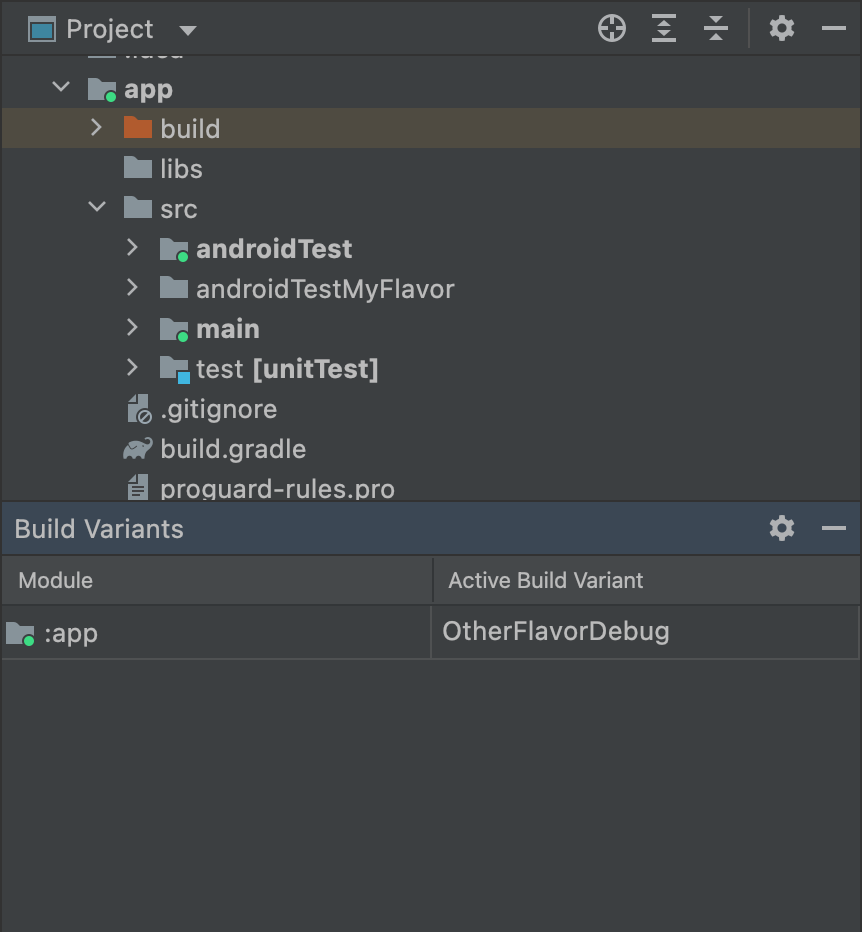
OtherFlavor y la carpeta androidTestMyFlavor no está activa en la vista Project.Para obtener más información acerca de cómo se combinan los conjuntos de orígenes, consulta Conjuntos de orígenes.
Cómo configurar ajustes del manifiesto de instrumentación
Las pruebas de instrumentación se compilan en un APK independiente, con su propio archivo AndroidManifest.xml. Cuando Gradle compila tu APK de prueba, genera automáticamente el archivo AndroidManifest.xml y lo configura con el nodo <instrumentation>.
Uno de los motivos por los que Gradle configura este nodo es para que puedas asegurarte de que la propiedad targetPackage especifique el nombre de paquete correcto de la app que estás probando.
Para cambiar otras opciones de configuración de este nodo, crea otro archivo de manifiesto en el conjunto de orígenes de prueba o configura el archivo build.gradle de nivel de módulo, como se indica en la siguiente muestra de código. Puedes encontrar la lista completa de opciones en la
BaseFlavor
referencia de la API.
Kotlin
android {
    ...
    defaultConfig {
        ...
        testApplicationId = "com.example.test"
        testInstrumentationRunner = "androidx.test.runner.AndroidJUnitRunner"
        testHandleProfiling = true
        testFunctionalTest = true
    }
}
Groovy
android {
    ...
    defaultConfig {
        ...
        testApplicationId "com.example.test"
        testInstrumentationRunner "androidx.test.runner.AndroidJUnitRunner"
        testHandleProfiling true
        testFunctionalTest true
    }
}
Cada variante de producto que configures puede anular las propiedades en el bloque defaultConfig {}. Para obtener más información, consulta Cómo configurar variantes de productos.
Las propiedades del fragmento son las siguientes:
| Configuración | Descripción |
|---|---|
testApplicationId
|
Especifica el ID de aplicación del APK de prueba. |
testInstrumentationRunner
|
Especifica el nombre de clase completamente calificado del ejecutor de instrumentación de pruebas. |
testHandleProfiling
|
Si se establece en true, habilita la clase de instrumentación para iniciar y detener la generación de perfiles.Si se establece en false, la generación de perfiles se produce durante todo el tiempo mientras la clase de instrumentación se esté ejecutando. |
testFunctionalTest
|
Si se establece en true, indica que el sistema Android debe ejecutar la clase de instrumentación como una prueba funcional.El valor predeterminado es false. |
Cómo cambiar el tipo de compilación de pruebas
De forma predeterminada, todas las pruebas de instrumentación se ejecutan en el tipo de compilación debug.
Puedes cambiar esta configuración a otro tipo de compilación usando la propiedad testBuildType en el archivo build.gradle del nivel de módulo. Por ejemplo, si deseas ejecutar tus pruebas en tu tipo de compilación staging, edita el archivo como se muestra en el siguiente fragmento:
Kotlin
android {
    ...
    testBuildType = "staging"
}
Groovy
android {
    ...
    testBuildType "staging"
}
Cómo configurar opciones de prueba de Gradle
El complemento de Android para Gradle te permite especificar determinadas opciones para algunas o todas tus pruebas. En el archivo a nivel de módulo
build.gradle, usa el bloque
testOptions
para especificar opciones que cambien la manera en la que Gradle ejecuta todas tus pruebas:
Kotlin
android {
    ...
    // Encapsulates options for running tests.
    testOptions {
        reportDir = "$rootDir/test-reports"
        resultsDir = "$rootDir/test-results"
    }
}
Groovy
android {
    ...
    // Encapsulates options for running tests.
    testOptions {
        reportDir "$rootDir/test-reports"
        resultsDir "$rootDir/test-results"
    }
}
La propiedad reportDir cambia el directorio en el que Gradle guarda los informes de prueba. De forma predeterminada, Gradle guarda los informes de prueba en el directorio path_to_your_project/module_name
/build/outputs/reports/. $rootDir establece la ruta de acceso en relación con el directorio raíz del proyecto actual.
La propiedad resultsDir cambia el directorio en el que Gradle guarda los resultados de las pruebas. De forma predeterminada, Gradle guarda los resultados de las pruebas en el directorio path_to_your_project/module_name
/build/outputs/test-results/. $rootDir establece la ruta de acceso en relación con el directorio raíz del proyecto actual.
Si deseas especificar opciones para pruebas de unidades locales únicamente, configura el
unitTests
bloque dentro de testOptions.
Kotlin
android {
    ...
    testOptions {
        ...
        // Encapsulates options for local unit tests.
        unitTests {
            returnDefaultValues = true

            all {
                jvmArgs = listOf("-XX:MaxPermSize=256m")

                 if (it.name == "testDebugUnitTest") {
                    systemProperty = mapOf("debug" to "true")
                }
                ...
            }
        }
    }
}
Groovy
android {
    ...
    testOptions {
        ...
        // Encapsulates options for local unit tests.
        unitTests {
            returnDefaultValues true

            all {
                jvmArgs '-XX:MaxPermSize=256m'

                if (it.name == 'testDebugUnitTest') {
                    systemProperty 'debug', 'true'
                }
                ...
            }
        }
    }
}
De forma predeterminada, las pruebas de unidades locales arrojan una excepción cada vez que el código
que pruebas intenta acceder a las APIs de la plataforma de Android, a menos que
simules dependencias de Android
tú mismo o con un framework de pruebas como
Mockito. Sin embargo, puedes habilitar la propiedad returnDefaultValues para que la prueba muestre un valor nulo o igual a cero cuando se acceda a las APIs de la plataforma, en lugar de arrojar una excepción.
El bloque all encapsula opciones para controlar la manera en que Gradle ejecuta las pruebas de unidades locales. Para obtener una lista de todas las opciones que puedes especificar, lee la documentación de referencia de Gradle.
La propiedad jvmArgs establece argumentos de JVM para las JVM de prueba.
También puedes verificar el nombre de la tarea para aplicar opciones solo a las pruebas que especifiques. En el fragmento de ejemplo, la propiedad debug se establece en true, pero solo para la tarea testDebugUnitTest.
Cómo usar módulos de prueba individuales para pruebas de instrumentación
Si deseas tener un módulo dedicado para pruebas de instrumentación y aislar el resto del código de las pruebas, crea un módulo de prueba por separado y configura su compilación del mismo modo que con un módulo de biblioteca.
Para crear un módulo de prueba, sigue estos pasos:
- Crea un módulo de biblioteca.
- En el archivo
build.gradlea nivel del módulo, aplica el complementocom.android.testen lugar decom.android.library. - Haz clic en Sync Project
 .
.
Después de crear el módulo de prueba, puedes incluir el código de prueba en el conjunto de orígenes principal o de la variante (por ejemplo, src/main/kotlin+java o src/variant/kotlin+java). Si el módulo de tu app define múltiples variantes de producto, puedes volver a crear esas variantes en tu módulo de prueba. Mediante la administración de dependencias con reconocimiento de variantes,
el módulo de prueba intenta probar el tipo coincidente en el módulo de orientación.
De manera predeterminada, los módulos de prueba contienen y prueban solo una variante de depuración. Sin embargo, puedes crear tipos de compilación nuevos que coincidan con el proyecto de app sometido a prueba. Si deseas que el módulo pruebe un tipo de compilación diferente y no la de depuración, usa VariantFilter para inhabilitar la variante de depuración en el proyecto de prueba, como se muestra a continuación:
Kotlin
android {
    variantFilter {
        if (buildType.name == "debug") {
            ignore = true
        }
    }
}
Groovy
android {
    variantFilter { variant ->
        if (variant.buildType.name.equals('debug')) {
            variant.setIgnore(true);
        }
    }
}
Si quieres que un módulo de prueba se oriente solamente a algunas variantes o algunos tipos de compilación de una app, puedes usar la propiedad matchingFallbacks para apuntar solo a las variantes que deseas probar. Así, también se evita que el módulo de prueba deba configurar esas variantes por sí mismo.