
A display cutout is an area on some devices that extends into the display surface. It allows for an edge-to-edge experience while providing space for important sensors on the front of the device.
Android supports display cutouts on devices running Android 9 (API level 28) and higher. However, device manufacturers can also support display cutouts on devices running Android 8.1 or lower.
This document describes how to implement support for devices with cutouts, including how to work with the cutout area—that is, the edge-to-edge rectangle on the display surface that contains the cutout.
Choose how your app handles cutout areas
If you don't want your content to overlap with a cutout area, it's generally
sufficient to make sure your content doesn't overlap with the status bar and the
navigation bar. If you're rendering into the cutout area, use
WindowInsetsCompat.getDisplayCutout()
to retrieve a DisplayCutout object
that contains the safe insets and bounding box for each cutout. These APIs let
you check whether your content overlaps with the cutout so that you can
reposition if needed.
You can also determine whether content is laid out behind the cutout area. The
layoutInDisplayCutoutMode
window layout attribute controls how your content is drawn in the cutout area.
You can set layoutInDisplayCutoutMode to one of the following values:
LAYOUT_IN_DISPLAY_CUTOUT_MODE_DEFAULT: content renders into the cutout area when the display cutout is contained in a system bar. Otherwise, the window does not overlap the display cutout; for example, content may be letterboxed when displayed in landscape mode. If your app targets SDK 35, this is interpreted asALWAYSfor non-floating windows.LAYOUT_IN_DISPLAY_CUTOUT_MODE_ALWAYS: content is always allowed to extend into the cutout areas. If your app targets SDK 35 and is running on an Android 15 device, this is the only allowed mode for non-floating windows to ensure an edge-to-edge display.LAYOUT_IN_DISPLAY_CUTOUT_MODE_SHORT_EDGES: content renders into the cutout area in both portrait and landscape modes. Don't use for floating windows. If your app targets SDK 35, this is interpreted asALWAYSfor non-floating windows.LAYOUT_IN_DISPLAY_CUTOUT_MODE_NEVER: content never renders into the cutout area. If your app targets SDK 35, this is interpreted asALWAYSfor non-floating windows.
You can set the cutout mode either programmatically or by setting a
style in your activity. The following
example defines a style to apply the LAYOUT_IN_DISPLAY_CUTOUT_MODE_SHORT_EDGES
attribute to the activity.
<style name="ActivityTheme">
  <item name="android:windowLayoutInDisplayCutoutMode">
    shortEdges <!-- default, shortEdges, or never -->
  </item>
</style>
The following sections describe the different cutout modes in more detail.
Default behavior
If your app targets SDK 35 and is running on an Android 15 device,
LAYOUT_IN_DISPLAY_CUTOUT_MODE_ALWAYS is the default behavior, and
LAYOUT_IN_DISPLAY_CUTOUT_MODE_DEFAULT is interpreted as
LAYOUT_IN_DISPLAY_CUTOUT_MODE_ALWAYS for non-floating windows.
Otherwise, LAYOUT_IN_DISPLAY_CUTOUT_MODE_DEFAULT is the default.
Render content in short edge cutout areas
If your app targets SDK 35 and is running on an Android 15 device,
LAYOUT_IN_DISPLAY_CUTOUT_MODE_SHORT_EDGES is interpreted as
LAYOUT_IN_DISPLAY_CUTOUT_MODE_ALWAYS for non-floating windows.
With LAYOUT_IN_DISPLAY_CUTOUT_MODE_SHORT_EDGES, the
content extends into the cutout area on the short edge of the display in both
portrait and landscape, regardless of whether the system bars are hidden or
visible. When using this mode, be sure that no important content overlaps with
the cutout area.
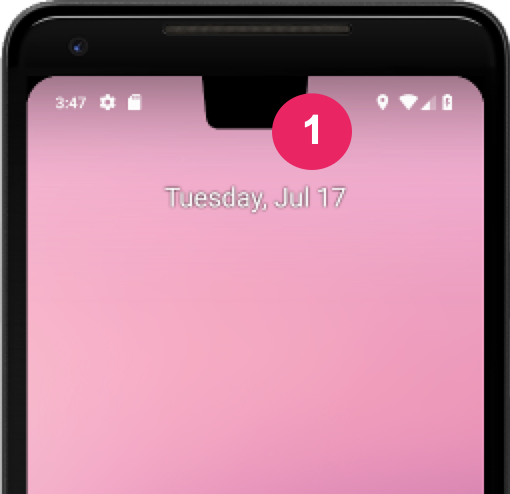
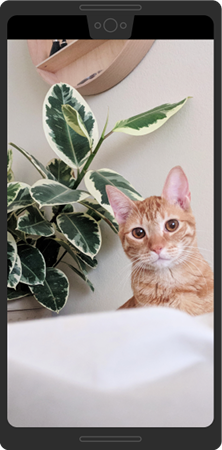
The following image is an example of LAYOUT_IN_DISPLAY_CUTOUT_MODE_SHORT_EDGES
for a device in portrait:
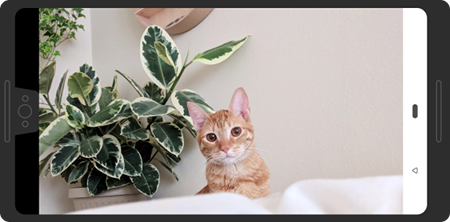
The following image is an example of LAYOUT_IN_DISPLAY_CUTOUT_MODE_SHORT_EDGES
for a device in landscape:
In this mode, the window extends under cutouts on the short edge of the display in both portrait and landscape, regardless of whether the window is hiding the system bars.
A cutout in the corner is considered to be on the short edge:
Never render content in the display cutout area
If your app targets SDK 35 and is running on an Android 15 device,
LAYOUT_IN_DISPLAY_CUTOUT_MODE_NEVER is interpreted as
LAYOUT_IN_DISPLAY_CUTOUT_MODE_ALWAYS for non-floating windows.
With LAYOUT_IN_DISPLAY_CUTOUT_MODE_NEVER, the window is never allowed to
overlap with the cutout area.
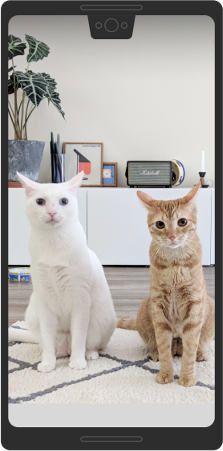
The following is an example of LAYOUT_IN_DISPLAY_CUTOUT_MODE_NEVER in
portrait:
LAYOUT_IN_DISPLAY_CUTOUT_MODE_NEVER for portrait mode.
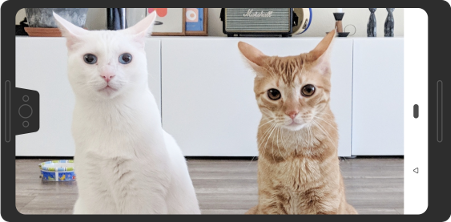
The following is an example of LAYOUT_IN_DISPLAY_CUTOUT_MODE_NEVER in
landscape mode:
LAYOUT_IN_DISPLAY_CUTOUT_MODE_NEVER in landscape mode.
Best practices for display cutout support
When working with display cutouts, consider the following:
- Be mindful of the placement of critical elements of the UI. Don't let the cutout area obscure any important text, controls, or other information.
- Don't place or extend any interactive elements that require fine-touch recognition into the cutout area. Touch sensitivity might be lower in the cutout area.
Where possible, use
WindowInsetsCompatto retrieve the status bar height and determine the appropriate padding to apply to your content. Avoid hardcoding the status bar height, as this can lead to overlapping or cut-off content.
Figure 7. Use WindowInsetsCompatto avoid overlapping or cutting off content.Use
View.getLocationInWindow()to determine how much window space your app is using. Don't assume the app is using the entire window, and don't useView.getLocationOnScreen().Use
always,shortEdgesornevercutout modes if your app needs to transition into and out of immersive mode. Default cutout behavior can cause content in your app to render in the cutout area while the system bars are present, but not while in immersive mode. This results in the content moving up and down during transitions, as demonstrated in the following example.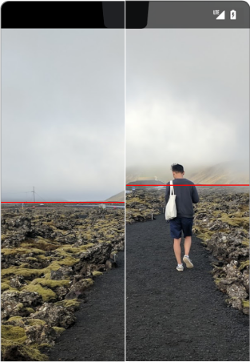
Figure 8. Example of content moving up and down during transitions. In immersive mode, be careful using window versus screen coordinates, since your app doesn't use the whole screen when letterboxed. Because of the letterbox, coordinates from the screen origin aren't the same as coordinates from the window origin. You can transform screen coordinates to the view's coordinates as needed by using
getLocationOnScreen(). The following image shows how coordinates differ when content is letterboxed: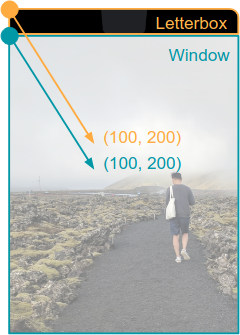
Figure 9. Window versus screen coordinates when content is letterboxed. When handling
MotionEvent, useMotionEvent.getX()andMotionEvent.getY()to avoid similar coordinate issues. Don't useMotionEvent.getRawX()orMotionEvent.getRawY().
Test how your content renders
Test all of your app's screens and experiences. Test on devices with different types of cutouts, if possible. If you don't have a device with a cutout, you can simulate common cutout configurations on any device or emulator running Android 9 or higher by doing the following:
- Enable Developer options.
- In the Developer options screen, scroll down to the Drawing section and select Simulate a display with a cutout.
Select the cutout type.
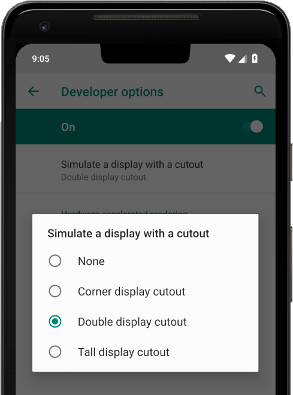
Figure 10. Developer options to test how your content renders.
Additional resources
- LAYOUT_IN_DISPLAY_CUTOUT_MODE_ALWAYS
- LAYOUT_IN_DISPLAY_CUTOUT_MODE_NEVER
- LAYOUT_IN_DISPLAY_CUTOUT_MODE_SHORT_EDGES
- LAYOUT_IN_DISPLAY_CUTOUT_MODE_DEFAULT