เงาจะยกระดับ UI ในเชิงภาพ แสดงการโต้ตอบต่อผู้ใช้ และให้ ความคิดเห็นทันทีเกี่ยวกับการดำเนินการของผู้ใช้ Compose มีหลายวิธีในการรวม เงาไว้ในแอป
Modifier.shadow(): สร้างเงาตามระดับความสูงด้านหลัง Composable ที่สอดคล้องกับหลักเกณฑ์ของ Material DesignModifier.dropShadow(): สร้างเงาที่ปรับแต่งได้ซึ่งปรากฏอยู่ด้านหลัง Composable ทำให้ดูเหมือนลอยขึ้นModifier.innerShadow(): สร้างเงาภายในเส้นขอบของ Composable ทำให้ดูเหมือนว่ากดลงไปบนพื้นผิวที่อยู่ด้านหลัง
Modifier.shadow() เหมาะสำหรับการสร้างเงาพื้นฐาน ส่วนตัวแก้ไข dropShadow() และ innerShadow() จะช่วยให้ควบคุมการแสดงผลเงาได้อย่างละเอียดและแม่นยำยิ่งขึ้น
หน้านี้อธิบายวิธีใช้ตัวแก้ไขแต่ละรายการ รวมถึงวิธี
สร้างภาพเคลื่อนไหวของเงาเมื่อผู้ใช้โต้ตอบ และวิธีเชื่อมโยงตัวแก้ไข
innerShadow()และdropShadow()เพื่อ
สร้างเงาแบบไล่ระดับสี
เงาแบบนิวโมฟิซึม และอื่นๆ
สร้างเงาพื้นฐาน
Modifier.shadow() สร้างเงาพื้นฐานตามหลักเกณฑ์ Material Design ที่จำลองแหล่งกำเนิดแสงเหนือศีรษะ ความลึกของเงา
จะอิงตามค่า elevation และเงาที่ทอดจะถูกตัดให้เป็น
รูปร่างของ Composable
@Composable fun ElevationBasedShadow() { Box( modifier = Modifier.aspectRatio(1f).fillMaxSize(), contentAlignment = Alignment.Center ) { Box( Modifier .size(100.dp, 100.dp) .shadow(10.dp, RectangleShape) .background(Color.White) ) } }
Modifier.shadow()ใช้เงาตกกระทบ
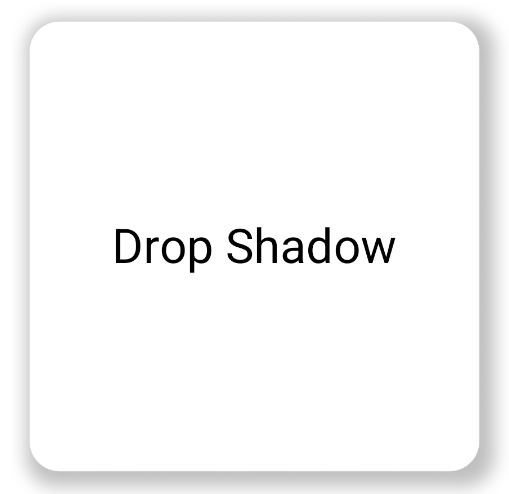
ใช้ตัวแก้ไข dropShadow() เพื่อวาดเงาที่แม่นยำด้านหลังเนื้อหา
ซึ่งจะทำให้องค์ประกอบดูเหมือนลอยขึ้น
คุณควบคุมแง่มุมสำคัญต่อไปนี้ได้ผ่านพารามิเตอร์ Shadow
radius: กำหนดความนุ่มนวลและการกระจายของเบลอcolor: กำหนดสีของสีแต้มoffset: จัดตำแหน่งเรขาคณิตของเงาตามแกน x และ yspread: ควบคุมการขยายหรือการหดของรูปทรงเรขาคณิตของเงา
นอกจากนี้ พารามิเตอร์ shape ยังกำหนดรูปร่างโดยรวมของเงาได้ด้วย โดยสามารถใช้รูปทรงเรขาคณิตใดก็ได้จากแพ็กเกจ androidx.compose.foundation.shape รวมถึงรูปทรง Material Expressive
หากต้องการใช้เงาตกกระทบพื้นฐาน ให้เพิ่มตัวแก้ไข dropShadow() ลงใน
เชนที่ใช้ได้ โดยระบุรัศมี สี และการกระจาย โปรดทราบว่า
purpleColor พื้นหลังที่ปรากฏเหนือเงาจะวาดหลังจากตัวแก้ไข
dropShadow()
@Composable fun SimpleDropShadowUsage() { Box(Modifier.fillMaxSize()) { Box( Modifier .width(300.dp) .height(300.dp) .dropShadow( shape = RoundedCornerShape(20.dp), shadow = Shadow( radius = 10.dp, spread = 6.dp, color = Color(0x40000000), offset = DpOffset(x = 4.dp, 4.dp) ) ) .align(Alignment.Center) .background( color = Color.White, shape = RoundedCornerShape(20.dp) ) ) { Text( "Drop Shadow", modifier = Modifier.align(Alignment.Center), fontSize = 32.sp ) } } }
ประเด็นสำคัญเกี่ยวกับโค้ด
- ใช้ตัวแก้ไข
dropShadow()กับBoxด้านใน เงามีลักษณะต่อไปนี้- รูปร่างสี่เหลี่ยมผืนผ้ามุมมน (
RoundedCornerShape(20.dp)) - รัศมีการเบลอ
10.dpทำให้ขอบนุ่มนวลและกระจาย - การกระจาย
6.dpซึ่งจะขยายขนาดเงาและทำให้ใหญ่กว่า กล่องที่สร้างเงา - ค่าอัลฟ่าเป็น
0.5fทำให้เงาโปร่งแสงบางส่วน
- รูปร่างสี่เหลี่ยมผืนผ้ามุมมน (
- หลังจากกำหนดเงาแล้ว ให้ทำดังนี้ใช้ตัวแก้ไข
background()แล้วBoxจะเติมสีขาว- ระบบจะตัดพื้นหลังให้เป็นรูปสี่เหลี่ยมผืนผ้าขอบมนเดียวกับเงา
ผลลัพธ์
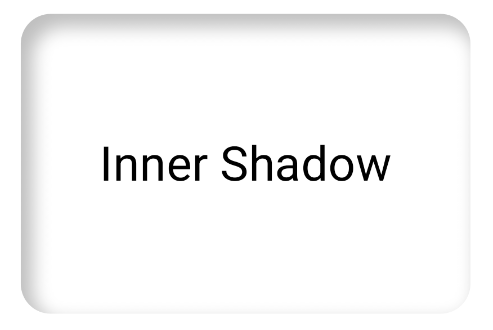
ใช้เงาด้านใน
หากต้องการสร้างเอฟเฟกต์ตรงข้ามกับ dropShadow() ให้ใช้
Modifier.innerShadow() ซึ่งจะสร้างภาพลวงตาว่าองค์ประกอบนั้น
เว้าลงหรือกดลงบนพื้นผิวที่อยู่ด้านล่าง
ลำดับมีความสำคัญเมื่อสร้างเงาด้านใน ตัวปรับ innerShadow()
จะดึงข้อมูลจากด้านบนของเนื้อหา โดยปกติแล้ว คุณจะต้องทำตามขั้นตอนต่อไปนี้เพื่อให้เงาปรากฏ
- วาดเนื้อหาพื้นหลัง
- ใช้ตัวแก้ไข
innerShadow()เพื่อสร้างลักษณะเว้า
หากวาง innerShadow() ไว้ก่อนพื้นหลัง ระบบจะวาดพื้นหลัง
ทับเงา ทำให้มองไม่เห็นเงาเลย
ตัวอย่างต่อไปนี้แสดงการใช้ innerShadow() ใน RoundedCornerShape
@Composable fun SimpleInnerShadowUsage() { Box(Modifier.fillMaxSize()) { Box( Modifier .width(300.dp) .height(200.dp) .align(Alignment.Center) // note that the background needs to be defined before defining the inner shadow .background( color = Color.White, shape = RoundedCornerShape(20.dp) ) .innerShadow( shape = RoundedCornerShape(20.dp), shadow = Shadow( radius = 10.dp, spread = 2.dp, color = Color(0x40000000), offset = DpOffset(x = 6.dp, 7.dp) ) ) ) { Text( "Inner Shadow", modifier = Modifier.align(Alignment.Center), fontSize = 32.sp ) } } }
Modifier.innerShadow() กับสี่เหลี่ยมผืนผ้าที่มีมุมโค้งสร้างภาพเคลื่อนไหวของเงาเมื่อผู้ใช้โต้ตอบ
หากต้องการให้เงาตอบสนองต่อการโต้ตอบของผู้ใช้ คุณสามารถผสานรวมพร็อพเพอร์ตี้เงากับ API ภาพเคลื่อนไหวของ Compose ได้ เมื่อผู้ใช้กดปุ่ม เช่น เงาจะเปลี่ยนเพื่อให้ผลตอบสนองแบบภาพในทันที
โค้ดต่อไปนี้จะสร้างเอฟเฟกต์ "กด" พร้อมเงา (ภาพลวงตาที่ พื้นผิวถูกกดลงในหน้าจอ)
@Composable fun AnimatedColoredShadows() { SnippetsTheme { Box(Modifier.fillMaxSize()) { val interactionSource = remember { MutableInteractionSource() } val isPressed by interactionSource.collectIsPressedAsState() // Create transition with pressed state val transition = updateTransition( targetState = isPressed, label = "button_press_transition" ) fun <T> buttonPressAnimation() = tween<T>( durationMillis = 400, easing = EaseInOut ) // Animate all properties using the transition val shadowAlpha by transition.animateFloat( label = "shadow_alpha", transitionSpec = { buttonPressAnimation() } ) { pressed -> if (pressed) 0f else 1f } // ... val blueDropShadow by transition.animateColor( label = "shadow_color", transitionSpec = { buttonPressAnimation() } ) { pressed -> if (pressed) Color.Transparent else blueDropShadowColor } // ... Box( Modifier .clickable( interactionSource, indication = null ) { // ** ...... **// } .width(300.dp) .height(200.dp) .align(Alignment.Center) .dropShadow( shape = RoundedCornerShape(70.dp), shadow = Shadow( radius = 10.dp, spread = 0.dp, color = blueDropShadow, offset = DpOffset(x = 0.dp, -(2).dp), alpha = shadowAlpha ) ) .dropShadow( shape = RoundedCornerShape(70.dp), shadow = Shadow( radius = 10.dp, spread = 0.dp, color = darkBlueDropShadow, offset = DpOffset(x = 2.dp, 6.dp), alpha = shadowAlpha ) ) // note that the background needs to be defined before defining the inner shadow .background( color = Color(0xFFFFFFFF), shape = RoundedCornerShape(70.dp) ) .innerShadow( shape = RoundedCornerShape(70.dp), shadow = Shadow( radius = 8.dp, spread = 4.dp, color = innerShadowColor2, offset = DpOffset(x = 4.dp, 0.dp) ) ) .innerShadow( shape = RoundedCornerShape(70.dp), shadow = Shadow( radius = 20.dp, spread = 4.dp, color = innerShadowColor1, offset = DpOffset(x = 4.dp, 0.dp), alpha = innerShadowAlpha ) ) ) { Text( "Animated Shadows", // ... ) } } } }
ประเด็นสำคัญเกี่ยวกับโค้ด
- ประกาศสถานะเริ่มต้นและสิ้นสุดสำหรับพารามิเตอร์ที่จะเคลื่อนไหวเมื่อกด
ด้วย
transition.animateColorและtransition.animateFloat - ใช้
updateTransitionและระบุtargetState (targetState = isPressed)ที่เลือกเพื่อยืนยันว่าภาพเคลื่อนไหวทั้งหมดซิงค์กัน เมื่อใดก็ตามที่isPressedเปลี่ยนแปลง ออบเจ็กต์การเปลี่ยนภาพจะจัดการภาพเคลื่อนไหวของพร็อพเพอร์ตี้ย่อยทั้งหมดจากค่าปัจจุบันไปยังค่าเป้าหมายใหม่โดยอัตโนมัติ - กำหนด
buttonPressAnimationtweenซึ่งควบคุมเวลา และการค่อยๆ เปลี่ยนของการเปลี่ยน โดยจะระบุtween(ย่อมาจาก ระหว่าง) ที่มีระยะเวลา 400 มิลลิวินาทีและเส้นโค้งEaseInOutซึ่ง หมายความว่าภาพเคลื่อนไหวจะเริ่มช้า เร็วขึ้นตรงกลาง และช้าลงที่ ตอนจบ - กำหนด
Boxด้วยฟังก์ชันตัวแก้ไขแบบเชนที่ใช้พร็อพเพอร์ตี้ภาพเคลื่อนไหวทั้งหมดเพื่อสร้างองค์ประกอบภาพ ซึ่งรวมถึงรายการต่อไปนี้- .
clickable(): ตัวปรับแต่งที่ทำให้Boxโต้ตอบได้ .dropShadow(): ระบบจะใช้เงาตกกระทบด้านนอก 2 รายการก่อน พร็อพเพอร์ตี้สีและอัลฟ่าจะลิงก์กับค่าที่เคลื่อนไหว (blueDropShadowฯลฯ) และสร้างลักษณะที่ยกขึ้นในตอนแรก.innerShadow(): มีการวาดเงาด้านใน 2 รายการไว้ด้านบนพื้นหลัง พร็อพเพอร์ตี้ของเงาจะลิงก์กับชุดค่าเคลื่อนไหวอื่นๆ (innerShadowColor1ฯลฯ) และสร้างลักษณะที่เยื้อง
- .
ผลลัพธ์
สร้างเงาแบบไล่ระดับสี
เงาไม่ได้จำกัดอยู่แค่สีพื้น Shadow API ยอมรับ Brush ซึ่ง
ช่วยให้คุณสร้างเงาแบบไล่ระดับสีได้
Box( modifier = Modifier .width(240.dp) .height(200.dp) .dropShadow( shape = RoundedCornerShape(70.dp), shadow = Shadow( radius = 10.dp, spread = animatedSpread.dp, brush = Brush.sweepGradient( colors ), offset = DpOffset(x = 0.dp, y = 0.dp), alpha = animatedAlpha ) ) .clip(RoundedCornerShape(70.dp)) .background(Color(0xEDFFFFFF)), contentAlignment = Alignment.Center ) { Text( text = breathingText, color = Color.Black, style = MaterialTheme.typography.bodyLarge ) }
ประเด็นสำคัญเกี่ยวกับโค้ด
dropShadow()เพิ่มเงาด้านหลังกล่องbrush = Brush.sweepGradient(colors)จะระบายสีเงาด้วยการไล่ระดับสีที่ หมุนเวียนผ่านรายการcolorsที่กำหนดไว้ล่วงหน้าเพื่อสร้างเอฟเฟกต์คล้ายรุ้ง
ผลลัพธ์
คุณใช้แปรงเป็นเงาเพื่อสร้างการไล่ระดับสี dropShadow() ด้วยภาพเคลื่อนไหวแบบ "หายใจ" ได้โดยทำดังนี้
รวมเงา
คุณสามารถรวมและซ้อนตัวแก้ไข dropShadow() และ innerShadow() เพื่อสร้างเอฟเฟกต์ที่หลากหลายได้
ส่วนต่อไปนี้จะแสดงวิธีสร้าง
เงาแบบนิวโมฟิซึม นีโอบรูทัลลิสต์ และเงาที่สมจริงด้วยเทคนิคนี้
สร้างเงาแบบนิวโมฟอร์มิซึม
เงาแบบนิวโมฟิซึมมีลักษณะเป็นเงาที่นุ่มนวลซึ่งเกิดขึ้น อย่างเป็นธรรมชาติจากพื้นหลัง หากต้องการสร้างเงาแบบนิวโมฟิซึม ให้ทำดังนี้
- ใช้องค์ประกอบที่มีสีเดียวกับพื้นหลัง
- ใช้เงาตกกระทบ 2 อันที่จางและอยู่ตรงข้ามกัน โดยให้เงาสว่างอยู่ที่มุมหนึ่งและ เงาเข้มอยู่ที่มุมตรงข้าม
ข้อมูลโค้ดต่อไปนี้จะซ้อนตัวแก้ไข 2 รายการของ dropShadow() เพื่อสร้าง
เอฟเฟกต์นิวโมฟิซึม
@Composable fun NeumorphicRaisedButton( shape: RoundedCornerShape = RoundedCornerShape(30.dp) ) { val bgColor = Color(0xFFe0e0e0) val lightShadow = Color(0xFFFFFFFF) val darkShadow = Color(0xFFb1b1b1) val upperOffset = -10.dp val lowerOffset = 10.dp val radius = 15.dp val spread = 0.dp Box( modifier = Modifier .fillMaxSize() .background(bgColor) .wrapContentSize(Alignment.Center) .size(240.dp) .dropShadow( shape, shadow = Shadow( radius = radius, color = lightShadow, spread = spread, offset = DpOffset(upperOffset, upperOffset) ), ) .dropShadow( shape, shadow = Shadow( radius = radius, color = darkShadow, spread = spread, offset = DpOffset(lowerOffset, lowerOffset) ), ) .background(bgColor, shape) ) }

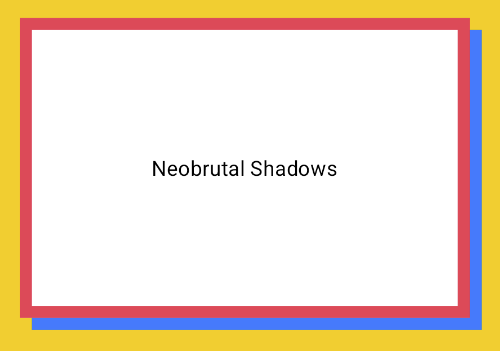
สร้างเงาแบบนีโอบรูทัลลิสต์
สไตล์นีโอบรูทัลลิสต์แสดงเลย์เอาต์แบบบล็อกที่มีคอนทราสต์สูง สีสดใส
และเส้นขอบหนา หากต้องการสร้างเอฟเฟกต์นี้ ให้ใช้ dropShadow() ที่ไม่มีการเบลอ
และมีการออฟเซ็ตที่แตกต่างกัน ดังที่แสดงในข้อมูลโค้ดต่อไปนี้
@Composable fun NeoBrutalShadows() { SnippetsTheme { val dropShadowColor = Color(0xFF007AFF) val borderColor = Color(0xFFFF2D55) Box(Modifier.fillMaxSize()) { Box( Modifier .width(300.dp) .height(200.dp) .align(Alignment.Center) .dropShadow( shape = RoundedCornerShape(0.dp), shadow = Shadow( radius = 0.dp, spread = 0.dp, color = dropShadowColor, offset = DpOffset(x = 8.dp, 8.dp) ) ) .border( 8.dp, borderColor ) .background( color = Color.White, shape = RoundedCornerShape(0.dp) ) ) { Text( "Neobrutal Shadows", modifier = Modifier.align(Alignment.Center), style = MaterialTheme.typography.bodyMedium ) } } } }
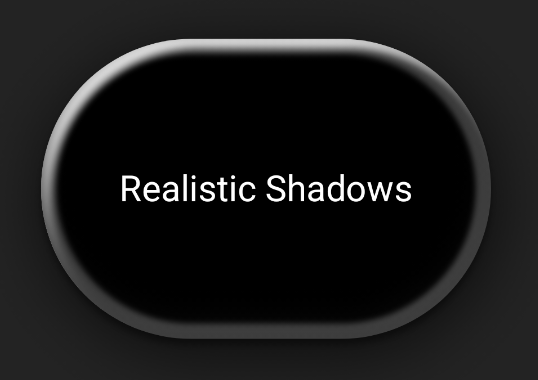
สร้างเงาที่สมจริง
เงาที่สมจริงจะจำลองเงาในโลกจริง โดยจะปรากฏขึ้นเมื่อมีแหล่งกำเนิดแสงหลัก ซึ่งจะทำให้เกิดทั้งเงาโดยตรงและเงาที่กระจายตัวมากขึ้น คุณซ้อนอินสแตนซ์ dropShadow() และ innerShadow() หลายรายการที่มีพร็อพเพอร์ตี้ต่างกันเพื่อสร้างเอฟเฟกต์เงาที่สมจริงได้ ดังที่แสดงในข้อมูลโค้ดต่อไปนี้
@Composable fun RealisticShadows() { Box(Modifier.fillMaxSize()) { val dropShadowColor1 = Color(0xB3000000) val dropShadowColor2 = Color(0x66000000) val innerShadowColor1 = Color(0xCC000000) val innerShadowColor2 = Color(0xFF050505) val innerShadowColor3 = Color(0x40FFFFFF) val innerShadowColor4 = Color(0x1A050505) Box( Modifier .width(300.dp) .height(200.dp) .align(Alignment.Center) .dropShadow( shape = RoundedCornerShape(100.dp), shadow = Shadow( radius = 40.dp, spread = 0.dp, color = dropShadowColor1, offset = DpOffset(x = 2.dp, 8.dp) ) ) .dropShadow( shape = RoundedCornerShape(100.dp), shadow = Shadow( radius = 4.dp, spread = 0.dp, color = dropShadowColor2, offset = DpOffset(x = 0.dp, 4.dp) ) ) // note that the background needs to be defined before defining the inner shadow .background( color = Color.Black, shape = RoundedCornerShape(100.dp) ) // // .innerShadow( shape = RoundedCornerShape(100.dp), shadow = Shadow( radius = 12.dp, spread = 3.dp, color = innerShadowColor1, offset = DpOffset(x = 6.dp, 6.dp) ) ) .innerShadow( shape = RoundedCornerShape(100.dp), shadow = Shadow( radius = 4.dp, spread = 1.dp, color = Color.White, offset = DpOffset(x = 5.dp, 5.dp) ) ) .innerShadow( shape = RoundedCornerShape(100.dp), shadow = Shadow( radius = 12.dp, spread = 5.dp, color = innerShadowColor2, offset = DpOffset(x = (-3).dp, (-12).dp) ) ) .innerShadow( shape = RoundedCornerShape(100.dp), shadow = Shadow( radius = 3.dp, spread = 10.dp, color = innerShadowColor3, offset = DpOffset(x = 0.dp, 0.dp) ) ) .innerShadow( shape = RoundedCornerShape(100.dp), shadow = Shadow( radius = 3.dp, spread = 9.dp, color = innerShadowColor4, offset = DpOffset(x = 1.dp, 1.dp) ) ) ) { Text( "Realistic Shadows", modifier = Modifier.align(Alignment.Center), fontSize = 24.sp, color = Color.White ) } } }
ประเด็นสำคัญเกี่ยวกับโค้ด
- ใช้ตัวแก้ไข
dropShadow()2 ตัวที่เชื่อมโยงกันซึ่งมีพร็อพเพอร์ตี้ที่แตกต่างกัน ตามด้วยตัวแก้ไขbackground() - ใช้ตัวแก้ไข
innerShadow()ที่เชื่อมโยงกันเพื่อสร้างเอฟเฟกต์ขอบโลหะ รอบขอบของคอมโพเนนต์
ผลลัพธ์
ข้อมูลโค้ดก่อนหน้าจะสร้างผลลัพธ์ต่อไปนี้