יוצרים כיתה חדשה שמתבססת על GlanceAppWidget ומחליפים את השיטה provideGlance. זוהי השיטה שבה אפשר לטעון נתונים שנדרשים לעיבוד הווידג'ט:
classMyAppWidget:GlanceAppWidget(){overridesuspendfunprovideGlance(context:Context,id:GlanceId){// In this method, load data needed to render the AppWidget.// Use `withContext` to switch to another thread for long running// operations.provideContent{// create your AppWidget hereText("Hello World")}}}
יוצרים מופע של ה-glanceAppWidget ב-GlanceAppWidgetReceiver:
classMyAppWidgetReceiver:GlanceAppWidgetReceiver(){// Let MyAppWidgetReceiver know which GlanceAppWidget to useoverridevalglanceAppWidget:GlanceAppWidget=MyAppWidget()}
/* Import Glance Composables In the event there is a name clash with the Compose classes of the same name, you may rename the imports per https://kotlinlang.org/docs/packages.html#imports using the `as` keyword.import androidx.glance.Buttonimport androidx.glance.layout.Columnimport androidx.glance.layout.Rowimport androidx.glance.text.Text*/classMyAppWidget:GlanceAppWidget(){overridesuspendfunprovideGlance(context:Context,id:GlanceId){// Load data needed to render the AppWidget.// Use `withContext` to switch to another thread for long running// operations.provideContent{// create your AppWidget hereMyContent()}}@ComposableprivatefunMyContent(){Column(modifier=GlanceModifier.fillMaxSize(),verticalAlignment=Alignment.Top,horizontalAlignment=Alignment.CenterHorizontally){Text(text="Where to?",modifier=GlanceModifier.padding(12.dp))Row(horizontalAlignment=Alignment.CenterHorizontally){Button(text="Home",onClick=actionStartActivity<MyActivity>())Button(text="Work",onClick=actionStartActivity<MyActivity>())}}}}
ברמה העליונה Column, הפריטים ממוקמים אנכית זה אחרי זה.
הגודל של Column יתרחב בהתאם למרחב הזמין (באמצעות GlanceModifier), התוכן יאונך בחלק העליון (verticalAlignment) ויוצג במרכז (horizontalAlignment).
התוכן של Column מוגדר באמצעות הפונקציה הלוגרית. הסדר חשוב.
הפריט הראשון ב-Column הוא רכיב Text עם 12.dp של ריפוד.
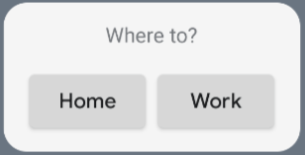
הפריט השני הוא Row, שבו הפריטים ממוקמים זה לצד זה באופן אופקי, עם שני Buttons שממורכזים אופקית (horizontalAlignment). התצוגה הסופית תלויה במרחב הזמין.
התמונה הבאה היא דוגמה למה שיכול להופיע:
איור 1. דוגמה לממשק משתמש.
כדי לשנות את המיקום והגודל של הרכיבים, אפשר לשנות את ערכי היישור או להחיל ערכי משתנה שונים (כמו ריווח). במסמכי העזרה מופיעה רשימה מלאה של הרכיבים, הפרמטרים והפונקציות הזמינות לכל מחלקה.
דוגמאות התוכן והקוד שבדף הזה כפופות לרישיונות המפורטים בקטע רישיון לתוכן. Java ו-OpenJDK הם סימנים מסחריים או סימנים מסחריים רשומים של חברת Oracle ו/או של השותפים העצמאיים שלה.
עדכון אחרון: 2025-08-27 (שעון UTC).
[[["התוכן קל להבנה","easyToUnderstand","thumb-up"],["התוכן עזר לי לפתור בעיה","solvedMyProblem","thumb-up"],["סיבה אחרת","otherUp","thumb-up"]],[["חסרים לי מידע או פרטים","missingTheInformationINeed","thumb-down"],["התוכן מורכב מדי או עם יותר מדי שלבים","tooComplicatedTooManySteps","thumb-down"],["התוכן לא עדכני","outOfDate","thumb-down"],["בעיה בתרגום","translationIssue","thumb-down"],["בעיה בדוגמאות/בקוד","samplesCodeIssue","thumb-down"],["סיבה אחרת","otherDown","thumb-down"]],["עדכון אחרון: 2025-08-27 (שעון UTC)."],[],[],null,["The following sections describe how to create a simple app widget with Glance.\n| **Key Point:** Glance provides a modern approach to build app widgets using Compose, but is restricted by the limitations of `AppWidgets` and `RemoteViews`. Therefore, Glance uses different *composables* from the Jetpack Compose UI.\n\nDeclare the `AppWidget` in the Manifest\n\nAfter completing the [setup steps](/develop/ui/compose/glance/setup), declare the [`AppWidget`](/guide/topics/appwidgets) and its\nmetadata in your app.\n\n1. Extend the `AppWidget` receiver from `GlanceAppWidgetReceiver`:\n\n\n ```kotlin\n class MyAppWidgetReceiver : GlanceAppWidgetReceiver() {\n override val glanceAppWidget: GlanceAppWidget = TODO(\"Create GlanceAppWidget\")\n }https://github.com/android/snippets/blob/5673ffc60b614daf028ee936227128eb8c4f9781/compose/snippets/src/main/java/com/example/compose/snippets/glance/GlanceSnippets.kt#L100-L102\n ```\n\n \u003cbr /\u003e\n\n2. Register the provider of the app widget in your `AndroidManifest.xml` file\n and the associated metadata file:\n\n \u003creceiver android:name=\".glance.MyReceiver\"\n android:exported=\"true\"\u003e\n \u003cintent-filter\u003e\n \u003caction android:name=\"android.appwidget.action.APPWIDGET_UPDATE\" /\u003e\n \u003c/intent-filter\u003e\n \u003cmeta-data\n android:name=\"android.appwidget.provider\"\n android:resource=\"@xml/my_app_widget_info\" /\u003e\n \u003c/receiver\u003e \n https://github.com/android/snippets/blob/5673ffc60b614daf028ee936227128eb8c4f9781/compose/snippets/src/main/AndroidManifest.xml#L61-L69\n\nAdd the `AppWidgetProviderInfo` metadata\n\nNext, follow the [Create a simple widget](/guide/topics/appwidgets#MetaData) guide to create and define the app\nwidget info in the `@xml/my_app_widget_info` file.\n\nThe only difference for Glance is that there is no `initialLayout` XML, but\nyou must define one. You can use the predefined loading layout provided in\nthe library: \n\n \u003cappwidget-provider xmlns:android=\"http://schemas.android.com/apk/res/android\"\n android:initialLayout=\"@layout/glance_default_loading_layout\"\u003e\n \u003c/appwidget-provider\u003e \n https://github.com/android/snippets/blob/5673ffc60b614daf028ee936227128eb8c4f9781/compose/snippets/src/main/res/xml/my_app_widget_info.xml#L18-L20\n\nDefine `GlanceAppWidget`\n\n1. Create a new class that extends from [`GlanceAppWidget`](/reference/kotlin/androidx/glance/appwidget/GlanceAppWidget) and overrides the\n `provideGlance` method. This is the method where you can load data that is\n needed to render your widget:\n\n | **Note:** `provideGlance` runs on the main thread. To perform any long running operations in `provideGlance`, switch to another thread using `withContext`. See [Use coroutines for main-safety](/kotlin/coroutines/coroutines-adv#main-safety) for more details on how to run outside of the main thread.\n\n\n ```kotlin\n class MyAppWidget : GlanceAppWidget() {\n\n override suspend fun provideGlance(context: Context, id: GlanceId) {\n\n // In this method, load data needed to render the AppWidget.\n // Use `withContext` to switch to another thread for long running\n // operations.\n\n provideContent {\n // create your AppWidget here\n Text(\"Hello World\")\n }\n }\n }https://github.com/android/snippets/blob/5673ffc60b614daf028ee936227128eb8c4f9781/compose/snippets/src/main/java/com/example/compose/snippets/glance/GlanceSnippets.kt#L116-L129\n ```\n\n \u003cbr /\u003e\n\n2. Instantiate it in the `glanceAppWidget` on your `GlanceAppWidgetReceiver`:\n\n\n ```kotlin\n class MyAppWidgetReceiver : GlanceAppWidgetReceiver() {\n\n // Let MyAppWidgetReceiver know which GlanceAppWidget to use\n override val glanceAppWidget: GlanceAppWidget = MyAppWidget()\n }https://github.com/android/snippets/blob/5673ffc60b614daf028ee936227128eb8c4f9781/compose/snippets/src/main/java/com/example/compose/snippets/glance/GlanceSnippets.kt#L108-L112\n ```\n\n \u003cbr /\u003e\n\nYou've now configured an `AppWidget` using Glance.\n\nCreate UI\n\nThe following snippet demonstrates how to create the UI:\n\n\n```kotlin\n/* Import Glance Composables\n In the event there is a name clash with the Compose classes of the same name,\n you may rename the imports per https://kotlinlang.org/docs/packages.html#imports\n using the `as` keyword.\n\nimport androidx.glance.Button\nimport androidx.glance.layout.Column\nimport androidx.glance.layout.Row\nimport androidx.glance.text.Text\n*/\nclass MyAppWidget : GlanceAppWidget() {\n\n override suspend fun provideGlance(context: Context, id: GlanceId) {\n // Load data needed to render the AppWidget.\n // Use `withContext` to switch to another thread for long running\n // operations.\n\n provideContent {\n // create your AppWidget here\n MyContent()\n }\n }\n\n @Composable\n private fun MyContent() {\n Column(\n modifier = GlanceModifier.fillMaxSize(),\n verticalAlignment = Alignment.Top,\n horizontalAlignment = Alignment.CenterHorizontally\n ) {\n Text(text = \"Where to?\", modifier = GlanceModifier.padding(12.dp))\n Row(horizontalAlignment = Alignment.CenterHorizontally) {\n Button(\n text = \"Home\",\n onClick = actionStartActivity\u003cMyActivity\u003e()\n )\n Button(\n text = \"Work\",\n onClick = actionStartActivity\u003cMyActivity\u003e()\n )\n }\n }\n }\n}https://github.com/android/snippets/blob/5673ffc60b614daf028ee936227128eb8c4f9781/compose/snippets/src/main/java/com/example/compose/snippets/glance/GlanceSnippets.kt#L135-L178\n```\n\n\u003cbr /\u003e\n\nThe preceding code sample does the following:\n\n- In the top level [`Column`](/reference/kotlin/androidx/glance/layout/package-summary#column), items are placed vertically one after each other.\n- The `Column` expands its size to match the available space (via the [`GlanceModifier`](/reference/kotlin/androidx/glance/GlanceModifier)) and aligns its content to the top (`verticalAlignment`) and centers it horizontally (`horizontalAlignment`).\n- The `Column`'s content is defined using the lambda. The order matters.\n - The first item in the `Column` is a `Text` component with `12.dp` of padding.\n - The second item is a [`Row`](/reference/kotlin/androidx/glance/layout/package-summary#row), where items are placed horizontally one after each other, with two [`Buttons`](/reference/kotlin/androidx/glance/package-summary#button) centered horizontally (`horizontalAlignment`). The final display depends on the available space. The following image is an example of what it may look like:\n\n**Figure 1.** An example UI.\n\nYou can change the alignment values or apply different modifier values (such as\npadding) to change the placement and size of the components. See the [reference\ndocumentation](/reference/kotlin/androidx/glance/package-summary) for a full list of components, parameters, and available\nmodifiers for each class."]]