संग्रह की मदद से व्यवस्थित रहें
अपनी प्राथमिकताओं के आधार पर, कॉन्टेंट को सेव करें और कैटगरी में बांटें.
WebP, Google का इमेज फ़ाइल फ़ॉर्मैट है. यह JPEG की तरह लॉसी कंप्रेशन और PNG की तरह पारदर्शिता देता है. हालांकि, यह JPEG या PNG से बेहतर कंप्रेशन दे सकता है. Android 4.0 (एपीआई लेवल 14) और इसके बाद के वर्शन में, लॉसलेस WebP इमेज इस्तेमाल की जा सकती हैं. वहीं, Android 4.3 (एपीआई लेवल 18) और इसके बाद के वर्शन में, लॉसलेस और पारदर्शी WebP इमेज इस्तेमाल की जा सकती हैं.
इस पेज पर, इमेज को WebP फ़ॉर्मैट में बदलने और WebP इमेज को PNG फ़ॉर्मैट में बदलने का तरीका बताया गया है.
डाउनलोड करने की स्पीड को बेहतर बनाने के लिए, इमेज का सही फ़ॉर्मैट चुनने के बारे में ज़्यादा जानने के लिए, इमेज डाउनलोड करने के साइज़ कम करना लेख पढ़ें.
इमेज को WebP फ़ॉर्मैट में बदलना
Android Studio, PNG, JPG, BMP या स्टैटिक GIF इमेज को WebP फ़ॉर्मैट में बदल सकता है.
अलग-अलग इमेज या इमेज के फ़ोल्डर को बदला जा सकता है.
किसी इमेज या इमेज वाले फ़ोल्डर को बदलने के लिए, यह तरीका अपनाएं:
किसी इमेज फ़ाइल या इमेज फ़ाइलें सेव किए गए फ़ोल्डर पर राइट क्लिक करें. इसके बाद, WebP में बदलें पर क्लिक करें.
इमेज को WebP में बदलें डायलॉग बॉक्स खुलता है. डिफ़ॉल्ट सेटिंग, मौजूदा मॉड्यूल के लिए minSdkVersion सेटिंग पर निर्भर करती हैं.
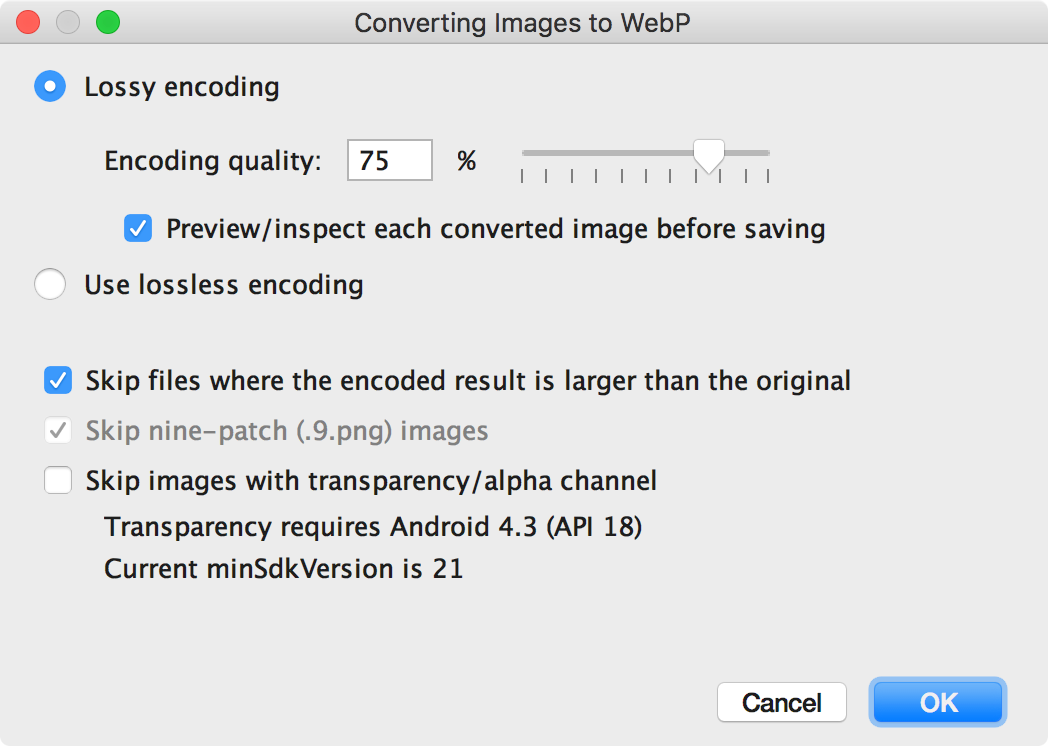
पहली इमेज. इमेज को WebP में बदलने का डायलॉग बॉक्स.
लॉसी या लॉसलेस एन्कोडिंग में से कोई एक चुनें.
लॉसलैस एन्कोडिंग की सुविधा सिर्फ़ तब उपलब्ध होती है, जब आपका minSdkVersion 18 या इससे ज़्यादा पर सेट हो.
अगर आपने लॉस वाली एन्कोडिंग चुनी है, तो एन्कोडिंग क्वालिटी सेट करें. साथ ही, यह चुनें कि सेव करने से पहले, आपको हर बदली गई इमेज की झलक देखनी है या नहीं.
आपके पास ऐसी फ़ाइलों को बदलने की प्रोसेस को छोड़ने का विकल्प भी होता है जिनका एन्कोड किया गया वर्शन, ओरिजनल वर्शन से बड़ा होता है. इसके अलावा, पारदर्शिता या ऐल्फ़ा चैनल वाली फ़ाइलों को भी बदलने की प्रोसेस को छोड़ा जा सकता है. Android Studio में सिर्फ़ तब पारदर्शी WebP इमेज बनाई जा सकती हैं, जब आपका minSdkVersion 18 या इससे ज़्यादा पर सेट हो. इसलिए, अगर आपका minSdkVersion 18 से कम पर सेट है, तो पारदर्शिता/अल्फ़ा चैनल वाली इमेज छोड़ें चेकबॉक्स अपने-आप चुन लिया जाता है.
ध्यान दें: 9-पैच फ़ाइलों को WebP इमेज में नहीं बदला जा सकता. कन्वर्टर टूल, 9-पैच वाली इमेज को हमेशा अपने-आप स्किप कर देता है.
कन्वर्ज़न शुरू करने के लिए, ठीक है पर क्लिक करें.
अगर एक से ज़्यादा इमेज का फ़ॉर्मैट बदला जा रहा है, तो यह एक ही चरण में पूरा हो जाता है. साथ ही, इसे पहले जैसा करने पर, एक साथ बदली गई सभी इमेज पहले जैसी हो जाती हैं.
लॉसलैस कन्वर्ज़न चुनने पर, कन्वर्ज़न तुरंत हो जाता है. आपकी इमेज को उनकी मूल जगह पर बदल दिया जाता है. अगर आपने लॉस कन्वर्ज़न चुना है, तो अगले चरण पर जाएं.
अगर आपने लॉस वाले कन्वर्ज़न का विकल्प चुना है और आपने सेव करने से पहले, हर बदली गई इमेज की झलक देखने का विकल्प चुना है, तो Android Studio आपको कन्वर्ज़न के दौरान हर इमेज दिखाता है, ताकि आप कन्वर्ज़न के नतीजे की जांच कर सकें. झलक देखने के चरण के दौरान, हर इमेज के लिए क्वालिटी सेटिंग को अलग-अलग तरीके से अडजस्ट किया जा सकता है. जैसा कि इमेज 2 में दिखाया गया है.
अगर आपने बदली गई इमेज की झलक देखने का विकल्प नहीं चुना है, तो Android Studio इस चरण को छोड़ देता है और आपकी इमेज को तुरंत बदल देता है.
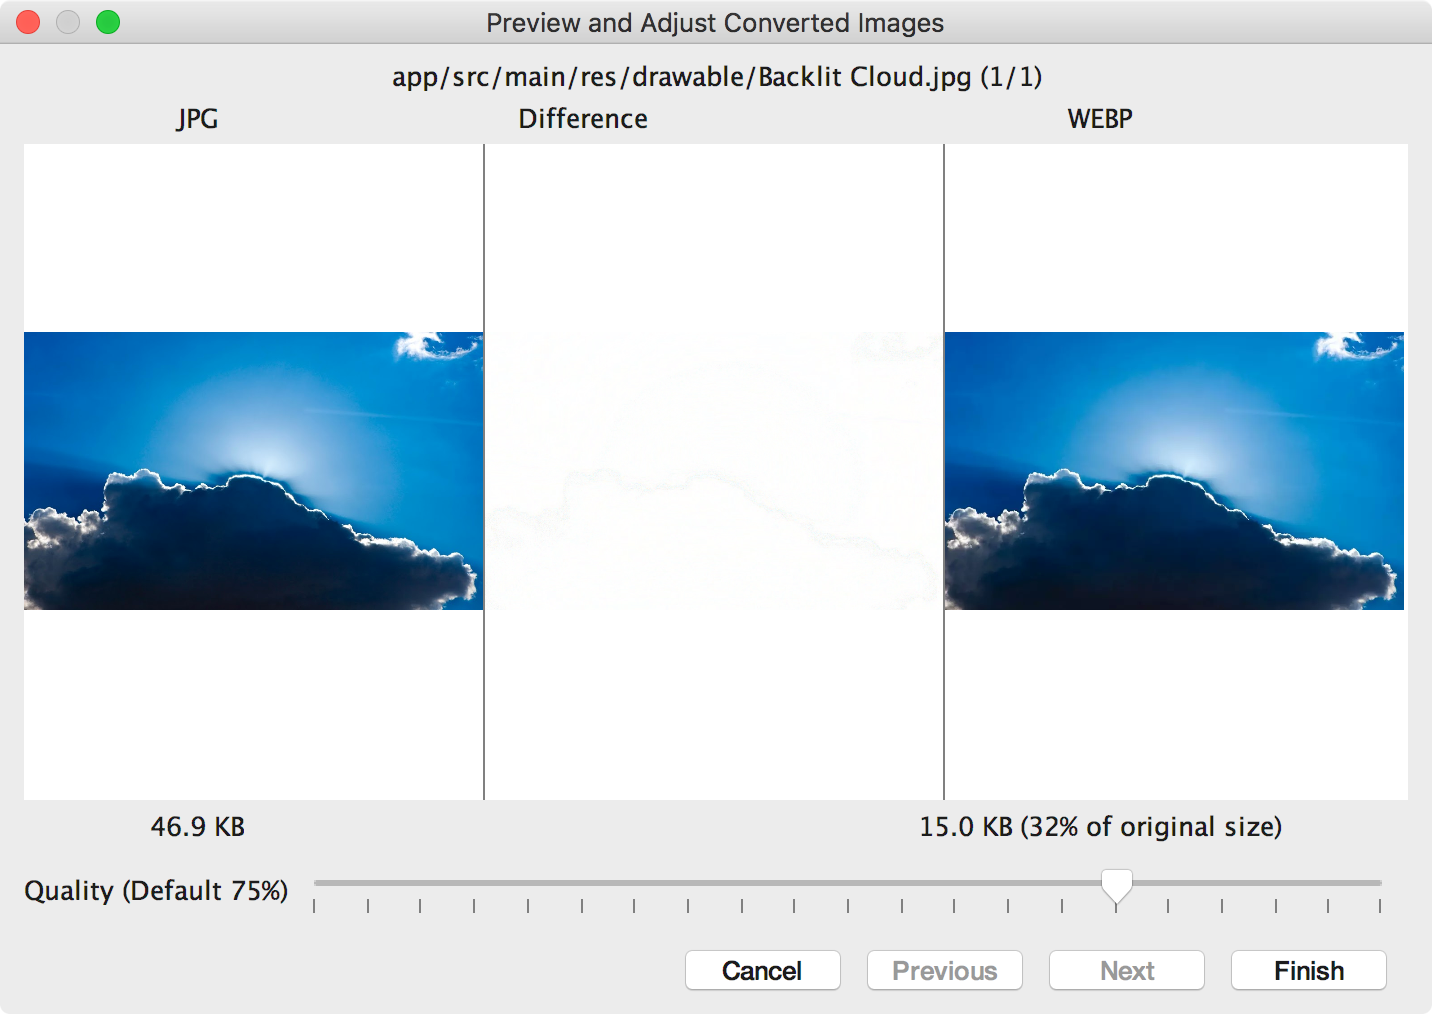
दूसरी इमेज. JPG इमेज को 75% क्वालिटी के साथ WebP फ़ॉर्मैट में बदलने की झलक.
दूसरी इमेज में, बाईं ओर ओरिजनल JPG इमेज और दाईं ओर लॉसी-एन्कोड की गई WebP इमेज दिखाई गई है. डायलॉग बॉक्स में, ओरिजनल और बदली गई इमेज का फ़ाइल साइज़ दिखता है. क्वालिटी की सेटिंग बदलने के लिए, स्लाइडर को बाईं या दाईं ओर खींचें. इससे, आपको तुरंत पता चल जाएगा कि एन्कोड की गई इमेज और फ़ाइल के साइज़ पर क्या असर पड़ा है.
बीच वाला हिस्सा, उन पिक्सल को दिखाता है जो ओरिजनल इमेज और एन्कोड की गई इमेज के बीच अलग-अलग होते हैं. दूसरी इमेज में, क्वालिटी को 75% पर सेट किया गया है. इसमें दोनों इमेज के बीच कोई अंतर नहीं है. तीसरी इमेज में, क्वालिटी को 0% पर सेट करके एन्कोड की गई वही इमेज दिखाई गई है.
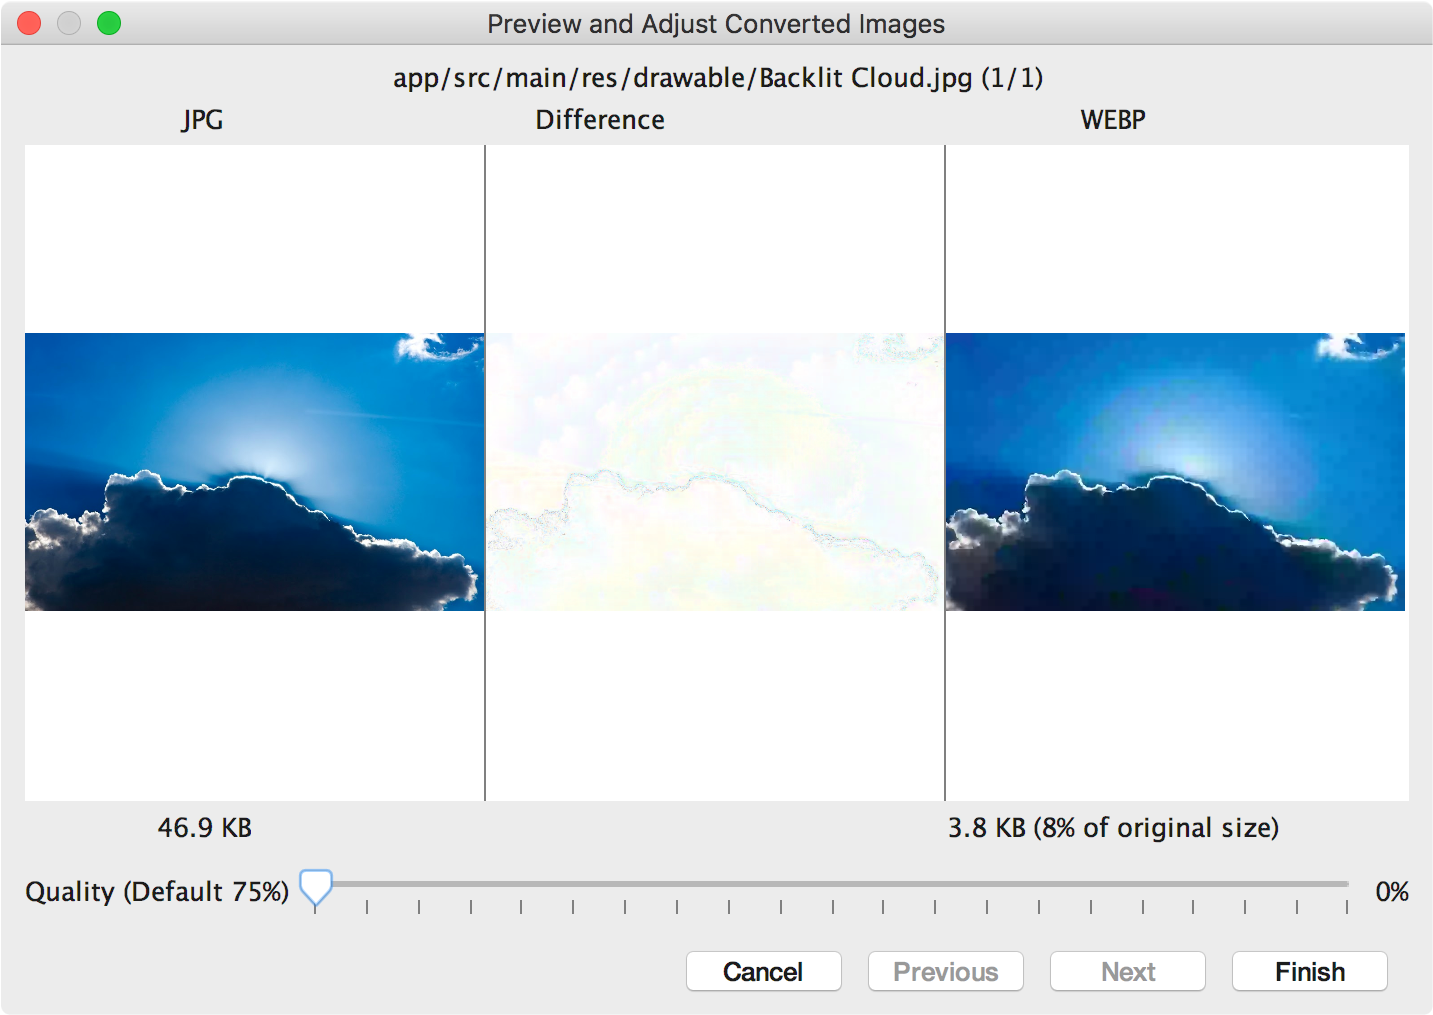
तीसरी इमेज. JPG इमेज को 0% क्वालिटी पर WebP फ़ॉर्मैट में बदलने की झलक.
ध्यान दें: अगर क्वालिटी को 100% पर सेट किया जाता है और minSdkVersion को 18 या इससे ज़्यादा पर सेट किया जाता है, तो Android Studio अपने-आप लॉसलेस एन्कोडिंग पर स्विच हो जाता है.
समीक्षा की जाने वाली हर इमेज के लिए, क्वालिटी सेटिंग चुनें. अगर आपको एक से ज़्यादा इमेज बदलनी हैं, तो अगली इमेज पर जाने के लिए, आगे बढ़ें पर क्लिक करें.
पूरा करें पर क्लिक करें. आपकी इमेज को उनकी मूल जगह पर बदल दिया जाता है.
WebP इमेज को PNG फ़ॉर्मैट में बदलना
अगर आपको अपने प्रोजेक्ट की WebP इमेज का इस्तेमाल किसी दूसरे काम के लिए करना है, तो Android Studio का इस्तेमाल करके WebP इमेज को PNG फ़ॉर्मैट में बदला जा सकता है. उदाहरण के लिए, किसी ऐसे वेब पेज में WebP इमेज का इस्तेमाल करना जहां ब्राउज़र में इमेज को सही तरीके से दिखाने के लिए, WebP सपोर्ट की ज़रूरत नहीं होती.
WebP इमेज को PNG में बदलने के लिए, यह तरीका अपनाएं:
Android Studio में किसी WebP इमेज पर राइट क्लिक करें. इसके बाद, PNG में बदलें पर क्लिक करें.
आपको एक डायलॉग बॉक्स दिखेगा. इसमें आपसे पूछा जाएगा कि क्या आपको कन्वर्ज़न के बाद, ओरिजनल WebP फ़ाइल मिटानी है या ओरिजनल WebP फ़ाइल के साथ-साथ नई PNG फ़ाइल भी रखनी है.
ओरिजनल WebP फ़ाइल मिटाने के लिए, हां पर क्लिक करें. इसके अलावा, PNG फ़ाइल के साथ-साथ WebP फ़ाइल को भी बनाए रखने के लिए, नहीं पर क्लिक करें. आपकी इमेज को तुरंत बदल दिया जाता है.
इस पेज पर मौजूद कॉन्टेंट और कोड सैंपल कॉन्टेंट के लाइसेंस में बताए गए लाइसेंस के हिसाब से हैं. Java और OpenJDK, Oracle और/या इससे जुड़ी हुई कंपनियों के ट्रेडमार्क या रजिस्टर किए हुए ट्रेडमार्क हैं.
आखिरी बार 2025-07-27 (UTC) को अपडेट किया गया.
[[["समझने में आसान है","easyToUnderstand","thumb-up"],["मेरी समस्या हल हो गई","solvedMyProblem","thumb-up"],["अन्य","otherUp","thumb-up"]],[["वह जानकारी मौजूद नहीं है जो मुझे चाहिए","missingTheInformationINeed","thumb-down"],["बहुत मुश्किल है / बहुत सारे चरण हैं","tooComplicatedTooManySteps","thumb-down"],["पुराना","outOfDate","thumb-down"],["अनुवाद से जुड़ी समस्या","translationIssue","thumb-down"],["सैंपल / कोड से जुड़ी समस्या","samplesCodeIssue","thumb-down"],["अन्य","otherDown","thumb-down"]],["आखिरी बार 2025-07-27 (UTC) को अपडेट किया गया."],[],[],null,["# Create WebP images\n\n[WebP](https://developers.google.com/speed/webp/) is an image file format from\nGoogle that provides lossy compression (like JPEG) as well as transparency (like\nPNG) but can provide better compression than either JPEG or PNG. Lossy WebP\nimages are supported in Android 4.0 (API level 14) and higher, and lossless and\ntransparent WebP images are supported in Android 4.3 (API level 18) and higher.\nThis page shows how to convert images to WebP format and how to convert WebP\nimages to PNG format.\n| **Note:** Because support for lossless and transparent WebP images is only available in Android 4.3 and higher, your project must declare a `minSdkVersion` of 18 or higher to create lossless or transparent WebP images using Android Studio.\n\nFor more information about\nselecting the correct image format to improve download speed, see [Reduce image\ndownload sizes](/topic/performance/network-xfer#webp).\n\nConvert images to WebP\n----------------------\n\nAndroid Studio can convert PNG, JPG, BMP, or static GIF images to WebP format.\nYou can convert individual images or folders of images.\n\nTo convert an image or folder of images, proceed as follows:\n\n1. Right-click an image file or a folder containing image files, and then click **Convert to WebP**.\n2. The **Converting Images to WebP** dialog opens. The default settings\n depend on the `minSdkVersion` setting for the current module.\n\n \u003cbr /\u003e\n\n **Figure 1.** The Converting Images to WebP dialog.\n3.\n Select either lossy or lossless encoding.\n\n Lossless encoding is only available if your `minSdkVersion` is set to 18 or higher.\n\n If you select lossy encoding, set the encoding quality and choose whether\n to preview each converted image before saving.\n\n\n You can also choose to skip the conversion of any files where the encoded\n version would be larger than the original or any files with transparency\n or an alpha channel. Because Android Studio only lets you\n create transparent WebP images if your `minSdkVersion` is set\n to 18 or higher, the **Skip images with transparency/alpha channel**\n checkbox is automatically selected if your `minSdkVersion`\n is lower than 18.\n\n\n **Note:** 9-patch files can't be converted to WebP images. The\n converter tool always automatically skips 9-patch images.\n4. Click **OK** to begin the conversion.\n\n If you are converting more than\n one image, the conversion is a single step, and can be undone to revert all\n the images you converted at once.\n\n If you selected lossless conversion, the conversion happens\n immediately. Your images are converted in their original\n location. If you selected lossy conversion, continue to the next step.\n5.\n If you selected lossy conversion and you chose to\n preview each converted image before saving, Android Studio\n shows you each image during the conversion so you can inspect the\n conversion result. During\n the preview step, you can adjust the quality setting for each image\n individually, as shown in figure 2.\n\n If you did not choose to preview the converted images, Android\n Studio skips this step and converts your images immediately.\n **Figure 2.** Previewing the conversion of a JPG image to WebP format at 75% quality.\n\n\n Figure 2 shows the original JPG image on the left and the lossy-encoded\n WebP image on the right. The dialog shows the file size for the original\n and the converted image. You can drag the slider left or right\n to change the quality setting and immediately see the effect on the\n encoded image and the file size.\n\n\n The middle area shows the pixels that differ between the original image\n and the encoded image. In figure 2, with the quality set to 75%, there's\n almost no difference between the two images. Figure 3 shows the same image\n encoded with the quality set to 0%.\n **Figure 3.** Previewing the conversion of a JPG image to WebP format at 0% quality.\n\n **Note:** If you set the quality to 100% and the\n `minSdkVersion` is set to 18 or higher, Android Studio\n automatically switches to lossless encoding instead.\n\n Select a quality setting for each image you review. If you are converting\n more than one image, click **Next** to advance to the next image.\n6. Click **Finish**. Your images are converted in their original location.\n\nConvert WebP images to PNG\n--------------------------\n\nIf you want to use a WebP image from your project for another purpose---for\nexample, in a web page that needs to correctly display images in a browser\nwithout WebP support---you can use Android Studio to convert WebP images to PNG\nformat.\n\nTo convert a WebP image to PNG, proceed as follows:\n\n1. Right-click a WebP image in Android Studio, and then click **Convert to\n PNG**.\n2. A dialog appears, asking whether you would like to\n delete the original WebP file after conversion or keep the original WebP\n file as well as the new PNG file.\n\n Click **Yes** to delete the original WebP file or **No**\n to retain the WebP file in addition to the PNG file. Your image is converted\n immediately."]]