
「在 Android Studio 中進行測試」和「從指令列進行測試」這兩篇文章說明了如何設定及執行基本測試。不過,當應用程式和測試要求條件變得更為複雜時,您就可能需要進一步調整測試設定。舉例來說,您可能需要採用進階測試設定,才能執行下列操作:
- 僅針對特定建構變數執行檢測設備測試,或是覆寫其資訊清單設定。
- 變更用於執行測試的建構類型,或設定其 Gradle 選項。
- 將檢測設備測試擷取至專屬的測試模組。
- 在持續整合設定中執行更深入的測試。
本頁說明在預設設定不符需求時,如何設定測試的各種方法。
為特定建構變數建立檢測設備測試
如果專案包含搭配專屬來源集的建構變數,建議您加入對應這些來源集的檢測設備測試。這樣做可讓測試程式碼保持井然有序,也可以僅執行適用於特定建構變數的測試。
如要將檢測設備測試與建構變數建立連結,請將其放在位於 src/androidTestVariantName 的專屬來源集中。
src/androidTest/ 來源集中的檢測設備測試是由所有建構變數共用。為應用程式的「MyFlavor」變數建構測試 APK 時,Gradle 會結合 src/androidTest/ 和 src/androidTestMyFlavor/ 來源集。
如要在 Android Studio 中為建構變數新增測試來源集,請按照下列步驟操作:
- 在「Project」視窗中按一下選單,然後選取「Project」檢視畫面。
- 在適當的模組資料夾中,於「src」資料夾上按一下滑鼠右鍵,然後依序點選「Add」>「Directory」。
- 輸入「androidTest<變數名稱>」做為目錄名稱。舉例來說,如果建構變數名稱為「MyFlavor」,請使用
androidTestMyFlavor做為目錄名稱。 - 按一下「OK」。
- 在新目錄上按一下滑鼠右鍵,然後依序選取「New」>「Directory」。
- 輸入「java」做為目錄名稱,然後按一下「OK」。
現在,您可以按照新增測試的步驟,在此新來源集中加入測試。出現「Choose Destination Directory」對話方塊時,請選取新的變數測試來源集。
下表以檢測設備測試檔案為例,說明其如何存放在應用程式程式碼來源集對應的來源集中:
表 1. 應用程式原始碼和對應的檢測設備測試檔案
| 應用程式類別的路徑 | 相應檢測設備測試類別的路徑 |
|---|---|
src/main/java/Example.java
|
src/androidTest/java/AndroidExampleTest.java
|
src/myFlavor/java/Example.java
|
src/androidTestMyFlavor/java/AndroidExampleTest.java
|
Gradle 建構作業會合併及覆寫不同測試來源集中的檔案,如同對應用程式來源集的處理方式。在這種情況下,androidTestMyFlavor 來源集中的 AndroidExampleTest.java 檔案會覆寫 androidTest 來源集中的版本。這是因為變種版本來源集的優先順序高於主要來源集。
如果您在建構變數選取器中選取不同變種版本,「Android」檢視畫面中會顯示適當的 androidTest 資料夾,指出已使用的資料夾:
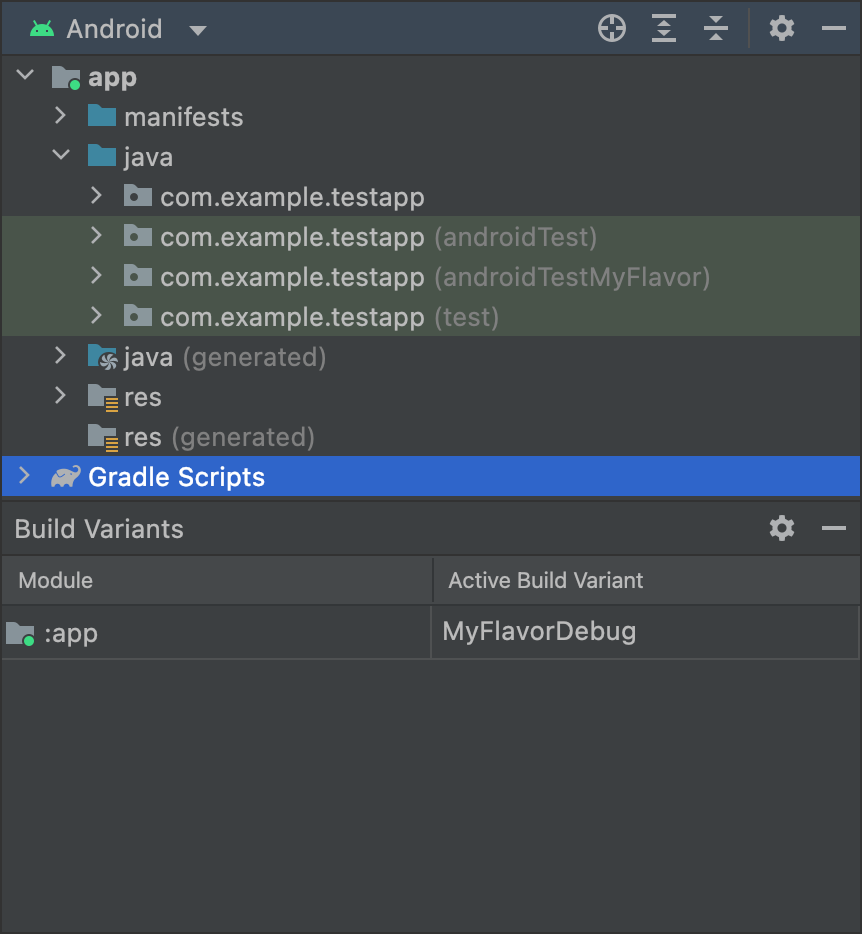
MyFlavor 變數後,「Android」檢視畫面會顯示 androidTestMyFlavor 資料夾。選取其他變數時,系統不會顯示 androidTestMyFlavor 資料夾:
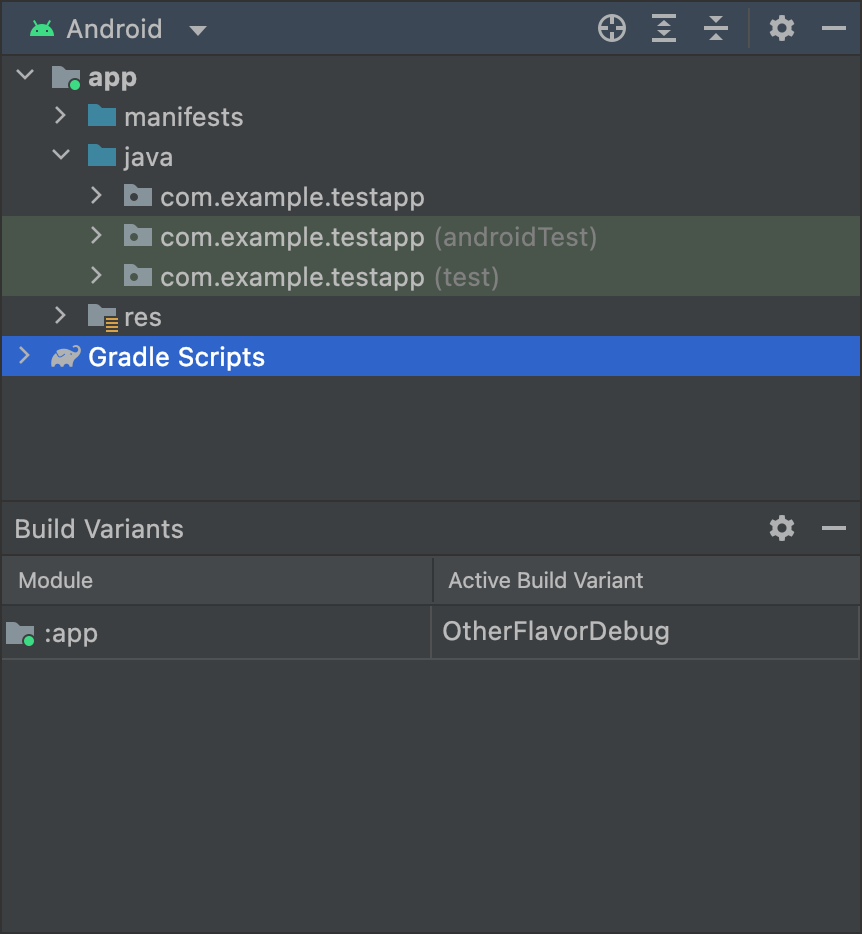
OtherFlavor 變數後,「Android」檢視畫面不會顯示 androidTestMyFlavor 資料夾。如果您使用的是「Project」檢視畫面,上述情形會稍有不同,但適用相同的原則:
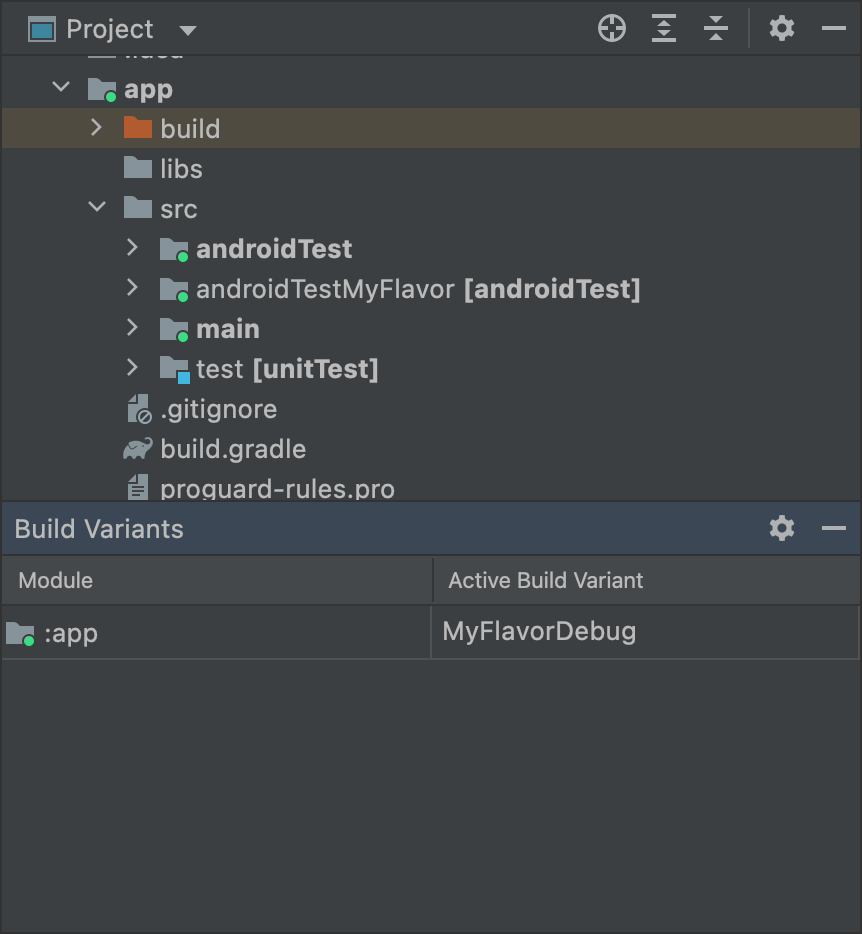
MyFlavor 變數後,「Project」檢視畫面會將 androidTestMyFlavor 資料夾標示為有效。選取不同的變數時,系統仍會顯示 androidTestMyFlavor 資料夾,但不會標示為有效:
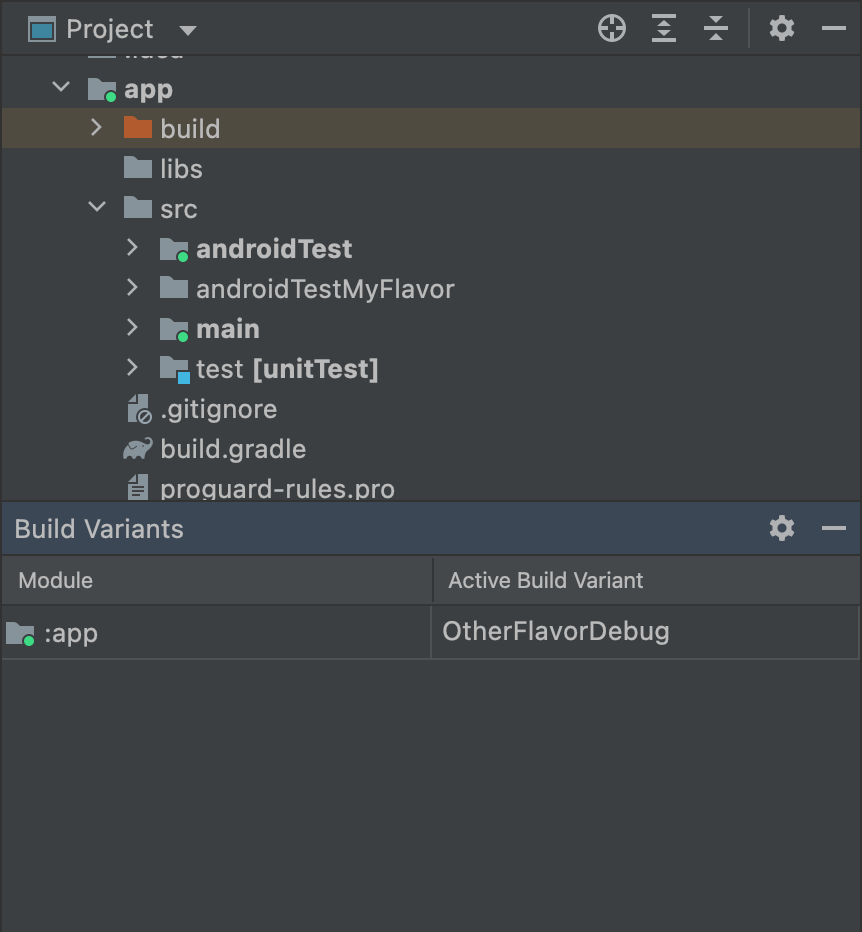
OtherFlavor 變數後,「Project」檢視畫面不會將 androidTestMyFlavor 資料夾標示為有效。如要進一步瞭解來源集的合併方式,請參閱「來源集」相關說明。
調整檢測資訊清單設定
設備測試會建構在獨立的 APK 中,擁有專屬的 AndroidManifest.xml 檔案。Gradle 建構測試 APK 時,會自動產生 AndroidManifest.xml 檔案,並使用 <instrumentation> 節點進行設定。Gradle 為您設定這個節點的原因之一,是要確保 targetPackage 屬性會指定受測應用程式的正確套件名稱。
如要變更這個節點的其他設定,可在測試來源集中建立另一個資訊清單檔案,或是設定模組層級的 build.gradle 檔案,如以下程式碼範例所示。如需完整的選項清單,請參閱 BaseFlavor API 參考資料。
Groovy
android {
    ...
    defaultConfig {
        ...
        testApplicationId "com.example.test"
        testInstrumentationRunner "androidx.test.runner.AndroidJUnitRunner"
        testHandleProfiling true
        testFunctionalTest true
    }
}
Kotlin
android {
    ...
    defaultConfig {
        ...
        testApplicationId = "com.example.test"
        testInstrumentationRunner = "androidx.test.runner.AndroidJUnitRunner"
        testHandleProfiling = true
        testFunctionalTest = true
    }
}
Each product flavor you configure can override properties in the
defaultConfig {} block. To learn more, go to Configure product
flavors.
The properties in the snippet are:
| Setting | Description |
|---|---|
testApplicationId
|
Specifies the application ID for the test APK. |
testInstrumentationRunner
|
Specifies the fully qualified class name of the test instrumentation runner. |
testHandleProfiling
|
If set to true, enables the instrumentation class
to start and stop profiling.If set to false, profiling occurs the entire time
the instrumentation class is running. |
testFunctionalTest
|
If set to true, indicates that the Android system
should run the instrumentation class as a functional
test.The default value is false. |
Change the test build type
By default, all instrumentation tests run against the debug build type.
You can change this to another build type by using the testBuildType
property in your module-level build.gradle file. For example, if you want
to run your tests against your staging build type, edit the file as
shown in the following snippet:
Groovy
android {
    ...
    testBuildType "staging"
}
Kotlin
android {
    ...
    testBuildType = "staging"
}
設定 Gradle 測試選項
Android Gradle 外掛程式可讓您為所有或部分測試指定特定選項。您可以在模組層級 build.gradle 檔案中,使用 testOptions 區塊指定相關選項,變更 Gradle 執行所有測試的方式:
Groovy
android {
    ...
    // Encapsulates options for running tests.
    testOptions {
        reportDir "$rootDir/test-reports"
        resultsDir "$rootDir/test-results"
    }
}
Kotlin
android {
    ...
    // Encapsulates options for running tests.
    testOptions {
        reportDir "$rootDir/test-reports"
        resultsDir = "$rootDir/test-results"
    }
}
reportDir 屬性可變更 Gradle 儲存測試報告的目錄。根據預設,Gradle 會將測試報告儲存在 path_to_your_project/module_name
/build/outputs/reports/ 目錄中。$rootDir 可設定相對於目前專案根目錄的路徑。
resultsDir 屬性可變更 Gradle 儲存測試結果的目錄。根據預設,Gradle 會將測試結果儲存在 path_to_your_project/module_name
/build/outputs/test-results/ 目錄中。$rootDir 可設定相對於目前專案根目錄的路徑。
如果只要指定本機單元測試的選項,請在 testOptions 中設定 unitTests 區塊。
Groovy
android {
    ...
    testOptions {
        ...
        // Encapsulates options for local unit tests.
        unitTests {
            returnDefaultValues true

            all {
                jvmArgs '-XX:MaxPermSize=256m'

                if (it.name == 'testDebugUnitTest') {
                    systemProperty 'debug', 'true'
                }
                ...
            }
        }
    }
}
Kotlin
android {
    ...
    testOptions {
        ...
        // Encapsulates options for local unit tests.
        unitTests {
            returnDefaultValues = true

            all {
                jvmArgs = listOf("-XX:MaxPermSize=256m")

                 if (it.name == "testDebugUnitTest") {
                    systemProperty = mapOf("debug" to "true")
                }
                ...
            }
        }
    }
}
根據預設,當受測程式碼嘗試存取 Android 平台 API 時,本機單元測試會擲回例外狀況,除非您自行模擬 Android 依附元件或是使用 Mockito 等測試架構 不過,您可以啟用 returnDefaultValues 屬性,讓測試在存取平台 API 時傳回空值或零,而非擲回例外狀況。
all 區塊會封裝各種選項,用於控制 Gradle 執行本機單元測試的方式。如需可供指定的完整選項清單,請參閱 Gradle 的參考說明文件。
jvmArgs 屬性可為測試 JVM 設定 JVM 引數。
您也可以指定工作名稱,僅將選項套用至指定的測試。在程式碼片段範例中,debug 屬性設定為 true,但僅適用於 testDebugUnitTest 工作。
針對檢測設備測試使用不同的測試模組
如果您希望檢測設備測試擁有專屬模組,可將其餘程式碼與測試隔離,另外建立測試模組,並設定與程式庫模組相似的建構版本。
如要建立測試模組,請按照下列指示操作:
- 建立程式庫模組。
- 在模組層級
build.gradle檔案中套用com.android.test外掛程式,而非com.android.library。 - 按一下「Sync Project」
 。
。
建立測試模組後,您可以在主要或變化版本來源集 (例如 src/main/java 或 src/variant/java) 中加入測試程式碼。如果應用程式模組定義了多個變種版本,您可以在測試模組中重新建立這些變種版本。使用變化版本感知依附元件管理功能時,測試模組會嘗試在目標模組中測試符合的變種版本。
根據預設,測試模組只會包含及測試偵錯變化版本。不過,您可以依據受測應用程式專案建立新的建構類型。如要讓測試模組測試不同的建構類型,而非偵錯類型,請使用 VariantFilter 停用測試專案中的偵錯變化版本,如下所示:
Groovy
android {
    variantFilter { variant ->
        if (variant.buildType.name.equals('debug')) {
            variant.setIgnore(true);
        }
    }
}
Kotlin
android {
    variantFilter {
        if (buildType.name == "debug") {
            ignore = true
        }
    }
}
如果希望測試模組僅以應用程式的特定變種版本或建構類型為目標,可以使用 matchingFallbacks 屬性,僅鎖定您要測試的變化版本。這樣一來,測試模組就不必自行設定這些變化版本。