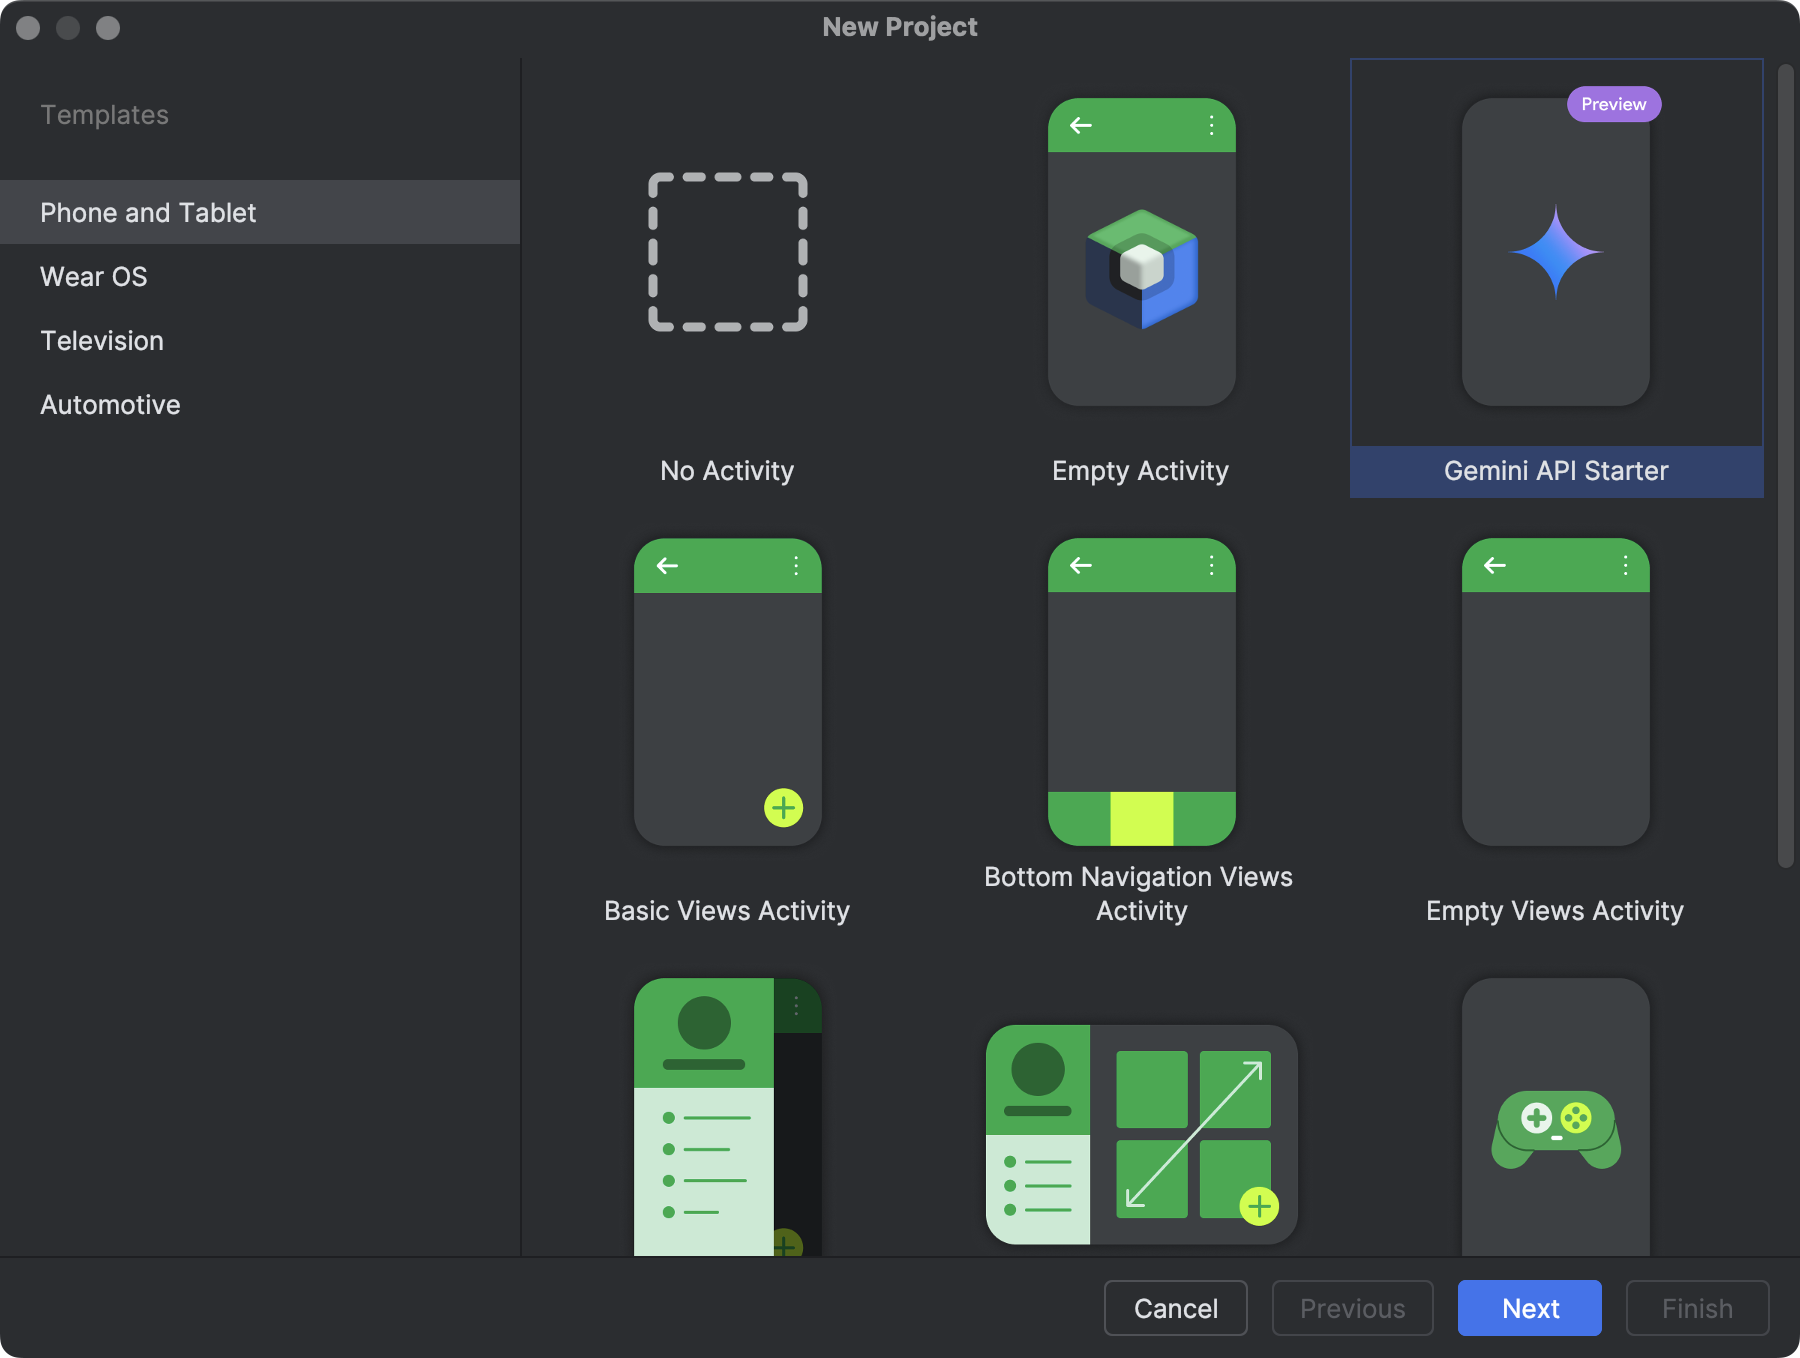
作成したいプロジェクトのタイプを選択すると、プロジェクトの開始に役立つサンプルコードおよびリソースが Android Studio によって追加されます。
プロジェクト タイプを選択して、[Next] をクリックします。
プロジェクトを構成する
プロジェクトを作成するための次のステップは、図 2 に示すように、いくつかの設定を構成することです。ネイティブ C++ プロジェクトを作成する場合は、C / C++ をサポートする新しいプロジェクトを作成するを参照して、構成する必要があるオプションの詳細を確認してください。
図 2. 新しいプロジェクトのいくつかの設定を構成する
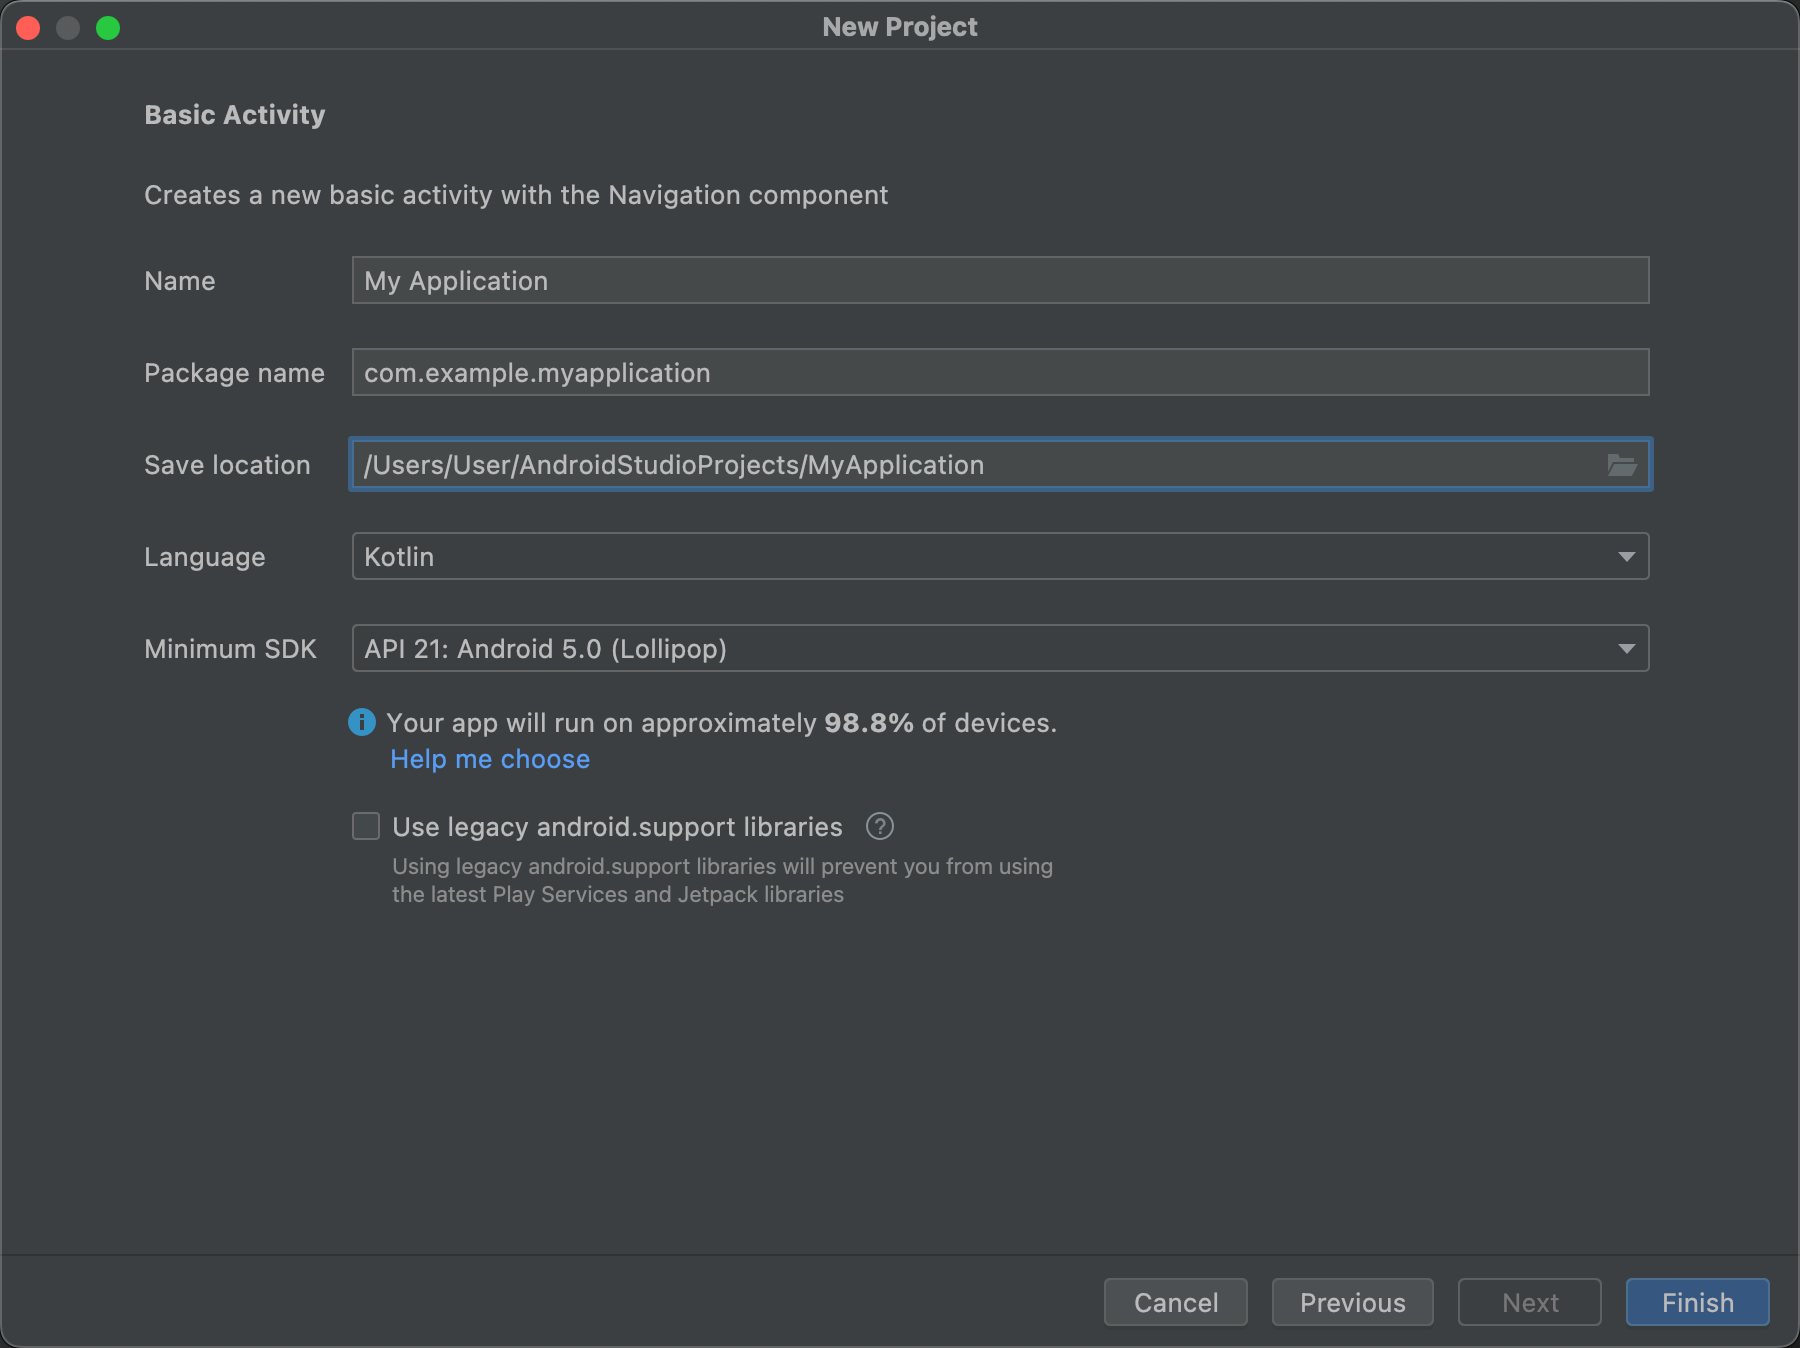
[Name] にプロジェクト名を指定します。
[Package name] にパッケージ名を指定します。デフォルトでは、このパッケージ名がプロジェクトの名前空間(プロジェクト リソースへのアクセスに使用されます)とプロジェクトのアプリケーション ID(公開用の ID として使用されます)になります。詳しくは、アプリ モジュールを設定するをご覧ください。
[Save location] に、プロジェクトのローカルの保存場所を指定します。
[Language] で Kotlin または Java を選択します。これは、新しいプロジェクトのサンプルコードを作成する際に Android Studio で使用する言語です。プロジェクト内の言語には限定されないことにご注意ください。
[Minimum API level] で、アプリがサポートする最小 API レベルを選択します。低い API レベルを選択すると、利用できる最新の Android API は少なくなりますが、アプリを実行できる Android デバイスの割合は増えます。高い API レベルを選択すると、この逆になります。
判断の参考になる詳細なデータを確認するには、[Help me choose] をクリックします。クリックすると、選択した API レベルの累積分布を示すダイアログが表示され、各種の最小 API レベルを使用した場合の影響を確認できます。
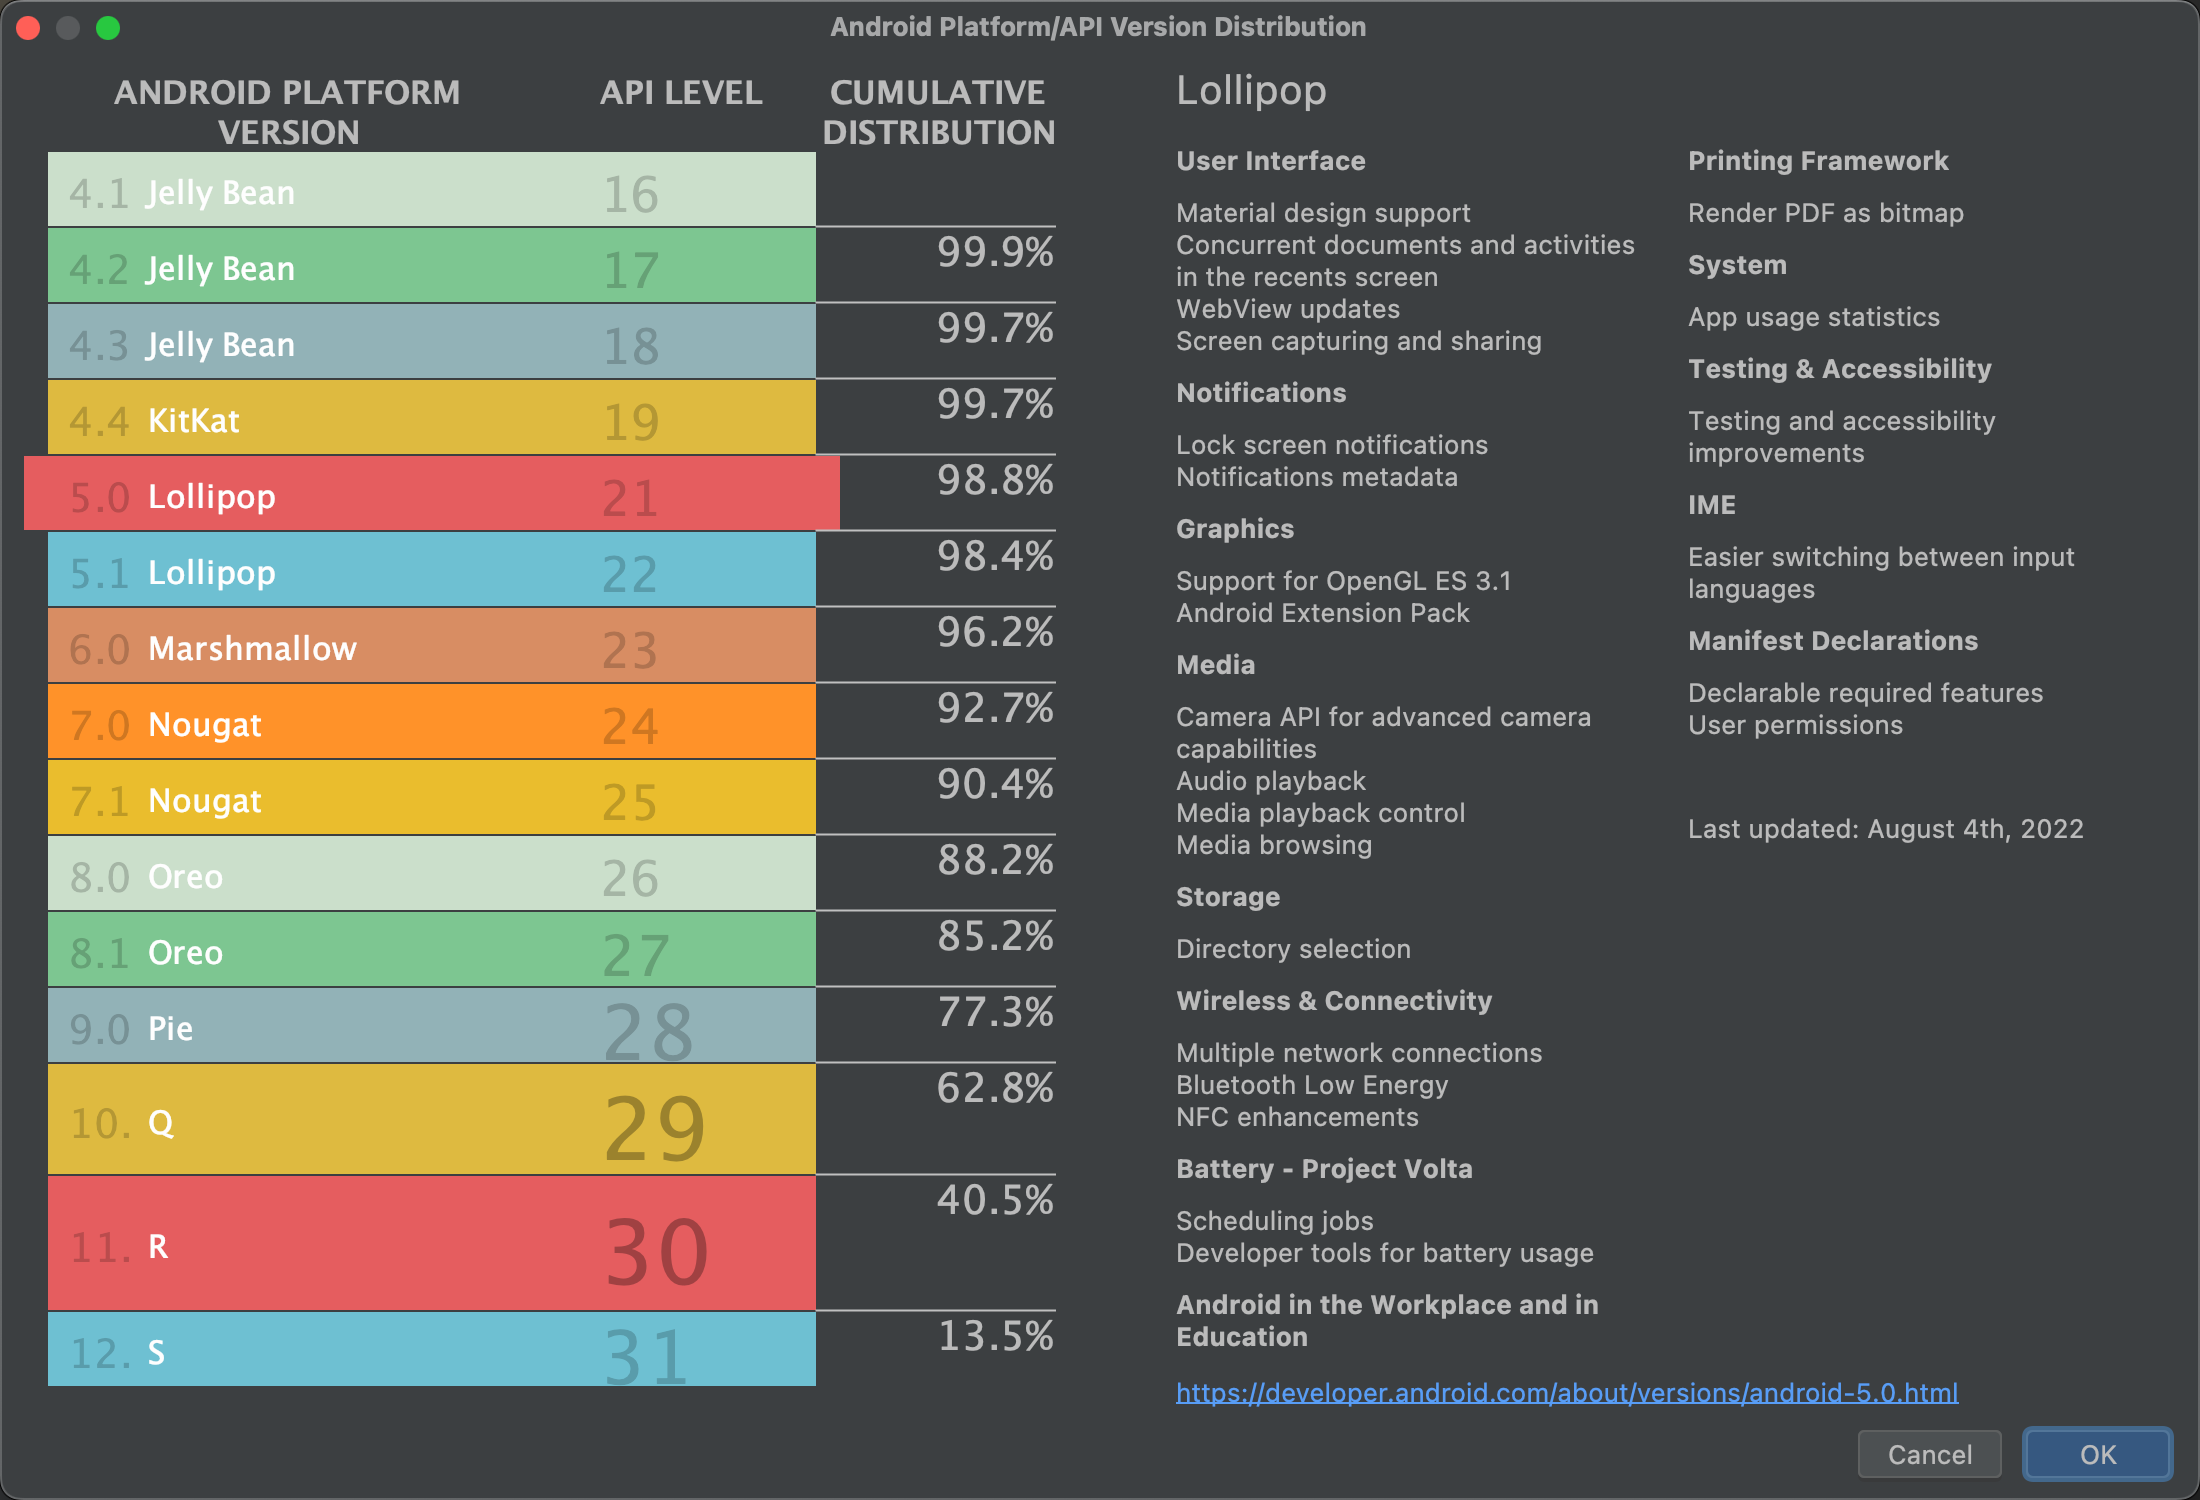
Android Studio により、サンプルとして使用できる基本的なコードとリソースを含む新しいプロジェクトが作成されます。その後、異なるデバイスのフォーム ファクタのサポートを追加することにした場合は、プロジェクトにモジュールを追加できます。モジュール間でコードとリソースを共有する場合は、Android ライブラリを作成することで共有を実現できます。
[[["わかりやすい","easyToUnderstand","thumb-up"],["問題の解決に役立った","solvedMyProblem","thumb-up"],["その他","otherUp","thumb-up"]],[["必要な情報がない","missingTheInformationINeed","thumb-down"],["複雑すぎる / 手順が多すぎる","tooComplicatedTooManySteps","thumb-down"],["最新ではない","outOfDate","thumb-down"],["翻訳に関する問題","translationIssue","thumb-down"],["サンプル / コードに問題がある","samplesCodeIssue","thumb-down"],["その他","otherDown","thumb-down"]],["最終更新日 2025-07-27 UTC。"],[],[],null,["# Create a project\n\nAndroid Studio makes it easy to create Android apps for various form factors,\nsuch as phones, tablets, TVs, and Wear devices. This page explains how to\nstart a new Android app project or import an existing project.\n\nIf you don't have a project opened, create a new project by clicking\n**New Project** on the Android Studio Welcome screen.\n\nIf you do have a project opened, create a new project by selecting\n**File \\\u003e New \\\u003e New Project** from the main menu.\n\nChoose your project type\n------------------------\n\nIn the **New Project** screen that appears, you can select the type of\nproject you want to create from categories of device form factors, shown in\nthe **Templates** pane. For example, figure 1 shows the project\ntemplates for phone and tablet.\n**Figure 1.** Choose the type of project you want to create on the **New Project** screen.\n\nSelecting the type of project you want to create lets Android Studio include\nsample code and resources in your project to help you get started.\n\nOnce you select your project type, click **Next**.\n\nConfigure your project\n----------------------\n\nThe next step in creating your project is to configure some settings, as\nshown in figure 2. If you're creating a **Native C++**\nproject, read\n[Create a new project with C/C++\nsupport](/studio/projects/add-native-code#new-project) to learn more about the\noptions you need to configure.\n**Figure 2.** Configure your new project with a few settings.\n\n1. Specify the **Name** of your project.\n2. Specify the **Package name** . By default, this package name becomes your project's namespace (used to access your project resources) and your project's application ID (used as the ID for publishing). To learn more, see [Configure the app module](/studio/build/configure-app-module).\n3. Specify the **Save location** where you want to locally store your project.\n4. Select the **Language**, Kotlin or Java, you want Android Studio to use when creating sample code for your new project. Keep in mind that you aren't limited to using only that language in the project.\n5. Select the **Minimum API level** you want your app to support. When you\n select a lower API level, your app can't use as many modern Android APIs.\n However, a larger percentage of Android devices can run your app. The\n opposite is true when selecting a higher API level.\n\n If you want to see more data to help you decide, click **Help me choose**.\n This displays a dialog showing the cumulative distribution for the API\n level you have selected and lets you see the impact of using different\n minimum API levels.\n **Figure 3.** A help screen that shows the cumulative distribution of different API levels.\n6. Your project is configured to use AndroidX libraries by default, which\n replace the Android Support libraries. To use the\n legacy support libraries instead, select **Use legacy\n android.support libraries** . However, this is not recommended, as the legacy\n support libraries are no longer supported. To learn more, read the\n [AndroidX overview](/jetpack/androidx).\n\n7. When you're ready to create your project, click **Finish**.\n\nAndroid Studio creates your new project with some basic code and resources to\nget you started. If you decide to add support for a different device form\nfactor later, you can [add a module](/studio/projects/add-app-module) to your project.\nAnd if you want to share code and resources between modules, you can do\nso by creating an [Android library](/studio/projects/android-library).\n\nFor more information about the Android project structure and module types,\nread the [Projects overview](/studio/projects). If you're new to Android\ndevelopment altogether, start with the [Android Developer Guides](/training).\n\nImport an existing project\n--------------------------\n\nTo import an existing local project into Android Studio, proceed as follows:\n\n1. Click **File** \\\u003e **New** \\\u003e **Import Project**.\n2. In the window that appears, navigate to the root directory of the project you want to import.\n3. Click **OK**.\n\nAndroid Studio opens the project in a new IDE window and indexes its\ncontents.\n\nIf you are importing a project from version control, select **File** \\\u003e\n**New** \\\u003e **Project from Version Control** . For more\ninformation about importing projects from version control, read IntelliJ's\ninformation about\n[Version control](https://www.jetbrains.com/help/idea/version-control-integration.html)."]]