C 및 C++ 코드를 프로젝트에 추가
컬렉션을 사용해 정리하기
내 환경설정을 기준으로 콘텐츠를 저장하고 분류하세요.
C 및 C++ 코드를 프로젝트 모듈의 cpp
디렉터리에 배치하여 Android 프로젝트에 추가합니다. 프로젝트를 빌드할 때 이 코드는 Gradle이 앱과 패키징할 수 있는 네이티브 라이브러리에 컴파일됩니다. 그러면 자바 코드 또는 Kotlin 코드가 자바 네이티브 인터페이스(JNI)를 통해 네이티브 라이브러리에서 함수를 호출할 수 있습니다. JNI 프레임워크를 사용하는 방법을 자세히 알아보려면 Android를 위한 JNI 도움말을 확인하세요.
Android 스튜디오는 크로스 플랫폼 프로젝트에 유용한 CMake를 지원합니다.
Android 스튜디오는 CMake보다 빠를 수 있지만 Android만 지원하는 ndk-build
도 지원합니다. 동일한 모듈에서 CMake와 ndk-build
를 모두 사용하는 것은 현재 지원되지 않습니다.
기존 ndk-build
라이브러리를 Android 스튜디오 프로젝트로 가져오려면 Gradle을 네이티브 라이브러리 프로젝트에 연결하는 방법을 알아보세요.
이 페이지는 필수 빌드 도구로 Android 스튜디오를 설정하는 방법, C/C++ 지원 기능으로 새 프로젝트를 만드는 방법 및 프로젝트에 새 C/C++ 파일을 추가하는 방법을 보여줍니다.
대신 기존 프로젝트에 네이티브 코드를 추가하려면 다음 단계를 따르세요.
-
새 네이티브 소스 파일을 만들어 Android 스튜디오 프로젝트에 추가합니다.
- 네이티브 코드가 이미 있거나 미리 빌드된 네이티브 라이브러리를 가져오려면 이 단계를 건너뜁니다.
-
CMake를 구성하여 라이브러리에 네이티브 소스 코드를 빌드합니다. 이 빌드 스크립트는 미리 빌드된 라이브러리 또는 플랫폼 라이브러리를 가져와 연결하는 경우 필요합니다.
- 이미
CMakeLists.txt
빌드 스크립트가 있거나 ndk-build
를 사용하고 Android.mk
빌드 스크립트를 포함하는 기존 네이티브 라이브러리가 있다면 이 단계를 건너뜁니다.
-
CMake 또는
ndk-build
스크립트 파일 경로를 제공하여 Gradle을 구성합니다. Gradle은 빌드 스크립트를 사용하여 소스 코드를 Android 스튜디오 프로젝트로 가져오고 네이티브 라이브러리를 앱에 패키징합니다.
프로젝트를 구성한 후에는 JNI 프레임워크를 사용하여 자바 또는 Kotlin 코드에서 네이티브 함수에 액세스합니다. 앱을 빌드하고 실행하려면 Run
을 클릭합니다.
참고: 기존 프로젝트에서 지원 중단된 ndkCompile
도구를 사용하는 경우 CMake 또는 ndk-build
를 사용하도록 이전하세요.
NDK 및 빌드 도구 다운로드
앱의 네이티브 코드를 컴파일하고 디버그하려면 다음 구성요소가 필요합니다.
-
Android Native Development Kit(NDK): Android에서 C 및 C++ 코드를 사용할 수 있도록 하는 도구 모음입니다. NDK는 네이티브 액티비티를 관리하고 센서, 터치 입력과 같은 실제 기기 구성요소에 액세스할 수 있는 플랫폼 라이브러리를 제공합니다.
-
CMake: Gradle과 함께 작동하여 네이티브 라이브러리를 빌드하는 외부 빌드 도구입니다.
ndk-build
만 사용하려는 경우에는 이 구성요소가 필요하지 않습니다.
-
LLDB: 네이티브 코드를 디버그하는 Android 스튜디오의 디버거입니다.
이러한 구성요소 설치에 관한 자세한 내용은 NDK 및 CMake 설치 및 구성을 참고하세요.
C/C++ 지원 기능을 활용하여 새 프로젝트 생성
네이티브 코드를 지원하는 새 프로젝트를 만드는 작업은 다른 Android 스튜디오 프로젝트를 생성하는 프로세스와 비슷하지만 다음과 같은 단계가 추가됩니다.
- 마법사의 Choose your project 섹션에서 Native C++ 프로젝트 유형을 선택합니다.
- Next를 클릭합니다.
- 마법사의 다음 섹션에서 다른 모든 필드를 완료합니다.
- Next를 클릭합니다.
-
마법사의 Customize C++ Support 섹션에서 C++ Standard 필드로 프로젝트를 맞춤설정할 수 있습니다.
-
드롭다운 목록을 사용하여 사용하려는 표준 C++를 선택합니다. Toolchain Default를 선택하면 기본 CMake 설정이 사용됩니다.
-
Finish를 클릭합니다.
Android 스튜디오에서 새 프로젝트가 만들어지면 IDE 왼쪽에서 Project 창을 열고 메뉴에서 Android 뷰를 선택합니다. 그림 1과 같이 Android 스튜디오는 cpp 그룹을 추가합니다.
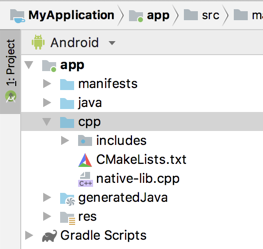
그림 1. 네이티브 소스 및 외부 빌드 스크립트를 포함하는 Android 뷰 그룹
참고: 이 뷰는 디스크에 있는 실제 파일 계층 구조를 반영하지 않지만, 유사한 파일을 그룹화하여 프로젝트 탐색을 간소화합니다.
cpp 그룹에서는 프로젝트에 포함된 모든 네이티브 소스 파일, 헤더, CMake 또는 ndk-build
의 빌드 스크립트 및 사전 빌드된 라이브러리를 찾을 수 있습니다. 새 프로젝트의 경우 Android 스튜디오는 샘플 C++ 소스 파일인 native-lib.cpp
를 만들어 앱 모듈의 src/main/cpp/
디렉터리에 배치합니다. 이 샘플 코드는 "Hello from C++"
문자열을 반환하는 간단한 C++ 함수인 stringFromJNI()
를 제공합니다. 새로운 네이티브 소스 파일을 생성하는 방법을 설명하는 섹션에서 프로젝트에 소스 파일을 추가하는 방법을 알아보세요.
Gradle이 build.gradle
파일을 통해 앱을 빌드하는 방법을 알 수 있는 것과 마찬가지로 CMake와 ndk-build
도 네이티브 라이브러리를 빌드하는 방법을 파악하려면 빌드 스크립트가 필요합니다. 새 프로젝트의 경우 Android 스튜디오에서 CMake 빌드 스크립트인 CMakeLists.txt
를 생성하여 모듈의 루트 디렉터리에 배치합니다.
이 빌드 스크립트의 콘텐츠를 자세히 알아보려면 CMake 구성을 참고하세요.
샘플 앱 빌드 및 실행
Run
을 클릭하면 Android 스튜디오에서 Android 기기 또는 에뮬레이터에 'Hello from C++'라는 텍스트를 표시하는 앱을 빌드하고 실행합니다. 다음 개요에서는 샘플 앱을 빌드하고 실행하는 데 발생하는 이벤트를 설명합니다.
- Gradle이 외부 빌드 스크립트인
CMakeLists.txt
를 호출합니다.
- CMake는 빌드 스크립트의 명령어에 따라 C++ 소스 파일인
native-lib.cpp
를 공유 객체 라이브러리로 컴파일하고 libnative-lib.so
로 이름을 지정합니다. 그런 다음 Gradle은 명명된 파일을 앱에 패키징합니다.
- 런타임 시, 앱의
MainActivity
에서 System.loadLibrary()
를 사용하여 네이티브 라이브러리를 로드합니다. 이제 앱에서 라이브러리의 네이티브 함수인 stringFromJNI()
를 사용할 수 있습니다.
-
MainActivity.onCreate()
는 stringFromJNI()
를 호출하고 이는 "Hello from C++"
를 반환하여 TextView
를 업데이트하는 데 사용합니다.
Gradle이 네이티브 라이브러리를 앱에 패키징하는지 확인하려면 다음과 같이 APK Analyzer를 사용하세요.
-
Build > Build Bundles(s) / APK(s) > Build APK(s)를 선택합니다.
- Build > Analyze APK를 선택합니다.
app/build/outputs/
디렉터리에서 APK 또는 AAB를 선택하고 OK를 클릭합니다.
- 그림 2와 같이 APK Analyzer 창에서
lib/<ABI>/
아래에 있는 libnative-lib.so
를 볼 수 있습니다. 
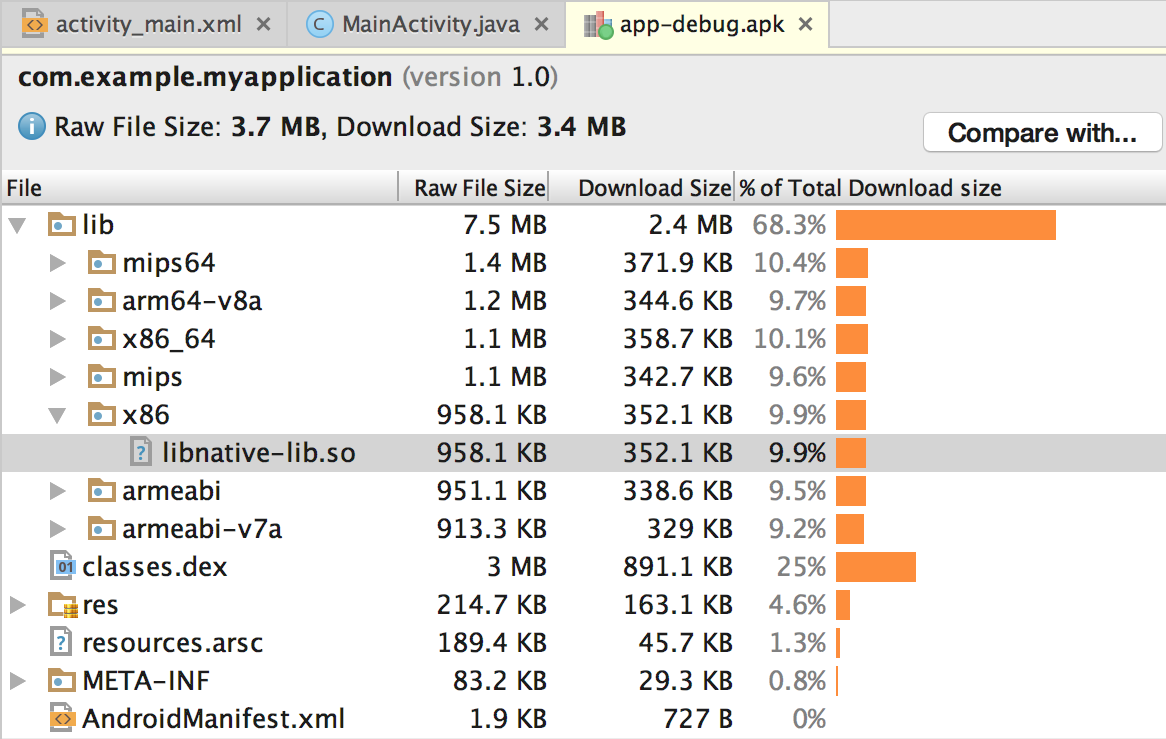
그림 2. APK Analyzer를 사용하여 네이티브 라이브러리 찾기
도움말: 네이티브 코드를 사용하는 다른 Android 앱으로 시험해 보려면 File > New > Import Sample을 클릭하고 Ndk 목록에서 샘플 프로젝트를 선택하세요.
새 C/C++ 소스 파일 생성
기존 프로젝트에 새 C/C++ 소스 파일을 추가하려면 다음 단계를 따르세요.
- 아직 앱의 기본 소스 세트에
cpp/
디렉터리가 없다면 다음과 같이 디렉터리를 생성합니다.
- IDE 왼쪽에서 Project 창을 열고 메뉴에서 Project 뷰를 선택합니다.
- your-module > src로 이동합니다.
- main 디렉터리를 마우스 오른쪽 버튼으로 클릭하고 New > Directory를 선택합니다.
- 디렉터리 이름으로
cpp
를 입력하고 OK를 클릭합니다.
cpp/
디렉터리를 마우스 오른쪽 버튼으로 클릭하여 New > C/C++ Source File을 선택합니다.
- 소스 파일의 이름(예:
native-lib
)을 입력합니다.
- Type 메뉴에서 소스 파일의 파일 확장자(예:
.cpp
)를 선택합니다.
- Edit File Types
를 클릭하여 .cxx
또는 .hxx
와 같은 다른 파일 형식을 메뉴에 추가합니다. 팝업되는 New File Extensions 대화상자의 Source Extension과 Header Extension 메뉴에서 다른 파일 확장자를 선택하고 OK를 클릭합니다.
- 헤더 파일을 만들려면 Create an
associated header 체크박스를 선택합니다.
- OK를 클릭합니다.
새 C/C++ 파일을 프로젝트에 추가한 후에도 CMake를 구성하여 파일을 네이티브 라이브러리에 포함해야 합니다.
추가 리소스
앱에서 C/C++ 코드를 지원하는 내용을 자세히 알아보려면 다음 리소스를 참고하세요.
Codelab
이 페이지에 나와 있는 콘텐츠와 코드 샘플에는 콘텐츠 라이선스에서 설명하는 라이선스가 적용됩니다. 자바 및 OpenJDK는 Oracle 및 Oracle 계열사의 상표 또는 등록 상표입니다.
최종 업데이트: 2025-08-21(UTC)
[[["이해하기 쉬움","easyToUnderstand","thumb-up"],["문제가 해결됨","solvedMyProblem","thumb-up"],["기타","otherUp","thumb-up"]],[["필요한 정보가 없음","missingTheInformationINeed","thumb-down"],["너무 복잡함/단계 수가 너무 많음","tooComplicatedTooManySteps","thumb-down"],["오래됨","outOfDate","thumb-down"],["번역 문제","translationIssue","thumb-down"],["샘플/코드 문제","samplesCodeIssue","thumb-down"],["기타","otherDown","thumb-down"]],["최종 업데이트: 2025-08-21(UTC)"],[],[],null,["# Add C and C++ code to your project\n\nAdd C and C++ code to your Android project by placing the code into a\n`cpp` directory in your project module. When you build your project, this\ncode is compiled into a native library that Gradle can package with your app.\nYour Java or Kotlin code can then call functions in your native library\nthrough the Java Native Interface (JNI). To learn more about using the JNI\nframework, read [JNI tips for\nAndroid](/training/articles/perf-jni).\n\nAndroid Studio supports CMake, which is useful for cross-platform projects.\nAndroid Studio also supports [`ndk-build`](/ndk/guides/ndk-build), which\ncan be faster than CMake but only supports Android. Using both CMake and\n`ndk-build` in the same module is not currently supported.\n\nTo import an existing `ndk-build` library into your Android Studio\nproject, learn how to\n[link Gradle to your native library project](/studio/projects/gradle-external-native-builds).\n\nThis page shows you how to [set up Android Studio](#download-ndk) with the\nnecessary build tools, [create a new project](#new-project) with C/C++\nsupport, and [add new C/C++ files](#create-sources) to your project.\n\n\nIf instead you want to add native code to an existing project,\nfollow these steps:\n\n1. [Create new native source files](#create-sources) and add the files to your Android Studio project.\n - Skip this step if you already have native code or want to import a prebuilt native library.\n2. [Configure CMake](/studio/projects/configure-cmake) to build your native source code into a library. This build script is required if you are importing and linking against prebuilt or platform libraries.\n - If you have an existing native library that already has a `CMakeLists.txt` build script or uses `ndk-build` and includes an [`Android.mk`](/ndk/guides/android_mk) build script, skip this step.\n3. [Configure\n Gradle](/studio/projects/gradle-external-native-builds) by providing a path to your CMake or `ndk-build` script file. Gradle uses the build script to import source code into your Android Studio project and package your native library into the app.\n\n\nOnce you configure your project, access your native functions from\nJava or Kotlin code using the [JNI framework](http://docs.oracle.com/javase/7/docs/technotes/guides/jni/spec/jniTOC.html). To build and run your app,\nclick **Run** .\n\n\n**Note:** If your existing project uses the deprecated\n`ndkCompile` tool, migrate to using either CMake or\n`ndk-build`.\n\nDownload the NDK and build tools\n--------------------------------\n\n\nTo compile and debug native code for your app, you need the following\ncomponents:\n\n- [The Android Native Development Kit\n (NDK)](/ndk): a toolset that lets you use C and C++ code with Android. NDK provides platform libraries that let you manage native activities and access physical device components, such as sensors and touch input.\n- [CMake](https://cmake.org/): an external build tool that works alongside Gradle to build your native library. You don't need this component if you only plan to use `ndk-build`.\n- [LLDB](http://lldb.llvm.org/): the debugger in Android Studio that [debugs native code](/studio/debug).\n\n\nFor information on installing these components, see [Install and configure the NDK and CMake](/studio/projects/install-ndk).\n\nCreate a new project with C/C++ support\n---------------------------------------\n\n\nTo create a new project with support for native code, the process is similar to\n[creating any other Android\nStudio project](/studio/projects/create-project), but with an additional step:\n\n1. In the **Choose your project** section of the wizard, select the **Native C++** project type.\n2. Click **Next**.\n3. Complete all other fields in the next section of the wizard.\n4. Click **Next**.\n5. In the **Customize C++ Support** section of the wizard, you can customize your project with the **C++ Standard** field.\n - Use the drop-down list to select which standardization of C++ you want to use. Selecting **Toolchain\n Default** uses the default CMake setting.\n6. Click **Finish**.\n\n\nAfter Android Studio finishes creating your new project, open the\n**Project** pane from the left side of the IDE and select the\n**Android** view from the menu. As shown in figure 1, Android\nStudio adds the **cpp** group:\n\n\n**Figure 1.** Android view groups for your native sources\nand external build scripts.\n\n\n**Note:** This view does not reflect the actual file hierarchy\non disk, but groups similar files to simplify navigating your project.\n\n\nThe **cpp** group is where you can find all the native\nsource files, headers, build scripts for CMake or `ndk-build`, and prebuilt\nlibraries that are a part of your project. For new projects, Android Studio\ncreates a sample C++ source file, `native-lib.cpp`, and places it\nin the `src/main/cpp/` directory of your app module. This sample\ncode provides a simple C++ function, `stringFromJNI()`, that\nreturns the string `\"Hello from C++\"`. Learn how to add additional\nsource files to your project in the section about how to\n[create new native source files](#create-sources).\n\nSimilar to how `build.gradle` files instruct Gradle how to build\nyour app, CMake and `ndk-build` require a build script to know how to build\nyour native library. For new projects, Android Studio creates a CMake build\nscript,`CMakeLists.txt`, and places it in your module's root directory.\nTo learn more about the contents of this build script, read\n[Configure CMake](/studio/projects/configure-cmake).\n\n### Build and run the sample app\n\n\nWhen you click **Run** , Android Studio\nbuilds and launches an app that displays the text \"Hello from C++\" on your\nAndroid device or emulator. The following overview describes the events that\noccur to build and run the sample app:\n\n1. Gradle calls on your external build script, `CMakeLists.txt`.\n2. CMake follows commands in the build script to compile a C++ source file, `native-lib.cpp`, into a shared object library and names it `libnative-lib.so`. Gradle then packages it into the app.\n3. During runtime, the app's `MainActivity` loads the native library using [`System.loadLibrary()`](/reference/java/lang/System#loadLibrary(java.lang.String)). The library's native function, `stringFromJNI()`, is now available to the app.\n4. `MainActivity.onCreate()` calls `stringFromJNI()`, which returns `\"Hello from C++\"` and uses it to update the [`TextView`](/reference/android/widget/TextView).\n\n\nTo verify that Gradle packages the native library in the app, use the\n[APK Analyzer](/studio/debug/apk-analyzer):\n\n1. Select **Build \\\u003e Build Bundles(s) / APK(s) \\\u003e Build APK(s)**.\n2. Select **Build \\\u003e Analyze APK**.\n3. Select the APK or AAB from the `app/build/outputs/` directory and click **OK**.\n4. As shown in figure 2, you can see `libnative-lib.so` in the APK Analyzer window under `lib/\u003cABI\u003e/`.\n\n\n **Figure 2.** Locate a native library using the APK\n Analyzer.\n\n\n**Tip:** If you want to experiment with other Android apps that\nuse native code, click **File \\\u003e New \\\u003e Import Sample** and\nselect a sample project from the **Ndk** list.\n\nCreate new C/C++ source files\n-----------------------------\n\n\nTo add new C/C++ source files to an existing project, proceed as follows:\n\n1. If you don't already have a `cpp/` directory in the main source set of your app, create one as follows:\n 1. Open the **Project** pane in the left side of the IDE and select the **Project** view from the menu.\n 2. Navigate to **\u003cvar translate=\"no\"\u003eyour-module\u003c/var\u003e \\\u003e src**.\n 3. Right-click on the **main** directory and select **New \\\u003e\n Directory**.\n 4. Enter `cpp` as the directory name and click **OK**.\n2. Right-click the `cpp/` directory and select **New \\\u003e\n C/C++ Source File**.\n3. Enter a name for your source file, such as `native-lib`.\n4. From the **Type** menu, select the file extension for your source file, such as `.cpp`.\n - Click **Edit File Types** to add other file types to the menu, such as `.cxx` or `.hxx`. In the **New File Extensions** dialog box that pops up, select another file extension from the **Source Extension** and **Header Extension** menus and click **OK**.\n5. To create a header file, select the **Create an\n associated header** checkbox.\n6. Click **OK**.\n\n\u003cbr /\u003e\n\nAfter you add new C/C++ files to you project, you still need to\n[configure CMake](/studio/projects/configure-cmake) to include the files in\nyour native library.\n\nAdditional resources\n--------------------\n\nTo learn more about supporting C/C++ code in your app, try the following\nresource.\n\n### Codelabs\n\n- [Create Hello-CMake with Android Studio](https://codelabs.developers.google.com/codelabs/android-studio-cmake/) This codelab shows you how to use the Android Studio CMake template to start Android NDK project development."]]