
Los accesos directos entregan tipos específicos de contenido a tus usuarios ayudándolos a acceder rápidamente a distintas partes de tu app.
La forma de entregar el contenido con accesos directos depende de tu caso de uso y de si el contexto del acceso directo es controlado por la app o por el usuario. Si bien el contexto de un acceso directo estático no cambia y el de un acceso directo dinámico cambia constantemente, tu app controla el contexto en ambos casos. En los casos en que un usuario elige cómo tu app le entrega contenido, como con un acceso directo fijado, el contexto lo define el usuario. En las siguientes situaciones, se describen algunos casos de uso para cada tipo de acceso directo:
- Los accesos directos estáticos son mejores para las apps que se vinculan al contenido usando una estructura coherente durante toda la interacción del usuario con la app. Como la mayoría de los selectores solo pueden mostrar cuatro accesos directos a la vez, los accesos directos estáticos son útiles para realizar una tarea de rutina de manera coherente, por ejemplo, si el usuario desea ver su calendario o correo electrónico de una manera específica.
- Los accesos directos dinámicos se usan para acciones en apps que son sensibles al contexto. Los accesos directos contextuales se adaptan a las acciones que los usuarios realizan en una app. Por ejemplo, si compilas un juego que permite al usuario comenzar desde su nivel actual en el lanzamiento, debes actualizar el acceso directo con frecuencia. El uso de un acceso directo dinámico te permite actualizar el acceso directo cada vez que el usuario pasa de nivel.
- Los accesos directos fijos se usan para acciones específicas controladas por el usuario. Por ejemplo, un usuario puede querer fijar un sitio web específico al selector. Esto es beneficioso porque permite que el usuario realice una acción personalizada, como navegar al sitio web en un solo paso, más rápido que si usara una instancia predeterminada de un navegador.
Cómo crear accesos directos estáticos
Los accesos directos estáticos proporcionan vínculos a acciones genéricas en tu app, y estas acciones deben ser coherentes durante la vigencia de la versión actual de la app. Las buenas opciones para los accesos directos estáticos incluyen visualizar mensajes enviados, establecer una alarma y mostrar la actividad de ejercicio de un usuario para el día.
Para crear un acceso directo estático, haz lo siguiente:
- En el archivo
AndroidManifest.xmlde tu app, busca la actividad cuyos filtros de intents estén configurados en la acciónandroid.intent.action.MAINy la categoríaandroid.intent.category.LAUNCHER. Agrega un elemento
<meta-data>a esta actividad que haga referencia al archivo de recursos donde se definen los accesos directos de la app:<manifest xmlns:android="http://schemas.android.com/apk/res/android" package="com.example.myapplication"> <application ... > <activity android:name="Main"> <intent-filter> <action android:name="android.intent.action.MAIN" /> <category android:name="android.intent.category.LAUNCHER" /> </intent-filter> <meta-data android:name="android.app.shortcuts" android:resource="@xml/shortcuts" /> </activity> </application> </manifest>Crea un archivo de recursos nuevo llamado
res/xml/shortcuts.xml.En el nuevo archivo de recursos, agrega un elemento raíz
<shortcuts>que contenga una lista de elementos<shortcut>. En cada elemento<shortcut>, incluye información sobre un acceso directo estático, como su ícono, sus etiquetas de descripción y los intents que inicia dentro de la app:<shortcuts xmlns:android="http://schemas.android.com/apk/res/android"> <shortcut android:shortcutId="compose" android:enabled="true" android:icon="@drawable/compose_icon" android:shortcutShortLabel="@string/compose_shortcut_short_label1" android:shortcutLongLabel="@string/compose_shortcut_long_label1" android:shortcutDisabledMessage="@string/compose_disabled_message1"> <intent android:action="android.intent.action.VIEW" android:targetPackage="com.example.myapplication" android:targetClass="com.example.myapplication.Main" /> <!-- If your shortcut is associated with multiple intents, include them here. The last intent in the list determines what the user sees when they launch this shortcut. --> <categories android:name="android.shortcut.conversation" /> <capability-binding android:key="actions.intent.CREATE_MESSAGE" /> </shortcut> <!-- Specify more shortcuts here. --> </shortcuts>
Cómo personalizar valores de atributos
En la siguiente lista, se incluyen descripciones de los diferentes atributos dentro de un acceso directo estático. Proporciona un valor para android:shortcutId y android:shortcutShortLabel. Todos los demás valores son opcionales.
android:shortcutIdEs un literal de cadena que representa el acceso directo cuando un objeto
ShortcutManagerrealiza operaciones en él.android:shortcutShortLabelEs una frase concisa que describe el propósito del acceso directo. Cuando sea posible, limita esta descripción breve a 10 caracteres.
Para obtener más información, consulta
setShortLabel().android:shortcutLongLabelEs una frase extendida que describe el propósito del acceso directo. Si hay suficiente espacio, el selector muestra este valor en lugar de
android:shortcutShortLabel. Cuando sea posible, limita esta descripción larga a 25 caracteres.Para obtener más información, consulta
setLongLabel().android:shortcutDisabledMessageEs el mensaje que aparece en un selector compatible cuando el usuario intenta iniciar un acceso directo inhabilitado. El mensaje debe explicar al usuario por qué el acceso directo está inhabilitado. El valor de este atributo no tiene efecto si
android:enabledestrue.android:enabledDetermina si el usuario puede interactuar con el acceso directo desde un selector compatible. El valor predeterminado de
android:enabledestrue. Si lo configuras comofalse, establece un objetoandroid:shortcutDisabledMessageque explique por qué inhabilitas el acceso directo. Si crees que no es necesario proporcionar un mensaje de este tipo, quita por completo el acceso directo del archivo XML.android:iconEs el mapa de bits o el ícono adaptable que usa el selector cuando se muestra el acceso directo al usuario. Este valor puede ser la ruta a una imagen o el archivo de recursos que contiene la imagen. Usa íconos adaptables siempre que sea posible para mejorar el rendimiento y la coherencia.
Cómo configurar elementos internos
El archivo XML que enumera los accesos directos estáticos de una app admite los siguientes elementos dentro de cada elemento <shortcut>. Debes incluir un elemento interno intent para cada acceso directo estático que definas.
intentEs la acción que el sistema inicia cuando el usuario selecciona el acceso directo. Este intent debe proporcionar un valor para el atributo
android:action.Puedes proporcionar varios intents para un solo acceso directo. Para obtener más detalles, consulta Cómo administrar varios intents y actividades, Cómo configurar un intent y la referencia de la clase
TaskStackBuilder.categoriesProporciona una agrupación para los tipos de acciones que realizan los accesos directos de tu app, como la creación de nuevos mensajes de chat.
Para obtener una lista de categorías de accesos directos compatibles, consulta la referencia de la clase
ShortcutInfo.capability-bindingDeclara la capacidad vinculada con el acceso directo.
En el ejemplo anterior, el acceso directo está vinculado a una función declarada para
CREATE_MESSAGE, que es un intent integrado de Acciones en apps. Esta vinculación de capacidad permite que los usuarios usen comandos por voz con Asistente de Google para invocar un acceso directo.
Cómo crear accesos directos dinámicos
Los accesos directos dinámicos proporcionan vínculos a acciones específicas y coherentes con el contexto dentro de tu app. Estas acciones pueden cambiar entre los usos de tu app y mientras esta se encuentra en ejecución. Algunos buenos usos para los accesos directos dinámicos incluyen llamar a una persona específica, navegar a una ubicación específica y cargar un juego desde el último punto de guardado del usuario. También puedes usar accesos directos dinámicos para abrir una conversación.
La biblioteca de ShortcutManagerCompat de Jetpack es útil para la API de ShortcutManager, que te permite administrar accesos directos dinámicos en tu app. Usar la biblioteca de ShortcutManagerCompat reduce el código estándar y ayuda a garantizar que tus accesos directos funcionen de manera coherente en todas las versiones de Android. Esta biblioteca también se requiere para enviar accesos directos dinámicos a fin de que puedan aparecer en las plataformas de Google, como Asistente, con la Biblioteca de integración de accesos directos de Google.
La API de ShortcutManagerCompat permite que tu app realice las siguientes operaciones con accesos directos dinámicos:
- Envío y actualización: Usa
pushDynamicShortcut()para publicar y actualizar tus accesos directos dinámicos. Si ya existen accesos directos dinámicos o fijos con el mismo ID, se actualizará cada uno de ellos. - Quitar: Quita un conjunto de accesos directos dinámicos con
removeDynamicShortcuts(). Quita todos los accesos directos dinámicos conremoveAllDynamicShortcuts().
Para obtener más información sobre cómo realizar operaciones en accesos directos, consulta Cómo administrar accesos directos y la referencia de ShortcutManagerCompat.
A continuación, se muestra un ejemplo de cómo crear un acceso directo dinámico y asociarlo con tu app:
val shortcut = ShortcutInfoCompat.Builder(context, "id1")
        .setShortLabel("Website")
        .setLongLabel("Open the website")
        .setIcon(IconCompat.createWithResource(context, R.drawable.icon_website))
        .setIntent(Intent(Intent.ACTION_VIEW,
                Uri.parse("https://www.mysite.example.com/")))
        .build()

ShortcutManagerCompat.pushDynamicShortcut(context, shortcut)
Cómo agregar la Biblioteca de integración de accesos directos de Google
La Biblioteca de integración de accesos directos de Google es una biblioteca de Jetpack opcional. Te permite insertar accesos directos dinámicos que se pueden mostrar en plataformas de Android, como el selector, y en plataformas de Google. El uso de esta biblioteca ayuda a los usuarios a descubrir tus accesos directos para acceder rápidamente a contenido específico o repetir acciones en tu app.
Los accesos directos dinámicos enviados con esta biblioteca no están sujetos a los límites de accesos directos que se aplican por dispositivo. Esto permite que tu app envíe un atajo cada vez que un usuario complete una acción asociada en ella. Enviar atajos frecuentes de esta manera permite que Google comprenda los patrones de uso de tus usuarios y les sugiera atajos contextualmente relevantes.
Por ejemplo, Asistente puede aprender de los accesos directos enviados desde tu app de seguimiento de actividad física que un usuario suele salir a correr por la mañana y sugerir de manera proactiva un acceso directo para "iniciar una carrera" cuando el usuario toma el teléfono por la mañana.
La Biblioteca de integración de accesos directos de Google no ofrece ninguna funcionalidad direccionable. Agregar esta biblioteca a tu app permite que las plataformas de Google transfieran los accesos directos que envía tu app con ShortcutManagerCompat.
Para usar la biblioteca en tu app, sigue estos pasos:
Actualiza el archivo
gradle.propertiesde modo que sea compatible con las bibliotecas de AndroidX:android.useAndroidX=true # Automatically convert third-party libraries to use AndroidX android.enableJetifier=trueEn
app/build.gradle, agrega dependencias para la Biblioteca de integración de accesos directos de Google yShortcutManagerCompat:dependencies { implementation "androidx.core:core:1.6.0" implementation 'androidx.core:core-google-shortcuts:1.0.0' ... }
Con las dependencias de la biblioteca agregadas a tu proyecto de Android, tu app puede usar el método pushDynamicShortcut() de ShortcutManagerCompat para enviar atajos dinámicos que son aptos para mostrarse en el selector y en las plataformas participantes de Google.
Cómo crear accesos directos fijos
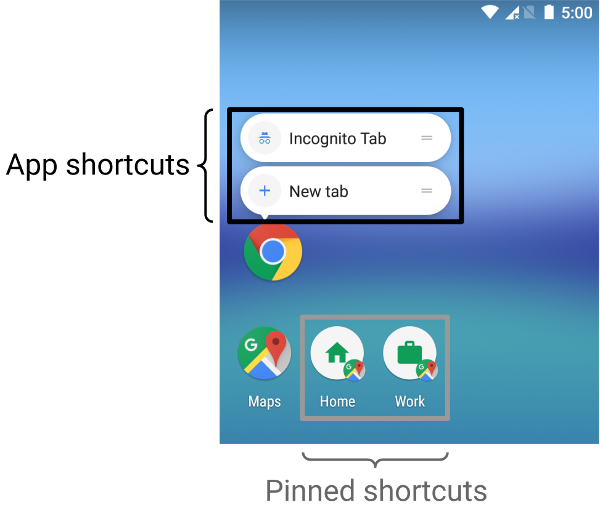
En Android 8.0 (nivel de API 26) y versiones posteriores, puedes crear accesos directos fijos. A diferencia de los accesos directos estáticos y dinámicos, los accesos directos fijos aparecen en los launchers compatibles como íconos separados. En la Figura 1, se muestra la distinción entre estos dos tipos de accesos directos.
Para fijar un acceso directo a un selector compatible con tu app, completa los siguientes pasos:
- Usa
isRequestPinShortcutSupported()para verificar que el selector predeterminado del dispositivo sea compatible con la función de fijación de accesos directos en la app. Crea un objeto
ShortcutInfode una de las dos maneras siguientes, según si el acceso directo existe:- Si el acceso directo existe, crea un objeto
ShortcutInfoque contenga solo el ID del acceso directo existente. El sistema encuentra y fija automáticamente el resto de la información relacionada con el acceso directo. - Si quieres fijar un nuevo acceso directo, crea un objeto
ShortcutInfoque contenga un ID, un intent y una etiqueta breve para el acceso directo.
- Si el acceso directo existe, crea un objeto
Fija el acceso directo al selector del dispositivo llamando a
requestPinShortcut(). Durante este proceso, puedes pasar un objetoPendingIntent, que notifica a tu app solo cuando el acceso directo se fija correctamente.Después de fijar un acceso directo, tu app puede actualizar su contenido con el método
updateShortcuts(). Para obtener más información, consulta Cómo actualizar los accesos directos.
En el siguiente fragmento de código, se muestra cómo crear un acceso directo fijo.
val shortcutManager = getSystemService<ShortcutManager>()

if (shortcutManager!!.isRequestPinShortcutSupported) {
    // Enable the existing shortcut with the ID "my-shortcut".
    val pinShortcutInfo = ShortcutInfo.Builder(context, "my-shortcut").build()

    // Create the PendingIntent object only if your app needs to be notified
    // that the user let the shortcut be pinned. If the pinning operation fails,
    // your app isn't notified. Assume here that the app implements a method
    // called createShortcutResultIntent() that returns a broadcast intent.
    val pinnedShortcutCallbackIntent = shortcutManager.createShortcutResultIntent(pinShortcutInfo)

    // Configure the intent so that your app's broadcast receiver gets the
    // callback successfully. For details, see PendingIntent.getBroadcast().
    val successCallback = PendingIntent.getBroadcast(context, /* request code */ 0,
            pinnedShortcutCallbackIntent, /* flags */ 0)

    shortcutManager.requestPinShortcut(pinShortcutInfo,
            successCallback.intentSender)
}
Cómo crear una actividad de accesos directos personalizada
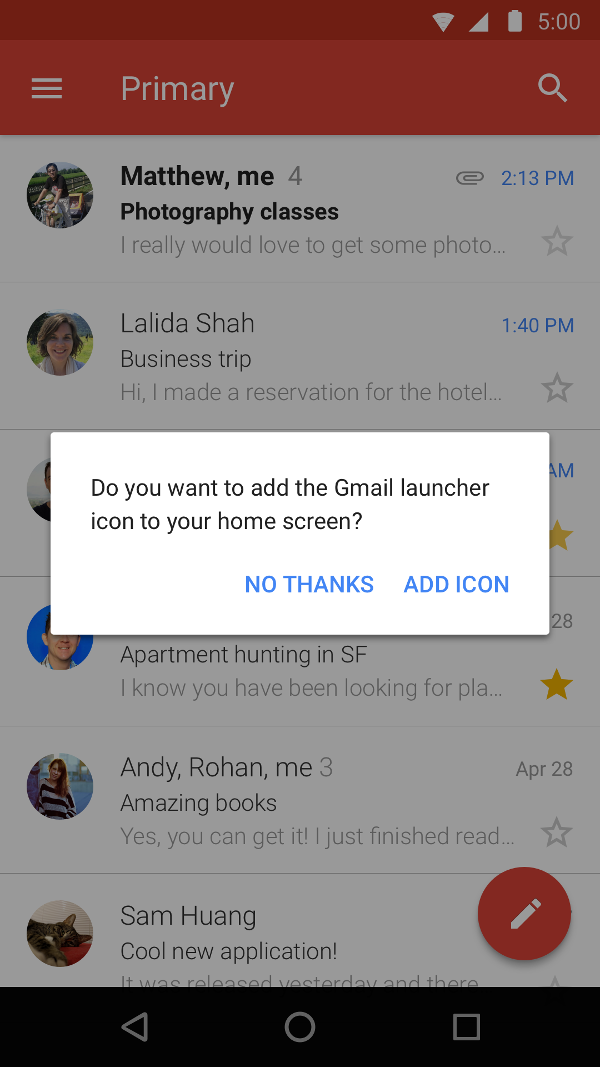
También puedes crear una actividad especializada que ayude a los usuarios a crear accesos directos, completar con opciones personalizadas y crear un botón de confirmación. En la Figura 2, se muestra un ejemplo de este tipo de actividad en la app de Gmail.
En el archivo de manifiesto de tu app, agrega ACTION_CREATE_SHORTCUT al elemento <intent-filter> de la actividad. Esta declaración configura el siguiente comportamiento cuando el usuario intenta crear un acceso directo:
- El sistema inicia la actividad especializada de tu app.
- El usuario configura opciones para el acceso directo.
- El usuario selecciona el botón de confirmación.
- Tu app crea el acceso directo con el método
createShortcutResultIntent(). Este método devuelve unIntent, que tu app retransmite a la actividad ejecutada previamente consetResult(). - Tu app llama a
finish()en la actividad que se usa para crear el acceso directo personalizado.
Del mismo modo, tu app puede solicitar a los usuarios que agreguen accesos directos fijos a la pantalla principal después de la instalación o la primera vez que se inicie la app. Este método es eficaz porque ayuda a tus usuarios a crear un acceso directo como parte de su flujo de trabajo habitual.
Cómo probar accesos directos
Para probar los accesos directos de tu app, instálala en un dispositivo con un selector que admita accesos directos. Luego, realiza las siguientes acciones:
- Mantén presionado el ícono de selector de tu app para ver los accesos directos que definiste para ella.
- Arrastra un acceso directo para fijarlo en el selector del dispositivo.