글꼴을 XML 리소스로 추가
컬렉션을 사용해 정리하기
내 환경설정을 기준으로 콘텐츠를 저장하고 분류하세요.
Compose 사용해 보기
Jetpack Compose는 Android에 권장되는 UI 도구 키트입니다. Compose에서 텍스트를 사용하는 방법을 알아보세요.
Android 8.0 (API 수준 26)에는 글꼴을 리소스로 사용할 수 있는 기능인 XML에 글꼴이 도입되었습니다. res/font/
폴더에 font
파일을 추가하여 글꼴을 번들로 묶어 리소스로 사용할 수 있습니다. 이러한 글꼴은 R
파일에 컴파일되며 Android 스튜디오에서 자동으로 사용 가능합니다. font
리소스 유형을 사용하여 글꼴 리소스에 액세스할 수 있습니다. 예를 들어 글꼴 리소스에 액세스하려면 @font/myfont
또는 R.font.myfont
를 사용합니다.
Android 4.1(API 수준 16) 이상을 실행하는 기기에서 XML의 글꼴 기능을 사용하려면 지원 라이브러리 26.0을 사용하세요. 지원 라이브러리 사용에 관한 자세한 내용은 지원 라이브러리 사용 섹션을 참고하세요.
글꼴을 리소스로 추가하려면 Android 스튜디오에서 다음 단계를 따르세요.
- res 폴더를 마우스 오른쪽 버튼으로 클릭하고 New > Android resource directory로 이동합니다. New Resource Directory 창이 표시됩니다.
- Resource type 목록에서 font를 선택한 다음 OK를 클릭합니다.
참고: 리소스 디렉터리의 이름은 font여야 합니다.
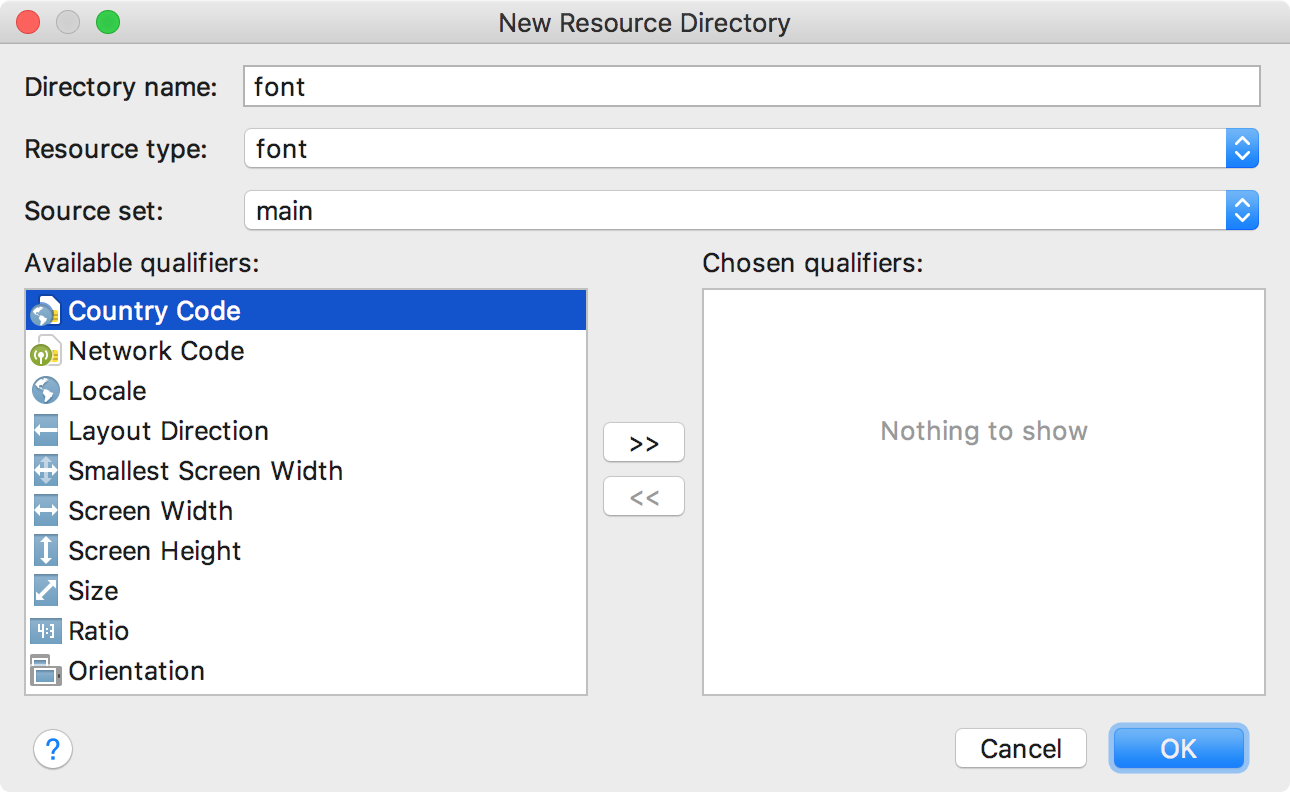
그림 1. 글꼴 리소스 디렉터리 추가
- 글꼴 파일을
font
폴더에 추가합니다.
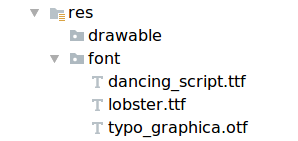
아래 폴더 구조는 R.font.dancing_script
, R.font.lobster
, R.font.typo_graphica
를 생성합니다.
그림 2. res/font
디렉터리에 글꼴 파일 추가
- 글꼴 파일을 더블클릭하여 편집기에서 파일의 글꼴을 미리 봅니다.
그림 3.
글꼴 파일 미리보기
글꼴 모음 만들기
글꼴 모음은 스타일 및 두께 세부정보가 포함된 글꼴 파일 집합입니다.
Android에서는 각 스타일과 두께를 별도의 리소스로 참조하는 대신 새로운 글꼴 모음을 XML 리소스로 만들어 단일 단위로 액세스할 수 있습니다. 이렇게 하면 사용 중인 텍스트 스타일에 기반해 시스템에서 올바른 글꼴을 선택할 수 있습니다.
글꼴 모음을 만들려면 Android 스튜디오에서 다음 단계를 따르세요.
font
폴더를 마우스 오른쪽 버튼으로 클릭하고 New > Font resource file을 선택합니다. New Resource File 창이 표시됩니다.
- 파일 이름을 입력하고 확인을 클릭합니다. 새로운 글꼴 리소스 XML이 편집기에서 열립니다.
- 각 글꼴 파일, 스타일 및 두께 속성을
<font>
요소로 묶습니다. 다음 XML은 글꼴 관련 속성을 글꼴 리소스 XML에 추가하는 방법을 보여줍니다.
<?xml version="1.0" encoding="utf-8"?>
<font-family xmlns:android="http://schemas.android.com/apk/res/android">
<font
android:fontStyle="normal"
android:fontWeight="400"
android:font="@font/lobster_regular" />
<font
android:fontStyle="italic"
android:fontWeight="400"
android:font="@font/lobster_italic" />
</font-family>
XML 레이아웃에서 글꼴 사용
fontFamily
속성을 사용하여 TextView
객체 또는 스타일에서 글꼴을 단일 글꼴 파일이나 글꼴 모음의 글꼴로 사용합니다.
참고: 글꼴 모음을 사용하면 TextView
가 필요에 따라 자체적으로 전환하여 글꼴 모음의 글꼴 파일을 사용합니다.
TextView에 글꼴 추가
TextView
의 글꼴을 설정하려면 다음 중 하나를 실행합니다.
- 레이아웃 XML 파일에서
fontFamily
속성을 액세스하려는 글꼴 파일로 설정합니다.<TextView
android:layout_width="wrap_content"
android:layout_height="wrap_content"
android:fontFamily="@font/lobster"/>
- Properties 창을 열어
TextView
의 글꼴을 설정합니다.
- 뷰를 선택하여 Properties 창을 엽니다.
참고:Properties 창은 디자인 편집기가 열려있을 때만 사용할 수 있습니다. 창 하단에서 Design 탭을 선택합니다.
- textAppearance 속성을 펼치고 fontFamily 목록에서 글꼴을 선택합니다.
-
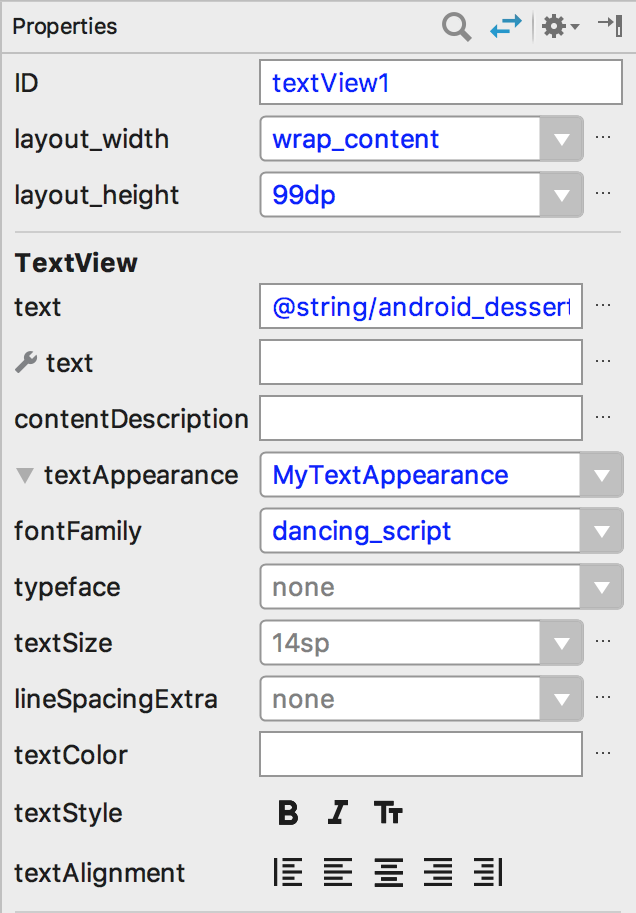
그림 4.
속성 창에서 글꼴을 선택합니다.
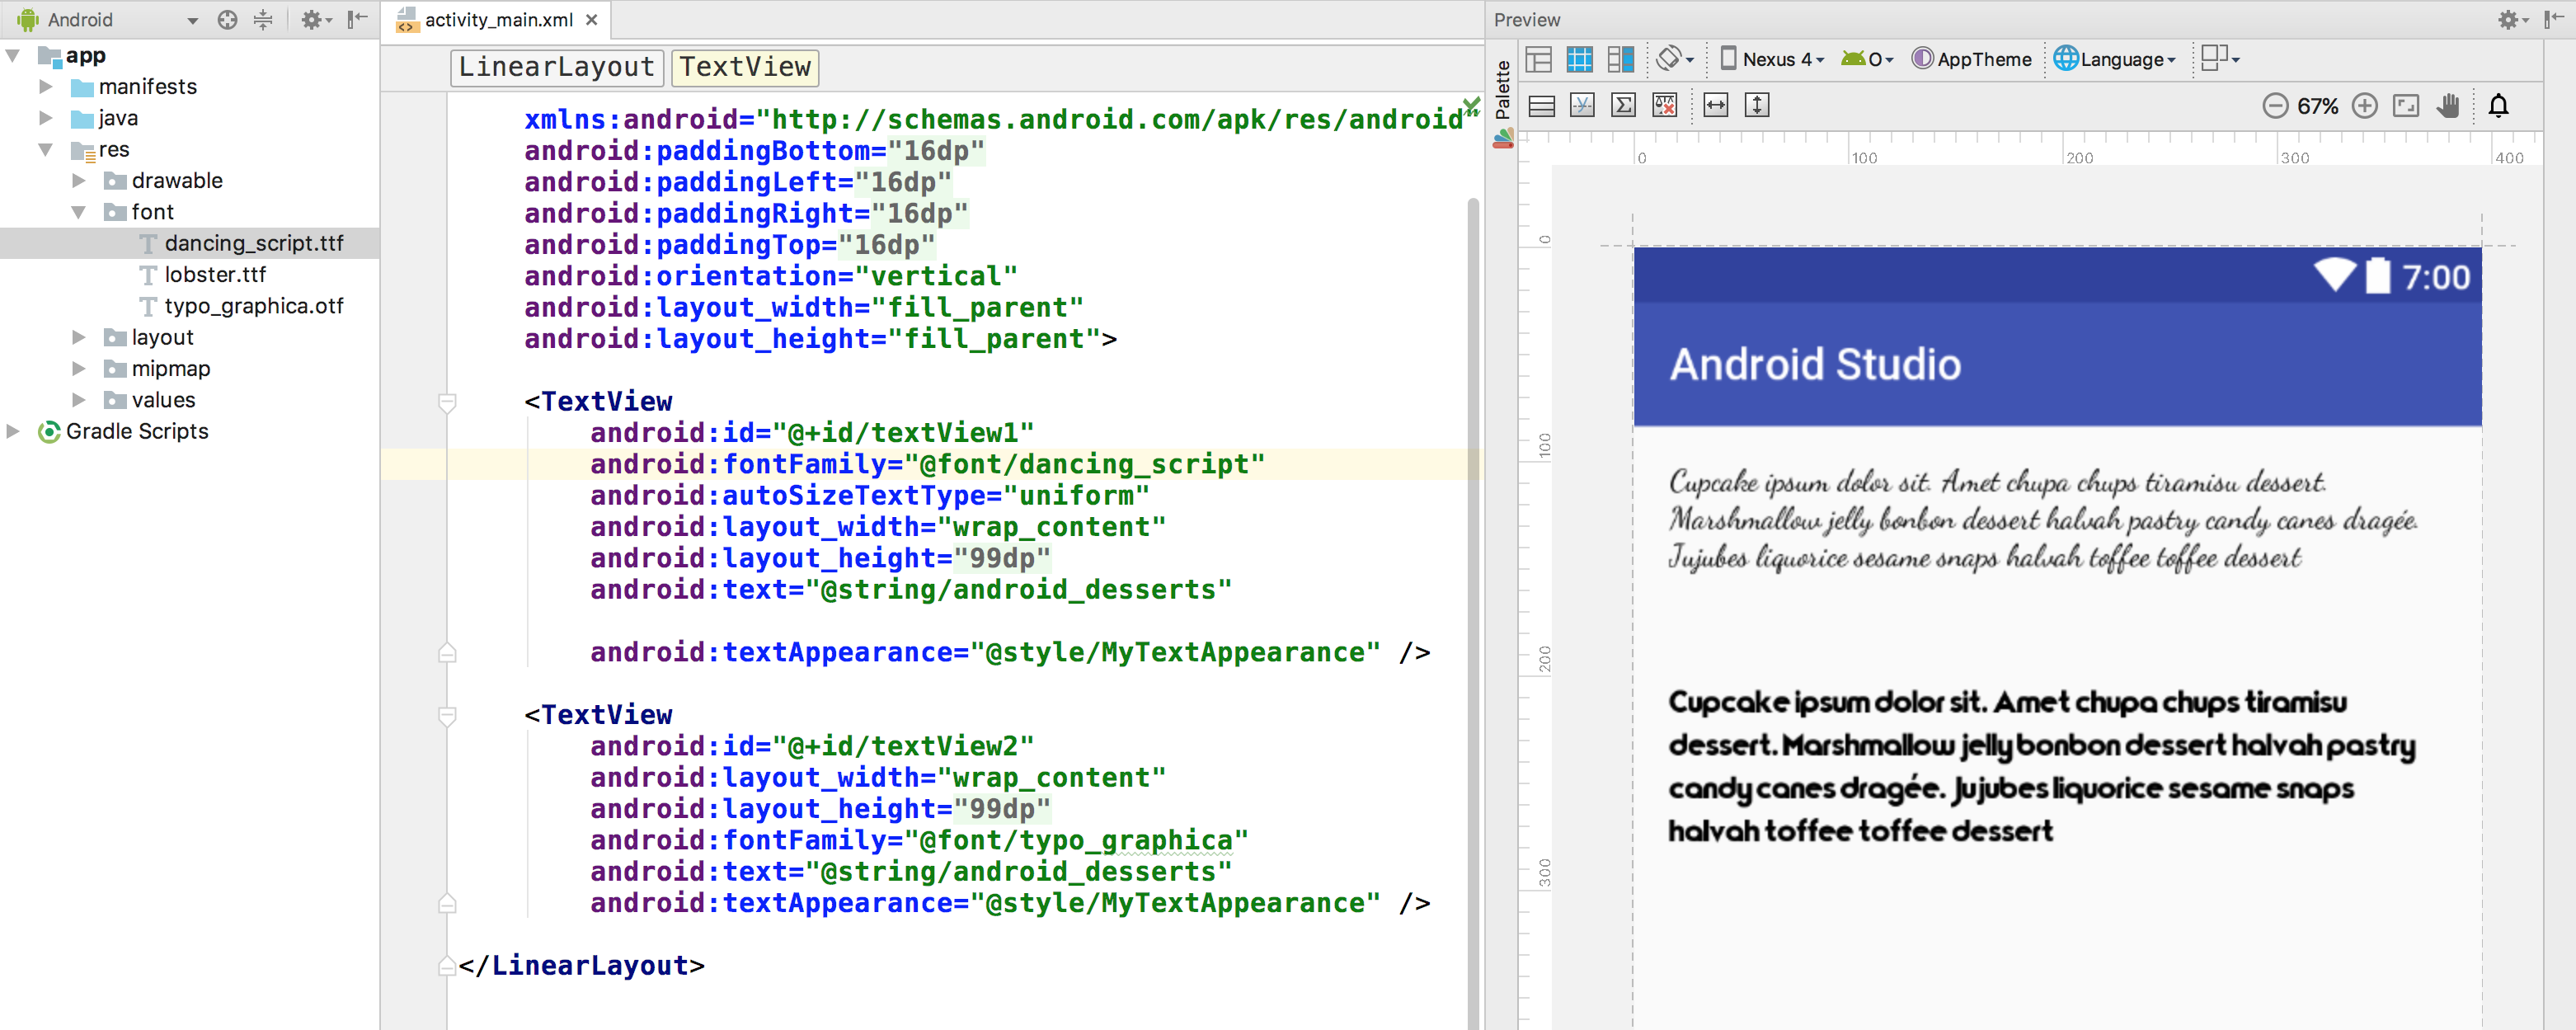
그림 5의 맨 오른쪽 창에 표시된 Android 스튜디오 레이아웃 미리보기를 사용하면 TextView
에 설정된 글꼴을 미리 볼 수 있습니다.
그림 5.
레이아웃 미리보기에서 글꼴 미리보기
스타일에 글꼴 추가
styles.xml
파일을 열고 액세스하려는 글꼴 파일로 fontFamily
속성을 설정합니다.
<style name="customfontstyle" parent="@android:style/TextAppearance.Small">
<item name="android:fontFamily">@font/lobster</item>
</style>
프로그래매틱 방식으로 글꼴 사용
프로그래매틱 방식으로 글꼴을 검색하려면 getFont(int)
메서드를 호출하여 검색하려는 글꼴의 리소스 식별자를 제공합니다. 이 메서드는 Typeface
객체를 반환합니다. 시스템이 글꼴 정보에서 가장 적합한 스타일을 선택하지만 setTypeface(android.graphics.Typeface, int)
메서드를 사용하여 특정 스타일로 서체를 설정할 수 있습니다.
참고: TextView
가 이 작업을 실행합니다.
Kotlin
val typeface = resources.getFont(R.font.myfont)
textView.typeface = typeface
자바
Typeface typeface = getResources().getFont(R.font.myfont);
textView.setTypeface(typeface);
지원 라이브러리 사용
지원 라이브러리 26.0은 Android 4.1 (API 수준 16) 이상을 실행하는 기기에서 XML의 글꼴을 지원합니다.
참고: 지원 라이브러리를 통해 XML 레이아웃에서 글꼴 모음을 선언할 때 앱 네임스페이스를 사용하여 글꼴이 로드되도록 합니다.
<?xml version="1.0" encoding="utf-8"?>
<font-family xmlns:app="http://schemas.android.com/apk/res-auto">
<font app:fontStyle="normal" app:fontWeight="400" app:font="@font/myfont-Regular"/>
<font app:fontStyle="italic" app:fontWeight="400" app:font="@font/myfont-Italic" />
</font-family>
프로그래매틱 방식으로 글꼴을 검색하려면 ResourceCompat.getFont(Context, int)
메서드를 호출하고 Context
인스턴스와 리소스 식별자를 제공합니다.
Kotlin
val typeface = ResourcesCompat.getFont(context, R.font.myfont)
Java
Typeface typeface = ResourcesCompat.getFont(context, R.font.myfont);
이 페이지에 나와 있는 콘텐츠와 코드 샘플에는 콘텐츠 라이선스에서 설명하는 라이선스가 적용됩니다. 자바 및 OpenJDK는 Oracle 및 Oracle 계열사의 상표 또는 등록 상표입니다.
최종 업데이트: 2025-07-26(UTC)
[[["이해하기 쉬움","easyToUnderstand","thumb-up"],["문제가 해결됨","solvedMyProblem","thumb-up"],["기타","otherUp","thumb-up"]],[["필요한 정보가 없음","missingTheInformationINeed","thumb-down"],["너무 복잡함/단계 수가 너무 많음","tooComplicatedTooManySteps","thumb-down"],["오래됨","outOfDate","thumb-down"],["번역 문제","translationIssue","thumb-down"],["샘플/코드 문제","samplesCodeIssue","thumb-down"],["기타","otherDown","thumb-down"]],["최종 업데이트: 2025-07-26(UTC)"],[],[],null,["# Add a font as an XML resource\n\nTry the Compose way \nJetpack Compose is the recommended UI toolkit for Android. Learn how to use text in Compose. \n[Set font →](/develop/ui/compose/text/fonts#set-font) \n\n\nAndroid 8.0 (API level 26) introduces fonts in XML, a feature that\nlets you use fonts as resources. You can add the `font` file in\nthe `res/font/` folder to bundle fonts as resources. These fonts\nare compiled in your `R` file and are automatically available in\nAndroid Studio. You can access the font resources using the `font` resource type. For\nexample, to access a font resource,\nuse `@font/myfont`, or `R.font.myfont`.\n\n\nTo use the fonts in XML feature on devices running Android 4.1\n(API level 16) and higher, use Support Library 26.0. For more information\non using the Support Library, refer to the\n[Use the Support Library](#using-support-lib) section.\n\n\nTo add fonts as resources, perform the following steps in Android\nStudio:\n\n\n1. Right-click the **res** folder and go to **New \\\u003e Android resource directory** . The **New Resource Directory** window appears.\n2. In the **Resource type** list, select **font** , then click **OK** .\n\n **Note** : The name of the resource directory must be\n **font**.\n\n\n **Figure 1.** Adding the font resource directory.\n3. Add your font files in the `font` folder.\n\n The folder structure below generates\n `R.font.dancing_script`, `R.font.lobster`, and\n `R.font.typo_graphica`.\n\n\n **Figure 2.** Adding the font files in the `res/font` directory.\n4. Double-click a font file to preview the file's fonts in the editor.\n\n **Figure 3.**\n Previewing the font file.\n\n### Create a font family\n\n\nA font family is a set of font files along with style and weight details.\nIn Android, you can create a new font family as an XML resource and access\nit as a single unit, instead of referencing each style and weight as\nseparate resources. By doing this, you let the system select the correct font\nbased on the text style you are using.\n\nTo create a font family, perform the following steps in Android Studio:\n\n1. Right-click the `font` folder and select **New \\\u003e Font resource file** . The **New Resource File** window appears.\n2. Enter the filename, then click **OK**. The new font resource XML opens in the editor.\n3. Enclose each font file, style, and weight attribute in the `\u003cfont\u003e` element. The following XML illustrates adding font-related attributes in the font resource XML: \n\n ```xml\n \u003c?xml version=\"1.0\" encoding=\"utf-8\"?\u003e\n \u003cfont-family xmlns:android=\"http://schemas.android.com/apk/res/android\"\u003e\n \u003cfont\n android:fontStyle=\"normal\"\n android:fontWeight=\"400\"\n android:font=\"@font/lobster_regular\" /\u003e\n \u003cfont\n android:fontStyle=\"italic\"\n android:fontWeight=\"400\"\n android:font=\"@font/lobster_italic\" /\u003e\n \u003c/font-family\u003e\n ```\n\n### Use fonts in XML layouts\n\n\nUse your fonts, either a single font file or a font from a\nfont family, in [TextView](/reference/android/widget/TextView)\nobjects or in styles by using the\n`fontFamily` attribute.\n\n**Note:** When you use a font family, the\n`TextView` switches on its own, as needed, to use the\nfont files from that family.\n\n#### Add fonts to a TextView\n\n\nTo set a font for a `TextView`, do one of the\nfollowing:\n\n- In the layout XML file, set the `fontFamily` attribute to the font file you want to access. \n\n ```xml\n \u003cTextView\n android:layout_width=\"wrap_content\"\n android:layout_height=\"wrap_content\"\n android:fontFamily=\"@font/lobster\"/\u003e\n ```\n- Open the **Properties** window to set the font for the `TextView`.\n 1. Select a view to open the **Properties** window.\n\n **Note:** The **Properties** window is available\n only when the design editor is open. Select the **Design** tab at\n the bottom of the window.\n 2. Expand the **textAppearance** property, and then select the font from the *fontFamily* list.\n 3.\n\n **Figure 4.**\n Selecting the font from the **Properties** window.\n\n\nThe Android Studio layout preview, shown in the rightmost pane in Figure 5,\nlets you preview the font set in the `TextView`.\n\n**Figure 5.**\nPreviewing fonts in layout preview.\n\n#### Add fonts to a style\n\nOpen the `styles.xml` file and set the `fontFamily`\nattribute to the font file you want to access.\n-\n\n ```xml\n \u003cstyle name=\"customfontstyle\" parent=\"@android:style/TextAppearance.Small\"\u003e\n \u003citem name=\"android:fontFamily\"\u003e@font/lobster\u003c/item\u003e\n \u003c/style\u003e\n ```\n\n### Use fonts programmatically\n\n- To retrieve fonts programmatically, call the [getFont(int)](/reference/android/content/res/Resources#getFont(int)) method and provide the resource identifier of the font you want to retrieve. This method returns a [Typeface](/reference/android/graphics/Typeface) object. Although the system picks the best style for you from the fonts' information, you can use the [setTypeface(android.graphics.Typeface, int)](/reference/android/widget/TextView#setTypeface(android.graphics.Typeface, int)) method to set the typeface with specific styles.\n- **Note:** The `TextView` does this for you. \n\n### Kotlin\n\n```kotlin\nval typeface = resources.getFont(R.font.myfont)\ntextView.typeface = typeface\n```\n\n### Java\n\n```java\nTypeface typeface = getResources().getFont(R.font.myfont);\ntextView.setTypeface(typeface);\n```\n\n### Use the Support Library\n\n- The Support Library 26.0 supports fonts in XML on devices running Android 4.1 (API level 16) and higher.\n- **Note** : When you declare font families in XML layout through the Support Library, use the **app** namespace to ensure that your fonts load. \n\n```xml\n\u003c?xml version=\"1.0\" encoding=\"utf-8\"?\u003e\n\u003cfont-family xmlns:app=\"http://schemas.android.com/apk/res-auto\"\u003e\n \u003cfont app:fontStyle=\"normal\" app:fontWeight=\"400\" app:font=\"@font/myfont-Regular\"/\u003e\n \u003cfont app:fontStyle=\"italic\" app:fontWeight=\"400\" app:font=\"@font/myfont-Italic\" /\u003e\n\u003c/font-family\u003e\n```\n- To retrieve fonts programmatically, call the `ResourceCompat.getFont(Context, int)` method and provide an instance of `Context` and the resource identifier. \n\n### Kotlin\n\n```kotlin\nval typeface = ResourcesCompat.getFont(context, R.font.myfont)\n```\n\n### Java\n\n```java\nTypeface typeface = ResourcesCompat.getFont(context, R.font.myfont);\n```"]]