
Dialog adalah jendela kecil yang meminta pengguna untuk membuat keputusan atau memasukkan informasi tambahan. Dialog tidak memenuhi layar dan biasanya digunakan untuk peristiwa modal yang mengharuskan pengguna melakukan tindakan sebelum mereka dapat melanjutkan.

Class Dialog
adalah class dasar untuk dialog, tetapi jangan membuat instance Dialog
secara langsung. Sebagai gantinya, gunakan salah satu dari subclass berikut:
AlertDialog- Dialog yang dapat menampilkan judul, hingga tiga tombol, daftar item yang dapat dipilih, atau tata letak kustom.
DatePickerDialogatauTimePickerDialog- Dialog dengan UI yang telah ditentukan sebelumnya yang memungkinkan pengguna memilih tanggal atau waktu.
Class ini menentukan gaya dan struktur untuk dialog Anda. Anda juga memerlukan
DialogFragment
sebagai penampung dialog. Class DialogFragment menyediakan
semua kontrol yang Anda perlukan untuk membuat dialog dan mengelola tampilannya,
bukan memanggil metode pada objek Dialog.
Menggunakan DialogFragment untuk mengelola dialog akan membuatnya menangani
peristiwa siklus proses dengan benar seperti saat pengguna mengetuk tombol Kembali atau memutar
layar. Class DialogFragment juga memungkinkan Anda menggunakan kembali UI dialog sebagai komponen yang dapat disematkan dalam UI yang lebih besar—persis seperti Fragment biasa—misalnya, saat Anda ingin UI dialog muncul berbeda di layar besar dan kecil.
Bagian berikut dalam dokumen ini menjelaskan cara menggunakan
DialogFragment yang dikombinasikan dengan objek
AlertDialog. Jika Anda ingin membuat pemilih tanggal atau waktu, baca
Menambahkan pemilih ke aplikasi
Anda.
Membuat fragmen dialog
Anda bisa menghasilkan beragam desain dialog, termasuk tata letak kustom dan yang dijelaskan dalam Dialog Desain Material, dengan memperluas DialogFragment dan membuat AlertDialog dalam metode callback onCreateDialog().
Misalnya, berikut AlertDialog dasar yang dikelola dalam
DialogFragment:
Kotlin
class StartGameDialogFragment : DialogFragment() {
    override fun onCreateDialog(savedInstanceState: Bundle?): Dialog {
        return activity?.let {
            // Use the Builder class for convenient dialog construction.
            val builder = AlertDialog.Builder(it)
            builder.setMessage("Start game")
                .setPositiveButton("Start") { dialog, id ->
                    // START THE GAME!
                }
                .setNegativeButton("Cancel") { dialog, id ->
                    // User cancelled the dialog.
                }
            // Create the AlertDialog object and return it.
            builder.create()
        } ?: throw IllegalStateException("Activity cannot be null")
    }
}

class OldXmlActivity : AppCompatActivity() {
    override fun onCreate(savedInstanceState: Bundle?) {
        super.onCreate(savedInstanceState)
        setContentView(R.layout.activity_old_xml)

        StartGameDialogFragment().show(supportFragmentManager, "GAME_DIALOG")
    }
}
Java
public class StartGameDialogFragment extends DialogFragment {
    @Override
    public Dialog onCreateDialog(Bundle savedInstanceState) {
        // Use the Builder class for convenient dialog construction.
        AlertDialog.Builder builder = new AlertDialog.Builder(getActivity());
        builder.setMessage(R.string.dialog_start_game)
               .setPositiveButton(R.string.start, new DialogInterface.OnClickListener() {
                   public void onClick(DialogInterface dialog, int id) {
                       // START THE GAME!
                   }
               })
               .setNegativeButton(R.string.cancel, new DialogInterface.OnClickListener() {
                   public void onClick(DialogInterface dialog, int id) {
                       // User cancels the dialog.
                   }
               });
        // Create the AlertDialog object and return it.
        return builder.create();
    }
}
// ...

StartGameDialogFragment().show(supportFragmentManager, "GAME_DIALOG");
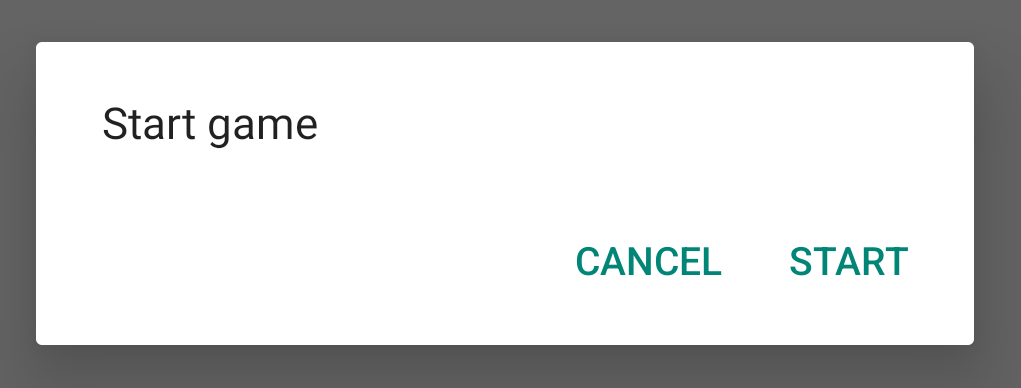
Saat Anda membuat instance class ini dan memanggil
show()
pada objek tersebut, dialog akan muncul seperti yang ditunjukkan pada gambar berikut.
Bagian berikutnya memberikan detail selengkapnya tentang penggunaan API
AlertDialog.Builder
untuk membuat dialog.
Bergantung pada seberapa rumit dialog tersebut, Anda dapat mengimplementasikan berbagai
metode callback lain dalam DialogFragment, termasuk semua
metode siklus proses fragmen dasar.
Membangun dialog pemberitahuan
Class AlertDialog memungkinkan Anda membuat berbagai desain dialog dan sering kali satu-satunya class dialog yang Anda perlukan. Seperti yang ditunjukkan pada gambar berikut, ada tiga area pada dialog peringatan:
- Judul: ini bersifat opsional dan hanya digunakan saat area konten berisi pesan terperinci, daftar, atau tata letak kustom. Jika Anda perlu menyatakan pesan atau pertanyaan sederhana, Anda tidak memerlukan judul.
- Area konten: area ini dapat menampilkan pesan, daftar, atau tata letak kustom lainnya.
- Tombol tindakan: dapat ada hingga tiga tombol tindakan dalam dialog.
Class AlertDialog.Builder menyediakan API yang memungkinkan Anda membuat
AlertDialog dengan jenis konten ini, termasuk tata letak
kustom.
Untuk membuat AlertDialog, lakukan hal berikut:
Kotlin
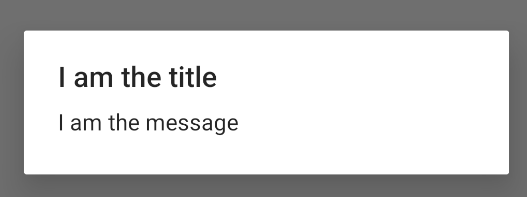
val builder: AlertDialog.Builder = AlertDialog.Builder(context)
builder
    .setMessage("I am the message")
    .setTitle("I am the title")

val dialog: AlertDialog = builder.create()
dialog.show()
Java
// 1. Instantiate an AlertDialog.Builder with its constructor.
AlertDialog.Builder builder = new AlertDialog.Builder(getActivity());

// 2. Chain together various setter methods to set the dialog characteristics.
builder.setMessage(R.string.dialog_message)
       .setTitle(R.string.dialog_title);

// 3. Get the AlertDialog.
AlertDialog dialog = builder.create();
Cuplikan kode sebelumnya menghasilkan dialog ini:
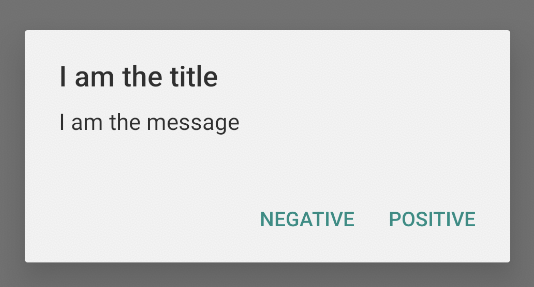
Menambahkan tombol
Untuk menambahkan tombol tindakan seperti dalam gambar 2, panggil metode
setPositiveButton()
dan
setNegativeButton():
Kotlin
val builder: AlertDialog.Builder = AlertDialog.Builder(context)
builder
    .setMessage("I am the message")
    .setTitle("I am the title")
    .setPositiveButton("Positive") { dialog, which ->
        // Do something.
    }
    .setNegativeButton("Negative") { dialog, which ->
        // Do something else.
    }

val dialog: AlertDialog = builder.create()
dialog.show()
Java
AlertDialog.Builder builder = new AlertDialog.Builder(getActivity());
// Add the buttons.
builder.setPositiveButton(R.string.ok, new DialogInterface.OnClickListener() {
           public void onClick(DialogInterface dialog, int id) {
               // User taps OK button.
           }
       });
builder.setNegativeButton(R.string.cancel, new DialogInterface.OnClickListener() {
           public void onClick(DialogInterface dialog, int id) {
               // User cancels the dialog.
           }
       });
// Set other dialog properties.
...

// Create the AlertDialog.
AlertDialog dialog = builder.create();
Metode set...Button() memerlukan judul untuk
tombol—disediakan oleh
resource string—dan
DialogInterface.OnClickListener
yang menentukan tindakan yang akan diambil saat pengguna mengetuk tombol.
Ada tiga tombol tindakan yang dapat ditambahkan:
- Positif: gunakan ini untuk menerima dan melanjutkan tindakan (tindakan "Oke").
- Negatif: gunakan ini untuk membatalkan tindakan.
- Netral: gunakan ini saat pengguna mungkin tidak ingin melanjutkan tindakan, tetapi tidak ingin membatalkannya. Tipe ini muncul di antara tombol positif dan negatif. Misalnya, tindakan dapat berupa "Ingatkan saya nanti".
Anda hanya bisa menambahkan satu dari setiap tipe tombol ke AlertDialog. Misalnya, Anda tidak boleh memiliki lebih dari satu tombol "positif".
Cuplikan kode sebelumnya akan memberi Anda dialog pemberitahuan seperti berikut:
Menambahkan daftar
Ada tiga jenis daftar yang tersedia pada API AlertDialog:
- Daftar pilihan tunggal biasa.
- Daftar pilihan tunggal persisten (tombol pilihan).
- Daftar pilihan ganda persisten (kotak centang).
Untuk membuat daftar pilihan tunggal seperti dalam gambar 5, gunakan metode
setItems():
Kotlin
val builder: AlertDialog.Builder = AlertDialog.Builder(context)
builder
    .setTitle("I am the title")
    .setPositiveButton("Positive") { dialog, which ->
        // Do something.
    }
    .setNegativeButton("Negative") { dialog, which ->
        // Do something else.
    }
    .setItems(arrayOf("Item One", "Item Two", "Item Three")) { dialog, which ->
        // Do something on item tapped.
    }

val dialog: AlertDialog = builder.create()
dialog.show()
Java
@Override
public Dialog onCreateDialog(Bundle savedInstanceState) {
    AlertDialog.Builder builder = new AlertDialog.Builder(getActivity());
    builder.setTitle(R.string.pick_color)
           .setItems(R.array.colors_array, new DialogInterface.OnClickListener() {
               public void onClick(DialogInterface dialog, int which) {
               // The 'which' argument contains the index position of the selected item.
           }
    });
    return builder.create();
}
Cuplikan kode ini menghasilkan dialog seperti berikut:
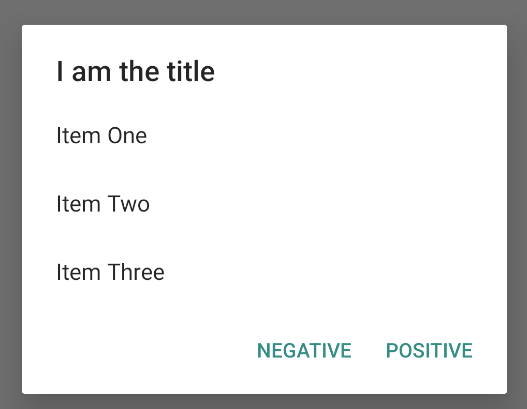
Karena daftar muncul di area konten dialog, dialog tidak dapat menampilkan
pesan dan daftar sekaligus. Tetapkan judul untuk dialog dengan
setTitle().
Untuk menentukan item untuk daftar, panggil setItems(), dengan meneruskan array. Atau, Anda dapat menentukan daftar menggunakan
setAdapter().
Hal ini memungkinkan Anda mendukung daftar dengan data dinamis—seperti dari
database—menggunakan
ListAdapter.
Jika Anda mendukung daftar dengan ListAdapter, selalu gunakan
Loader
agar konten dimuat secara asinkron. Hal ini dijelaskan lebih lanjut dalam
Membangun tata letak
dengan adaptor dan
Loader.
Menambahkan daftar pilihan ganda atau pilihan tunggal persisten
Untuk menambahkan daftar item pilihan ganda (kotak centang) atau item pilihan tunggal
(tombol pilihan), masing-masing gunakan
metode setMultiChoiceItems()
atau
setSingleChoiceItems().
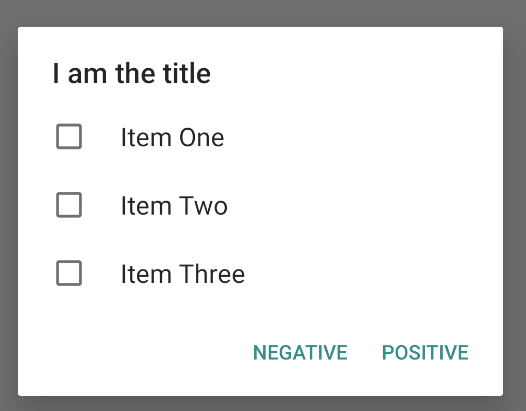
Misalnya, berikut cara membuat daftar pilihan ganda seperti yang
ditampilkan dalam gambar 6 yang menyimpan item terpilih dalam
ArrayList:
Kotlin
val builder: AlertDialog.Builder = AlertDialog.Builder(context)
builder
    .setTitle("I am the title")
    .setPositiveButton("Positive") { dialog, which ->
        // Do something.
    }
    .setNegativeButton("Negative") { dialog, which ->
        // Do something else.
    }
    .setMultiChoiceItems(
        arrayOf("Item One", "Item Two", "Item Three"), null) { dialog, which, isChecked ->
        // Do something.
    }

val dialog: AlertDialog = builder.create()
dialog.show()
Java
@Override
public Dialog onCreateDialog(Bundle savedInstanceState) {
    selectedItems = new ArrayList();  // Where we track the selected items
    AlertDialog.Builder builder = new AlertDialog.Builder(getActivity());
    // Set the dialog title.
    builder.setTitle(R.string.pick_toppings)
    // Specify the list array, the items to be selected by default (null for
    // none), and the listener through which to receive callbacks when items
    // are selected.
           .setMultiChoiceItems(R.array.toppings, null,
                      new DialogInterface.OnMultiChoiceClickListener() {
               @Override
               public void onClick(DialogInterface dialog, int which,
                       boolean isChecked) {
                   if (isChecked) {
                       // If the user checks the item, add it to the selected
                       // items.
                       selectedItems.add(which);
                   } else if (selectedItems.contains(which)) {
                       // If the item is already in the array, remove it.
                       selectedItems.remove(which);
                   }
               }
           })
    // Set the action buttons
           .setPositiveButton(R.string.ok, new DialogInterface.OnClickListener() {
               @Override
               public void onClick(DialogInterface dialog, int id) {
                   // User taps OK, so save the selectedItems results
                   // somewhere or return them to the component that opens the
                   // dialog.
                   ...
               }
           })
           .setNegativeButton(R.string.cancel, new DialogInterface.OnClickListener() {
               @Override
               public void onClick(DialogInterface dialog, int id) {
                   ...
               }
           });

    return builder.create();
}
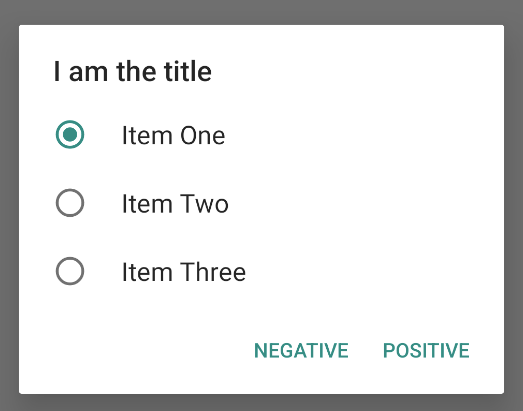
Dialog peringatan pilihan tunggal dapat diperoleh seperti ini:
Kotlin
val builder: AlertDialog.Builder = AlertDialog.Builder(context)
builder
    .setTitle("I am the title")
    .setPositiveButton("Positive") { dialog, which ->
        // Do something.
    }
    .setNegativeButton("Negative") { dialog, which ->
        // Do something else.
    }
    .setSingleChoiceItems(
        arrayOf("Item One", "Item Two", "Item Three"), 0
    ) { dialog, which ->
        // Do something.
    }

val dialog: AlertDialog = builder.create()
dialog.show()
Java
        String[] choices = {"Item One", "Item Two", "Item Three"};

        AlertDialog.Builder builder = AlertDialog.Builder(context);
        builder
                .setTitle("I am the title")
                .setPositiveButton("Positive", (dialog, which) -> {

                })
                .setNegativeButton("Negative", (dialog, which) -> {

                })
                .setSingleChoiceItems(choices, 0, (dialog, which) -> {

                });

        AlertDialog dialog = builder.create();
        dialog.show();
Hal ini menghasilkan contoh berikut:
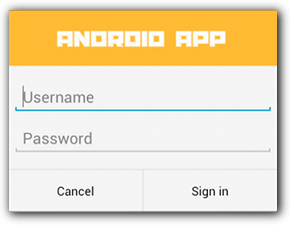
Membuat tata letak kustom
Jika Anda menginginkan tata letak kustom dalam dialog, buat tata letak dan tambahkan
ke AlertDialog dengan memanggil
setView()
pada objek AlertDialog.Builder.
Secara default, tata letak kustom akan mengisi jendela dialog, tetapi Anda tetap dapat menggunakan
metode AlertDialog.Builder untuk menambahkan tombol dan judul.
Misalnya, berikut adalah file tata letak untuk tata letak dialog kustom sebelumnya:
res/layout/dialog_signin.xml
<LinearLayout xmlns:android="http://schemas.android.com/apk/res/android"
    android:orientation="vertical"
    android:layout_width="wrap_content"
    android:layout_height="wrap_content">
    <ImageView
        android:src="@drawable/header_logo"
        android:layout_width="match_parent"
        android:layout_height="64dp"
        android:scaleType="center"
        android:background="#FFFFBB33"
        android:contentDescription="@string/app_name" />
    <EditText
        android:id="@+id/username"
        android:inputType="textEmailAddress"
        android:layout_width="match_parent"
        android:layout_height="wrap_content"
        android:layout_marginTop="16dp"
        android:layout_marginLeft="4dp"
        android:layout_marginRight="4dp"
        android:layout_marginBottom="4dp"
        android:hint="@string/username" />
    <EditText
        android:id="@+id/password"
        android:inputType="textPassword"
        android:layout_width="match_parent"
        android:layout_height="wrap_content"
        android:layout_marginTop="4dp"
        android:layout_marginLeft="4dp"
        android:layout_marginRight="4dp"
        android:layout_marginBottom="16dp"
        android:fontFamily="sans-serif"
        android:hint="@string/password"/>
</LinearLayout>
Untuk meng-inflate tata letak dalam DialogFragment, dapatkan
LayoutInflater
dengan
getLayoutInflater()
dan panggil
inflate().
Parameter pertama adalah ID resource tata letak, dan parameter kedua adalah
tampilan induk untuk tata letak. Selanjutnya Anda bisa memanggil
setView()
untuk menempatkan tata letak dalam dialog. Hal ini ditunjukkan dalam contoh berikut.
Kotlin
override fun onCreateDialog(savedInstanceState: Bundle?): Dialog {
    return activity?.let {
        val builder = AlertDialog.Builder(it)
        // Get the layout inflater.
        val inflater = requireActivity().layoutInflater;

        // Inflate and set the layout for the dialog.
        // Pass null as the parent view because it's going in the dialog
        // layout.
        builder.setView(inflater.inflate(R.layout.dialog_signin, null))
                // Add action buttons.
                .setPositiveButton(R.string.signin,
                        DialogInterface.OnClickListener { dialog, id ->
                            // Sign in the user.
                        })
                .setNegativeButton(R.string.cancel,
                        DialogInterface.OnClickListener { dialog, id ->
                            getDialog().cancel()
                        })
        builder.create()
    } ?: throw IllegalStateException("Activity cannot be null")
}
Java
@Override
public Dialog onCreateDialog(Bundle savedInstanceState) {
    AlertDialog.Builder builder = new AlertDialog.Builder(getActivity());
    // Get the layout inflater.
    LayoutInflater inflater = requireActivity().getLayoutInflater();

    // Inflate and set the layout for the dialog.
    // Pass null as the parent view because it's going in the dialog layout.
    builder.setView(inflater.inflate(R.layout.dialog_signin, null))
    // Add action buttons
           .setPositiveButton(R.string.signin, new DialogInterface.OnClickListener() {
               @Override
               public void onClick(DialogInterface dialog, int id) {
                   // Sign in the user.
               }
           })
           .setNegativeButton(R.string.cancel, new DialogInterface.OnClickListener() {
               public void onClick(DialogInterface dialog, int id) {
                   LoginDialogFragment.this.getDialog().cancel();
               }
           });
    return builder.create();
}
Jika menginginkan dialog kustom, Anda dapat menampilkan
Activity sebagai
dialog, bukan menggunakan API Dialog. Buat aktivitas dan
setel temanya ke
Theme.Holo.Dialog
di elemen
manifes <activity>:
<activity android:theme="@android:style/Theme.Holo.Dialog" >
Aktivitas sekarang ditampilkan dalam jendela dialog, bukan layar penuh.
Meneruskan peristiwa kembali ke host dialog
Saat pengguna mengetuk salah satu tombol tindakan dialog atau memilih item
dari daftarnya, DialogFragment Anda dapat melakukan sendiri tindakan yang
diperlukan, tetapi sering kali Anda perlu mengirim peristiwa tersebut ke aktivitas atau
fragmen yang membuka dialog. Caranya, tentukan antarmuka dengan metode
untuk setiap jenis peristiwa klik. Kemudian, implementasikan antarmuka tersebut dalam komponen
host yang menerima peristiwa tindakan dari dialog.
Misalnya, berikut adalah DialogFragment yang menentukan antarmuka
yang akan digunakan untuk mengirim kembali suatu peristiwa ke aktivitas host:
Kotlin
class NoticeDialogFragment : DialogFragment() {
    // Use this instance of the interface to deliver action events.
    internal lateinit var listener: NoticeDialogListener

    // The activity that creates an instance of this dialog fragment must
    // implement this interface to receive event callbacks. Each method passes
    // the DialogFragment in case the host needs to query it.
    interface NoticeDialogListener {
        fun onDialogPositiveClick(dialog: DialogFragment)
        fun onDialogNegativeClick(dialog: DialogFragment)
    }

    // Override the Fragment.onAttach() method to instantiate the
    // NoticeDialogListener.
    override fun onAttach(context: Context) {
        super.onAttach(context)
        // Verify that the host activity implements the callback interface.
        try {
            // Instantiate the NoticeDialogListener so you can send events to
            // the host.
            listener = context as NoticeDialogListener
        } catch (e: ClassCastException) {
            // The activity doesn't implement the interface. Throw exception.
            throw ClassCastException((context.toString() +
                    " must implement NoticeDialogListener"))
        }
    }
}
Java
public class NoticeDialogFragment extends DialogFragment {

    // The activity that creates an instance of this dialog fragment must
    // implement this interface to receive event callbacks. Each method passes
    // the DialogFragment in case the host needs to query it.
    public interface NoticeDialogListener {
        public void onDialogPositiveClick(DialogFragment dialog);
        public void onDialogNegativeClick(DialogFragment dialog);
    }

    // Use this instance of the interface to deliver action events.
    NoticeDialogListener listener;

    // Override the Fragment.onAttach() method to instantiate the
    // NoticeDialogListener.
    @Override
    public void onAttach(Context context) {
        super.onAttach(context);
        // Verify that the host activity implements the callback interface.
        try {
            // Instantiate the NoticeDialogListener so you can send events to
            // the host.
            listener = (NoticeDialogListener) context;
        } catch (ClassCastException e) {
            // The activity doesn't implement the interface. Throw exception.
            throw new ClassCastException(activity.toString()
                    + " must implement NoticeDialogListener");
        }
    }
    ...
}
Aktivitas yang menghosting dialog akan membuat instance dialog dengan
konstruktor fragmen dialog dan menerima peristiwa dialog melalui
implementasi antarmuka NoticeDialogListener:
Kotlin
class MainActivity : FragmentActivity(),
        NoticeDialogFragment.NoticeDialogListener {

    fun showNoticeDialog() {
        // Create an instance of the dialog fragment and show it.
        val dialog = NoticeDialogFragment()
        dialog.show(supportFragmentManager, "NoticeDialogFragment")
    }

    // The dialog fragment receives a reference to this Activity through the
    // Fragment.onAttach() callback, which it uses to call the following
    // methods defined by the NoticeDialogFragment.NoticeDialogListener
    // interface.
    override fun onDialogPositiveClick(dialog: DialogFragment) {
        // User taps the dialog's positive button.
    }

    override fun onDialogNegativeClick(dialog: DialogFragment) {
        // User taps the dialog's negative button.
    }
}
Java
public class MainActivity extends FragmentActivity
                          implements NoticeDialogFragment.NoticeDialogListener{
    ...
    public void showNoticeDialog() {
        // Create an instance of the dialog fragment and show it.
        DialogFragment dialog = new NoticeDialogFragment();
        dialog.show(getSupportFragmentManager(), "NoticeDialogFragment");
    }

    // The dialog fragment receives a reference to this Activity through the
    // Fragment.onAttach() callback, which it uses to call the following
    // methods defined by the NoticeDialogFragment.NoticeDialogListener
    // interface.
    @Override
    public void onDialogPositiveClick(DialogFragment dialog) {
        // User taps the dialog's positive button.
        ...
    }

    @Override
    public void onDialogNegativeClick(DialogFragment dialog) {
        // User taps the dialog's negative button.
        ...
    }
}
Karena aktivitas host mengimplementasikan
NoticeDialogListener, yang diberlakukan oleh
metode callback onAttach()
yang ditunjukkan dalam contoh sebelumnya, fragmen dialog dapat
menggunakan metode callback antarmuka untuk mengirimkan peristiwa klik ke aktivitas:
Kotlin
    override fun onCreateDialog(savedInstanceState: Bundle): Dialog {
        return activity?.let {
            // Build the dialog and set up the button click handlers.
            val builder = AlertDialog.Builder(it)

            builder.setMessage(R.string.dialog_start_game)
                    .setPositiveButton(R.string.start,
                            DialogInterface.OnClickListener { dialog, id ->
                                // Send the positive button event back to the
                                // host activity.
                                listener.onDialogPositiveClick(this)
                            })
                    .setNegativeButton(R.string.cancel,
                            DialogInterface.OnClickListener { dialog, id ->
                                // Send the negative button event back to the
                                // host activity.
                                listener.onDialogNegativeClick(this)
                            })

            builder.create()
        } ?: throw IllegalStateException("Activity cannot be null")
    }
Java
public class NoticeDialogFragment extends DialogFragment {
    ...
    @Override
    public Dialog onCreateDialog(Bundle savedInstanceState) {
        // Build the dialog and set up the button click handlers.
        AlertDialog.Builder builder = new AlertDialog.Builder(getActivity());
        builder.setMessage(R.string.dialog_start_game)
               .setPositiveButton(R.string.start, new DialogInterface.OnClickListener() {
                   public void onClick(DialogInterface dialog, int id) {
                       // Send the positive button event back to the host activity.
                       listener.onDialogPositiveClick(NoticeDialogFragment.this);
                   }
               })
               .setNegativeButton(R.string.cancel, new DialogInterface.OnClickListener() {
                   public void onClick(DialogInterface dialog, int id) {
                       // Send the negative button event back to the host activity.
                       listener.onDialogNegativeClick(NoticeDialogFragment.this);
                   }
               });
        return builder.create();
    }
}
Menampilkan dialog
Bila Anda ingin menampilkan dialog, buat instance
DialogFragment dan panggil
show(),
dengan meneruskan
FragmentManager
dan nama tag untuk fragmen dialognya.
Anda bisa mendapatkan FragmentManager dengan memanggil
getSupportFragmentManager()
dari
FragmentActivity
atau dengan memanggil
getParentFragmentManager()
dari Fragment. Lihat contoh berikut:
Kotlin
fun confirmStartGame() {
    val newFragment = StartGameDialogFragment()
    newFragment.show(supportFragmentManager, "game")
}
Java
public void confirmStartGame() {
    DialogFragment newFragment = new StartGameDialogFragment();
    newFragment.show(getSupportFragmentManager(), "game");
}
Argumen kedua, "game", adalah nama tag unik yang digunakan
sistem untuk menyimpan dan memulihkan status fragmen bila diperlukan. Tag ini juga memungkinkan Anda mendapatkan tuas ke fragmen dengan memanggil findFragmentByTag().
Menampilkan dialog sebagai layar penuh atau fragmen tersemat
Anda mungkin ingin bagian dari desain UI Anda muncul sebagai dialog dalam beberapa
situasi dan sebagai layar penuh atau fragmen tersemat dalam situasi lain. Anda mungkin juga
inginnya muncul secara berbeda bergantung pada ukuran layar perangkat. Class
DialogFragment menawarkan fleksibilitas untuk mencapai hal ini,
karena dapat berperilaku sebagai Fragment yang dapat disematkan.
Namun, dalam hal ini Anda tidak bisa menggunakan AlertDialog.Builder atau objek
Dialog lain untuk membangun dialog. Jika Anda ingin
DialogFragment dapat disematkan, tentukan UI dialog dalam
tata letak, lalu muat tata letak tersebut dalam
callback onCreateView().
Berikut adalah contoh DialogFragment yang dapat muncul sebagai dialog atau
fragmen yang dapat disematkan, menggunakan tata letak bernama
purchase_items.xml:
Kotlin
class CustomDialogFragment : DialogFragment() {

    // The system calls this to get the DialogFragment's layout, regardless of
    // whether it's being displayed as a dialog or an embedded fragment.
    override fun onCreateView(
            inflater: LayoutInflater,
            container: ViewGroup?,
            savedInstanceState: Bundle?
    ): View {
        // Inflate the layout to use as a dialog or embedded fragment.
        return inflater.inflate(R.layout.purchase_items, container, false)
    }

    // The system calls this only when creating the layout in a dialog.
    override fun onCreateDialog(savedInstanceState: Bundle): Dialog {
        // The only reason you might override this method when using
        // onCreateView() is to modify the dialog characteristics. For example,
        // the dialog includes a title by default, but your custom layout might
        // not need it. Here, you can remove the dialog title, but you must
        // call the superclass to get the Dialog.
        val dialog = super.onCreateDialog(savedInstanceState)
        dialog.requestWindowFeature(Window.FEATURE_NO_TITLE)
        return dialog
    }
}
Java
public class CustomDialogFragment extends DialogFragment {
    // The system calls this to get the DialogFragment's layout, regardless of
    // whether it's being displayed as a dialog or an embedded fragment.
    @Override
    public View onCreateView(LayoutInflater inflater, ViewGroup container,
            Bundle savedInstanceState) {
        // Inflate the layout to use as a dialog or embedded fragment.
        return inflater.inflate(R.layout.purchase_items, container, false);
    }

    // The system calls this only when creating the layout in a dialog.
    @Override
    public Dialog onCreateDialog(Bundle savedInstanceState) {
        // The only reason you might override this method when using
        // onCreateView() is to modify the dialog characteristics. For example,
        // the dialog includes a title by default, but your custom layout might
        // not need it. Here, you can remove the dialog title, but you must
        // call the superclass to get the Dialog.
        Dialog dialog = super.onCreateDialog(savedInstanceState);
        dialog.requestWindowFeature(Window.FEATURE_NO_TITLE);
        return dialog;
    }
}
Contoh berikut menentukan apakah akan menampilkan fragmen sebagai dialog atau UI layar penuh, berdasarkan ukuran layar:
Kotlin
fun showDialog() {
    val fragmentManager = supportFragmentManager
    val newFragment = CustomDialogFragment()
    if (isLargeLayout) {
        // The device is using a large layout, so show the fragment as a
        // dialog.
        newFragment.show(fragmentManager, "dialog")
    } else {
        // The device is smaller, so show the fragment fullscreen.
        val transaction = fragmentManager.beginTransaction()
        // For a polished look, specify a transition animation.
        transaction.setTransition(FragmentTransaction.TRANSIT_FRAGMENT_OPEN)
        // To make it fullscreen, use the 'content' root view as the container
        // for the fragment, which is always the root view for the activity.
        transaction
                .add(android.R.id.content, newFragment)
                .addToBackStack(null)
                .commit()
    }
}
Java
public void showDialog() {
    FragmentManager fragmentManager = getSupportFragmentManager();
    CustomDialogFragment newFragment = new CustomDialogFragment();

    if (isLargeLayout) {
        // The device is using a large layout, so show the fragment as a
        // dialog.
        newFragment.show(fragmentManager, "dialog");
    } else {
        // The device is smaller, so show the fragment fullscreen.
        FragmentTransaction transaction = fragmentManager.beginTransaction();
        // For a polished look, specify a transition animation.
        transaction.setTransition(FragmentTransaction.TRANSIT_FRAGMENT_OPEN);
        // To make it fullscreen, use the 'content' root view as the container
        // for the fragment, which is always the root view for the activity.
        transaction.add(android.R.id.content, newFragment)
                   .addToBackStack(null).commit();
    }
}
Untuk informasi selengkapnya tentang cara melakukan transaksi fragmen, lihat Fragmen.
Dalam contoh ini, nilai (logika) Boolean mIsLargeLayout menentukan apakah
perangkat saat ini harus menggunakan desain tata letak besar aplikasi dan dengan demikian menampilkan
fragmen ini sebagai dialog, bukan layar penuh. Cara terbaik untuk menyetel jenis
boolean ini adalah mendeklarasikan
nilai resource
boolean dengan nilai
resource
alternatif untuk berbagai ukuran layar. Misalnya, berikut ini adalah
dua versi resource boolean untuk berbagai ukuran layar:
res/values/bools.xml
<!-- Default boolean values -->
<resources>
    <bool name="large_layout">false</bool>
</resources>
res/values-large/bools.xml
<!-- Large screen boolean values -->
<resources>
    <bool name="large_layout">true</bool>
</resources>
Kemudian, Anda dapat melakukan inisialisasi nilai mIsLargeLayout selama metode
onCreate()
aktivitas, seperti yang ditunjukkan dalam contoh berikut:
Kotlin
override fun onCreate(savedInstanceState: Bundle?) {
    super.onCreate(savedInstanceState)
    setContentView(R.layout.activity_main)

    isLargeLayout = resources.getBoolean(R.bool.large_layout)
}
Java
boolean isLargeLayout;

@Override
public void onCreate(Bundle savedInstanceState) {
    super.onCreate(savedInstanceState);
    setContentView(R.layout.activity_main);

    isLargeLayout = getResources().getBoolean(R.bool.large_layout);
}
Menampilkan aktivitas sebagai dialog di layar besar
Sebagai ganti menampilkan dialog berupa UI layar penuh di layar kecil, Anda bisa mendapatkan
hasil yang sama dengan menampilkan Activity sebagai dialog di layar
besar. Pendekatan yang Anda pilih bergantung pada desain aplikasi, tetapi menampilkan
aktivitas sebagai dialog sering kali berguna jika aplikasi Anda didesain untuk layar
kecil dan Anda ingin meningkatkan pengalaman di tablet dengan menampilkan
aktivitas berjangka pendek sebagai dialog.
Untuk hanya menampilkan aktivitas sebagai dialog di layar besar, terapkan tema
Theme.Holo.DialogWhenLarge
pada elemen manifes <activity>:
<activity android:theme="@android:style/Theme.Holo.DialogWhenLarge" >
Untuk informasi selengkapnya tentang menata gaya aktivitas Anda dengan tema, lihat Gaya dan tema.
Menutup dialog
Saat pengguna mengetuk tombol tindakan yang dibuat dengan
AlertDialog.Builder, sistem akan menutup dialog untuk Anda.
Sistem juga menutup dialog saat pengguna mengetuk item dalam daftar
dialog, kecuali jika daftar menggunakan tombol pilihan atau kotak centang. Jika tidak, Anda dapat
menutup dialog secara manual dengan memanggil
dismiss()
pada DialogFragment.
Jika Anda perlu melakukan tindakan tertentu saat dialog menghilang, Anda dapat
mengimplementasikan
metode
onDismiss()
dalam DialogFragment.
Anda juga bisa membatalkan dialog. Ini adalah peristiwa khusus yang
menunjukkan bahwa pengguna keluar dari dialog tanpa menyelesaikan tugas. Hal ini
terjadi jika pengguna mengetuk tombol Kembali atau mengetuk layar di luar area
dialog atau jika Anda secara eksplisit memanggil
cancel()
di Dialog, misalnya sebagai respons terhadap tombol "Batal" di
dialog.
Seperti yang ditampilkan dalam contoh sebelumnya, Anda dapat merespons peristiwa batal dengan
mengimplementasikan
onCancel()
dalam class DialogFragment.