
기본 레이아웃 구조를 사용하면
설계하는 것입니다. 그러나 앱에 추가하는 각 위젯과 레이아웃은
초기화, 레이아웃, 그리기가 필요합니다. 예를 들어
인스턴스
LinearLayout
뷰 계층 구조가 지나치게 깊어질 수 있습니다 또한 여러 개의
layout_weight를 사용하는 LinearLayout 인스턴스
매개변수는 각 하위 요소를 두 번 측정해야 하므로 특히 비용이 많이 들 수 있습니다.
이는 다음과 같이 레이아웃이 반복적으로 확장될 때 특히 중요합니다.
에서 사용되는 경우
RecyclerView
이 문서에서는 Layout Inspector 및 린트를 사용하여 레이아웃을 검사하고 최적화합니다.
레이아웃 검사
Android SDK 도구에는 Layout Inspector 도구를 사용하면 레이아웃을 분석할 수 있습니다. 이 도구를 사용하면 레이아웃 성능의 비효율성을 발견하게 됩니다.
Layout Inspector를 사용하면 연결된 기기에서 실행 중인 프로세스를 선택하거나 그런 다음 레이아웃 트리를 표시합니다. 각 블록의 신호등 측정, 레이아웃, 그리기 성능을 나타내므로 문제를 해결하는 데 도움이 됩니다
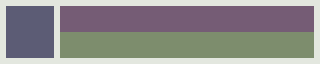
예를 들어 그림 1은
RecyclerView 이 레이아웃에서는 왼쪽에 작은 비트맵 이미지를 표시합니다.
오른쪽에는 두 개의 스택 텍스트 항목이 있습니다. 특히 중요한 것은
이와 같이 여러 번 부풀려지는 레이아웃은
성능 이점이 배가됩니다
RecyclerView
사용 가능한 기기 및 실행 중인 기기 목록을 보여주는 Layout Inspector 구성할 수 있습니다. Windows 탭에서 구성요소를 선택하고 Layout Inspector를 사용하여 선택한 구성요소의 레이아웃 계층 구조를 확인합니다. 예를 들어 그림 2는 그림에 표시된 목록 항목의 레이아웃을 보여줍니다. 1.
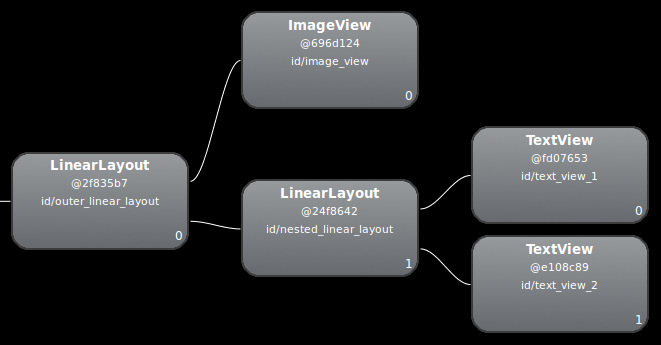
LinearLayout의 중첩된 인스턴스 사용
레이아웃 수정
중첩 레이어로 인해 이전 레이아웃 성능이 느려지기 때문입니다.
LinearLayout를 사용하는 경우
즉, 레이아웃을 얕고 넓게 만드는 것이 아니라
좁고 깊습니다. 가
ConstraintLayout
루트 노드가 이러한 레이아웃을 허용하기 때문입니다. 이 디자인을 사용하도록 변환하면
ConstraintLayout를 사용하면 레이아웃이 2단계 계층 구조가 됩니다.
    <androidx.constraintlayout.widget.ConstraintLayout
      xmlns:android="http://schemas.android.com/apk/res/android"
      xmlns:app="http://schemas.android.com/apk/res-auto"
      xmlns:tools="http://schemas.android.com/tools"
      android:id="@+id/root"
      android:layout_width="match_parent"
      android:layout_height="52dp"
      android:background="#e4e6e4"
      android:padding="4dp">

      <ImageView
          android:id="@+id/image"
          android:layout_width="48dp"
          android:layout_height="48dp"
          android:background="#5c5c74"
          android:contentDescription="An example box"
          app:layout_constraintBottom_toBottomOf="parent"
          app:layout_constraintStart_toStartOf="parent"
          app:layout_constraintTop_toTopOf="parent" />

      <TextView
          android:id="@+id/title"
          android:layout_width="0dp"
          android:layout_height="0dp"
          android:layout_marginStart="4dp"
          android:background="#745c74"
          app:layout_constraintBottom_toTopOf="@+id/subtitle"
          app:layout_constraintEnd_toEndOf="parent"
          app:layout_constraintStart_toEndOf="@id/image"
          app:layout_constraintTop_toTopOf="parent" />

      <TextView
          android:id="@+id/subtitle"
          android:layout_width="0dp"
          android:layout_height="0dp"
          android:background="#7e8d6e"
          app:layout_constraintBottom_toBottomOf="parent"
          app:layout_constraintEnd_toEndOf="parent"
          app:layout_constraintStart_toStartOf="@id/title"
          app:layout_constraintTop_toBottomOf="@+id/title" />
  </androidx.constraintlayout.widget.ConstraintLayout>
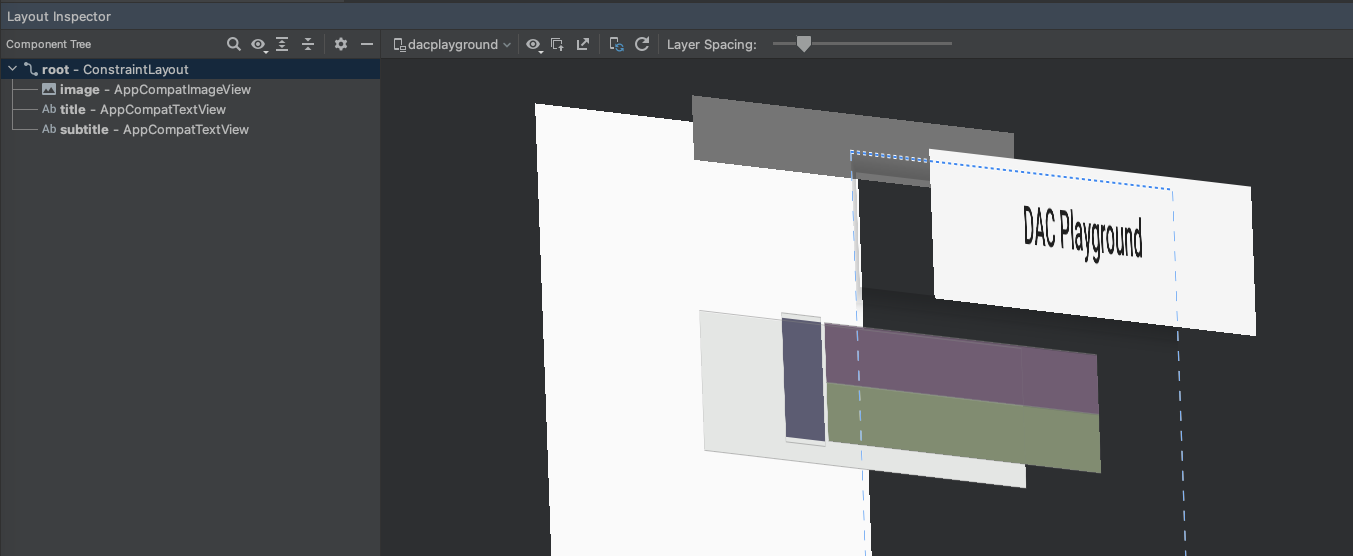
새 레이아웃은 다음과 같이 검사됩니다.
이 레이아웃의 이점은 배가 됩니다. 왜냐하면 이 레이아웃이 항목을 찾습니다.
대부분의 차이는 다음과 같이 layout_weight를 사용하기 때문입니다.
LinearLayout 설계로 인해 측정 속도가 느려질 수 있습니다. 이것은 1
각 레이아웃이 어떻게 사용되는지 보여주는 예입니다. 주의 깊게
50개가 넘는 로드를 구현해야 합니다
일부 복잡한 레이아웃에서는 시스템에서 동일한 UI를 측정하느라 시간을 낭비할 수 있습니다. 요소를 두 번 이상 사용할 수 없습니다. 이 현상은 이중 과세라고 합니다. 대상 이중 과세 및 이를 방지하는 방법에 대한 자세한 내용은 실적 및 뷰 계층 구조를 참조하세요.
린트 사용
린트 도구를 실행하는 것이 좋습니다. 를 사용하여 가능한 뷰 계층 구조 최적화를 검색합니다. 린트 layoutopt 도구를 대체하고 더 많은 기능을 제공합니다. 다음은 린트 예시 규칙:
-
복합 드로어블을 사용합니다. 다음과 같은
LinearLayout를 처리할 수 있습니다. 포함ImageView및 <ph type="x-smartling-placeholder">TextView</ph> 더 효율적으로 처리할 수 있습니다. -
루트 프레임을 병합합니다. 레이아웃의 루트가
FrameLayout배경이나 패딩을 제공하지 않는 경우 병합 태그가 약간 더 효율적입니다. - 쓸모없는 잎은 제거하세요. 하위 요소가 없는 레이아웃을 삭제하거나 눈에 띄지 않으므로 배경이 없어 더 평평하게 할 수 있습니다. 효율적인 레이아웃 계층 구조를 만듭니다.
-
쓸모없는 부모 삭제 다음 요소가 없는 하위 요소가 있는 레이아웃을 삭제할 수 있습니다.
형제 자매는
ScrollView또는 루트 레이아웃이 있고 배경이 없습니다. 또한 포드의 상태를 하위 뷰를 상위 요소에 직접 표시하여 더 평평하고 효율적으로 할 수 있습니다. 레이아웃 계층 구조로 되어 있습니다. -
깊은 레이아웃은 피하세요. 중첩이 너무 많은 레이아웃은
확인할 수 있습니다 다음과 같이 더 평평한 레이아웃을 사용해 보세요.
ConstraintLayout, 성능을 개선할 수 있습니다 린트 검사의 기본 최대 깊이는 10입니다.
린트 도구의 또 다른 이점은 Android 스튜디오에 통합한다는 것입니다. 린트 프로그램을 컴파일할 때마다 자동으로 실행됩니다. Android 스튜디오를 사용하면 특정 빌드 변형이나 모든 빌드에 대해 린트 검사를 실행할 수도 있음 있습니다.
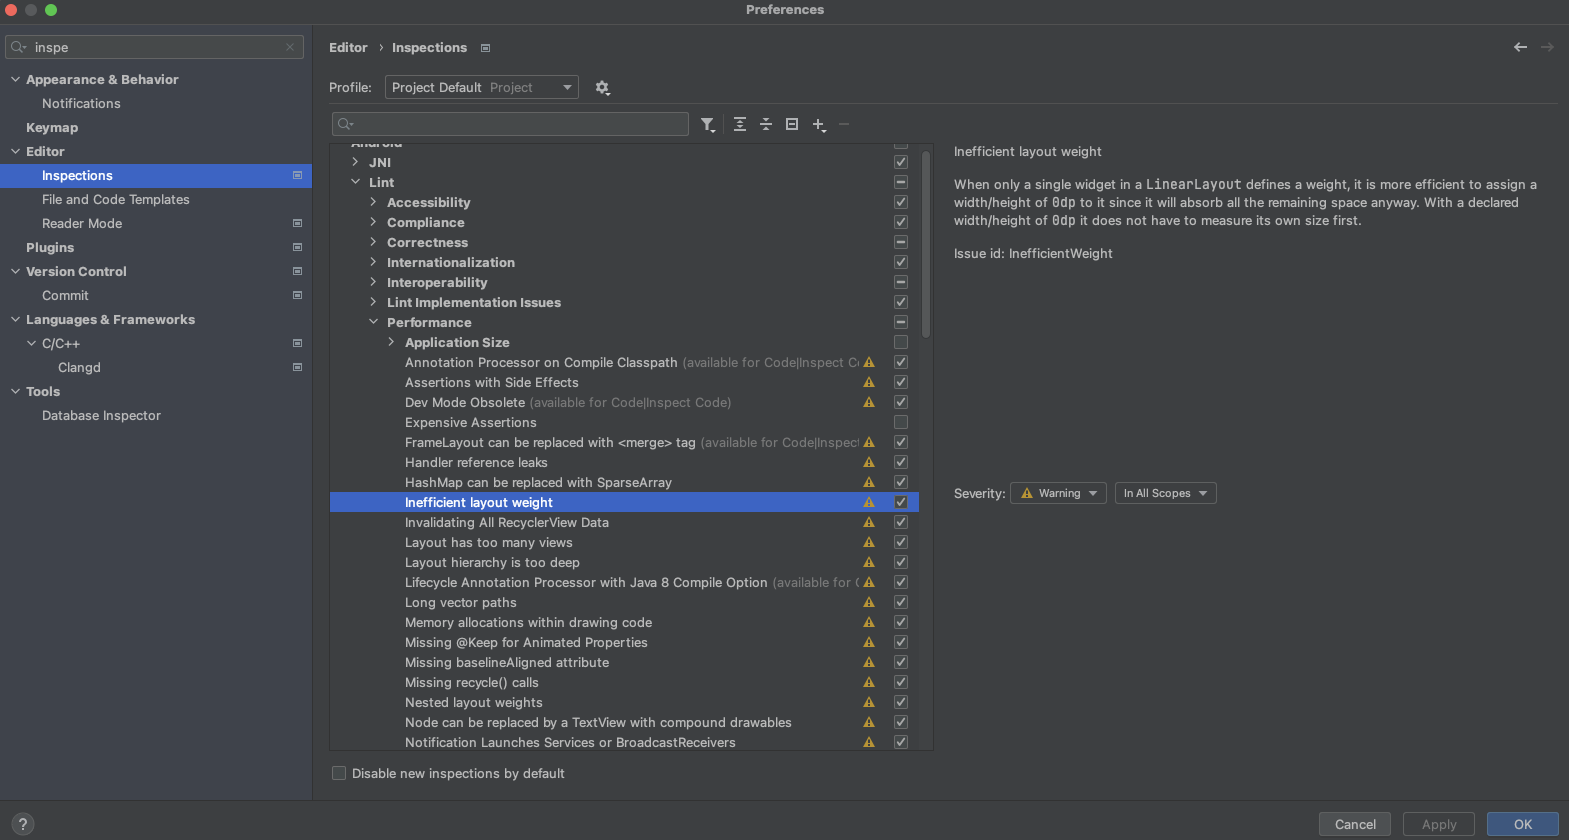
또한 GCP 내에서 검사 프로필을 관리하고 검사를 구성할 수 있습니다. Android 스튜디오에서 File > 설정 > 프로젝트 설정 옵션을 선택합니다. 'Inspection Configuration'(검사 구성) 페이지가 검사:
린트는 일부 문제를 자동으로 수정하고 다른 문제에 관한 제안을 제공할 수 있습니다. 문제의 코드로 바로 이동하여 검토를 받으세요.
자세한 내용은 레이아웃 및 레이아웃 리소스를 참고하세요.