
आम तौर पर, किसी सूचना में एक टाइटल, टेक्स्ट की एक लाइन, और वे कार्रवाइयां शामिल होती हैं जिन्हें उपयोगकर्ता, सूचना के जवाब में कर सकता है. ज़्यादा जानकारी देने के लिए, इस दस्तावेज़ में बताए गए सूचना के किसी एक टेंप्लेट का इस्तेमाल करके, बड़ी और एक्सपैंड की जा सकने वाली सूचनाएं बनाई जा सकती हैं.
शुरू करने के लिए, सूचना बनाएं में बताए गए तरीके से, सभी ज़रूरी कॉन्टेंट के साथ सूचना बनाएं. इसके बाद, स्टाइल ऑब्जेक्ट के साथ setStyle() को कॉल करें और
हर टेंप्लेट के हिसाब से जानकारी दें. जैसा कि यहां दिए गए
उदाहरणों में दिखाया गया है.
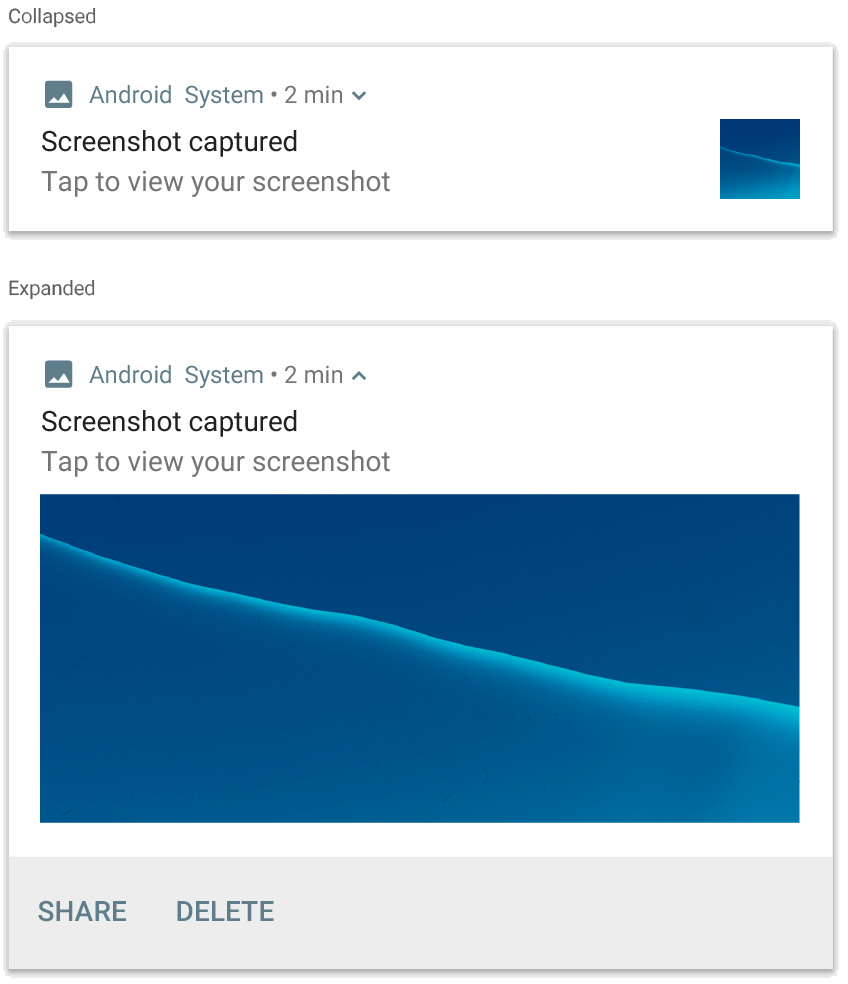
बड़ी इमेज जोड़ना
अपनी सूचना में कोई इमेज जोड़ने के लिए, NotificationCompat.BigPictureStyle का इंस्टेंस setStyle() में पास करें.
var notification = NotificationCompat.Builder(context, CHANNEL_ID) .setSmallIcon(com.example.compose.snippets.R.drawable.ic_logo) .setContentTitle("Title") .setContentText("Content text") .setStyle( NotificationCompat.BigPictureStyle() .bigPicture(bitmapImage) ) .build()
अगर आपको इमेज को सिर्फ़ थंबनेल के तौर पर दिखाना है, तो सूचना को
कोलैप्स करने पर, जैसा कि यहां दी गई इमेज में दिखाया गया है, कॉल करें
setLargeIcon()
और उसमें इमेज पास करें. इसके बाद,
BigPictureStyle.bigLargeIcon()
को कॉल करें और उसमें null पास करें, ताकि सूचना को
एक्सपैंड करने पर बड़ा आइकॉन गायब हो जाए:
notification = NotificationCompat.Builder(context, CHANNEL_ID) .setSmallIcon(R.drawable.ic_logo) .setContentTitle("Title") .setContentText("Content text") .setLargeIcon(Icon.createWithResource(context, R.drawable.dog)) .setStyle( NotificationCompat.BigPictureStyle() .bigPicture(bitmapImage) .bigLargeIcon(null as Bitmap?) ) .build()
NotificationCompat.BigPictureStyle.
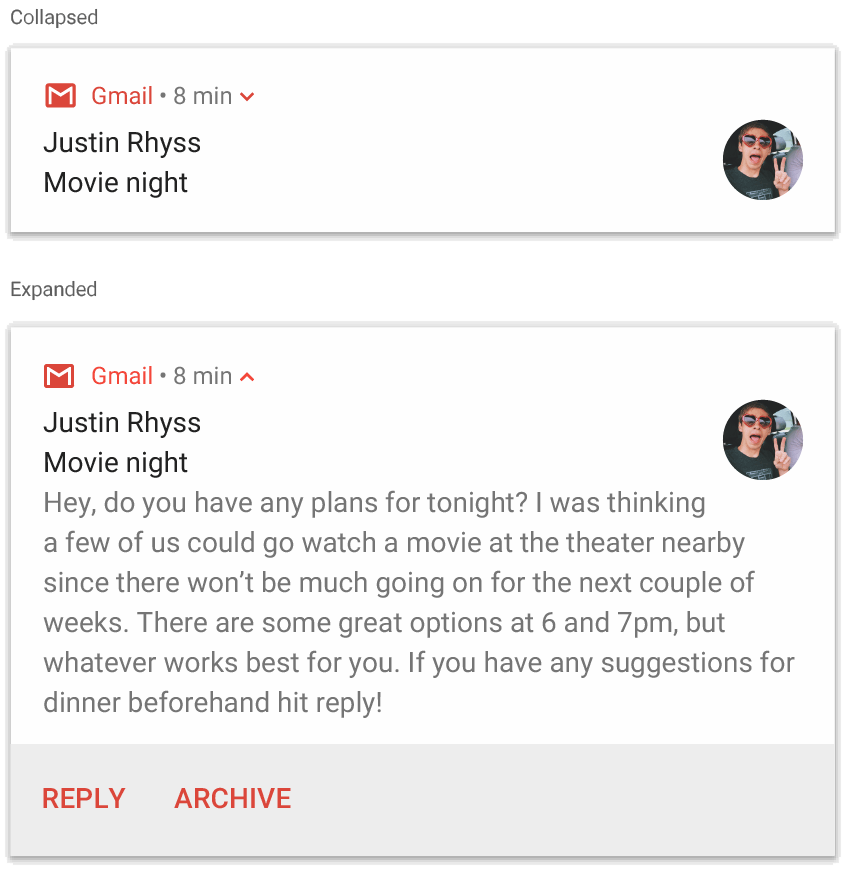
टेक्स्ट का बड़ा ब्लॉक जोड़ना
सूचना के एक्सपैंड किए गए कॉन्टेंट वाले सेक्शन में टेक्स्ट दिखाने के लिए, NotificationCompat.BigTextStyle का इस्तेमाल करें:
notification = NotificationCompat.Builder(context, CHANNEL_ID) .setSmallIcon(R.drawable.ic_logo) .setContentTitle("Sender name") .setContentText("Email subject") .setLargeIcon(Icon.createWithResource(context, R.drawable.dog)) .setStyle( NotificationCompat.BigTextStyle() .bigText(someVeryLongMessage) ) .build()
NotificationCompat.BigTextStyle.
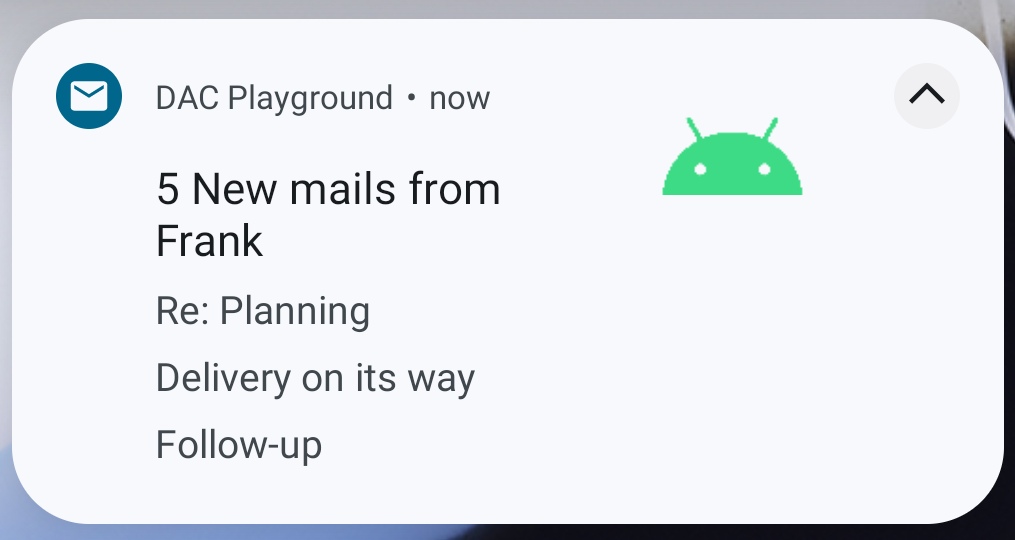
इनबॉक्स स्टाइल वाली सूचना बनाना
अगर आपको किसी सूचना में, कई छोटी खास जानकारी वाली लाइनें जोड़नी हैं, तो NotificationCompat.InboxStyle का इस्तेमाल करें. जैसे, आने वाले ईमेल के स्निपेट. इससे, कॉन्टेंट के कई ऐसे टेक्स्ट जोड़े जा सकते हैं जिन्हें एक लाइन में छोटा किया गया हो. जबकि NotificationCompat.BigTextStyle में, टेक्स्ट की एक लाइन होती है.
नई लाइन जोड़ने के लिए, addLine() को छह बार तक कॉल करें. जैसा कि यहां दिए गए
उदाहरण में दिखाया गया है. अगर छह से ज़्यादा लाइनें जोड़ी जाती हैं, तो सिर्फ़ पहली छह लाइनें दिखती हैं.
notification = NotificationCompat.Builder(context, CHANNEL_ID) .setSmallIcon(R.drawable.mail) .setContentTitle("5 New mails from Frank") .setContentText("Check them out") .setLargeIcon(bitmapImage) .setStyle( NotificationCompat.InboxStyle() .addLine("Re: Planning") .addLine("Delivery on its way") .addLine("Follow-up") ) .build()
नतीजा, यहां दी गई इमेज जैसा दिखता है:
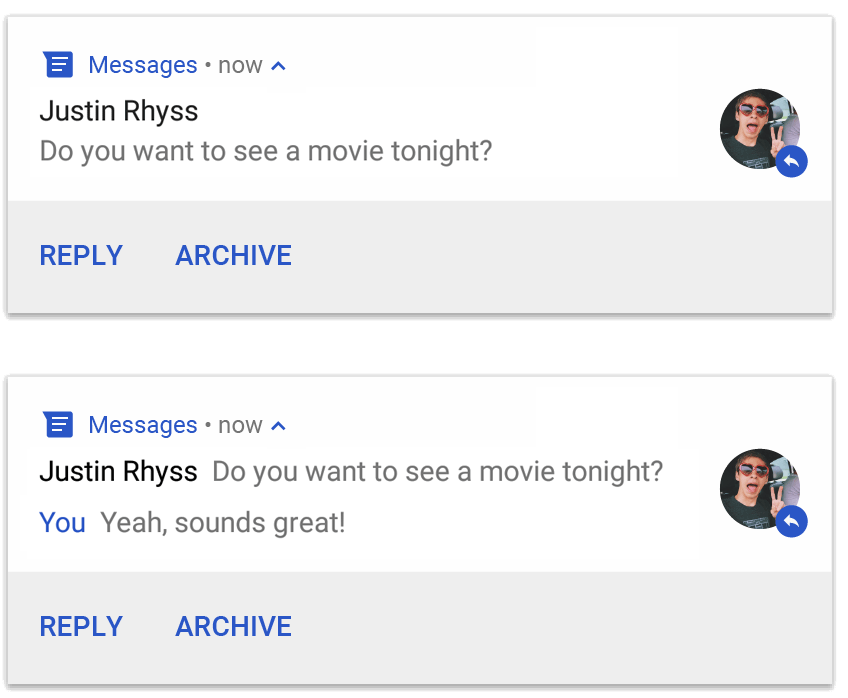
सूचना में बातचीत दिखाना
किसी भी संख्या में लोगों के बीच क्रम से भेजे गए मैसेज दिखाने के लिए, NotificationCompat.MessagingStyle का इस्तेमाल करें. यह मैसेजिंग ऐप्लिकेशन के लिए सबसे सही है, क्योंकि यह भेजने वाले के नाम और मैसेज के टेक्स्ट को अलग-अलग हैंडल करके, हर मैसेज के लिए एक जैसा लेआउट उपलब्ध कराता है. साथ ही, हर मैसेज कई लाइनों का हो सकता है.
नया मैसेज जोड़ने के लिए, addMessage() को कॉल करें. इसमें मैसेज का टेक्स्ट, मिलने का
समय, और भेजने वाले का नाम पास करें. इस जानकारी को
NotificationCompat.MessagingStyle.Message ऑब्जेक्ट के तौर पर भी पास किया जा सकता है. जैसा कि यहां दिए गए
उदाहरण में दिखाया गया है:
val message1 = NotificationCompat.MessagingStyle.Message( messages[0].text, messages[0].time, messages[0].sender ) val message2 = NotificationCompat.MessagingStyle.Message( messages[1].text, messages[1].time, messages[1].sender ) notification = NotificationCompat.Builder(context, CHANNEL_ID) .setSmallIcon(R.drawable.ic_logo) .setStyle( NotificationCompat.MessagingStyle(Person.Builder().setName("Me").build()) .addMessage(message1) .addMessage(message2) ) .build()
NotificationCompat.MessagingStyle.
NotificationCompat.MessagingStyle का इस्तेमाल करते समय, setContentTitle() और setContentText() को दी गई किसी भी वैल्यू को अनदेखा कर दिया जाता है.
बातचीत के ऊपर दिखने वाला टाइटल जोड़ने के लिए, setConversationTitle() को कॉल किया जा सकता है. यह ग्रुप का उपयोगकर्ता की ओर से बनाया गया नाम हो सकता है. अगर इसका कोई खास नाम नहीं है, तो बातचीत में शामिल लोगों की सूची हो सकती है.
एक-दूसरे से की जाने वाली चैट के लिए, बातचीत का टाइटल सेट न करें, क्योंकि सिस्टम इस फ़ील्ड के मौजूद होने को इस बात का संकेत मानता है कि बातचीत किसी ग्रुप में हो रही है.
यह स्टाइल, सिर्फ़ Android 7.0 (एपीआई लेवल 24) और उसके बाद के वर्शन वाले डिवाइसों पर लागू होती है.
जैसा कि पहले बताया गया है, कंपैटिबिलिटी लाइब्रेरी (NotificationCompat) का
इस्तेमाल करने पर, MessagingStyle वाली सूचनाएं, अपने-आप एक्सपैंड की जा सकने वाली सूचना की किसी ऐसी स्टाइल पर फ़ॉल बैक हो जाती हैं जो काम करती है.
चैट की बातचीत के लिए इस तरह की सूचना बनाते समय, सीधे जवाब देने की कार्रवाई जोड़ें.
मीडिया कंट्रोल वाली सूचना बनाना
मीडिया प्लेबैक
कंट्रोल और ट्रैक की जानकारी दिखाने के लिए, MediaStyleNotificationHelper.MediaStyle का इस्तेमाल करें.
कंस्ट्रक्टर में, अपने जुड़े हुए MediaSession की जानकारी दें. इससे Android, आपके मीडिया के बारे में सही जानकारी दिखा पाता है.
पांच आइकॉन बटन दिखाने के लिए, addAction() को पांच बार तक कॉल करें.
एल्बम का आर्टवर्क सेट करने के लिए, setLargeIcon() को कॉल करें.
MediaStyle सूचना की अन्य स्टाइल के उलट, आपको कोलैप्स किए गए साइज़ वाले कॉन्टेंट व्यू में भी बदलाव करने की सुविधा देता है. इसके लिए, तीन ऐक्शन बटन तय किए जा सकते हैं. ये बटन, कोलैप्स किए गए व्यू में भी दिखते हैं. ऐसा करने के लिए, ऐक्शन बटन के इंडेक्स
setShowActionsInCompactView() को दें.
यहां दिए गए उदाहरण में, मीडिया कंट्रोल वाली सूचना बनाने का तरीका बताया गया है:
notification = NotificationCompat.Builder(context, CHANNEL_ID) // Show controls on lock screen even when user hides sensitive content. .setVisibility(NotificationCompat.VISIBILITY_PUBLIC) .setSmallIcon(com.example.compose.snippets.R.drawable.play) // Add media control buttons that invoke intents in your media service .addAction(R.drawable.previous, "Previous", null /* Add valid intent */) // #0 .addAction(R.drawable.pause, "Pause", null /* Add valid intent */) // #1 .addAction(R.drawable.next, "Next", null /* Add valid intent */) // #2 // Apply the media style template. .setStyle(MediaStyleNotificationHelper.MediaStyle(mediaSession) .setShowActionsInCompactView(1 /* #1: pause button */)) .setContentTitle("Wonderful music") .setContentText("My Awesome Band") .setLargeIcon(bitmapImage) .build()
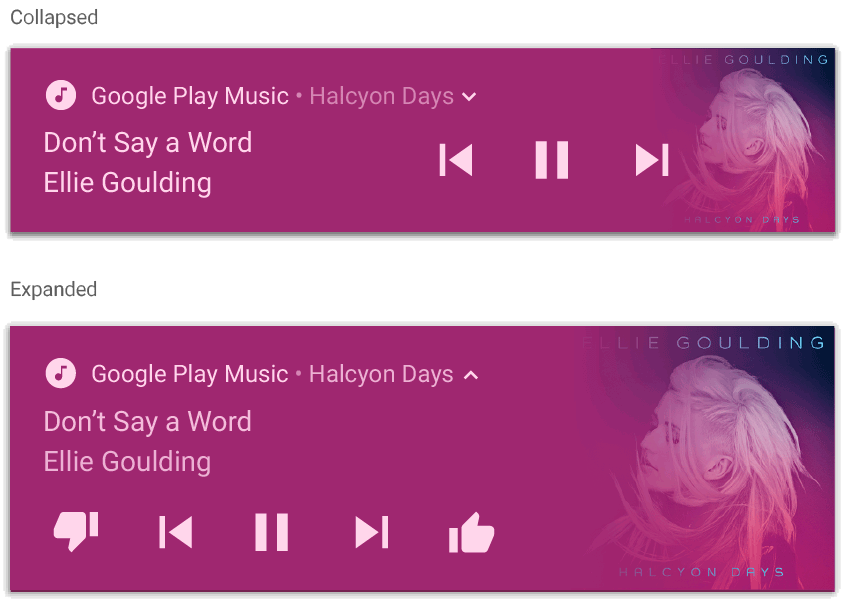
MediaStyleNotificationHelper.MediaStyle.
अन्य संसाधन
MediaStyle और एक्सपैंड की जा सकने वाली सूचनाओं के बारे में ज़्यादा जानने के लिए, यहां दिए गए रेफ़रंस देखें.