คุณสามารถเพิ่ม UI ที่ใช้ Compose ลงในแอปที่มีอยู่ซึ่งใช้การออกแบบที่อิงตาม View ได้
หากต้องการสร้างหน้าจอใหม่ที่ใช้ Compose ทั้งหมด ให้เรียกใช้เมธอด setContent() ในกิจกรรม และส่งฟังก์ชันที่ประกอบกันได้ตามต้องการ
class ExampleActivity : ComponentActivity() { override fun onCreate(savedInstanceState: Bundle?) { super.onCreate(savedInstanceState) setContent { // In here, we can call composables! MaterialTheme { Greeting(name = "compose") } } } } @Composable fun Greeting(name: String) { Text(text = "Hello $name!") }
โค้ดนี้มีลักษณะเหมือนกับโค้ดที่คุณจะพบในแอปที่ใช้ Compose เท่านั้น
ViewCompositionStrategy สำหรับ ComposeView
ViewCompositionStrategy
กำหนดเวลาที่ควรทิ้ง Composition ค่าเริ่มต้น ViewCompositionStrategy.Default จะกำจัด Composition เมื่อ ComposeView ที่เกี่ยวข้องแยกออกจากหน้าต่าง เว้นแต่จะเป็นส่วนหนึ่งของคอนเทนเนอร์ที่ใช้ร่วมกัน เช่น RecyclerView ในแอปที่ใช้ Compose เท่านั้นซึ่งมีกิจกรรมเดียว ลักษณะการทำงานเริ่มต้นนี้คือสิ่งที่คุณต้องการ อย่างไรก็ตาม หากคุณเพิ่ม Compose ในฐานของโค้ดทีละน้อย ลักษณะการทำงานนี้อาจทำให้สูญเสียสถานะในบางสถานการณ์
หากต้องการเปลี่ยน ViewCompositionStrategy ให้เรียกใช้เมธอด setViewCompositionStrategy() และระบุกลยุทธ์อื่น
ตารางด้านล่างสรุปสถานการณ์ต่างๆ ที่คุณใช้ ViewCompositionStrategy ได้
ViewCompositionStrategy |
คำอธิบายและสถานการณ์การทำงานร่วมกัน |
|---|---|
DisposeOnDetachedFromWindow |
ระบบจะทิ้ง Composition เมื่อแยก ComposeView ที่เกี่ยวข้องออกจากหน้าต่าง ซึ่งถูกแทนที่ด้วย DisposeOnDetachedFromWindowOrReleasedFromPoolสถานการณ์การทำงานร่วมกัน: * ComposeView ไม่ว่าจะเป็นองค์ประกอบเดียวในลำดับชั้นการแสดงผล หรือในบริบทของหน้าจอ View/Compose แบบผสม (ไม่ใช่ใน Fragment) |
DisposeOnDetachedFromWindowOrReleasedFromPool (ค่าเริ่มต้น) |
คล้ายกับ DisposeOnDetachedFromWindow เมื่อ Composition ไม่อยู่ในคอนเทนเนอร์การรวม เช่น RecyclerView หากอยู่ในคอนเทนเนอร์การรวม ระบบจะทิ้งเมื่อคอนเทนเนอร์การรวมแยกออกจากหน้าต่าง หรือเมื่อมีการทิ้งรายการ (เช่น เมื่อพูลเต็ม)สถานการณ์การทำงานร่วมกัน: * ComposeView ไม่ว่าจะเป็นองค์ประกอบเดียวในลำดับชั้นการแสดงผล หรือในบริบทของหน้าจอ View/Compose แบบผสม (ไม่ได้อยู่ใน Fragment)* ComposeView เป็นรายการในคอนเทนเนอร์รวม เช่น RecyclerView |
DisposeOnLifecycleDestroyed |
ระบบจะกำจัด Composition เมื่อ Lifecycle ที่ระบุถูกทำลายสถานการณ์การทำงานร่วมกัน * ComposeView ในมุมมองของ Fragment |
DisposeOnViewTreeLifecycleDestroyed |
ระบบจะทิ้ง Composition เมื่อ Lifecycle ที่ LifecycleOwner เป็นเจ้าของซึ่งแสดงผลโดย ViewTreeLifecycleOwner.get ของหน้าต่างถัดไปที่ View แนบอยู่ถูกทำลายสถานการณ์การทำงานร่วมกัน: * ComposeView ใน View ของ Fragment* ComposeView ในมุมมองที่ยังไม่ทราบวงจร |
ComposeView ใน Fragment (ขั้นตอนการเปลี่ยนผ่าน)
หากต้องการรวมเนื้อหา UI ของ Compose ไว้ใน Fragment หรือเลย์เอาต์ View ที่มีอยู่ ให้ใช้ ComposeView และเรียกใช้เมธอด setContent() ComposeView เป็น View ของ Android
คุณสามารถใส่ ComposeView ในเลย์เอาต์ XML ได้เหมือนกับ View อื่นๆ ดังนี้
<LinearLayout xmlns:android="http://schemas.android.com/apk/res/android" android:orientation="vertical" android:layout_width="match_parent" android:layout_height="match_parent"> <TextView android:id="@+id/text" android:layout_width="wrap_content" android:layout_height="wrap_content" /> <androidx.compose.ui.platform.ComposeView android:id="@+id/compose_view" android:layout_width="match_parent" android:layout_height="match_parent" /> </LinearLayout>
ในซอร์สโค้ด Kotlin ให้ขยายเลย์เอาต์จากทรัพยากรเลย์เอาต์ที่กำหนดไว้ใน XML จากนั้นรับ ComposeView โดยใช้รหัส XML, ตั้งค่ากลยุทธ์ Composition ที่เหมาะกับโฮสต์ View มากที่สุด แล้วเรียกใช้ setContent() เพื่อใช้ Compose
class ExampleFragmentXml : Fragment() { override fun onCreateView( inflater: LayoutInflater, container: ViewGroup?, savedInstanceState: Bundle? ): View { val view = inflater.inflate(R.layout.fragment_example, container, false) val composeView = view.findViewById<ComposeView>(R.id.compose_view) composeView.apply { // Dispose of the Composition when the view's LifecycleOwner // is destroyed setViewCompositionStrategy(ViewCompositionStrategy.DisposeOnViewTreeLifecycleDestroyed) setContent { // In Compose world MaterialTheme { Text("Hello Compose!") } } } return view } }
หรือจะใช้การเชื่อมโยงมุมมองเพื่อรับการอ้างอิงไปยัง ComposeView โดยอ้างอิงคลาสการเชื่อมโยงที่สร้างขึ้นสำหรับไฟล์เลย์เอาต์ XML ก็ได้
class ExampleFragment : Fragment() { private var _binding: FragmentExampleBinding? = null // This property is only valid between onCreateView and onDestroyView. private val binding get() = _binding!! override fun onCreateView( inflater: LayoutInflater, container: ViewGroup?, savedInstanceState: Bundle? ): View { _binding = FragmentExampleBinding.inflate(inflater, container, false) val view = binding.root binding.composeView.apply { // Dispose of the Composition when the view's LifecycleOwner // is destroyed setViewCompositionStrategy(ViewCompositionStrategy.DisposeOnViewTreeLifecycleDestroyed) setContent { // In Compose world MaterialTheme { Text("Hello Compose!") } } } return view } override fun onDestroyView() { super.onDestroyView() _binding = null } }
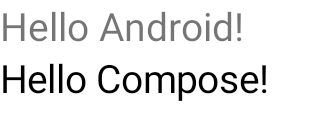
รูปที่ 1 ซึ่งจะแสดงเอาต์พุตของโค้ดที่เพิ่มองค์ประกอบ Compose ในลำดับชั้น UI ของมุมมอง ข้อความ "Hello Android!" จะแสดงโดยวิดเจ็ต TextView ข้อความ "Hello Compose!" จะแสดงโดยองค์ประกอบของข้อความของ Compose
นอกจากนี้ คุณยังรวม ComposeView ไว้ใน Fragment โดยตรงได้ด้วยหากเต็มหน้าจอสร้างขึ้นด้วย Compose ซึ่งจะช่วยให้คุณหลีกเลี่ยงการใช้ไฟล์เลย์เอาต์ XML ได้อย่างสมบูรณ์
class ExampleFragmentNoXml : Fragment() { override fun onCreateView( inflater: LayoutInflater, container: ViewGroup?, savedInstanceState: Bundle? ): View { return ComposeView(requireContext()).apply { // Dispose of the Composition when the view's LifecycleOwner // is destroyed setViewCompositionStrategy(ViewCompositionStrategy.DisposeOnViewTreeLifecycleDestroyed) setContent { MaterialTheme { // In Compose world Text("Hello Compose!") } } } } }
มีอินสแตนซ์ ComposeView หลายรายการในเลย์เอาต์เดียวกัน
หากมีองค์ประกอบ ComposeView หลายรายการในเลย์เอาต์เดียวกัน แต่ละรายการต้องมีรหัสที่ไม่ซ้ำกันเพื่อให้ savedInstanceState ทำงานได้
class ExampleFragmentMultipleComposeView : Fragment() { override fun onCreateView( inflater: LayoutInflater, container: ViewGroup?, savedInstanceState: Bundle? ): View = LinearLayout(requireContext()).apply { addView( ComposeView(requireContext()).apply { setViewCompositionStrategy( ViewCompositionStrategy.DisposeOnViewTreeLifecycleDestroyed ) id = R.id.compose_view_x // ... } ) addView(TextView(requireContext())) addView( ComposeView(requireContext()).apply { setViewCompositionStrategy( ViewCompositionStrategy.DisposeOnViewTreeLifecycleDestroyed ) id = R.id.compose_view_y // ... } ) } }
รหัส ComposeView กำหนดไว้ในไฟล์ res/values/ids.xml ดังนี้
<resources> <item name="compose_view_x" type="id" /> <item name="compose_view_y" type="id" /> </resources>
แสดงตัวอย่างคอมโพสิเบิลในเครื่องมือแก้ไขเลย์เอาต์
นอกจากนี้ คุณยังดูตัวอย่าง Composable ภายในเครื่องมือแก้ไขเลย์เอาต์สำหรับเลย์เอาต์ XML ที่มี ComposeView ได้ด้วย ซึ่งจะช่วยให้คุณเห็นลักษณะของ Composable ในเลย์เอาต์แบบผสมระหว่าง View และ Compose
สมมติว่าคุณต้องการแสดง Composable ต่อไปนี้ใน Layout Editor โปรดทราบว่า Composable ที่มีคำอธิบายประกอบด้วย @Preview เป็นตัวเลือกที่ดีในการแสดงตัวอย่างใน Layout Editor
@Preview @Composable fun GreetingPreview() { Greeting(name = "Android") }
หากต้องการแสดง Composable นี้ ให้ใช้แอตทริบิวต์ tools:composableName tools และตั้งค่าเป็นชื่อที่สมบูรณ์ในตัวเองของ Composable เพื่อแสดงตัวอย่างในเลย์เอาต์
<LinearLayout xmlns:android="http://schemas.android.com/apk/res/android" xmlns:tools="http://schemas.android.com/tools" android:orientation="vertical" android:layout_width="match_parent" android:layout_height="match_parent"> <androidx.compose.ui.platform.ComposeView android:id="@+id/my_compose_view" tools:composableName="com.example.compose.snippets.interop.InteroperabilityAPIsSnippetsKt.GreetingPreview" android:layout_height="match_parent" android:layout_width="match_parent"/> </LinearLayout>