以下各節說明如何使用 Glance 建立簡單的應用程式小工具。
在資訊清單中宣告 AppWidget
完成設定步驟後,請在應用程式中宣告 AppWidget 及其中繼資料。
從
GlanceAppWidgetReceiver擴充AppWidget接收器:class MyAppWidgetReceiver : GlanceAppWidgetReceiver() { override val glanceAppWidget: GlanceAppWidget = TODO("Create GlanceAppWidget") }
在
AndroidManifest.xml檔案和相關中繼資料檔案中註冊應用程式小工具的供應者:<receiver android:name=".glance.MyReceiver" android:exported="true"> <intent-filter> <action android:name="android.appwidget.action.APPWIDGET_UPDATE" /> </intent-filter> <meta-data android:name="android.appwidget.provider" android:resource="@xml/my_app_widget_info" /> </receiver>
新增 AppWidgetProviderInfo 中繼資料
接下來,請按照「建立簡易小工具」指南建立並定義 @xml/my_app_widget_info 檔案中的應用程式小工具資訊。
Glance 唯一的差異在於沒有 initialLayout XML,但您必須定義一個。您可以使用程式庫中提供的預先定義載入版面配置:
<appwidget-provider xmlns:android="http://schemas.android.com/apk/res/android"
android:initialLayout="@layout/glance_default_loading_layout">
</appwidget-provider>
定義 GlanceAppWidget
建立可從
GlanceAppWidget擴充的新類別,並覆寫provideGlance方法。您可以透過這個方法載入用於轉譯小工具所需的資料:class MyAppWidget : GlanceAppWidget() { override suspend fun provideGlance(context: Context, id: GlanceId) { // In this method, load data needed to render the AppWidget. // Use `withContext` to switch to another thread for long running // operations. provideContent { // create your AppWidget here Text("Hello World") } } }
在
GlanceAppWidgetReceiver的glanceAppWidget中建立例項:class MyAppWidgetReceiver : GlanceAppWidgetReceiver() { // Let MyAppWidgetReceiver know which GlanceAppWidget to use override val glanceAppWidget: GlanceAppWidget = MyAppWidget() }
您現在已使用 Glance 設定 AppWidget。
建立 UI
以下程式碼片段示範如何建立 UI:
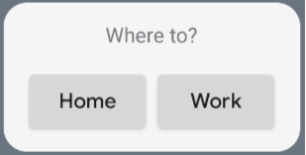
/* Import Glance Composables In the event there is a name clash with the Compose classes of the same name, you may rename the imports per https://kotlinlang.org/docs/packages.html#imports using the `as` keyword. import androidx.glance.Button import androidx.glance.layout.Column import androidx.glance.layout.Row import androidx.glance.text.Text */ class MyAppWidget : GlanceAppWidget() { override suspend fun provideGlance(context: Context, id: GlanceId) { // Load data needed to render the AppWidget. // Use `withContext` to switch to another thread for long running // operations. provideContent { // create your AppWidget here MyContent() } } @Composable private fun MyContent() { Column( modifier = GlanceModifier.fillMaxSize(), verticalAlignment = Alignment.Top, horizontalAlignment = Alignment.CenterHorizontally ) { Text(text = "Where to?", modifier = GlanceModifier.padding(12.dp)) Row(horizontalAlignment = Alignment.CenterHorizontally) { Button( text = "Home", onClick = actionStartActivity<MyActivity>() ) Button( text = "Work", onClick = actionStartActivity<MyActivity>() ) } } } }
上述程式碼範例會執行下列作業:
- 在頂層
Column中,項目會以垂直方向依序排列。 Column會擴大尺寸,以便與可用空間相符 (透過GlanceModifier),並將內容對齊頂端 (verticalAlignment),並將其水平置中 (horizontalAlignment)。Column的內容是使用 lambda 定義的。順序很重要。

您可以變更對齊值或套用不同的修飾符值 (例如邊框間距),變更元件的放置位置和大小。如需各類別的元件、參數和可用修飾符完整清單,請參閱參考說明文件。
