
The Android Emulator simulates Android devices on your computer so that you can test your application on a variety of devices and Android API levels without needing to have each physical device. The emulator offers these advantages:
Flexibility: In addition to being able to simulate a variety of devices and Android API levels, the emulator comes with predefined configurations for various Android phone, tablet, Wear OS, Android Automotive OS, and Android TV devices.
High fidelity: The emulator provides almost all the capabilities of a real Android device. You can simulate incoming phone calls and text messages, specify the location of the device, simulate different network speeds, simulate rotation and other hardware sensors, access the Google Play Store, and much more.
Speed: Testing your app on the emulator is in some ways faster and easier than doing so on a physical device. For example, you can transfer data faster to the emulator than to a device connected over USB.
In most cases, the emulator is the best option for your testing needs. This page covers the core emulator functionalities and how to get started with it.
Alternatively, you can deploy your app to a physical device. For more information, see Run apps on a hardware device.
Get started with the emulator
The Android Emulator lets you test your app on many different devices virtually. The emulator comes with Android Studio, so you don't need to install it separately. To use the emulator, follow these basic steps, which are described in more detail in the sections that follow:
- Verify that you have the system requirements.
- Create an Android Virtual Device (AVD).
- Run your app on the emulator.
- Navigate the emulator.
This page covers the steps to set up and explore your virtual testing environment in more detail. If you already have your app running on the emulator and are ready to use more advanced features, see Advanced emulator usage.
If you're experiencing issues with the emulator, see Troubleshoot known issues with Android Emulator. Depending on your needs and resources, it might be worth delving into system requirements and technical configurations, or it might be better to use a physical device.
Emulator system requirements
For the best experience, you should use the emulator in Android Studio on a computer with at least the following specs:
- 16 GB RAM
- 64-bit Windows 10 or higher, MacOS 12 or higher, Linux, or ChromeOS operating system
- 16 GB disk space
Running higher API levels and/or virtual devices with larger screens may require higher system specs than listed above. If you don't have these specs, the emulator might still run but not smoothly. In this case, consider testing on a physical device instead by following the guidance at Run apps on a hardware device.
Create an Android Virtual Device
Each instance of the Android Emulator uses an Android virtual device (AVD) to specify the Android version and hardware characteristics of the simulated device. To create an AVD, see Create and manage virtual devices.
Each AVD functions as an independent device with its own private storage for user data, SD card, and so on. By default, the emulator stores the user data, SD card data, and cache in a directory specific to that AVD. When you launch the emulator, it loads the user data and SD card data from the AVD directory.
Run your app on the emulator
After you have created an AVD, you can start the Android Emulator and run an app in your project:
In the toolbar, select the AVD that you want to run your app on from the target device menu.
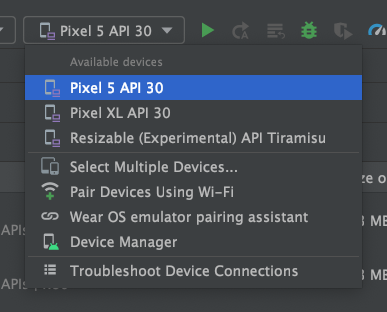
Figure 1. The target device menu. Click Run. The emulator might take a minute or so to launch for the first time, but subsequent launches use a snapshot and should launch faster. If you experience issues, see the troubleshooting guide.
Once your app is installed on your AVD, you can run it from the device as you would run any app on a device. Any time you want to deploy new changes, you need to click Run or Apply Changes again.
Wear OS pairing assistant
If you want to test your app with Wear OS devices, the Wear OS pairing assistant guides you step-by-step through pairing Wear OS emulators with physical or virtual phones directly in Android Studio. To learn more, see Use the Wear OS emulator pairing assistant.
Navigate the emulator
While the emulator is running, you can use your computer mouse pointer to mimic your finger on the touch screen and use the emulator panel to perform common actions.
Navigate the emulator screen
Use your computer mouse pointer to mimic your finger on the touchscreen, select menu items and input fields, and click buttons and controls. Use your computer keyboard to type characters and enter emulator shortcuts.
Table 1. Gestures for navigating the emulator
| Feature | Description |
|---|---|
| Swipe the screen | Point to the screen, press and hold the primary mouse button, swipe across the screen, and then release. |
| Drag an item | Point to an item on the screen, press and hold the primary mouse button, move the item, and then release. |
| Tap | Point to the screen, press the primary mouse button, and then release. |
| Double tap | Point to the screen, double-click the primary mouse button quickly, and then release. |
| Touch & hold | Point to an item on the screen, press the primary mouse button, hold, and then release. |
| Type | You can type in the emulator by using your computer keyboard or using a keyboard that pops up on the emulator screen. |
Pressing Control (Command on macOS) brings up a pinch gesture
multi-touch interface. The mouse acts as the first finger, and across the
anchor point is the second finger. Drag the cursor to move the first point.
Clicking the left mouse button mimics touching down both points and
releasing mimics picking both up. |
|
| Vertical swipe | Open a vertical menu on the screen and use the scroll wheel (mouse wheel) to scroll through the menu items. Click a menu item to select it. |
Perform common actions using the emulator panel
To perform common actions with the emulator, use the emulator toolbar, if you're running the emulator within Android Studio, or the panel on the right side, if you're running the emulator in a window outside of Android Studio. Table 2 describes common emulator actions and associated buttons.
You can use keyboard shortcuts to perform many common actions in the emulator. For a complete list of shortcuts in the emulator, press F1 (Command+/ on macOS) to open the Help pane in the Extended controls window.
Table 2. Common actions in the emulator
| Feature | Description |
|---|---|
Close |
Close the emulator. |
Minimize |
Minimize the emulator window. |
| Resize | Resize the emulator as you would any other operating system window. The emulator maintains an aspect ratio appropriate for your device. |
Power |
Click to turn the screen on or off. Click and hold to turn the device on or off. |
Volume up |
Click to view a slider control and turn the volume up. Click again to turn it up more, or use the slider control to change the volume. |
Volume down |
Click to view a slider control and turn the volume down. Click again to turn it down more, or use the slider control to change the volume. |
Rotate left |
Rotate the device 90 degrees counterclockwise. |
Rotate right |
Rotate the device 90 degrees clockwise. |
Take screenshot
|
Click to take a screenshot of the device. |

|
Click to change the cursor to the zoom icon. To exit zoom mode, click the button again. To zoom in and out in zoom mode:
To pan in zoom mode, hold Control (Command on macOS) while pressing the arrow keys on the keyboard. To tap the device screen in zoom mode, Control-click (Command-click on macOS). |
Back |
Return to the previous screen or close a dialog, an options menu, the Notifications panel, or the onscreen keyboard. |
Home |
Return to the Home screen. |
Overview
 (Recent Apps) |
Tap to open a list of thumbnail images of apps you've worked with recently. To open an app, tap its thumbnail. To remove a thumbnail from the list, swipe it left or right. This button isn't supported for Wear OS. |
Fold |
For foldable devices, fold the device to display its smaller screen configuration. |
Unfold |
For foldable devices, unfold the device to display its larger screen configuration. |
Button 1
|
For Wear devices, press Button 1 on the device. Only available on Wear devices running API level 28 or higher. |
Button 2
|
For Wear devices, press Button 2 on the device. Only available on Wear devices running API level 30 or higher. |
Palm
|
For Wear devices, press your palm on the device screen. This sets your device to ambient mode. Only available on Wear devices running API level 28 or higher. |
Tilt
|
For Wear devices, tilt the device. This exits ambient mode. Only available on Wear devices running API level 28 or higher. |
| Menu | Press Control+M (Command+M on macOS) to simulate the Menu button. |
More |
Click to access other features and settings. |
Update the emulator
To update the Android Emulator, select the Android Emulator component in the SDK Tools tab of the SDK Manager. For instructions, see Update your tools using the SDK Manager.