
The Translations Editor provides a consolidated and editable view of all of your default and translated string resources.
For an introduction to translating your app for different languages, read Support different languages and cultures.
![]()
Figure 1. The Translations Editor showing app text before translation
String resources
The string resources for a project are contained in strings.xml files. Your
project has a default strings.xml file that contains string resources in the
default language for your app, which is the language you expect most of your app
users to speak. You can also have translated strings.xml files that contain
string resources for other languages that you want your app to accommodate.
Once you have your default strings.xml file completed, you can add the
translations yourself, or pay a professional service to do the translations.
Either way, you should take advantage of the Android Studio features to help you
manage and test localizable text. For information about
professional translation services, see Translation services.
Open the Translations Editor
You can access the Translations Editor from the following places in Android Studio.
Open from the Android view
- In the Project > Android panel on the left, select ModuleName > res > values.
- Right-click the strings.xml file, and select Open Translations Editor.
The Translations Editor displays the key and value pairs from the
strings.xmlfile.Note: When you have translated
strings.xmlfiles, your project has multiple corresponding values folders with suffixes that indicate the language, such as values-es for Spanish. Your defaultstrings.xmlfile is always in the values (no suffix) folder.
Figure 1 shows the default app text (in this case, English) in the Translations
Editor for a simple app before translation work has been done. The contents of
translated strings.xml files will appear to the right of the
Untranslatable column with one column per language, as shown in figure 2.
Open from within strings.xml
You can access the Translations Editor from within any of your strings.xml
files.
- In the Project > Android panel on the left, select ModuleName > res > values.
- Double-click strings.xml to open it for editing.
- In strings.xml, click the Open editor link in the upper-right corner.
Configure untranslatable rows
In the Translations Editor, you can select Untranslatable to indicate that you don't want the text in this row to be translated. Text that you would not want translated might be product-specific text like trade names and trade marks, or technical terms that don't have a translation.
When you select Untranslatable, the corresponding line in the default
strings.xml file adds translatable="false". In the following example,
EasyApp in the top line is not translated because it is the product name.
<resources>
    <string name="app_name" translatable="false">EasyApp</string>
    <string name="action_settings">Settings</string>
    <string name="easy_app">I am a Simple App!</string>
    <string name="next_page">Next Page</string>
    <string name="second_page_message">I am the Second Page!</string>
    <string name="title_activity_second">SecondActivity</string>
</resources>
Add and delete languages
The Translations Editor supports BCP 47 and combines locale and region (country) codes into a single selection for targeted localizations. A locale defines more than the language. A locale includes country-dependent formatting for things like the date and time, currencies, and decimals.
To add a language, do the following:
- In the Translations Editor, click the globe icon
 .
. - From the drop-down list, select the language you want to add. The new language appears in the Translations Editor, and a values-* folder with a `strings.xml` file is added to the project. For example, values-es for Spanish.
To delete a language, do the following:
You can delete a language in the Translations Editor by deleting every value in the column (see Edit, add, and delete text), or you can delete the project folder for that language, as follows:
- In the Project > Android panel on the left, select ModuleName > res.
- Right-click the values-* folder for the language you want to delete. For example, values-hi for Hindi.
- From the list, select Delete to delete the folder and its strings.xml file.
Edit, add, and delete text
You can operate on the text settings directly in the strings.xml file or
through the Translations Editor. This section describes the Translations
Editor approach. In the Translations Editor, you can edit, add, or delete
text through the list view or through the Translation field at the bottom
of the Translations Editor.
![]()
Figure 2. List view on the top and the Translation field on the bottom
List view
To edit or add text, do the following:
- Double-click the cell where you want to edit or add text.
- Do a keyboard copy-paste, or, if you have a keyboard that supports diacritic marks, type directly into the list view.
- Tab or move the cursor out of the field.
To delete text, do the following:
- Double-click the cell you want to delete.
- In the list view, select the text and press Delete.
- Tab or move the cursor out of the field.
Translation field
To edit or add text, do the following:
- In the list view, single-click the cell where you want to edit or add text.
- In the Translation field, do a keyboard copy-paste, or, if you have a keyboard that supports diacritic marks, type directly into the Translation field.
- Tab or move the cursor out of the field.
To delete text, do the following:
- Single-click the cell you want to delete.
- In the Translation field, select the text and press Delete.
Add and delete keys
In the Translations Editor, the Key column lists the unique identifiers for
each data item in your strings.xml files. You can add and delete keys through
the Translations Editor. When you delete a key, the Translations Editor deletes
it and all of its associated translations. The Translations Editor uses the Safe
Delete refactoring to delete a key so you know if the key text is used elsewhere
and have a chance to make necessary adjustments before you delete the key. The
Safe Delete refactoring ensures that your code still compiles after you delete
the key.
To add a key, do the following:
- In the Translations Editor, click Add Key
 .
. - In the dialog, enter a key name, default value, and the location of the
default strings.xml file.
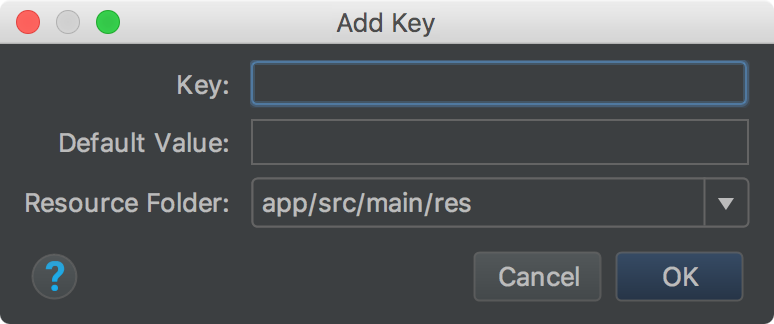
Figure 3. Add a key
To delete a key, do the following:
- In the Translations Editor, select the key you want to delete.
- Click Remove Keys
 .
. - In the Delete dialog, decide if you want a safe delete and whether you
want to search in comments and strings, and click OK.
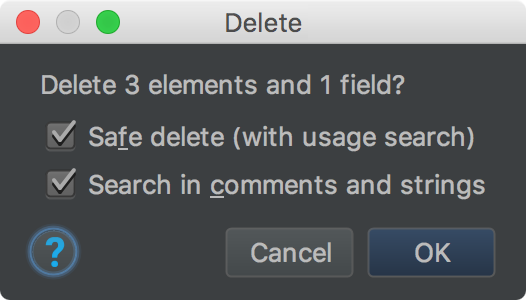
Figure 4. Delete dialog
If there are no references (usages) to the deleted key, or if all references are safely collapsible, the key is deleted. Otherwise, the Translations Editor displays the Usages Detected dialog with information about the problems detected.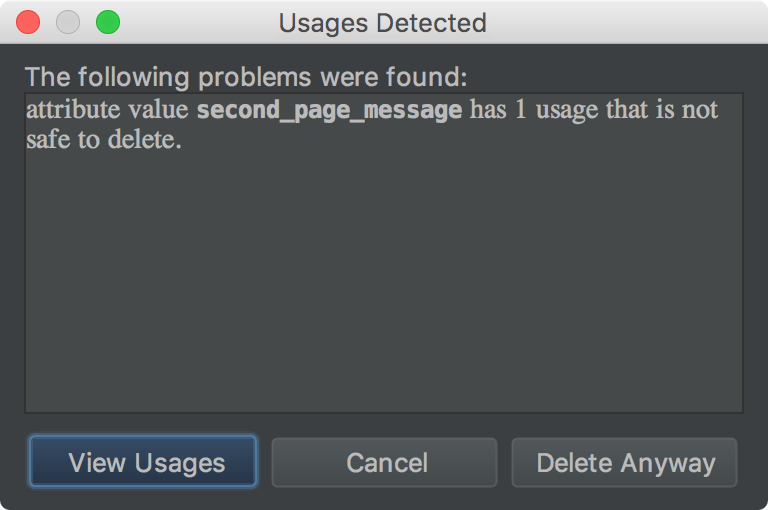
Figure 5. Delete dialog
- Select View Usages to review what will be deleted. The Find Safe Delete
Conflicts dialog shows all of the usages that are not safe to delete so
you can edit your corresponding code.
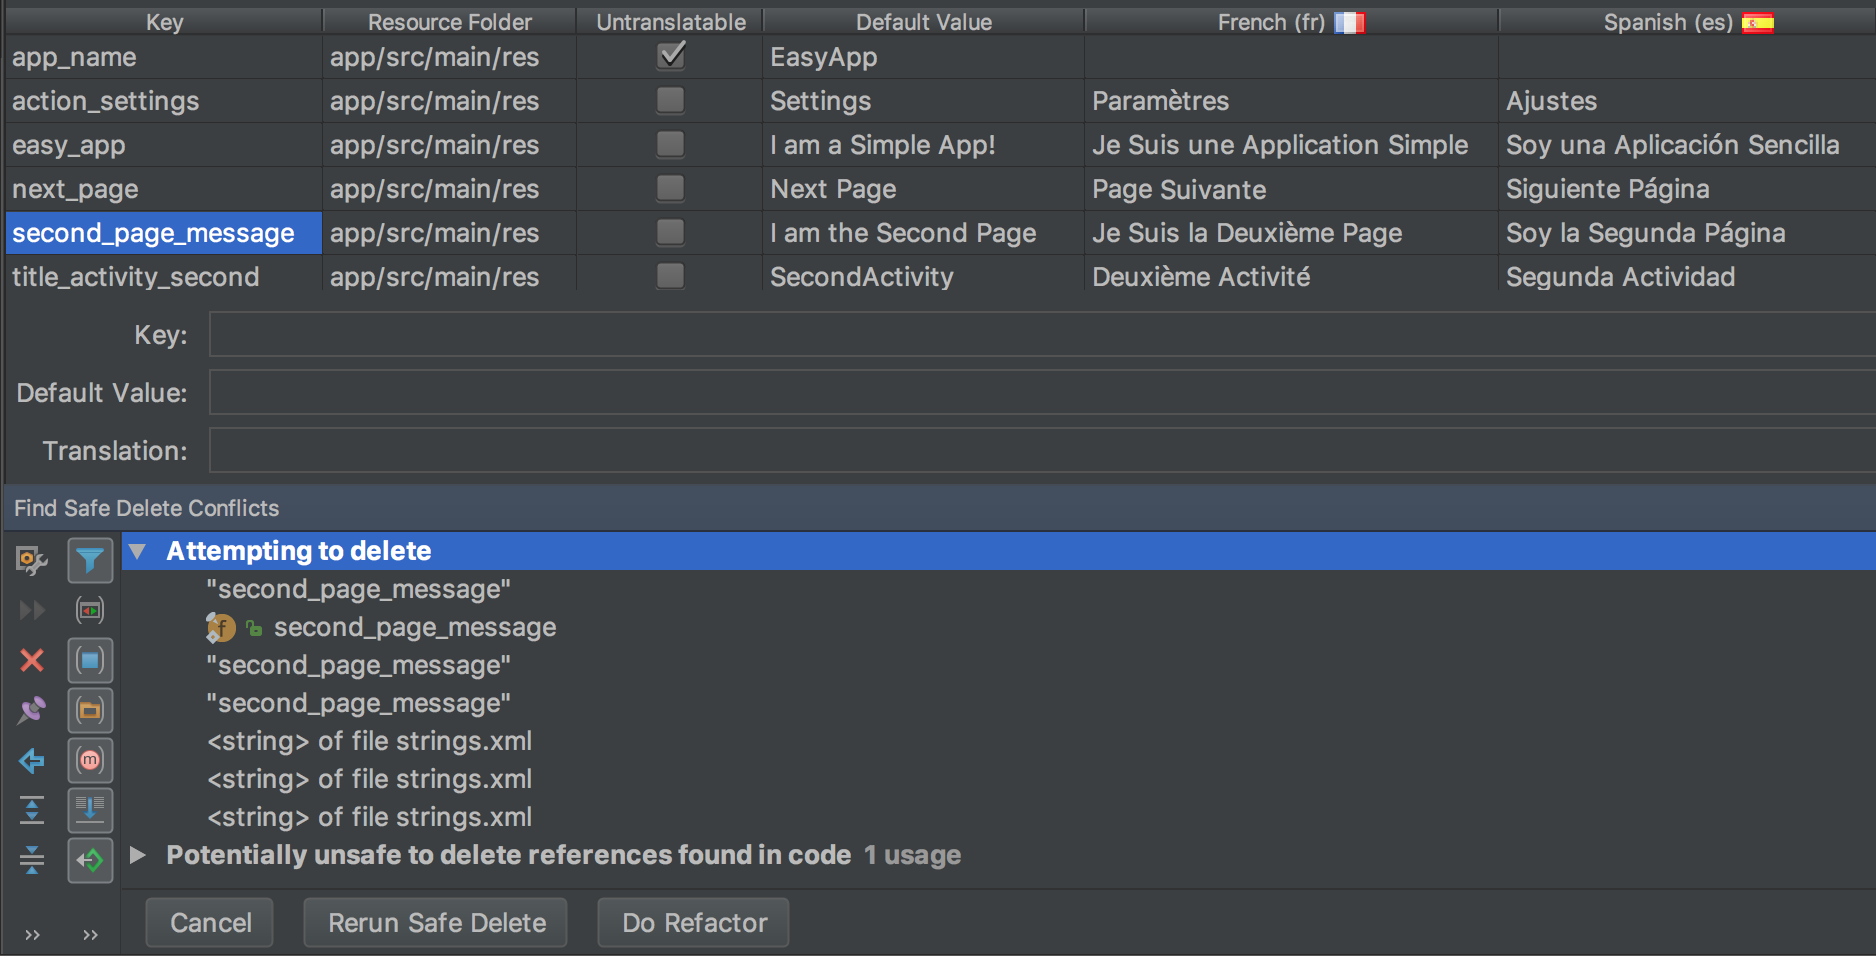
Figure 6. Unsafe usages
- Right-click a usage to display the context menu and select Jump to Source so you can make the needed changes.
- In the Find Safe Delete Conflicts panel, select Rerun Safe Delete to make sure there are no other usages that need attention.
- When the usages are cleaned up, click Do Refactor to delete the key.
Correct errors
Figure 7 shows the Translations Editor displaying the contents of the
English, French, and Spanish strings.xml files. The red text indicates lines
that have errors.
![]()
Figure 7. Red text indicates an error condition that you must fix
To correct an error, hover over the red text to display an explanation of the problem and its resolution.
When you make changes in the Translations Editor, the underlying
strings.xml files update with your changes. When you make changes in a
strings.xml file, the corresponding column in the Translations Editor
updates with your changes.
Example Translations Editor corrections:
- Figure 7 shows that the app_name row has Untranslatable checked, but there is a Spanish translation provided. Delete the Spanish translation to correct the error.
- Figure 7 shows that the next_page row is missing a French translation. Use your keyboard to copy Page Suivante into the cell to correct the error. A keyboard copy-paste operation copies the text with any diacritic marks into the cell.
Manage and test localizable text
The Android platform and Android Studio provide several features to help you manage and test your localizable app text. These features have options to help you target issues with right-to-left (RTL) scripts, such as Arabic or Hebrew. Testing your localizable text lets you make adjustments to the UI text and its layout before you commit your messages to the source repository to be sent for translation later.
Support RTL languages
Jetpack Compose handles right-to-left (RTL) layouts natively. Layout modifiers
and APIs are built around directional concepts like start and end rather
than absolute directions like left and right. When the system language
changes to an RTL locale, Compose automatically mirrors these layouts for you.
For your app to recognize the RTL locale and trigger this mirroring, you must opt in using your app's manifest file.
To enable RTL support, do the following:
- Open your
AndroidManifest.xmlfile. - Add the
android:supportsRtl="true"attribute to the<application>element:
<manifest ... >
    <application
        ...
        android:supportsRtl="true">
    </application>
</manifest>
To learn more about how Compose handles text layout, mirroring, and custom RTL configurations, see Working with RTL languages.
Manually set text direction
In Jetpack Compose, you don't use a visual Properties window to force layout or text directions. Compose automatically handles RTL mirroring based on the system locale.
However, if you need to manually override the direction for a specific text
element (for example, displaying an LTR string in an RTL layout), you can pass a
TextDirection object into your TextStyle.
Supported values include:
TextDirection.Content: (Default): Infers the direction from the first strong directional character.TextDirection.Ltr: Forces left-to-right direction.TextDirection.Rtl: Forces right-to-left direction.
To learn more about styling text and configuring manual text directions in Compose, see Style text.
Use localized strings in your app
Once you have added and translated your strings using the Translations Editor,
your underlying res/values/strings.xml files are automatically updated and you
can use the localized resources directly in your UI.
To learn how to display localized text, handle RTL natively, and use @Preview
to test different locales and pseudolocales, see the Strings section of
Resources in Compose.
Pseudolocales
A pseudolocale is a simulated locale that is designed to assume the characteristics of languages that cause UI, layout, RTL, and other translation problems when an app is translated. Pseudolocales provide instant and automatic translations that are readable in English for all localizable messages. This makes it possible for you to catch untranslatable messages in your source code.
For information about how to use pseudolocales, see Test your app with pseudolocales.