
With the Create New Class dialog and file templates, Android Studio helps you to quickly create the following new classes and types:
- Java classes
- Enumeration and singleton classes
- Interface and annotation types
After you fill in the Create New Class dialog fields and click
OK, Android Studio creates a .java file containing
skeleton code, including a package statement, any necessary imports, a header,
and a class or type declaration. Next, you can add your code to this file.
File templates specify how Android Studio generates the skeleton code. You can use the file templates provided with Android Studio as is, or customize them to suit your development process.
Viewing and customizing file templates
Android Studio provides file templates that determine how new Java classes and types are created with the Create New Class dialog. You can customize these templates.
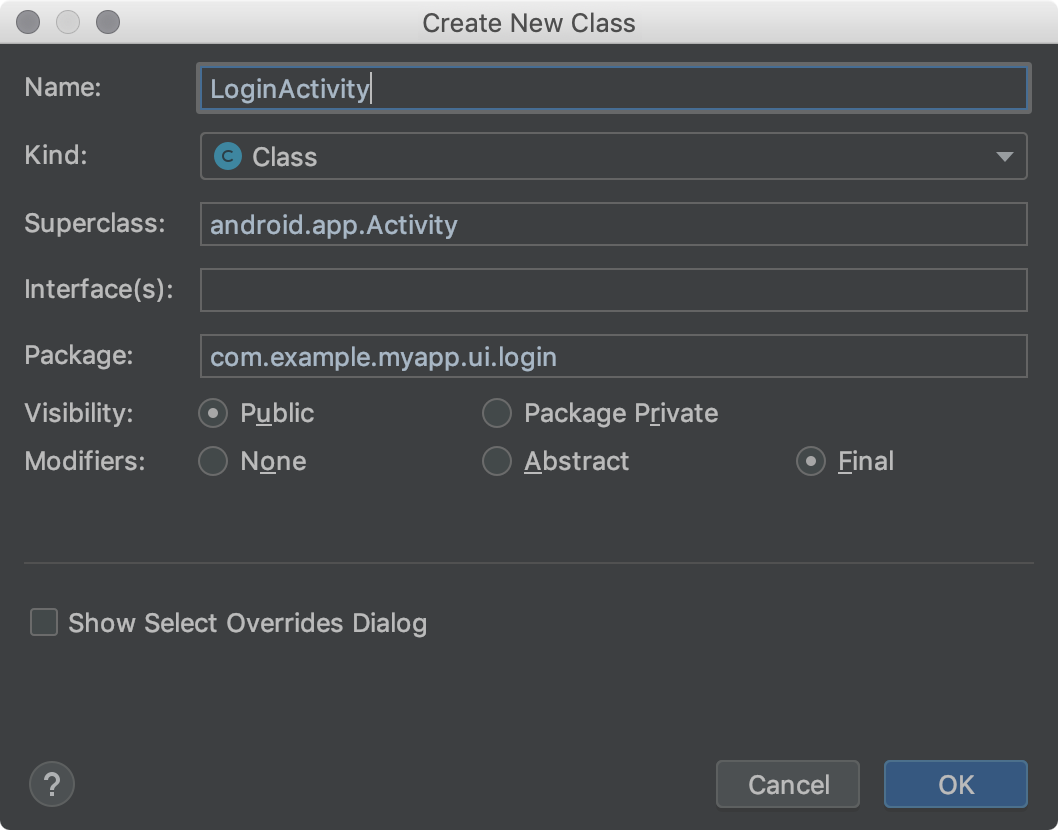
Figure 1. The Create New Class dialog.
The Android Studio file templates include Velocity Template Language (VTL) code and variables that handle these additional options. The Create New Class dialog uses the AnnotationType, Class, Enum, Interface, and Singleton file templates.
To view the templates, find customizations, and modify the templates, follow these steps:
Do one of the following:
- For Windows or Linux, select File > Settings > Editor > File and Code Templates > Files.
- For macOS, select Android Studio > Preferences > Editor > File and Code Templates > Files.
In the template list, internal template names are in bold font. Customized template names are displayed in a highlight color, such as blue.
Customize the file templates as needed.
If you want to use the Create New Class dialog fields, make sure your changes comply with the Android Studio file template code.
For more information about file templates, including VTL, see File and Code Templates and File and Code Templates Dialog.
Creating a Java class or type
Android Studio helps you to create new Java classes; enumeration and singleton classes; and interface and annotation types based on file templates.
To create a new Java class or type, follow these steps:
- In the Project window, right-click a Java file or folder, and select New > Java Class.
- In the Create New Class dialog, fill in the fields:
- Name - The name of the new class or type. It must comply with Java name requirements. Don’t type a file name extension.
- Kind - Select the category of class or type.
- Superclass - The class that your new class inherits from. You can type the package and class name, or just the class name and then double-click an item in the drop-down list to autocomplete it.
- Interface(s) - One or more interfaces that the new class or type implements. Multiple interfaces should be separated by a comma followed by an optional space. You can type the package and interface name, or just the interface name and then double-click an item in the drop-down list to autocomplete it.
- Package - The package that the class or type will reside
in. The default automatically appears in the field. If you type a package name
in the field, any portions of the package identifier that don’t exist are
highlighted red; in this case, Android Studio creates the package after you
click OK. This field must contain a value; otherwise, the Java
file won’t contain a
packagestatement, and the class or type won’t be placed within a package in the project. - Visibility - Select whether the class or type is visible to all classes, or just to those in its own package.
- Modifiers - Select the Abstract or Final modifier for a Class, or neither.
- Show Select Overrides Dialog - For a Kind of Class, check this option to open the Select Methods to Override/Implement dialog after you click OK. In this dialog, you can select methods that you would like to override or implement, and Android Studio will generate skeleton code for these methods.
- Click OK.
Alternatively, select a Java file or folder in the Project window, or click in a Java file in the Code Editor. Then select File > New > Java Class.
The item you select determines the default package for the new class or type.
Autocomplete works for the first interface name only. Note that while the comma and the following interface name can bring up a tooltip error, you can ignore the error because it doesn’t affect the generated code.
The default depends on how you launched the Create New Class dialog. If you first selected a Java file or folder in the Project window, the default is the package for the item you selected. If you first clicked in a Java file in the Code Editor, the default is the package that contains this file.
Any fields that don’t apply to the Kind are hidden.
Android Studio creates a Java file with skeleton code that you can modify. It opens the file in the Code Editor.
Note: You can create a singleton class by selecting File > New > Singleton or File > New > Java Class; the latter technique offers more options.
Android Studio file templates
This section lists the Android Studio file template code written in the VTL scripting language, followed
by definitions of the variables. The values that you provide in the
Create New Class dialog become the variable values in the template.
Note that the lines that begin with
#if (${VISIBILITY} extend all the way to the open brace (
{ ).
AnnotationType file template
#if (${PACKAGE_NAME} != "")package ${PACKAGE_NAME};#end

#if (${IMPORT_BLOCK} != "")${IMPORT_BLOCK}
#end
#parse("File Header.java")

#if (${VISIBILITY} == "PUBLIC")public #end @interface ${NAME} #if (${INTERFACES} != "")extends ${INTERFACES} #end {
}
Class file template
#if (${PACKAGE_NAME} != "")package ${PACKAGE_NAME};#end

#if (${IMPORT_BLOCK} != "")${IMPORT_BLOCK}
#end
#parse("File Header.java")

#if (${VISIBILITY} == "PUBLIC")public #end #if (${ABSTRACT} == "TRUE")abstract #end #if (${FINAL} == "TRUE")final #end class ${NAME} #if (${SUPERCLASS} != "")extends ${SUPERCLASS} #end #if (${INTERFACES} != "")implements ${INTERFACES} #end {
}
Enum file template
#if (${PACKAGE_NAME} != "")package ${PACKAGE_NAME};#end

#if (${IMPORT_BLOCK} != "")${IMPORT_BLOCK}
#end
#parse("File Header.java")

#if (${VISIBILITY} == "PUBLIC")public #end enum ${NAME} #if (${INTERFACES} != "")implements ${INTERFACES} #end {
}
Interface file template
#if (${PACKAGE_NAME} != "")package ${PACKAGE_NAME};#end

#if (${IMPORT_BLOCK} != "")${IMPORT_BLOCK}
#end
#parse("File Header.java")

#if (${VISIBILITY} == "PUBLIC")public #end enum ${NAME} #if (${INTERFACES} != "")implements ${INTERFACES} #end {
#end {
}
Singleton file template
#if (${PACKAGE_NAME} != "")package ${PACKAGE_NAME};#end

#if (${IMPORT_BLOCK} != "")${IMPORT_BLOCK}
#end
#parse("File Header.java")

#if (${VISIBILITY} == "PUBLIC")public #end class ${NAME} #if (${SUPERCLASS} != "")extends ${SUPERCLASS} #end #if (${INTERFACES} != "")implements ${INTERFACES} #end {
    private static final ${NAME} ourInstance = new ${NAME}();

    #if (${VISIBILITY} == "PUBLIC")public #end static ${NAME} getInstance() {
        return ourInstance;
    }

    private ${NAME}() {
    }
}
File template variables
Android Studio replaces file template variables with values in the generated Java file. You enter the values in the Create New Class dialog. The template has the following variables that you can use:
IMPORT_BLOCK- A newline-delimited list of Javaimportstatements necessary to support any superclass or interfaces, or an empty string (""). For example, If you only implement theRunnableinterface and extend nothing, this variable will be"import java.lang.Runnable;\n". If you implement theRunnableinterface and extend theActivityclass, it will be"import android.app.Activity;\nimportjava.lang.Runnable;\n".VISIBILITY- Whether the class will have public access or not. It can have a value ofPUBLICorPACKAGE_PRIVATE.SUPERCLASS- A single class name, or empty. If present, there will be anextends ${SUPERCLASS}clause after the new class name.INTERFACES- A comma-separated list of interfaces, or empty. If present, there will be animplements ${INTERFACES}clause after the superclass, or after the class name if there’s no superclass. For interfaces and annotation types, the interfaces have theextendskeyword.ABSTRACT- Whether the class should be abstract or not. It can have a value ofTRUEorFALSE.FINAL- Whether the class should be final or not. It can have a value ofTRUEorFALSE.