Stay organized with collections
Save and categorize content based on your preferences.
WebP is an image file format from
Google that provides lossy compression (like JPEG) as well as transparency (like
PNG) but can provide better compression than either JPEG or PNG. Lossy WebP
images are supported in Android 4.0 (API level 14) and higher, and lossless and
transparent WebP images are supported in Android 4.3 (API level 18) and higher.
This page shows how to convert images to WebP format and how to convert WebP
images to PNG format.
For more information about
selecting the correct image format to improve download speed, see Reduce image
download sizes.
Convert images to WebP
Android Studio can convert PNG, JPG, BMP, or static GIF images to WebP format.
You can convert individual images or folders of images.
To convert an image or folder of images, proceed as follows:
Right-click an image file or a folder containing image
files, and then click Convert to WebP.
The Converting Images to WebP dialog opens. The default settings
depend on the minSdkVersion setting for the current module.
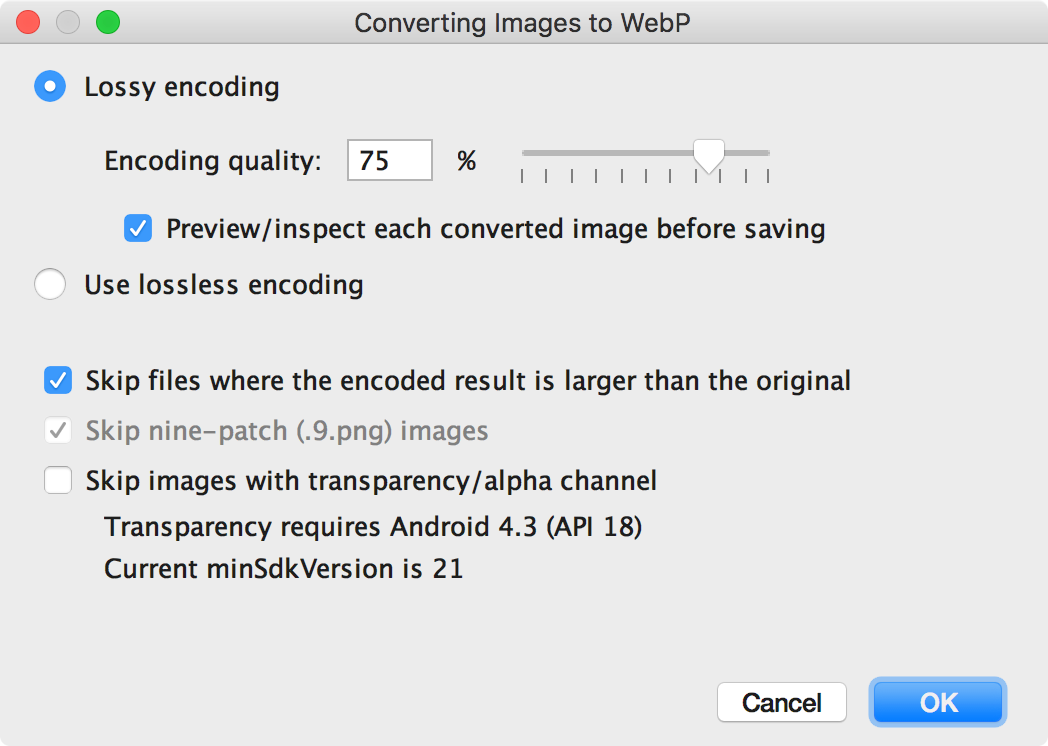
Figure 1. The Converting Images to
WebP dialog.
Select either lossy or lossless encoding.
Lossless encoding is
only available if your minSdkVersion is set to 18 or higher.
If you select lossy encoding, set the encoding quality and choose whether
to preview each converted image before saving.
You can also choose to skip the conversion of any files where the encoded
version would be larger than the original or any files with transparency
or an alpha channel. Because Android Studio only lets you
create transparent WebP images if your minSdkVersion is set
to 18 or higher, the Skip images with transparency/alpha channel
checkbox is automatically selected if your minSdkVersion
is lower than 18.
Note: 9-patch files can't be converted to WebP images. The
converter tool always automatically skips 9-patch images.
Click OK to begin the conversion.
If you are converting more than
one image, the conversion is a single step, and can be undone to revert all
the images you converted at once.
If you selected lossless conversion, the conversion happens
immediately. Your images are converted in their original
location. If you selected lossy conversion, continue to the next step.
If you selected lossy conversion and you chose to
preview each converted image before saving, Android Studio
shows you each image during the conversion so you can inspect the
conversion result. During
the preview step, you can adjust the quality setting for each image
individually, as shown in figure 2.
If you did not choose to preview the converted images, Android
Studio skips this step and converts your images immediately.
Figure 2. Previewing the conversion of a JPG image to WebP
format at 75% quality.
Figure 2 shows the original JPG image on the left and the lossy-encoded
WebP image on the right. The dialog shows the file size for the original
and the converted image. You can drag the slider left or right
to change the quality setting and immediately see the effect on the
encoded image and the file size.
The middle area shows the pixels that differ between the original image
and the encoded image. In figure 2, with the quality set to 75%, there's
almost no difference between the two images. Figure 3 shows the same image
encoded with the quality set to 0%.
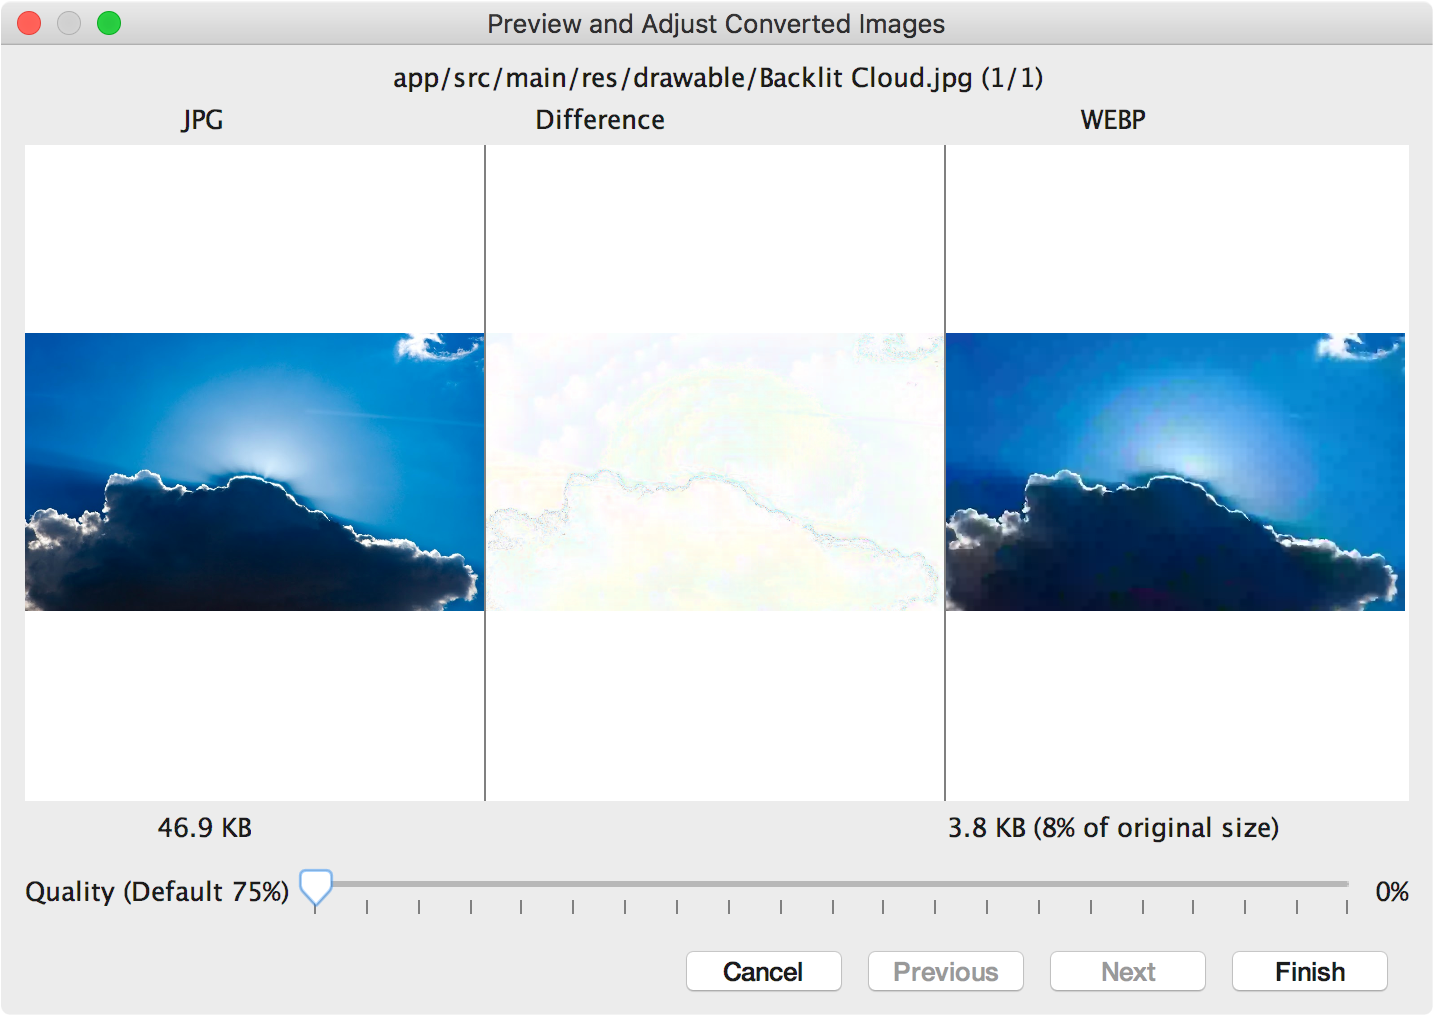
Figure 3. Previewing the conversion of a JPG image to WebP
format at 0% quality.
Note: If you set the quality to 100% and the
minSdkVersion is set to 18 or higher, Android Studio
automatically switches to lossless encoding instead.
Select a quality setting for each image you review. If you are converting
more than one image, click Next to advance to the next image.
Click Finish. Your images are converted in their original
location.
Convert WebP images to PNG
If you want to use a WebP image from your project for another purpose—for
example, in a web page that needs to correctly display images in a browser
without WebP support—you can use Android Studio to convert WebP images to PNG
format.
To convert a WebP image to PNG, proceed as follows:
Right-click a WebP image in Android Studio, and then click Convert to
PNG.
A dialog appears, asking whether you would like to
delete the original WebP file after conversion or keep the original WebP
file as well as the new PNG file.
Click Yes to delete the original WebP file or No
to retain the WebP file in addition to the PNG file. Your image is converted
immediately.
Content and code samples on this page are subject to the licenses described in the Content License. Java and OpenJDK are trademarks or registered trademarks of Oracle and/or its affiliates.
Last updated 2023-04-12 UTC.
[[["Easy to understand","easyToUnderstand","thumb-up"],["Solved my problem","solvedMyProblem","thumb-up"],["Other","otherUp","thumb-up"]],[["Missing the information I need","missingTheInformationINeed","thumb-down"],["Too complicated / too many steps","tooComplicatedTooManySteps","thumb-down"],["Out of date","outOfDate","thumb-down"],["Samples / code issue","samplesCodeIssue","thumb-down"],["Other","otherDown","thumb-down"]],["Last updated 2023-04-12 UTC."],[],[],null,["# Create WebP images\n\n[WebP](https://developers.google.com/speed/webp/) is an image file format from\nGoogle that provides lossy compression (like JPEG) as well as transparency (like\nPNG) but can provide better compression than either JPEG or PNG. Lossy WebP\nimages are supported in Android 4.0 (API level 14) and higher, and lossless and\ntransparent WebP images are supported in Android 4.3 (API level 18) and higher.\nThis page shows how to convert images to WebP format and how to convert WebP\nimages to PNG format.\n| **Note:** Because support for lossless and transparent WebP images is only available in Android 4.3 and higher, your project must declare a `minSdkVersion` of 18 or higher to create lossless or transparent WebP images using Android Studio.\n\nFor more information about\nselecting the correct image format to improve download speed, see [Reduce image\ndownload sizes](/topic/performance/network-xfer#webp).\n\nConvert images to WebP\n----------------------\n\nAndroid Studio can convert PNG, JPG, BMP, or static GIF images to WebP format.\nYou can convert individual images or folders of images.\n\nTo convert an image or folder of images, proceed as follows:\n\n1. Right-click an image file or a folder containing image files, and then click **Convert to WebP**.\n2. The **Converting Images to WebP** dialog opens. The default settings\n depend on the `minSdkVersion` setting for the current module.\n\n \u003cbr /\u003e\n\n **Figure 1.** The Converting Images to WebP dialog.\n3.\n Select either lossy or lossless encoding.\n\n Lossless encoding is only available if your `minSdkVersion` is set to 18 or higher.\n\n If you select lossy encoding, set the encoding quality and choose whether\n to preview each converted image before saving.\n\n\n You can also choose to skip the conversion of any files where the encoded\n version would be larger than the original or any files with transparency\n or an alpha channel. Because Android Studio only lets you\n create transparent WebP images if your `minSdkVersion` is set\n to 18 or higher, the **Skip images with transparency/alpha channel**\n checkbox is automatically selected if your `minSdkVersion`\n is lower than 18.\n\n\n **Note:** 9-patch files can't be converted to WebP images. The\n converter tool always automatically skips 9-patch images.\n4. Click **OK** to begin the conversion.\n\n If you are converting more than\n one image, the conversion is a single step, and can be undone to revert all\n the images you converted at once.\n\n If you selected lossless conversion, the conversion happens\n immediately. Your images are converted in their original\n location. If you selected lossy conversion, continue to the next step.\n5.\n If you selected lossy conversion and you chose to\n preview each converted image before saving, Android Studio\n shows you each image during the conversion so you can inspect the\n conversion result. During\n the preview step, you can adjust the quality setting for each image\n individually, as shown in figure 2.\n\n If you did not choose to preview the converted images, Android\n Studio skips this step and converts your images immediately.\n **Figure 2.** Previewing the conversion of a JPG image to WebP format at 75% quality.\n\n\n Figure 2 shows the original JPG image on the left and the lossy-encoded\n WebP image on the right. The dialog shows the file size for the original\n and the converted image. You can drag the slider left or right\n to change the quality setting and immediately see the effect on the\n encoded image and the file size.\n\n\n The middle area shows the pixels that differ between the original image\n and the encoded image. In figure 2, with the quality set to 75%, there's\n almost no difference between the two images. Figure 3 shows the same image\n encoded with the quality set to 0%.\n **Figure 3.** Previewing the conversion of a JPG image to WebP format at 0% quality.\n\n **Note:** If you set the quality to 100% and the\n `minSdkVersion` is set to 18 or higher, Android Studio\n automatically switches to lossless encoding instead.\n\n Select a quality setting for each image you review. If you are converting\n more than one image, click **Next** to advance to the next image.\n6. Click **Finish**. Your images are converted in their original location.\n\nConvert WebP images to PNG\n--------------------------\n\nIf you want to use a WebP image from your project for another purpose---for\nexample, in a web page that needs to correctly display images in a browser\nwithout WebP support---you can use Android Studio to convert WebP images to PNG\nformat.\n\nTo convert a WebP image to PNG, proceed as follows:\n\n1. Right-click a WebP image in Android Studio, and then click **Convert to\n PNG**.\n2. A dialog appears, asking whether you would like to\n delete the original WebP file after conversion or keep the original WebP\n file as well as the new PNG file.\n\n Click **Yes** to delete the original WebP file or **No**\n to retain the WebP file in addition to the PNG file. Your image is converted\n immediately."]]