
Firebase 기반의 Android 기기 스트리밍을 사용하면 Google의 보안 데이터 센터 및 Android 파트너 기기 연구소에 호스팅된 원격 실제 Android 기기에 안전하게 연결할 수 있습니다. Google Pixel 9, 9a 9 Pro, Pixel Fold, Samsung, OPPO, OnePlus, Xiaomi, vivo, Transsion의 다양한 모델을 비롯한 최신 Android 기기의 실제 기기에서 앱을 테스트하는 가장 빠르고 쉬운 방법입니다.
현재 기기 스트리밍은 Spark 요금제의 Firebase 프로젝트에서 무료로 사용해 볼 수 있습니다. 월별 무료 사용 시간을 초과하는 사용량에는 요금이 청구될 수 있습니다. 자세한 내용은 Android 기기 스트리밍 가격 책정 을 참고하세요.
기기에 연결한 후 Android 스튜디오를 종료하지 않고도 앱을 배포하고, 디스플레이를 보고, 기기와 상호작용 (기기 회전 또는 펼치기 포함)하고, SSL 연결을 통한 ADB를 사용하여 기기로 할 수 있는 모든 작업을 할 수 있습니다. 기기 사용이 끝나면 Google은 모든 데이터를 삭제하고 기기를 초기화한 후 다른 개발자가 사용할 수 있도록 합니다.
시작하기
시작하려면 다음 단계를 따르세요.
- 아직 다운로드 및 설치하지 않았다면 최신 버전의 Android 스튜디오를 다운로드하여 설치합니다. 출시되지 않은 기능을 미리 사용해 보려면 최신 카나리아 버전을 다운로드하여 설치하세요.
- Android 스튜디오 프로젝트를 엽니다.
- View > Tool Windows > Device Manager 로 이동하여 창 상단 근처에 있는 Firebase 버튼을 클릭합니다.
- 개발자 계정에 아직 로그인하지 않았다면 Google에 로그인 을 클릭하여 안내를 따릅니다. Android 스튜디오에 Firebase 액세스 권한을 부여한 후 IDE로 돌아갑니다.
- Firebase 프로젝트를 선택합니다. 현재 청구 주기에 남은 할당량 또는 사용된 시간을 확인할 수도 있습니다.
- Firebase 프로젝트가 없는 경우 Firebase Console에서 무료로 만들 수 있습니다. 새 프로젝트를 만든 후 Android 스튜디오에서 선택할 수 있게 되기까지 약간의 지연이 있을 수 있습니다.
- 선택한 프로젝트에서 기기 스트리밍을 사용할 적절한 권한이 없다는 오류가 발생하면 안내에 따라 권한을 사용 설정합니다.
- 확인 을 클릭합니다.
기본 기기 세트가 기기 관리도구에 자동으로 표시되어 사용할 수 있습니다. 기기 옆에 있는 시작 작업을 클릭하거나 기본 툴바의 배포 대상 드롭다운에서 기기를 선택하고 평소와 같이 앱을 배포하여 기기에 연결할 수 있습니다.
Android 스튜디오에서 요청한 기기를 예약하고 연결하면 Running Devices 창이 표시됩니다. 세션을 연장하려면 Running Devices 창 툴바에서 Extend Reservation 버튼을 클릭하고 세션을 연장할 기간을 선택합니다.
권한 사용
기기 스트리밍을 사용하려면 편집자 또는 소유자 권한이 있는 Firebase 프로젝트를 사용해야 합니다.
- Google Cloud Console의 IAM 섹션으로 이동합니다.
- 보안 주체별로 보기 > 액세스 권한 부여 를 클릭합니다.
- 기기 스트리밍에 액세스할 수 있도록 하려는 각 사용자의 사용자 ID를 추가합니다.
- 역할 선택 드롭다운에서 Firebase Test Lab 직접 액세스 관리자 역할을 선택합니다.
- 다른 역할 추가 를 클릭하고 역할 선택 드롭다운에서 서비스 사용량 소비자 를 선택합니다.
- 저장 을 클릭하여 변경사항을 저장합니다.
전체 기기 카탈로그 사용해 보기
추가 기기를 탐색하고 기기 관리도구에 추가하려면 다음 단계를 따르세요.
- 기기 관리도구에서 + > 원격 기기 선택 을 클릭합니다.
- 표시되는 카탈로그에서 각 기기 옆에 있는 체크박스를 선택하여 원하는 기기를 선택할 수 있습니다.
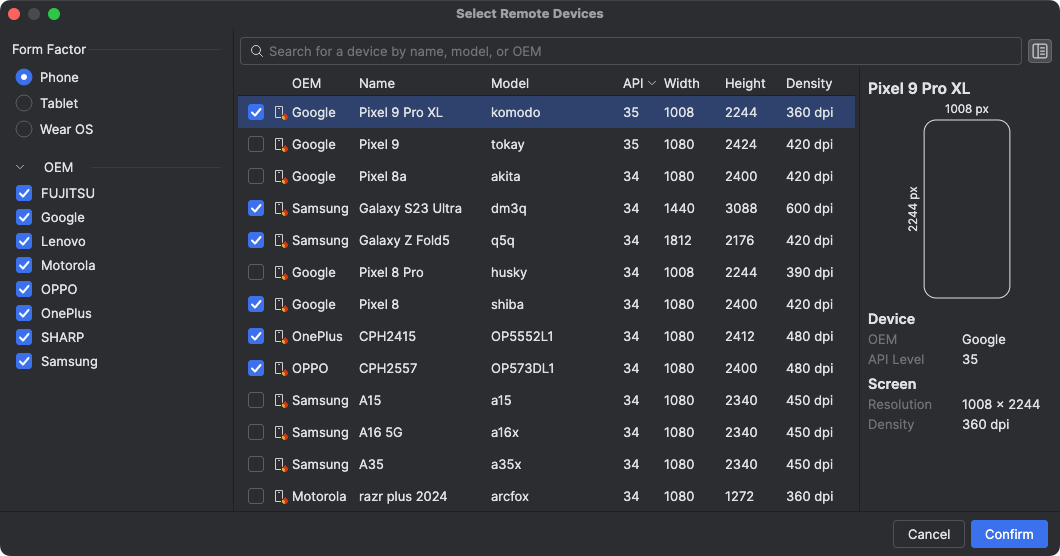
- 확인 을 클릭합니다. 선택한 기기가 기기 관리도구에 표시됩니다.
세션 종료
기기 사용이 끝나면 기기 관리도구의 기기 오버플로 메뉴 또는 Running Devices 창에서 기기 탭을 닫은 후 표시되는 알림에서 Return and Erase Device 를 클릭해야 합니다. 이렇게 하면 기기 사용 시간을 불필요하게 사용하지 않고 다른 개발자가 사용할 수 있게 되기 전에 기기가 즉시 삭제되고 초기화됩니다. 세션에서 사용하지 않은 시간은 프로젝트로 반환됩니다.
Android 파트너 기기 연구소에 연결
Android 파트너 기기 연구소는 Samsung, Xiaomi, OPPO, OnePlus, vivo, Transsion 등 Google OEM 파트너가 운영하는 기기 연구소로, Android 기기 스트리밍에서 사용할 수 있는 기기 선택을 확장합니다. 이 서비스는 Android 스튜디오 Narwhal Feature Drop부터 안정화 버전 채널에서 사용할 수 있습니다.
시작하려면 다음 안내를 따르세요.
- 기기 관리도구에서 + > 원격 기기 선택 을 클릭합니다.
- 표시되는 기기 카탈로그에서 사용하려는 Android 파트너 기기 연구소의 기기를 선택합니다. 파트너 연구소의 기기는 기기 아이콘과 카탈로그의 '연구소' 열로 표시됩니다. 기기 연구소 필터를 사용하면 하나 이상의 기기 연구소의 기기를 필터링할 수 있습니다.
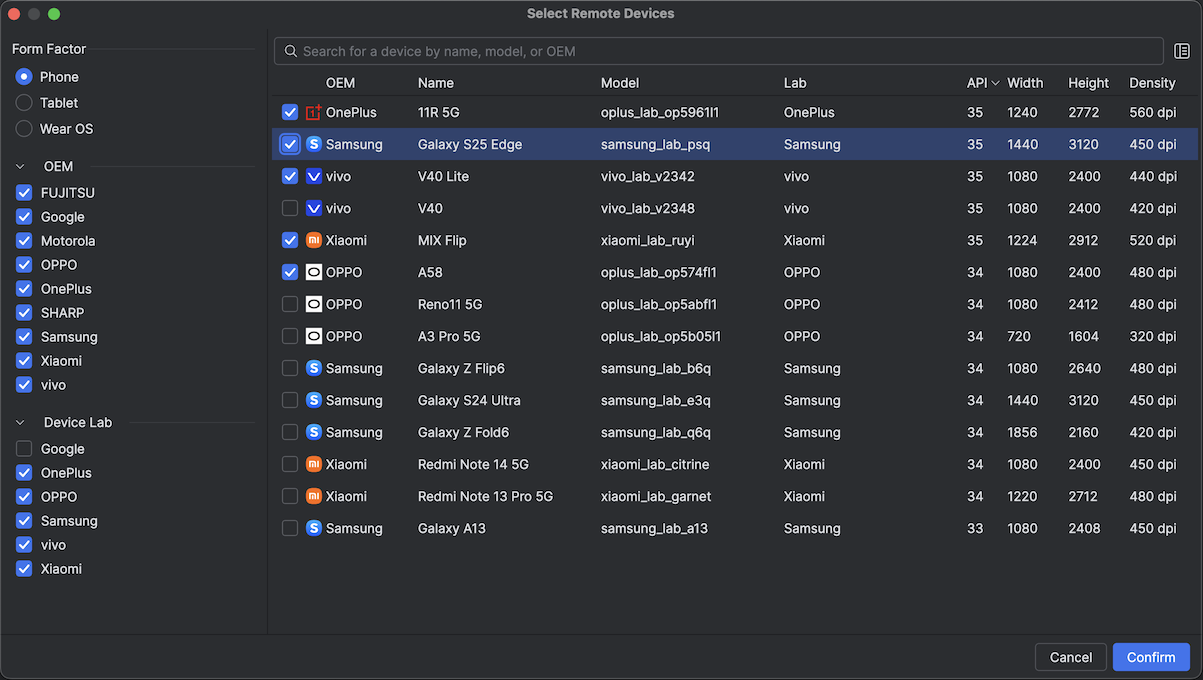
- 확인 을 클릭합니다.
- 기기 관리도구에서 다른 Android 기기 스트리밍 기기와 마찬가지로 파트너 연구소 기기에 연결할 수 있습니다.
Google Cloud Console에서 파트너 기기 연구소 사용 설정
선택한 Firebase 프로젝트에 필요한 파트너 연구소가 사용 설정되어 있지 않으면 Android 스튜디오에서 알림을 표시하며, 안내에 따라 선택한 파트너 연구소를 사용 설정할 수 있습니다.
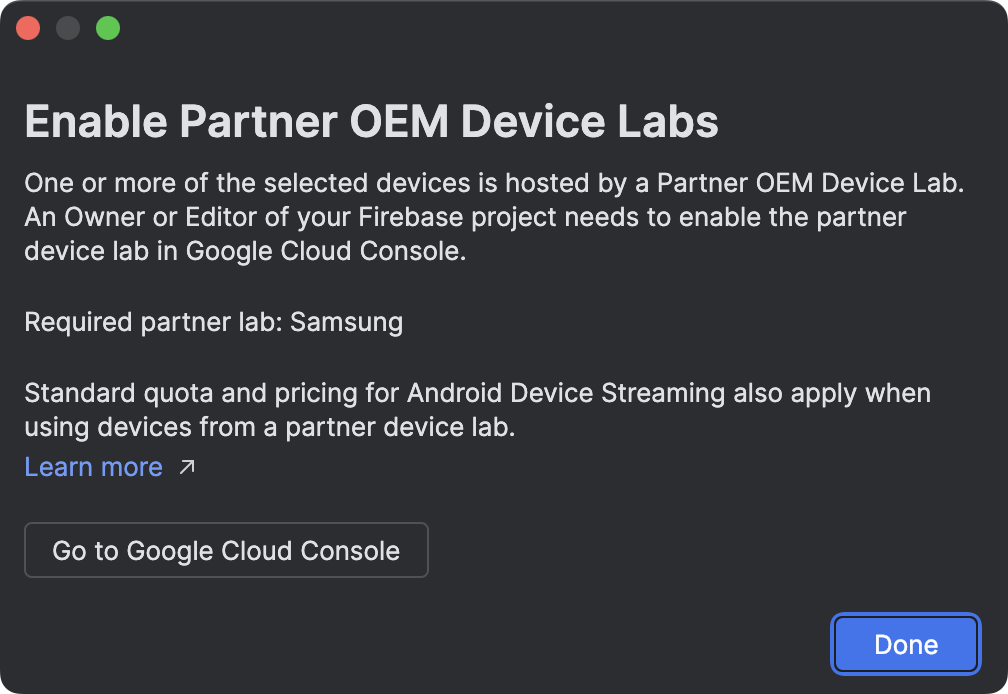
Google Cloud Console의 파트너 기기 연구소 페이지에서 각 파트너 연구소를 사용 설정하려면 프로젝트의 편집자 또는 소유자가 필요합니다. 파트너 연구소를 사용 설정하는 방법은 다음과 같습니다.
- 페이지 상단에서 올바른 Google Cloud 프로젝트가 선택되어 있는지 확인합니다.
- 사용 설정하려는 기기 연구소의 전환 버튼을 클릭하고 안내를 따릅니다.
- 파트너 연구소가 사용 설정되면 사용자와 팀에서 Android 스튜디오의 기기를 사용할 수 있습니다.
Android 기기 스트리밍 가격 책정
자세한 내용은 Firebase 사용량 수준, 할당량, 가격 책정을 참고하세요.
자주 묻는 질문(FAQ)
Firebase 기반의 Android 기기 스트리밍의 차별화 요소는 무엇인가요?
기기, 보안, 기능입니다. Android 기기 스트리밍을 사용하면 최신 Android 기기에 최대한 빨리 액세스할 수 있습니다. 또한 이 서비스는 다양한 구성과 API 수준에 액세스할 수 있도록 일부 이전 기기를 지원합니다. 이러한 기기는 보안 데이터 센터에 보관되므로 세션이 안전하고 다른 사용자가 사용할 수 있게 되기 전에 기기가 초기화되고 삭제됩니다.
마지막으로 이 서비스는 Android 스튜디오와 직접 통합되어 있으며 SSL 연결을 통한 ADB를 통해 액세스할 수 있으므로 ADB를 통해 매일 사용하는 도구가 기기 스트리밍과 원활하게 작동합니다.
서비스 비용은 얼마인가요?
가격 책정 세부정보는 Android 기기 스트리밍 가격 책정을 참고하세요.
세션은 안전한가요? 세션이 끝나면 어떻게 되나요?
각 기기는 Google의 보안 데이터 센터에 있으며 SSL 연결을 통한 ADB를 사용하여 워크스테이션에 연결됩니다. 세션이 끝나면 기기 데이터가 완전히 삭제되고 초기화된 후 다른 개발자가 사용할 수 있게 됩니다.
Android 스튜디오를 사용해야 하나요?
서비스에 연결하고 기기를 요청하려면 Android 스튜디오 Jellyfish 이상이 필요하지만 SSL 연결을 통한 직접 ADB를 사용하면 기기를 예약하고 연결한 후 ADB를 사용하여 테스트 기기와 통신하는 모든 도구 또는 IDE를 사용할 수 있습니다.
권한
서비스 권한을 참고하세요.