
تتيح لك ميزة "بث التطبيقات على أجهزة Android"، التي تستند إلى Firebase، الاتصال بشكل آمن بأجهزة Android فعلية بعيدة تتم استضافتها في مراكز بيانات Google الآمنة وفي مختبرات أجهزة شركاء Android. وهي أسرع وأسهل طريقة لاختبار تطبيقك على وحدات فعلية من بعض أحدث أجهزة Android، بما في ذلك Google Pixel 9 و9a و9 Pro وPixel Fold ومجموعة متنوعة من الطُرز من Samsung وOPPO وOnePlus وXiaomi وvivo وTranssion.
في الوقت الحالي، تتوفّر لك ميزة البث على الأجهزة لتجربتها بدون أي تكلفة مع مشاريع Firebase ضمن خطة Spark. قد يتم تحصيل رسوم مقابل الاستخدام الذي يتجاوز عدد الدقائق الشهرية بدون تكلفة. يمكنك الاطّلاع على أسعار ميزة "بث التطبيقات على أجهزة Android" للحصول على مزيد من المعلومات.
بعد الاتصال بجهاز، يمكنك نشر تطبيقك وعرض الشاشة والتفاعل مع الجهاز (بما في ذلك تدوير الجهاز أو فتحه) وتنفيذ أي إجراء آخر يمكنك تنفيذه باستخدام اتصال ADB عبر SSL، وكل ذلك بدون مغادرة Android Studio. عند الانتهاء من استخدام الجهاز، تمحو Google جميع بياناتك وتعيد ضبط الجهاز على الإعدادات الأصلية قبل إتاحته لمطوّر آخر.
البدء
للبدء، اتّبِع الخطوات التالية:
- إذا لم يسبق لك إجراء ذلك، نزِّل الإصدار الأخير من Android Studio وثبِّته. إذا أردت استخدام الميزات قبل إطلاقها، نزِّل أحدث إصدار من Canary وثبِّته.
- افتح مشروعًا في "استوديو Android".
- انتقِل إلى عرض > نوافذ الأدوات > "إدارة الأجهزة" (View > Tool Windows > Device Manager) وانقر على زر Firebase بالقرب من أعلى النافذة.
- إذا لم تكن مسجِّلاً الدخول إلى حساب المطوِّر، انقر على تسجيل الدخول إلى Google واتّبِع التعليمات. بعد منح "استوديو Android" الإذن بالوصول إلى Firebase، ارجع إلى بيئة التطوير المتكاملة (IDE).
- اختَر مشروعًا على Firebase. يمكنك أيضًا الاطّلاع على مقدار مساحة التخزين المتبقية أو الدقائق المستخدَمة في دورة الفوترة الحالية.
- إذا لم يكن لديك مشروع على Firebase، يمكنك إنشاء مشروع بدون أي تكلفة في وحدة تحكّم Firebase. يُرجى العِلم أنّه قد يحدث تأخير بسيط بين إنشاء مشروع جديد وإمكانية اختياره من "استوديو Android".
- إذا ظهرت لك رسالة خطأ تشير إلى أنّه ليس لديك الأذونات اللازمة لاستخدام ميزة "البث المباشر على الجهاز" مع المشروع المحدّد، اتّبِع التعليمات لتفعيل الأذونات.
- انقر على تأكيد.
من المفترض أن تظهر مجموعة تلقائية من الأجهزة تلقائيًا في "إدارة الأجهزة" لتتمكّن من استخدامها. يمكنك الاتصال بجهاز من خلال النقر على الإجراء بدء بجانب أحد الأجهزة، أو من خلال اختيار جهاز من القائمة المنسدلة الخاصة بهدف النشر في شريط الأدوات الرئيسي ونشر تطبيقك كما تفعل عادةً.
بعد أن يحجز Android Studio الجهاز الذي طلبته ويتصل به، ستظهر نافذة الأجهزة قيد التشغيل. لتمديد جلسة، انقر على الزر تمديد الحجز من شريط أدوات نافذة الأجهزة قيد التشغيل، ثم اختَر المدة التي تريد تمديد جلستك بها.
تفعيل الأذونات
لاستخدام ميزة "بث الأجهزة"، يجب استخدام مشروع على Firebase لديك فيه إذن محرِّر أو مالك.
إذا لم تكن لديك هذه الأذونات لمشاريعك الحالية على Firebase، يمكنك إما إنشاء مشروع جديد بصفتك "مالك" بدون أي تكلفة في وحدة تحكّم Firebase، أو أن تطلب من أحد أعضاء فريقك الذي لديه هذه الأذونات اتّباع الخطوات التالية:
- انتقِل إلى قسم "إدارة الهوية وإمكانية الوصول" في Google Cloud Console.
- انقر على العرض حسب المبادئ > منح إذن الوصول.
- أضِف أرقام تعريف المستخدمين لكل مستخدم تريد أن يتمكّن من الوصول إلى ميزة "بث الشاشة من الجهاز".
- باستخدام القائمة المنسدلة اختيار دور، اختَر دور مشرف الوصول المباشر إلى Firebase Test Lab.
- انقر على إضافة دور آخر واختَر مستخدم خدمة من القائمة المنسدلة اختيار دور.
- احفظ التغييرات من خلال النقر على حفظ.
تجربة قائمة الأجهزة الكاملة
لتصفّح أجهزة إضافية وإضافتها إلى "مدير الأجهزة"، اتّبِع الخطوات التالية:
- من "إدارة الأجهزة"، انقر على + > اختيار جهاز عن بُعد.
- في الكتالوج الذي يظهر، يمكنك اختيار الأجهزة التي تريدها من خلال وضع علامة في المربّع بجانب كل جهاز.
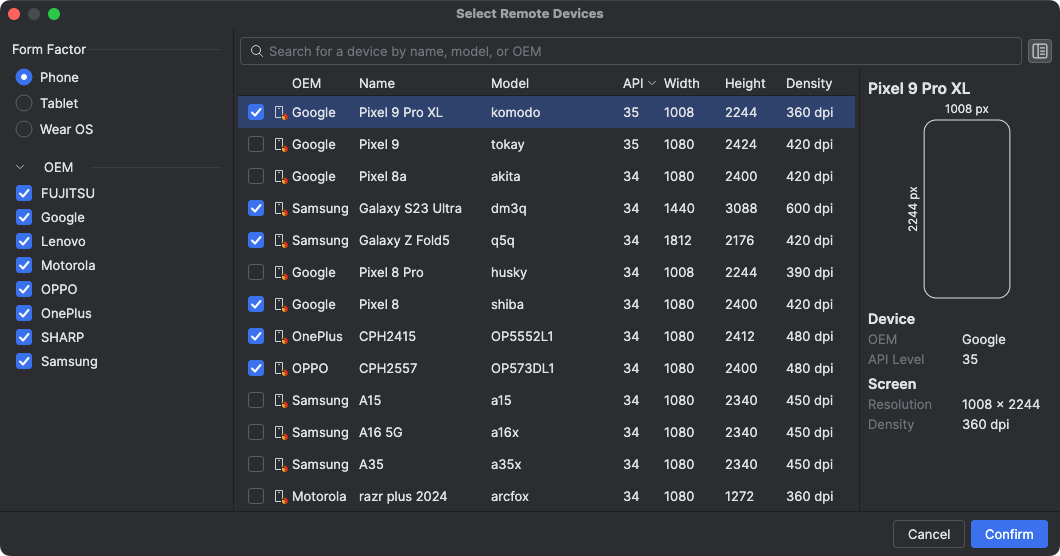
- انقر على تأكيد. من المفترض أن تظهر الأجهزة التي اخترتها الآن في "إدارة الأجهزة".
إنهاء جلستك
عند الانتهاء من استخدام جهاز، تذكَّر النقر على إرجاع الجهاز ومحو بياناته إما من قائمة الخيارات الإضافية للجهاز في "إدارة الأجهزة" أو من الإشعار الذي يظهر بعد إغلاق علامة تبويب الجهاز في نافذة "الأجهزة قيد التشغيل". يضمن ذلك عدم إضاعة دقائق الجهاز بدون داعٍ، كما يتم محو بيانات جهازك وإعادة ضبطه على الإعدادات الأصلية فورًا قبل إتاحته لمطوّر آخر. يتم ردّ أي دقائق غير مستخدَمة من جلستك إلى مشروعك.
الانضمام إلى مختبرات أجهزة شركاء Android
مختبرات أجهزة شركاء Android هي مختبرات أجهزة يديرها شركاء Google من المصنّعين الأصليين للأجهزة، مثل Samsung وXiaomi وOPPO وOnePlus وvivo وTranssion وغيرهم، وتوسّع مجموعة الأجهزة المتاحة في خدمة "بث أجهزة Android". تتوفّر هذه الخدمة في القناة الثابتة، بدءًا من الإصدار الرابع من ميزات Android Studio Narwhal.
للبدء، يمكنك تنفيذ ما يلي:
- في "إدارة الأجهزة"، انقر على + > اختيار الأجهزة البعيدة.
- في قائمة الأجهزة التي تظهر، اختَر جهازًا من مختبر Android Partner
Device Lab الذي تريد استخدامه. يتم تمييز الأجهزة من مختبرات الشركاء برمز الجهاز وعمود "المختبر" في القائمة. تساعدك فلاتر معمل الأجهزة في فلترة الأجهزة من معمل أجهزة واحد أو أكثر.
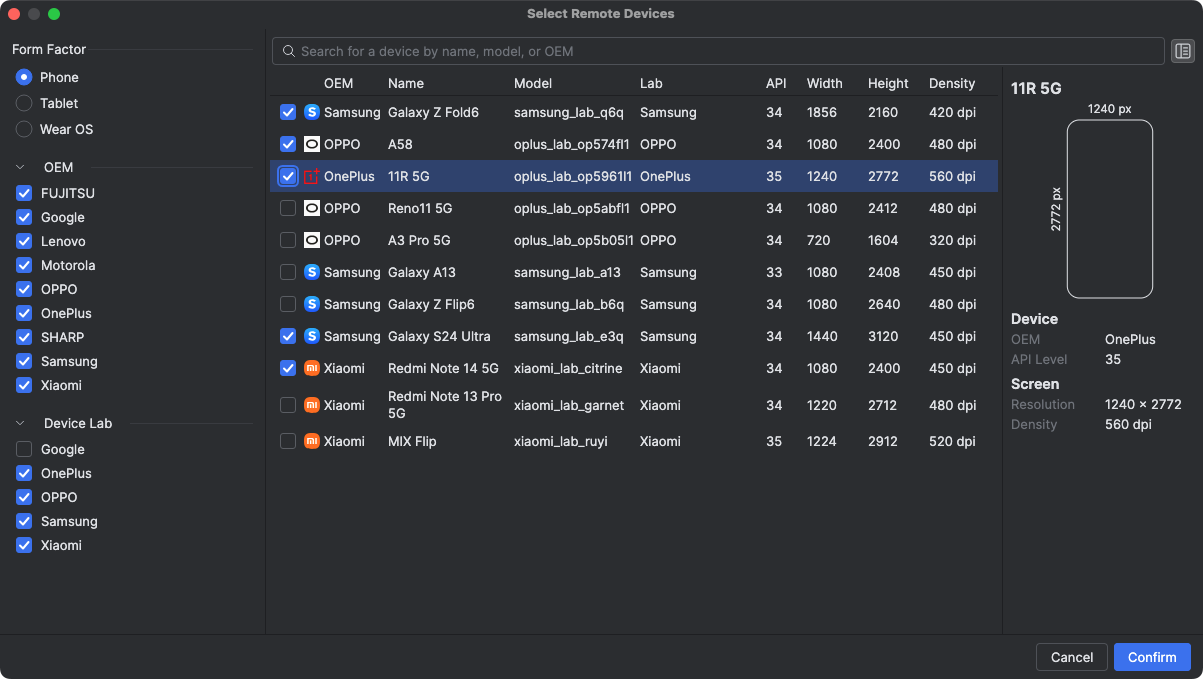
- انقر على تأكيد.
- من "إدارة الأجهزة"، يمكنك الاتصال بجهاز المختبر الشريك كما تفعل مع أي جهاز آخر من أجهزة "البث المباشر على أجهزة Android".
تفعيل "مختبرات الأجهزة الشريكة" في Google Cloud Console
إذا لم يتم تفعيل مختبر الشريك المطلوب لمشروع Firebase الذي اخترته، سيُرسل إليك "استوديو Android" إشعارًا، ويمكنك اتّباع التعليمات لتفعيل مختبرات الشريك المحدّدة.

يجب أن يكون لديك دور "محرِّر" أو "مالك" للمشروع لتفعيل كل مختبر شريك في صفحة مختبرات الأجهزة الشريكة في Google Cloud Console. في ما يلي كيفية تفعيل ميزة اختبارية في حساب شريك:
- تأكَّد من اختيار مشروع Google Cloud الصحيح في أعلى الصفحة.
- انقر على زر التبديل الخاص بمختبر الأجهزة الذي تريد تفعيله واتّبِع التعليمات.
- بعد تفعيل "مختبر الشريك"، يمكنك أنت وفريقك استخدام الأجهزة في "استوديو Android".
أسعار ميزة "بثّ المحتوى إلى أجهزة Android"
لمزيد من المعلومات، اطّلِع على مستويات الاستخدام والحصص والأسعار في Firebase.
الأسئلة الشائعة
ما الذي يميّز ميزة "بث التطبيقات على أجهزة Android" المستندة إلى Firebase؟
الأجهزة والأمان والميزات من خلال خدمة "بث أجهزة Android"، يمكنك الحصول على بعض أحدث أجهزة Android في أسرع وقت ممكن. بالإضافة إلى ذلك، تتيح الخدمة عددًا محدّدًا من الأجهزة القديمة، ما يتيح لك الوصول إلى مجموعة كبيرة من الإعدادات ومستويات واجهة برمجة التطبيقات. وبما أنّ هذه الأجهزة يتم تخزينها في مراكز بيانات آمنة، تكون جلساتك آمنة ويتم إعادة ضبط أجهزتك على الإعدادات الأصلية ومحو بياناتها قبل أن تصبح متاحة لمستخدم آخر.
أخيرًا، يتم دمج الخدمة مباشرةً مع "استوديو Android" ويمكن الوصول إليها عبر اتصال ADB عبر طبقة المقابس الآمنة، وبالتالي تعمل الأدوات التي تستخدمها يوميًا عبر ADB بسلاسة مع ميزة "بث الجهاز".
كم تبلغ تكلفة الخدمة؟
للاطّلاع على تفاصيل الأسعار، يُرجى الانتقال إلى أسعار ميزة "بث Android على الأجهزة".
هل جلستي آمنة وماذا يحدث عند انتهائها؟
يقع كل جهاز في مراكز بيانات Google الآمنة ويتصل بمحطة العمل باستخدام اتصال ADB عبر SSL. عند انتهاء جلستك، يتم محو بيانات الجهاز بالكامل وإعادة ضبطه على الإعدادات الأصلية قبل إتاحته لمطوّر آخر.
هل يجب استخدام "استوديو Android"؟
على الرغم من أنّ استخدام Android Studio Jellyfish أو إصدار أحدث مطلوب للاتصال بالخدمة وطلب جهاز، يتيح لك الاتصال المباشر عبر بروتوكول تصحيح الأخطاء عبر USB (ADB) من خلال طبقة المقابس الآمنة استخدام أي أدوات أو بيئات تطوير متكاملة تستخدم بروتوكول تصحيح الأخطاء عبر USB (ADB) للتواصل مع الأجهزة الاختبارية بعد حجز جهاز والاتصال به.
الأذونات
يُرجى الاطّلاع على أذونات الخدمة.