En Android 11 y versiones posteriores, la función Controles de dispositivos de Acceso rápido permite al usuario ver y controlar rápidamente dispositivos externos, como luces, termostatos y cámaras, desde una indicación visual de usuario en tres interacciones desde un selector predeterminado. El OEM del dispositivo elige qué selector usa. Los agregadores de dispositivos (por ejemplo, Google Home) y las apps de proveedores externos pueden proporcionar dispositivos para mostrar en este espacio. En esta página, se explica cómo mostrar los controles del dispositivo en este espacio y vincularlos a tu app de control.
Para agregar esta compatibilidad, crea y declara un ControlsProviderService. Crea los controles que tu app admite según los tipos de controles predefinidos y luego crea publicadores para estos controles.
Interfaz de usuario
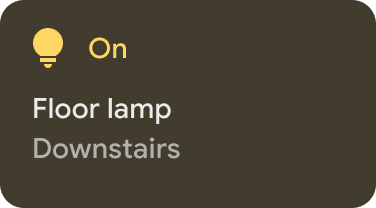
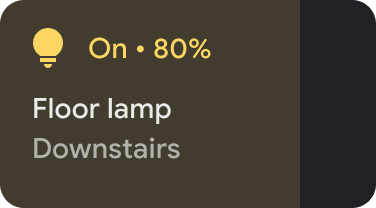
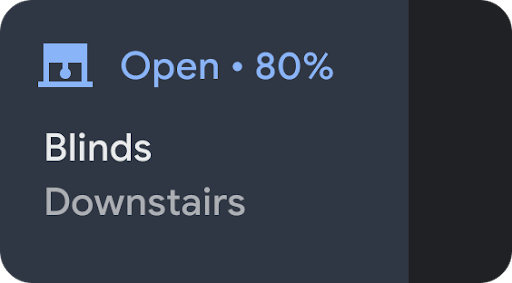
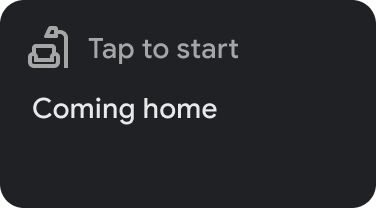
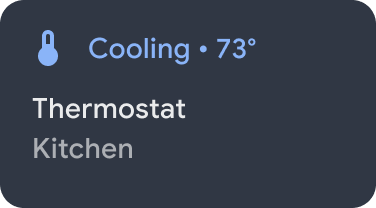
Se muestran los dispositivos en Controles de dispositivos como widgets con plantilla. Hay cinco widgets de control de dispositivos disponibles, como se muestra en la siguiente figura:
 |
 |
|
 |
|
Si mantienes presionado un widget, accederás a la app para obtener un mayor control. Puedes personalizar el ícono y el color de cada widget, pero, para obtener la mejor experiencia del usuario, usa el ícono y el color predeterminados si el conjunto predeterminado coincide con el dispositivo.
Cómo crear el servicio
En esta sección, se muestra cómo crear el
ControlsProviderService.
Este servicio le indica a la IU del sistema Android que tu app contiene controles de dispositivos que deberían aparecer en el área Controles de dispositivos de la IU de Android.
La API de ControlsProviderService asume que conoces el funcionamiento de las transmisiones reactivas, como se
define en el proyecto de GitHub sobre transmisiones reactivas
y se implementa en las interfaces de Java 9 Flow.
La API se basa en los siguientes conceptos:
- Publicador: Tu aplicación es el publicador.
- Suscriptor: La IU del sistema es el suscriptor y puede solicitar varios controles al publicador.
- Suscripción: Es el período durante el cual el publicador puede enviar actualizaciones a la IU del sistema. El publicador o el suscriptor pueden cerrar esta ventana.
Cómo declarar el servicio
Tu app debe declarar un servicio, como MyCustomControlService, en su manifiesto de la app.
El servicio debe incluir un filtro de intents para ControlsProviderService. Este filtro permite que las aplicaciones aporten controles a la IU del sistema.
También necesitas una label que se muestre en los controles de la IU del sistema.
En el siguiente ejemplo, se muestra cómo declarar un servicio:
<service
    android:name="MyCustomControlService"
    android:label="My Custom Controls"
    android:permission="android.permission.BIND_CONTROLS"
    android:exported="true"
    >
    <intent-filter>
      <action android:name="android.service.controls.ControlsProviderService" />
    </intent-filter>
</service>
A continuación, crea un archivo de Kotlin nuevo llamado MyCustomControlService.kt y haz que extienda ControlsProviderService():
Kotlin
    class MyCustomControlService : ControlsProviderService() {
        ...
    }
Java
    public class MyCustomJavaControlService extends ControlsProviderService {
        ...
    }
Cómo seleccionar el tipo de control correcto
La API proporciona métodos de compilación para crear los controles. Para propagar el compilador, determina el dispositivo que deseas controlar y cómo interactúa el usuario con él. Completa los pasos siguientes:
- Elige el tipo de dispositivo que el control represente. La
DeviceTypesclase es una enumeración de todos los dispositivos compatibles. El tipo se usa para determinar los íconos y los colores del dispositivo en la IU. - Determina el nombre que verá el usuario, la ubicación del dispositivo (por ejemplo, la cocina) y otros elementos de texto de la IU asociados con el control.
- Elige la mejor plantilla para admitir la interacción del usuario. A los controles se les asigna una
ControlTemplatedesde la aplicación. Esta plantilla muestra directamente el estado del control al usuario, así como los métodos de entrada disponibles, es decir, elControlAction. En la siguiente tabla, se describen algunas de las plantillas disponibles y las acciones que admiten:
| Plantilla | Acción | Descripción |
ControlTemplate.getNoTemplateObject()
|
None
|
La aplicación puede usar esto para transmitir información sobre el control, pero el usuario no puede interactuar con él. |
ToggleTemplate
|
BooleanAction
|
Representa un control que se puede pasar de estado habilitado a inhabilitado
estados. El objeto BooleanAction contiene un campo que cambia
para representar el nuevo estado solicitado cuando el usuario presiona el control.
|
RangeTemplate
|
FloatAction
|
Representa un widget de control deslizante con valores mínimos, máximos y de pasos. Cuando
el usuario interactúa con el control deslizante, envía un nuevo FloatAction
objeto a la aplicación con el valor actualizado.
|
ToggleRangeTemplate
|
BooleanAction, FloatAction
|
Esta plantilla es una combinación de la ToggleTemplate y
RangeTemplate. Admite eventos táctiles y un control deslizante,
por ejemplo, para controlar luces atenuables.
|
TemperatureControlTemplate
|
ModeAction, BooleanAction, FloatAction
|
Además de encapsular las acciones anteriores, esta plantilla le permite al usuario configurar un modo, como calor, frío, calor/frío, ecológico o apagado. |
StatelessTemplate
|
CommandAction
|
Se usa para representar un control que proporciona capacidad táctil, pero del que no se puede determinar su estado , como un control remoto de televisión IR. Puedes usar esta plantilla para definir una rutina o macro, que es una agregación de cambios de control y de estado. |
Con esta información, puedes crear el control:
- Usa la clase de compilador
Control.StatelessBuildercuando no se conozca el estado del control. - Usa la
Control.StatefulBuilderclase de compilador cuando se conozca el estado del control.
Por ejemplo, para controlar una lámpara inteligente y un termostato, agrega las siguientes constantes a tu MyCustomControlService:
Kotlin
    private const val LIGHT_ID = 1234
    private const val LIGHT_TITLE = "My fancy light"
    private const val LIGHT_TYPE = DeviceTypes.TYPE_LIGHT
    private const val THERMOSTAT_ID = 5678
    private const val THERMOSTAT_TITLE = "My fancy thermostat"
    private const val THERMOSTAT_TYPE = DeviceTypes.TYPE_THERMOSTAT

    class MyCustomControlService : ControlsProviderService() {
      ...
    }
Java
    public class MyCustomJavaControlService extends ControlsProviderService {

    private final int LIGHT_ID = 1337;
    private final String LIGHT_TITLE = "My fancy light";
    private final int LIGHT_TYPE = DeviceTypes.TYPE_LIGHT;
    private final int THERMOSTAT_ID = 1338;
    private final String THERMOSTAT_TITLE = "My fancy thermostat";
    private final int THERMOSTAT_TYPE = DeviceTypes.TYPE_THERMOSTAT;

    ...
    }
Cómo crear publicadores para los controles
Después de crear el control, este necesita un publicador. El publicador informa a la IU del sistema que hay un control. La clase ControlsProviderService tiene dos métodos de publicador que debes anular en el código de la aplicación:
createPublisherForAllAvailable(): crea unPublisherpara todos los controles disponibles en tu app. UsaControl.StatelessBuilder()para compilar objetosControlpara este publicador.createPublisherFor(): Crea unPublisherpara una lista de controles determinados, reconocidos por sus identificadores de cadena. UsaControl.StatefulBuilderpara compilar estos objetosControl, ya que el publicador debe asignar un estado a cada control.
Cómo crear el publicador
Cuando tu app publica controles por primera vez en la IU del sistema, no conoce el estado de cada control. Obtener el estado puede ser una operación que requiere mucho tiempo y que implica muchos saltos en la red del proveedor del dispositivo. Usa el
createPublisherForAllAvailable()
método para anunciar al sistema los controles disponibles. Este método usa la clase de compilador Control.StatelessBuilder, ya que se desconoce el estado de cada control.
Una vez que los controles aparecen en la IU de Android , el usuario puede seleccionar los controles favoritos.
Para usar las corrutinas de Kotlin para crear un ControlsProviderService, agrega una nueva dependencia a tu build.gradle:
Groovy
dependencies {
    implementation "org.jetbrains.kotlinx:kotlinx-coroutines-jdk9:1.6.4"
}
Kotlin
dependencies {
    implementation("org.jetbrains.kotlinx:kotlinx-coroutines-jdk9:1.6.4")
}
Una vez que sincronices tus archivos de Gradle, agrega el siguiente fragmento a tu Service para implementar createPublisherForAllAvailable():
Kotlin
class MyCustomControlService : ControlsProviderService() { override fun createPublisherForAllAvailable(): Flow.Publisher= flowPublish { send(createStatelessControl(LIGHT_ID, LIGHT_TITLE, LIGHT_TYPE)) send(createStatelessControl(THERMOSTAT_ID, THERMOSTAT_TITLE, THERMOSTAT_TYPE)) } private fun createStatelessControl(id: Int, title: String, type: Int): Control { val intent = Intent(this, MainActivity::class.java) .putExtra(EXTRA_MESSAGE, title) .addFlags(Intent.FLAG_ACTIVITY_NEW_TASK) val action = PendingIntent.getActivity( this, id, intent, PendingIntent.FLAG_UPDATE_CURRENT or PendingIntent.FLAG_IMMUTABLE ) return Control.StatelessBuilder(id.toString(), action) .setTitle(title) .setDeviceType(type) .build() } override fun createPublisherFor(controlIds: List ): Flow.Publisher { TODO() } override fun performControlAction( controlId: String, action: ControlAction, consumer: Consumer ) { TODO() } }
Java
    public class MyCustomJavaControlService extends ControlsProviderService {

        private final int LIGHT_ID = 1337;
        private final String LIGHT_TITLE = "My fancy light";
        private final int LIGHT_TYPE = DeviceTypes.TYPE_LIGHT;
        private final int THERMOSTAT_ID = 1338;
        private final String THERMOSTAT_TITLE = "My fancy thermostat";
        private final int THERMOSTAT_TYPE = DeviceTypes.TYPE_THERMOSTAT;

        private boolean toggleState = false;
        private float rangeState = 18f;
        private final Map<String, ReplayProcessor> controlFlows = new HashMap<>();

        @NonNull
        @Override
        public Flow.Publisher createPublisherForAllAvailable() {
            List controls = new ArrayList<>();
            controls.add(createStatelessControl(LIGHT_ID, LIGHT_TITLE, LIGHT_TYPE));
            controls.add(createStatelessControl(THERMOSTAT_ID, THERMOSTAT_TITLE, THERMOSTAT_TYPE));
            return FlowAdapters.toFlowPublisher(Flowable.fromIterable(controls));
        }

        @NonNull
        @Override
        public Flow.Publisher createPublisherFor(@NonNull List controlIds) {
            ReplayProcessor updatePublisher = ReplayProcessor.create();

            controlIds.forEach(control -> {
                controlFlows.put(control, updatePublisher);
                updatePublisher.onNext(createLight());
                updatePublisher.onNext(createThermostat());
            });

            return FlowAdapters.toFlowPublisher(updatePublisher);
        }
    }
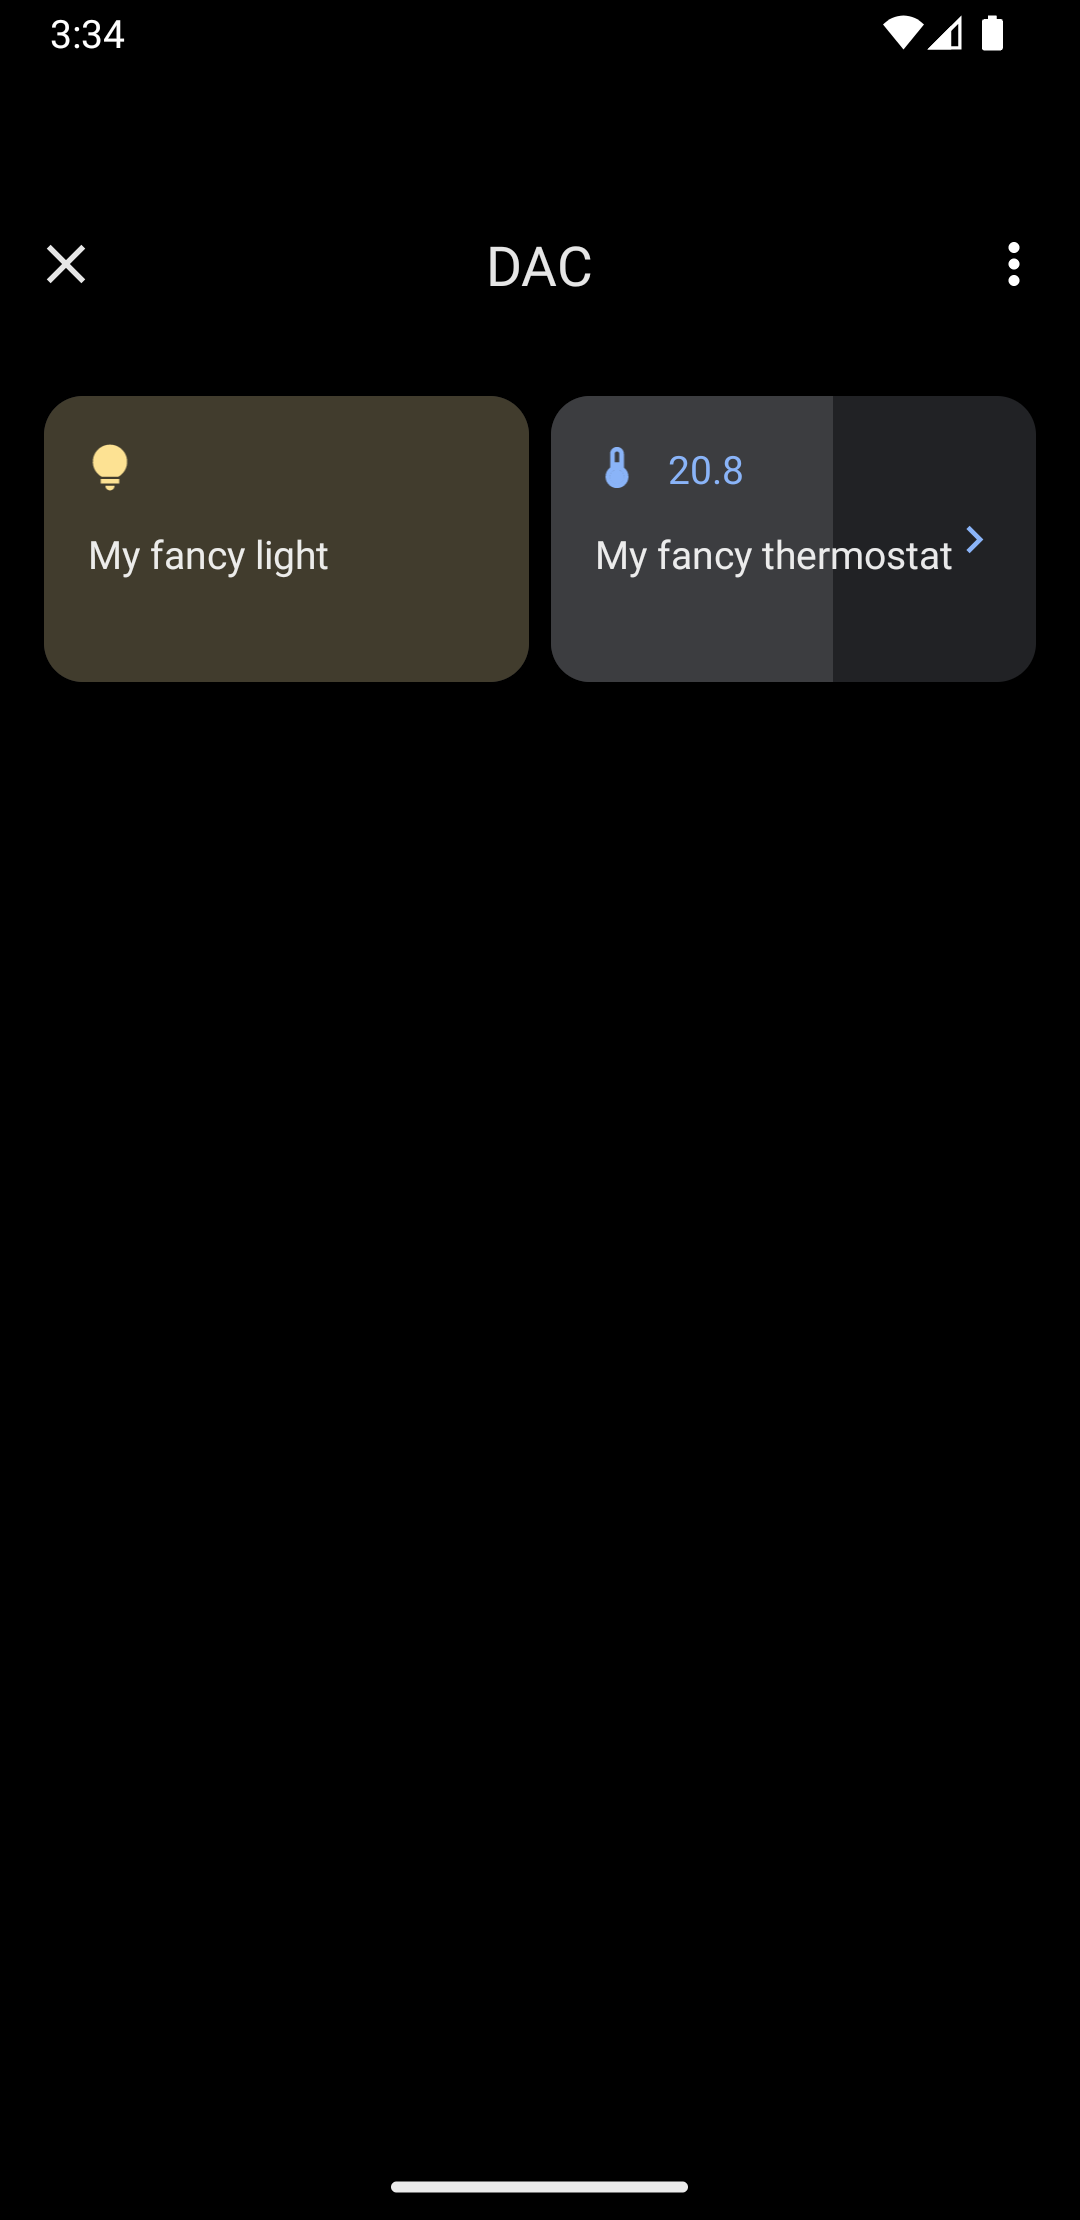
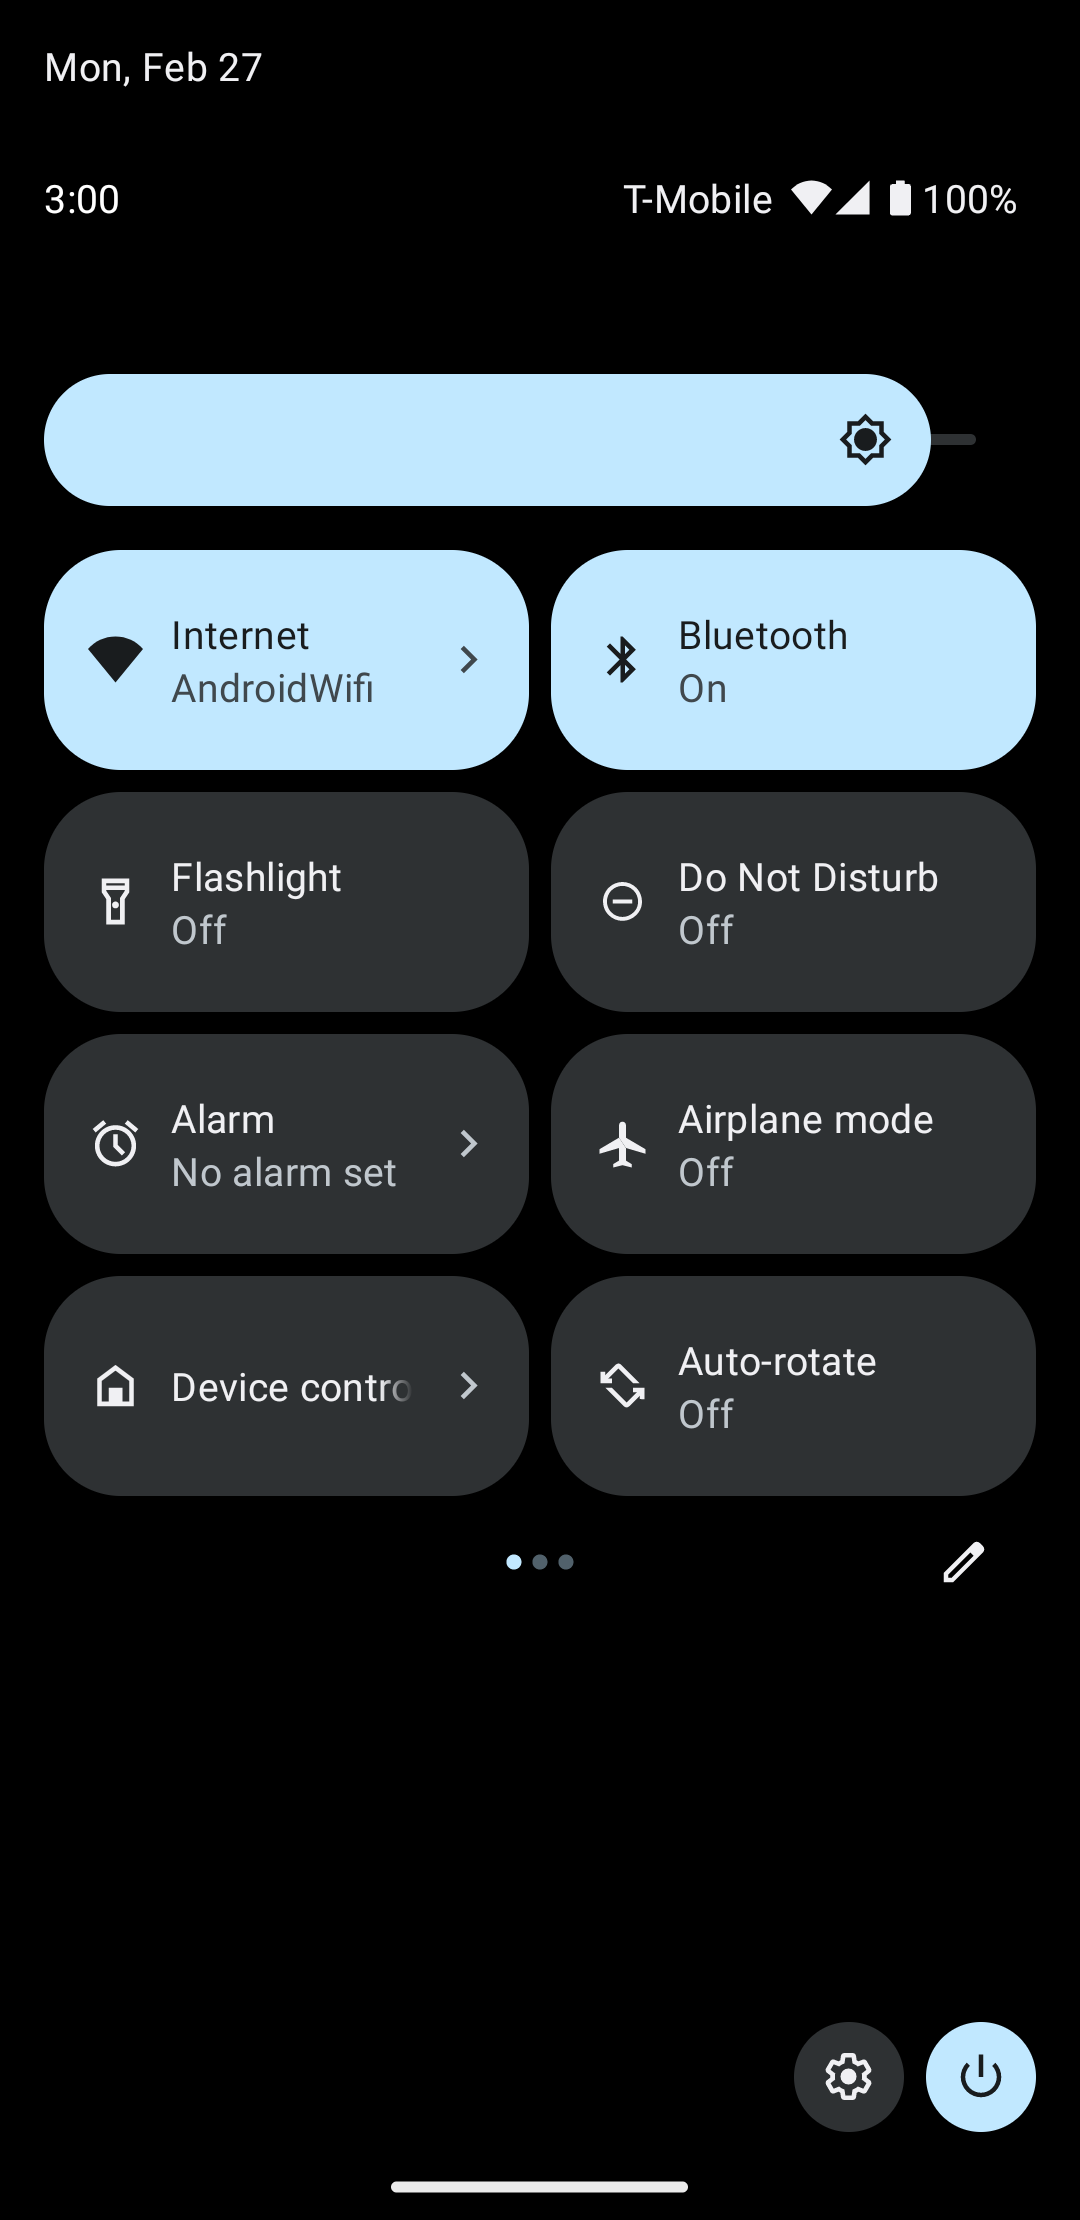
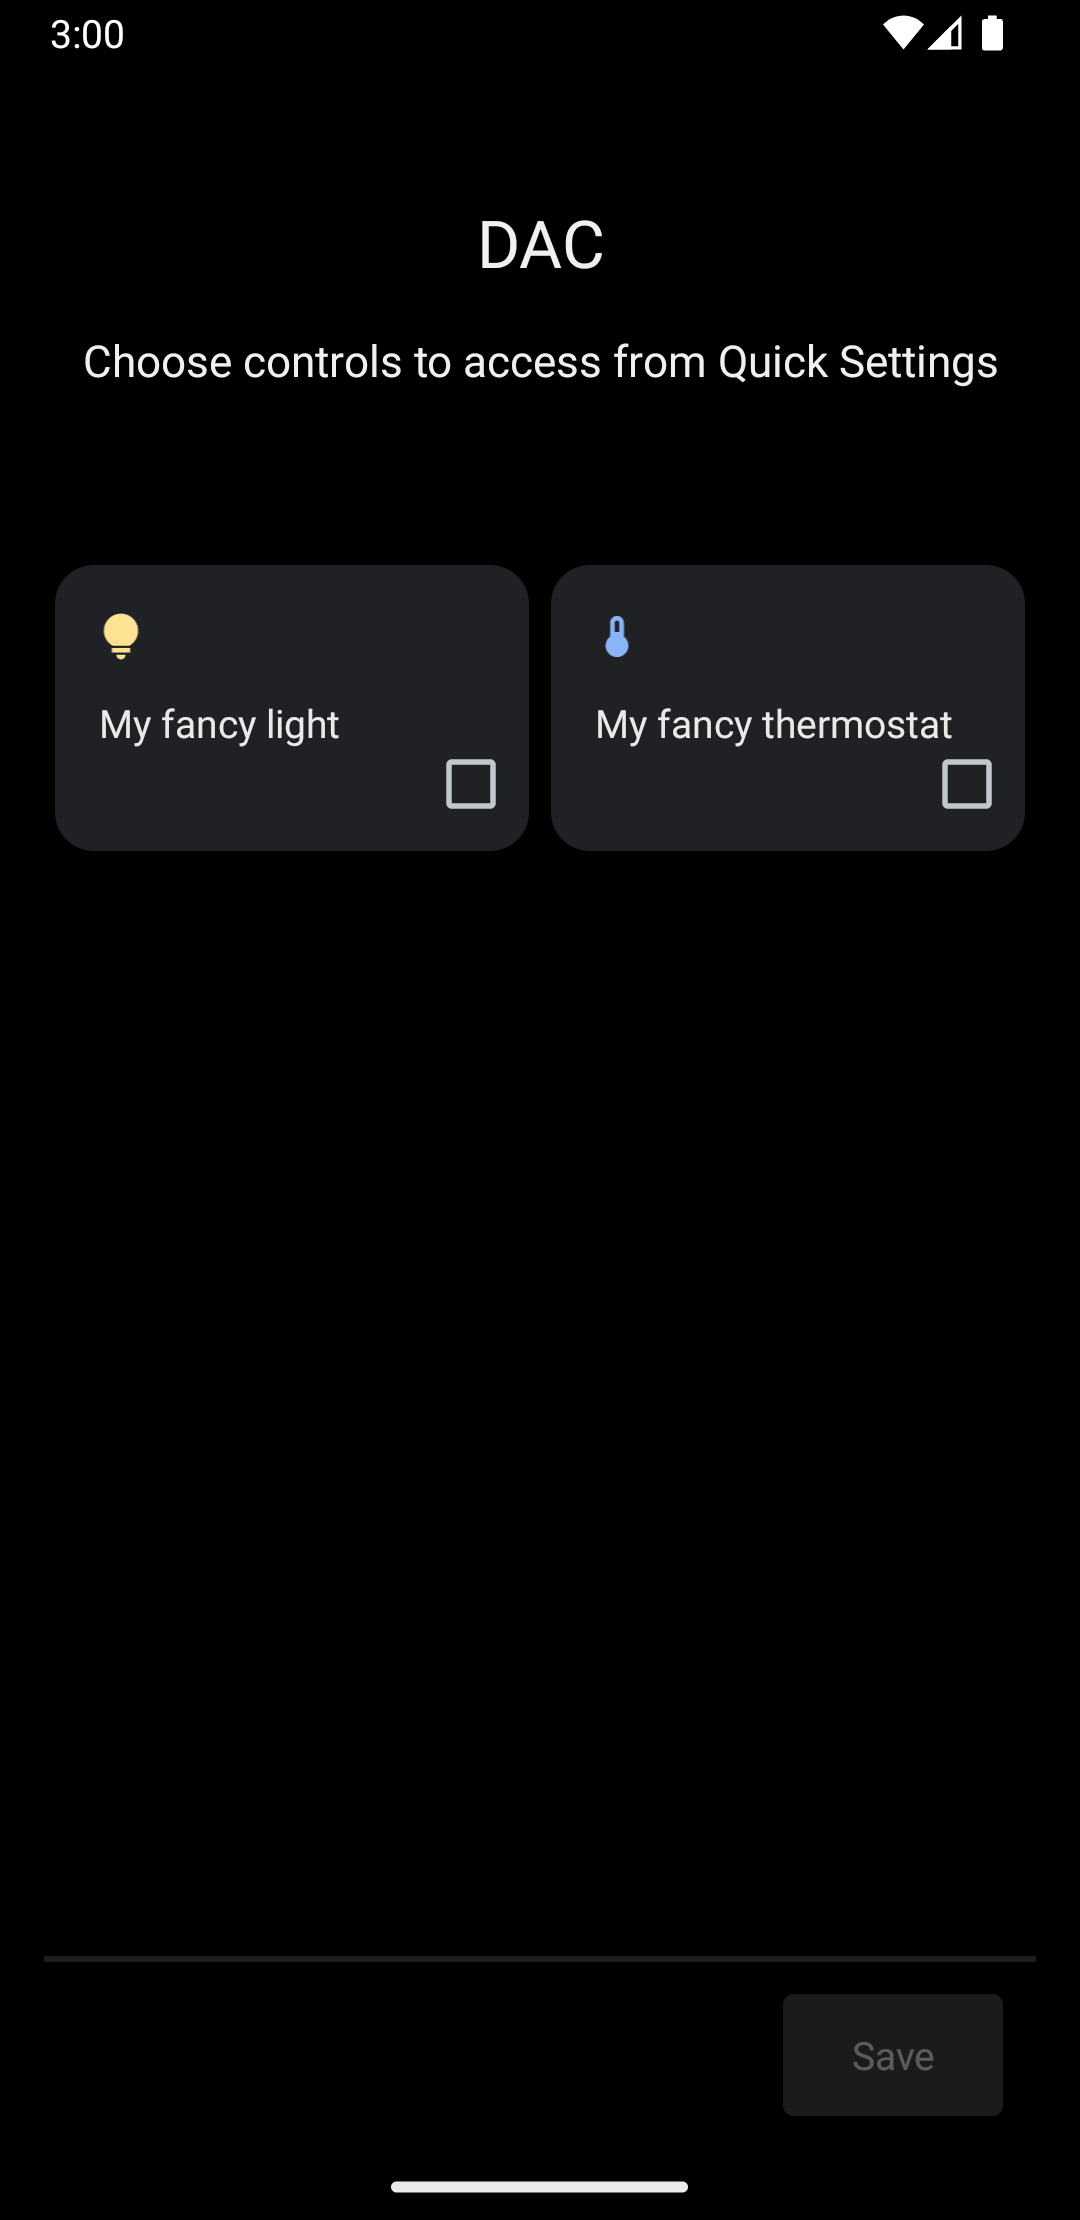
Desliza el dedo hacia abajo en el menú del sistema y busca el botón Controles de dispositivos, que se muestra en la figura 4:
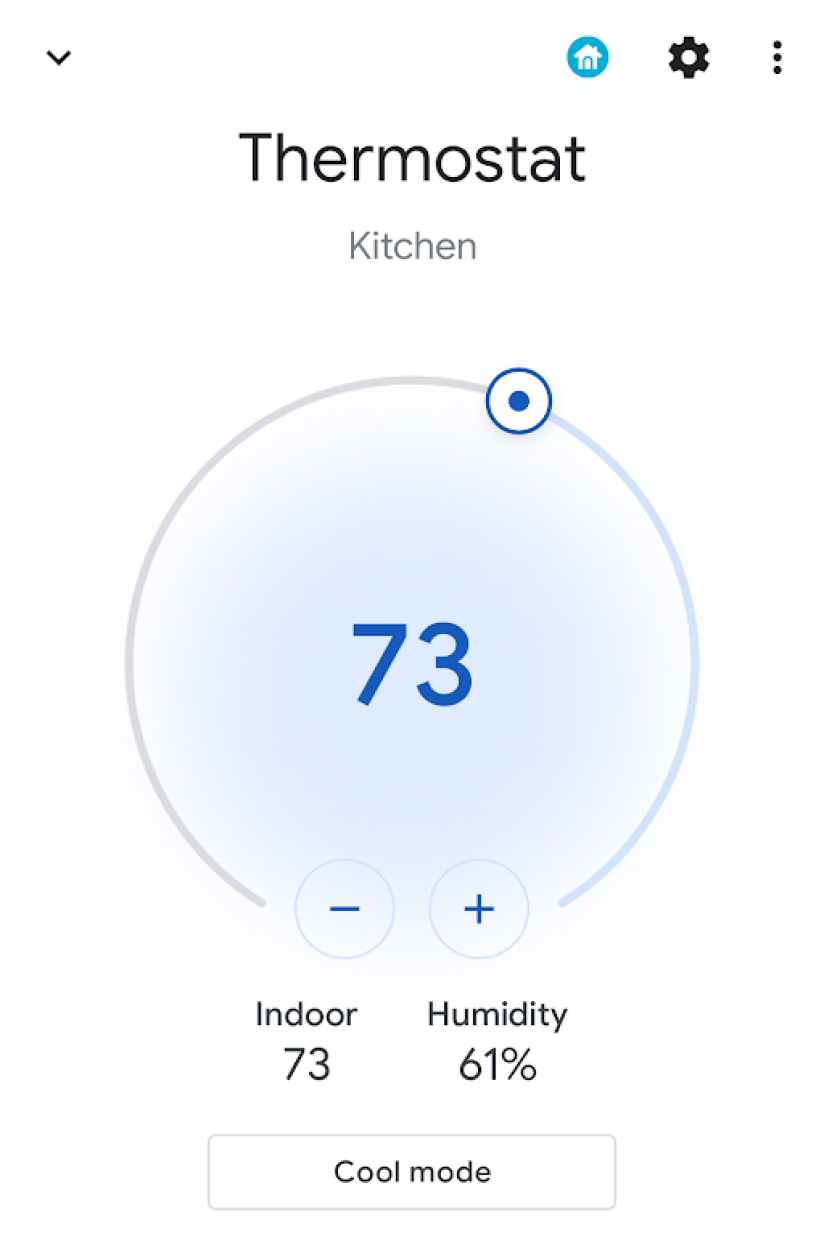
Si presionas Controles de dispositivos , se abrirá una segunda pantalla en la que podrás seleccionar tu app. Una vez que la selecciones, verás cómo el fragmento anterior crea un menú del sistema personalizado que muestra tus nuevos controles, como se muestra en la figura 5:
Ahora, implementa el método createPublisherFor() y agrega lo siguiente a tu Service:
Kotlin
private val job = SupervisorJob() private val scope = CoroutineScope(Dispatchers.IO + job) private val controlFlows = mutableMapOf<String, MutableSharedFlow>() private var toggleState = false private var rangeState = 18f override fun createPublisherFor(controlIds: List ): Flow.Publisher { val flow = MutableSharedFlow (replay = 2, extraBufferCapacity = 2) controlIds.forEach { controlFlows[it] = flow } scope.launch { delay(1000) // Retrieving the toggle state. flow.tryEmit(createLight()) delay(1000) // Retrieving the range state. flow.tryEmit(createThermostat()) } return flow.asPublisher() } private fun createLight() = createStatefulControl( LIGHT_ID, LIGHT_TITLE, LIGHT_TYPE, toggleState, ToggleTemplate( LIGHT_ID.toString(), ControlButton( toggleState, toggleState.toString().uppercase(Locale.getDefault()) ) ) ) private fun createThermostat() = createStatefulControl( THERMOSTAT_ID, THERMOSTAT_TITLE, THERMOSTAT_TYPE, rangeState, RangeTemplate( THERMOSTAT_ID.toString(), 15f, 25f, rangeState, 0.1f, "%1.1f" ) ) private fun createStatefulControl(id: Int, title: String, type: Int, state: T, template: ControlTemplate): Control { val intent = Intent(this, MainActivity::class.java) .putExtra(EXTRA_MESSAGE, "$title $state") .addFlags(Intent.FLAG_ACTIVITY_NEW_TASK) val action = PendingIntent.getActivity( this, id, intent, PendingIntent.FLAG_UPDATE_CURRENT or PendingIntent.FLAG_IMMUTABLE ) return Control.StatefulBuilder(id.toString(), action) .setTitle(title) .setDeviceType(type) .setStatus(Control.STATUS_OK) .setControlTemplate(template) .build() } override fun onDestroy() { super.onDestroy() job.cancel() }
Java
@NonNull @Override public Flow.PublishercreatePublisherFor(@NonNull List controlIds) { ReplayProcessor updatePublisher = ReplayProcessor.create(); controlIds.forEach(control -> { controlFlows.put(control, updatePublisher); updatePublisher.onNext(createLight()); updatePublisher.onNext(createThermostat()); }); return FlowAdapters.toFlowPublisher(updatePublisher); } private Control createStatelessControl(int id, String title, int type) { Intent intent = new Intent(this, MainActivity.class) .putExtra(EXTRA_MESSAGE, title) .addFlags(Intent.FLAG_ACTIVITY_NEW_TASK); PendingIntent action = PendingIntent.getActivity( this, id, intent, PendingIntent.FLAG_UPDATE_CURRENT | PendingIntent.FLAG_IMMUTABLE ); return new Control.StatelessBuilder(id + "", action) .setTitle(title) .setDeviceType(type) .build(); } private Control createLight() { return createStatefulControl( LIGHT_ID, LIGHT_TITLE, LIGHT_TYPE, toggleState, new ToggleTemplate( LIGHT_ID + "", new ControlButton( toggleState, String.valueOf(toggleState).toUpperCase(Locale.getDefault()) ) ) ); } private Control createThermostat() { return createStatefulControl( THERMOSTAT_ID, THERMOSTAT_TITLE, THERMOSTAT_TYPE, rangeState, new RangeTemplate( THERMOSTAT_ID + "", 15f, 25f, rangeState, 0.1f, "%1.1f" ) ); } private Control createStatefulControl(int id, String title, int type, T state, ControlTemplate template) { Intent intent = new Intent(this, MainActivity.class) .putExtra(EXTRA_MESSAGE, "$title $state") .addFlags(Intent.FLAG_ACTIVITY_NEW_TASK); PendingIntent action = PendingIntent.getActivity( this, id, intent, PendingIntent.FLAG_UPDATE_CURRENT | PendingIntent.FLAG_IMMUTABLE ); return new Control.StatefulBuilder(id + "", action) .setTitle(title) .setDeviceType(type) .setStatus(Control.STATUS_OK) .setControlTemplate(template) .build(); }
En este ejemplo, el método createPublisherFor() contiene una implementación falsa de lo que debe hacer tu app: comunicarse con tu dispositivo para recuperar su estado y emitir ese estado al sistema.
El método createPublisherFor() usa corrutinas y flujos de Kotlin para satisfacer la API de Reactive Streams requerida de la siguiente manera:
- Crea un
Flow. - Espera un segundo.
- Crea y emite el estado de la lámpara inteligente.
- Espera otro segundo.
- Crea y emite el estado del termostato.
Cómo controlar acciones
El método performControlAction() indica cuándo el usuario interactúa con un control publicado. El tipo de ControlAction enviado determina la acción.
Realiza la acción adecuada para el control específico y, luego, actualiza el estado del dispositivo en la IU de Android.
Para completar el ejemplo, agrega lo siguiente a tu Service:
Kotlin
override fun performControlAction( controlId: String, action: ControlAction, consumer: Consumer) { controlFlows[controlId]?.let { flow -> when (controlId) { LIGHT_ID.toString() -> { consumer.accept(ControlAction.RESPONSE_OK) if (action is BooleanAction) toggleState = action.newState flow.tryEmit(createLight()) } THERMOSTAT_ID.toString() -> { consumer.accept(ControlAction.RESPONSE_OK) if (action is FloatAction) rangeState = action.newValue flow.tryEmit(createThermostat()) } else -> consumer.accept(ControlAction.RESPONSE_FAIL) } } ?: consumer.accept(ControlAction.RESPONSE_FAIL) }
Java
@Override public void performControlAction(@NonNull String controlId, @NonNull ControlAction action, @NonNull Consumerconsumer) { ReplayProcessor processor = controlFlows.get(controlId); if (processor == null) return; if (controlId.equals(LIGHT_ID + "")) { consumer.accept(ControlAction.RESPONSE_OK); if (action instanceof BooleanAction) toggleState = ((BooleanAction) action).getNewState(); processor.onNext(createLight()); } if (controlId.equals(THERMOSTAT_ID + "")) { consumer.accept(ControlAction.RESPONSE_OK); if (action instanceof FloatAction) rangeState = ((FloatAction) action).getNewValue() processor.onNext(createThermostat()); } }
Ejecuta la app, accede al menú Controles de dispositivos y consulta los controles de luces y termostatos.