
Hệ thống ảnh động thuộc tính là một khung mạnh mẽ cho phép bạn tạo ảnh động cho hầu hết mọi thứ. Bạn có thể xác định một ảnh động để thay đổi bất kỳ thuộc tính đối tượng nào theo thời gian, bất kể đối tượng đó có vẽ lên màn hình hay không. Ảnh động thuộc tính thay đổi giá trị của một thuộc tính (một trường trong đối tượng) trong một khoảng thời gian nhất định. Để tạo hiệu ứng cho một đối tượng, bạn chỉ định thuộc tính đối tượng mà bạn muốn tạo hiệu ứng, chẳng hạn như vị trí của đối tượng trên màn hình, thời gian bạn muốn tạo hiệu ứng và giá trị bạn muốn tạo hiệu ứng.
Hệ thống ảnh động thuộc tính cho phép bạn xác định các đặc điểm sau của một ảnh động:
- Thời lượng: Bạn có thể chỉ định thời lượng của một ảnh động. Độ dài mặc định là 300 mili giây.
- Nội suy thời gian: Bạn có thể chỉ định cách tính các giá trị cho thuộc tính dưới dạng một hàm của thời gian đã trôi qua hiện tại của ảnh động.
- Số lần lặp lại và hành vi: Bạn có thể chỉ định xem có nên lặp lại ảnh động khi ảnh động kết thúc một khoảng thời gian hay không và số lần lặp lại ảnh động. Bạn cũng có thể chỉ định xem bạn muốn phát ảnh động theo hướng ngược lại hay không. Khi bạn đặt thành reverse, ảnh động sẽ phát đi rồi phát lại liên tục cho đến khi đạt đến số lần lặp lại.
- Tập hợp đối tượng tạo ảnh động: Bạn có thể nhóm các ảnh động thành các tập hợp logic phát cùng nhau hoặc tuần tự hoặc sau một khoảng thời gian trễ cụ thể.
- Độ trễ làm mới khung hình: Bạn có thể chỉ định tần suất làm mới khung hình của ảnh động. Theo mặc định, tốc độ làm mới được đặt thành 10 mili giây, nhưng tốc độ mà ứng dụng của bạn có thể làm mới khung hình cuối cùng phụ thuộc vào mức độ bận của hệ thống nói chung và tốc độ mà hệ thống có thể phục vụ bộ hẹn giờ cơ bản.
Để xem ví dụ đầy đủ về ảnh động thuộc tính, hãy xem lớp ChangeColor trong mẫu CustomTransition trên GitHub.
Cách hoạt động của ảnh động thuộc tính
Trước tiên, hãy xem cách hoạt động của một ảnh động qua một ví dụ đơn giản. Hình 1 mô tả một đối tượng giả định được tạo ảnh động bằng thuộc tính x, đại diện cho vị trí ngang của đối tượng trên màn hình. Thời lượng của ảnh động được đặt thành 40 mili giây và khoảng cách di chuyển là 40 pixel. Cứ 10 mili giây (tốc độ làm mới khung hình mặc định), đối tượng sẽ di chuyển theo chiều ngang 10 pixel. Khi hết 40 mili giây, ảnh động sẽ dừng và đối tượng kết thúc ở vị trí ngang 40. Đây là ví dụ về một ảnh động có phép nội suy tuyến tính, tức là đối tượng di chuyển với tốc độ không đổi.
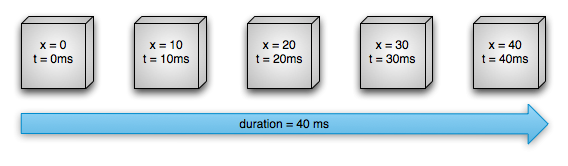
Hình 1. Ví dụ về ảnh động tuyến tính
Bạn cũng có thể chỉ định ảnh động có phép nội suy không tuyến tính. Hình 2 minh hoạ một đối tượng giả định tăng tốc ở đầu ảnh động và giảm tốc ở cuối ảnh động. Đối tượng vẫn di chuyển 40 pixel trong 40 mili giây, nhưng không theo đường thẳng. Lúc đầu, ảnh động này tăng tốc cho đến điểm giữa, sau đó giảm tốc từ điểm giữa cho đến khi kết thúc ảnh động. Như Hình 2 cho thấy, khoảng cách di chuyển ở đầu và cuối ảnh động nhỏ hơn ở giữa.
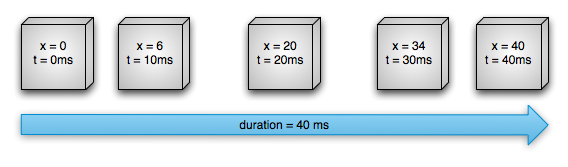
Hình 2. Ví dụ về ảnh động phi tuyến tính
Hãy xem xét chi tiết cách các thành phần quan trọng của hệ thống hoạt ảnh thuộc tính sẽ tính toán các ảnh động như những ảnh động minh hoạ ở trên. Hình 3 mô tả cách các lớp chính hoạt động với nhau.
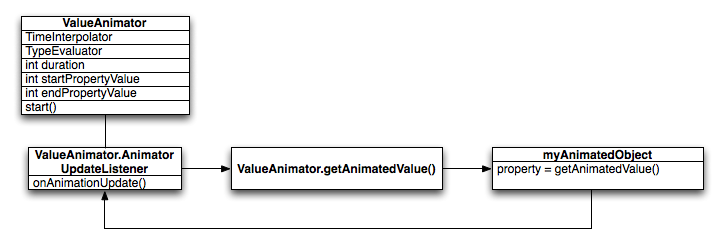
Hình 3. Cách tính toán ảnh động
Đối tượng ValueAnimator theo dõi thời gian của ảnh động, chẳng hạn như thời gian chạy của ảnh động và giá trị hiện tại của thuộc tính mà ảnh động đang tạo.
ValueAnimator đóng gói một TimeInterpolator (xác định nội suy ảnh động) và một TypeEvaluator (xác định cách tính toán các giá trị cho thuộc tính đang được tạo ảnh động). Ví dụ: trong Hình 2, TimeInterpolator được dùng sẽ là AccelerateDecelerateInterpolator và TypeEvaluator sẽ là IntEvaluator.
Để bắt đầu một ảnh động, hãy tạo một ValueAnimator và cung cấp cho ảnh động đó các giá trị bắt đầu và kết thúc cho thuộc tính mà bạn muốn tạo ảnh động, cùng với thời lượng của ảnh động. Khi bạn gọi start(), ảnh động sẽ bắt đầu. Trong suốt quá trình tạo ảnh động, ValueAnimator sẽ tính toán phân số đã trôi qua trong khoảng từ 0 đến 1, dựa trên thời lượng của ảnh động và thời gian đã trôi qua. Phân số đã trôi qua biểu thị tỷ lệ phần trăm thời gian mà ảnh động đã hoàn thành, 0 có nghĩa là 0% và 1 có nghĩa là 100%. Ví dụ: trong Hình 1, phân số đã trôi qua tại t = 10 ms sẽ là 0, 25 vì tổng thời lượng là t = 40 ms.
Khi ValueAnimator tính toán xong một phần đã trôi qua, nó sẽ gọi TimeInterpolator hiện được đặt để tính toán một phần được nội suy. Một phân số được nội suy sẽ liên kết phân số đã trôi qua với một phân số mới có tính đến nội suy thời gian đã đặt. Ví dụ: trong Hình 2, vì ảnh động tăng tốc từ từ, nên phần phân số được nội suy (khoảng 0,15) nhỏ hơn phần phân số đã trôi qua (0,25) tại t = 10 mili giây. Trong Hình 1, phần phân số được nội suy luôn bằng với phần phân số đã trôi qua.
Khi phân số được nội suy được tính, ValueAnimator sẽ gọi TypeEvaluator thích hợp để tính giá trị của thuộc tính mà bạn đang tạo ảnh động, dựa trên phân số được nội suy, giá trị bắt đầu và giá trị kết thúc của ảnh động. Ví dụ: trong Hình 2, phân số được nội suy là 0,15 tại t = 10 mili giây, vì vậy, giá trị của thuộc tính tại thời điểm đó sẽ là 0,15 × (40 – 0) hoặc 6.
Sự khác biệt giữa ảnh động thuộc tính và ảnh động thành phần hiển thị
Hệ thống ảnh động của khung hiển thị chỉ cung cấp khả năng tạo ảnh động cho các đối tượng View. Vì vậy, nếu muốn tạo ảnh động cho các đối tượng không phải View, bạn phải triển khai mã riêng để làm việc đó. Hệ thống ảnh động của khung hiển thị cũng bị hạn chế ở chỗ hệ thống này chỉ hiển thị một số khía cạnh của đối tượng View để tạo ảnh động, chẳng hạn như việc điều chỉnh tỷ lệ và xoay một Khung hiển thị nhưng không phải là màu nền.
Một nhược điểm khác của hệ thống ảnh động khung hiển thị là hệ thống này chỉ sửa đổi vị trí vẽ Khung hiển thị chứ không sửa đổi chính Khung hiển thị thực tế. Ví dụ: nếu bạn tạo hiệu ứng chuyển động cho một nút để di chuyển trên màn hình, thì nút đó sẽ vẽ chính xác, nhưng vị trí thực tế mà bạn có thể nhấp vào nút sẽ không thay đổi, vì vậy, bạn phải triển khai logic của riêng mình để xử lý việc này.
Với hệ thống ảnh động thuộc tính, các quy tắc ràng buộc này sẽ bị xoá hoàn toàn và bạn có thể tạo ảnh động cho mọi thuộc tính của mọi đối tượng (Thành phần hiển thị và không phải Thành phần hiển thị) và bản thân đối tượng đó thực sự được sửa đổi. Hệ thống ảnh động thuộc tính cũng mạnh mẽ hơn trong cách thực hiện ảnh động. Ở cấp độ cao, bạn chỉ định các đối tượng tạo ảnh động cho những thuộc tính mà bạn muốn tạo ảnh động, chẳng hạn như màu sắc, vị trí hoặc kích thước và có thể xác định các khía cạnh của ảnh động như nội suy và đồng bộ hoá nhiều đối tượng tạo ảnh động.
Tuy nhiên, hệ thống ảnh động của khung hiển thị mất ít thời gian thiết lập hơn và yêu cầu bạn viết ít mã hơn. Nếu ảnh động trên khung hiển thị hoàn thành mọi việc bạn cần làm hoặc nếu mã hiện có của bạn đã hoạt động theo cách bạn muốn, thì bạn không cần sử dụng hệ thống ảnh động thuộc tính. Bạn cũng nên sử dụng cả hai hệ thống ảnh động cho các tình huống khác nhau nếu trường hợp sử dụng phát sinh.
Tổng quan về API
Bạn có thể tìm thấy hầu hết các API của hệ thống ảnh động thuộc tính trong android.animation. Vì hệ thống ảnh động của khung hiển thị đã xác định nhiều bộ nội suy trong android.view.animation, nên bạn cũng có thể sử dụng những bộ nội suy đó trong hệ thống ảnh động thuộc tính. Các bảng sau đây mô tả các thành phần chính của hệ thống hoạt ảnh thuộc tính.
Lớp Animator cung cấp cấu trúc cơ bản để tạo ảnh động. Thông thường, bạn không sử dụng trực tiếp lớp này vì lớp này chỉ cung cấp chức năng tối thiểu phải được mở rộng để hỗ trợ đầy đủ các giá trị hoạt hoạ. Các lớp con sau đây mở rộng Animator:
Bảng 1. Hoạ sĩ hoạt hình
| Lớp | Mô tả |
|---|---|
ValueAnimator |
Công cụ tính thời gian chính cho ảnh động thuộc tính, đồng thời tính toán các giá trị cho thuộc tính cần tạo ảnh động. Lớp này có tất cả chức năng cốt lõi để tính toán các giá trị ảnh động và chứa thông tin chi tiết về thời gian của từng ảnh động, thông tin về việc ảnh động có lặp lại hay không, các trình nghe nhận sự kiện cập nhật và khả năng đặt các loại tuỳ chỉnh để đánh giá. Có 2 phần để tạo ảnh động cho các thuộc tính: tính toán các giá trị ảnh động và đặt các giá trị đó trên đối tượng và thuộc tính đang được tạo ảnh động. ValueAnimator không thực hiện phần thứ hai, vì vậy, bạn phải theo dõi các nội dung cập nhật cho các giá trị do ValueAnimator tính toán và sửa đổi các đối tượng mà bạn muốn tạo ảnh động bằng logic của riêng mình. Hãy xem phần về Tạo ảnh động bằng ValueAnimator để biết thêm thông tin. |
ObjectAnimator |
Một lớp con của ValueAnimator cho phép bạn đặt một đối tượng đích và thuộc tính đối tượng để tạo hiệu ứng động. Lớp này sẽ cập nhật thuộc tính cho phù hợp khi tính toán một giá trị mới cho ảnh động. Bạn nên sử dụng ObjectAnimator hầu hết thời gian vì nó giúp quá trình tạo hiệu ứng cho các giá trị trên đối tượng đích dễ dàng hơn nhiều. Tuy nhiên, đôi khi bạn muốn sử dụng trực tiếp ValueAnimator vì ObjectAnimator có thêm một số hạn chế, chẳng hạn như yêu cầu các phương thức truy cập cụ thể phải có trên đối tượng đích. |
AnimatorSet |
Cung cấp một cơ chế để nhóm các ảnh động lại với nhau để chúng chạy liên quan đến nhau. Bạn có thể đặt ảnh động phát cùng nhau, theo tuần tự hoặc sau một khoảng trễ cụ thể. Hãy xem phần về Điều phối nhiều ảnh động bằng Bộ đối tượng tạo ảnh động để biết thêm thông tin. |
Trình đánh giá cho hệ thống ảnh động thuộc tính biết cách tính toán các giá trị cho một thuộc tính nhất định. Chúng lấy dữ liệu về thời gian do một lớp Animator cung cấp, giá trị bắt đầu và kết thúc của ảnh động, đồng thời tính toán các giá trị được tạo ảnh động của thuộc tính dựa trên dữ liệu này. Hệ thống hoạt ảnh thuộc tính cung cấp các trình đánh giá sau:
Bảng 2. Người đánh giá
| Lớp/Giao diện | Mô tả |
|---|---|
IntEvaluator |
Trình đánh giá mặc định để tính toán các giá trị cho thuộc tính int. |
FloatEvaluator |
Trình đánh giá mặc định để tính toán các giá trị cho thuộc tính float. |
ArgbEvaluator |
Trình đánh giá mặc định để tính toán các giá trị cho thuộc tính màu được biểu thị dưới dạng giá trị thập lục phân. |
TypeEvaluator |
Một giao diện cho phép bạn tạo trình đánh giá của riêng mình. Nếu bạn đang tạo ảnh động cho một thuộc tính đối tượng không phải là int, float hoặc màu sắc, thì bạn phải triển khai giao diện TypeEvaluator để chỉ định cách tính toán các giá trị được tạo ảnh động của thuộc tính đối tượng. Bạn cũng có thể chỉ định một TypeEvaluator tuỳ chỉnh cho các giá trị int, float và màu, nếu muốn xử lý các loại đó theo cách khác với hành vi mặc định.
Hãy xem phần Sử dụng TypeEvaluator để biết thêm thông tin về cách viết trình đánh giá tuỳ chỉnh. |
Bộ nội suy thời gian xác định cách tính các giá trị cụ thể trong một ảnh động dưới dạng hàm thời gian. Ví dụ: bạn có thể chỉ định ảnh động diễn ra theo đường thẳng trong toàn bộ ảnh động, tức là ảnh động di chuyển đều đặn trong toàn bộ thời gian hoặc bạn có thể chỉ định ảnh động sử dụng thời gian không tuyến tính, chẳng hạn như tăng tốc ở đầu và giảm tốc ở cuối ảnh động. Bảng 3 mô tả các bộ nội suy có trong android.view.animation. Nếu không có bộ nội suy nào được cung cấp phù hợp với nhu cầu của bạn, hãy triển khai giao diện TimeInterpolator và tạo bộ nội suy của riêng bạn. Hãy xem bài viết Sử dụng bộ nội suy để biết thêm thông tin về cách viết bộ nội suy tuỳ chỉnh.
Bảng 3. Bộ nội suy
| Lớp/Giao diện | Mô tả |
|---|---|
AccelerateDecelerateInterpolator |
Một bộ nội suy có tốc độ thay đổi bắt đầu và kết thúc từ từ nhưng tăng tốc ở giữa quá trình. |
AccelerateInterpolator |
Một bộ nội suy có tốc độ thay đổi bắt đầu từ từ rồi tăng tốc. |
AnticipateInterpolator |
Một bộ nội suy có sự thay đổi bắt đầu lùi lại phía sau rồi hất lên phía trước. |
AnticipateOvershootInterpolator |
Một bộ nội suy có sự thay đổi bắt đầu lùi lại phía sau, hất lên phía trước và vượt quá giá trị mục tiêu, sau đó cuối cùng quay trở lại giá trị cuối cùng. |
BounceInterpolator |
Một bộ nội suy có thay đổi bật nảy lên khi kết thúc. |
CycleInterpolator |
Một bộ nội suy có ảnh động lặp lại trong một số chu kỳ được chỉ định. |
DecelerateInterpolator |
Một bộ nội suy có tốc độ thay đổi bắt đầu nhanh chóng rồi giảm tốc. |
LinearInterpolator |
Một bộ nội suy có tốc độ thay đổi không đổi. |
OvershootInterpolator |
Một bộ nội suy có sự thay đổi hất về phía trước và vượt quá giá trị cuối cùng, sau đó quay trở lại. |
TimeInterpolator |
Một giao diện cho phép bạn triển khai bộ nội suy của riêng mình. |
Tạo ảnh động bằng ValueAnimator
Lớp ValueAnimator cho phép bạn tạo ảnh động cho các giá trị thuộc một số loại trong thời gian diễn ra ảnh động bằng cách chỉ định một tập hợp các giá trị int, float hoặc màu để tạo ảnh động. Bạn nhận được một ValueAnimator bằng cách gọi một trong các phương thức nhà máy của nó: ofInt(), ofFloat() hoặc ofObject(). Ví dụ:
Kotlin
ValueAnimator.ofFloat(0f, 100f).apply {
    duration = 1000
    start()
}
Java
ValueAnimator animation = ValueAnimator.ofFloat(0f, 100f);
animation.setDuration(1000);
animation.start();
Trong mã này, ValueAnimator bắt đầu tính toán các giá trị của ảnh động, trong khoảng từ 0 đến 100, trong khoảng thời gian 1000 mili giây, khi phương thức start() chạy.
Bạn cũng có thể chỉ định một loại tuỳ chỉnh để tạo ảnh động bằng cách làm như sau:
Kotlin
ValueAnimator.ofObject(MyTypeEvaluator(), startPropertyValue, endPropertyValue).apply {
    duration = 1000
    start()
}
Java
ValueAnimator animation = ValueAnimator.ofObject(new MyTypeEvaluator(), startPropertyValue, endPropertyValue);
animation.setDuration(1000);
animation.start();
Trong mã này, ValueAnimator bắt đầu tính toán các giá trị của ảnh động, giữa startPropertyValue và endPropertyValue bằng cách sử dụng logic do MyTypeEvaluator cung cấp trong khoảng thời gian 1000 mili giây, khi phương thức start() chạy.
Bạn có thể sử dụng các giá trị của ảnh động bằng cách thêm một AnimatorUpdateListener vào đối tượng ValueAnimator, như minh hoạ trong mã sau:
Kotlin
ValueAnimator.ofObject(...).apply {
    ...
    addUpdateListener { updatedAnimation ->
        // You can use the animated value in a property that uses the
        // same type as the animation. In this case, you can use the
        // float value in the translationX property.
        textView.translationX = updatedAnimation.animatedValue as Float
    }
    ...
}
Java
animation.addUpdateListener(new ValueAnimator.AnimatorUpdateListener() {
    @Override
    public void onAnimationUpdate(ValueAnimator updatedAnimation) {
        // You can use the animated value in a property that uses the
        // same type as the animation. In this case, you can use the
        // float value in the translationX property.
        float animatedValue = (float)updatedAnimation.getAnimatedValue();
        textView.setTranslationX(animatedValue);
    }
});
Trong phương thức onAnimationUpdate(), bạn có thể truy cập vào giá trị ảnh động đã cập nhật và sử dụng giá trị đó trong một thuộc tính của một trong các khung hiển thị. Để biết thêm thông tin về trình nghe, hãy xem phần Trình nghe ảnh động.
Tạo ảnh động bằng ObjectAnimator
ObjectAnimator là một lớp con của ValueAnimator (được thảo luận trong phần trước) và kết hợp công cụ tính thời gian và giá trị của ValueAnimator với khả năng tạo ảnh động cho một thuộc tính được đặt tên của đối tượng đích. Điều này giúp việc tạo ảnh động cho mọi đối tượng trở nên dễ dàng hơn nhiều, vì bạn không cần triển khai ValueAnimator.AnimatorUpdateListener nữa, vì thuộc tính có ảnh động sẽ tự động cập nhật.
Việc khởi tạo một ObjectAnimator tương tự như một ValueAnimator, nhưng bạn cũng chỉ định đối tượng và tên của thuộc tính của đối tượng đó (dưới dạng một chuỗi) cùng với các giá trị để tạo ảnh động giữa:
Kotlin
ObjectAnimator.ofFloat(textView, "translationX", 100f).apply {
    duration = 1000
    start()
}
Java
ObjectAnimator animation = ObjectAnimator.ofFloat(textView, "translationX", 100f);
animation.setDuration(1000);
animation.start();
Để ObjectAnimator cập nhật các thuộc tính một cách chính xác, bạn phải làm như sau:
- Thuộc tính đối tượng mà bạn đang tạo hiệu ứng phải có một hàm setter (theo quy tắc viết hoa chữ cái đầu của từ thứ hai) dưới dạng
set<PropertyName>(). VìObjectAnimatortự động cập nhật thuộc tính trong quá trình tạo hiệu ứng động, nên nó phải có thể truy cập vào thuộc tính bằng phương thức setter này. Ví dụ: nếu tên thuộc tính làfoo, bạn cần có phương thứcsetFoo(). Nếu phương thức setter này không tồn tại, bạn có 3 lựa chọn:- Thêm phương thức setter vào lớp nếu bạn có quyền làm như vậy.
- Sử dụng một lớp bao bọc mà bạn có quyền thay đổi và để lớp bao bọc đó nhận giá trị bằng một phương thức setter hợp lệ rồi chuyển tiếp giá trị đó đến đối tượng ban đầu.
- Thay vào đó, hãy sử dụng
ValueAnimator.
- Nếu bạn chỉ định một giá trị cho tham số
values...trong một trong các phương thức của nhà máyObjectAnimator, thì giá trị đó được giả định là giá trị kết thúc của ảnh động. Do đó, thuộc tính đối tượng mà bạn đang tạo ảnh động phải có một hàm getter được dùng để lấy giá trị bắt đầu của ảnh động. Hàm getter phải có dạngget<PropertyName>(). Ví dụ: nếu tên thuộc tính làfoo, bạn cần có một phương thứcgetFoo(). - Phương thức getter (nếu cần) và setter của thuộc tính mà bạn đang tạo ảnh động phải hoạt động trên cùng một loại với các giá trị bắt đầu và kết thúc mà bạn chỉ định cho
ObjectAnimator. Ví dụ: bạn phải cótargetObject.setPropName(float)vàtargetObject.getPropName()nếu tạoObjectAnimatorsau đây:ObjectAnimator.ofFloat(targetObject, "propName", 1f)
- Tuỳ thuộc vào thuộc tính hoặc đối tượng mà bạn đang tạo ảnh động, bạn có thể cần gọi phương thức
invalidate()trên một Chế độ xem để buộc màn hình vẽ lại chính nó bằng các giá trị ảnh động đã cập nhật. Bạn thực hiện việc này trong lệnh gọi lạionAnimationUpdate(). Ví dụ: việc tạo hiệu ứng cho thuộc tính màu của đối tượng Drawable chỉ khiến màn hình cập nhật khi đối tượng đó tự vẽ lại. Tất cả các phương thức thiết lập thuộc tính trên Chế độ xem, chẳng hạn nhưsetAlpha()vàsetTranslationX()đều vô hiệu hoá Chế độ xem một cách thích hợp, vì vậy, bạn không cần vô hiệu hoá Chế độ xem khi gọi các phương thức này bằng các giá trị mới. Để biết thêm thông tin về trình nghe, hãy xem phần Trình nghe ảnh động.
Dàn dựng nhiều ảnh động bằng AnimatorSet
Trong nhiều trường hợp, bạn muốn phát một ảnh động tuỳ thuộc vào thời điểm một ảnh động khác bắt đầu hoặc kết thúc. Hệ thống Android cho phép bạn kết hợp các ảnh động thành một AnimatorSet, để bạn có thể chỉ định xem có nên bắt đầu ảnh động đồng thời, tuần tự hay sau một khoảng thời gian trễ cụ thể hay không. Bạn cũng có thể lồng các đối tượng AnimatorSet vào nhau.
Đoạn mã sau đây phát các đối tượng Animator sau theo cách sau:
- Phát
bounceAnim. - Phát
squashAnim1,squashAnim2,stretchAnim1vàstretchAnim2cùng lúc. - Phát
bounceBackAnim. - Phát
fadeAnim.
Kotlin
val bouncer = AnimatorSet().apply {
    play(bounceAnim).before(squashAnim1)
    play(squashAnim1).with(squashAnim2)
    play(squashAnim1).with(stretchAnim1)
    play(squashAnim1).with(stretchAnim2)
    play(bounceBackAnim).after(stretchAnim2)
}
val fadeAnim = ObjectAnimator.ofFloat(newBall, "alpha", 1f, 0f).apply {
    duration = 250
}
AnimatorSet().apply {
    play(bouncer).before(fadeAnim)
    start()
}
Java
AnimatorSet bouncer = new AnimatorSet();
bouncer.play(bounceAnim).before(squashAnim1);
bouncer.play(squashAnim1).with(squashAnim2);
bouncer.play(squashAnim1).with(stretchAnim1);
bouncer.play(squashAnim1).with(stretchAnim2);
bouncer.play(bounceBackAnim).after(stretchAnim2);
ValueAnimator fadeAnim = ObjectAnimator.ofFloat(newBall, "alpha", 1f, 0f);
fadeAnim.setDuration(250);
AnimatorSet animatorSet = new AnimatorSet();
animatorSet.play(bouncer).before(fadeAnim);
animatorSet.start();
Trình nghe ảnh động
Bạn có thể theo dõi các sự kiện quan trọng trong thời gian diễn ra một ảnh động bằng các trình nghe được mô tả bên dưới.
Animator.AnimatorListeneronAnimationStart()– Được gọi khi ảnh động bắt đầu.onAnimationEnd()– Được gọi khi ảnh động kết thúc.onAnimationRepeat()– Được gọi khi ảnh động lặp lại.onAnimationCancel()– Được gọi khi ảnh động bị huỷ. Ảnh động bị huỷ cũng gọionAnimationEnd(), bất kể ảnh động đó kết thúc như thế nào.
ValueAnimator.AnimatorUpdateListener-
onAnimationUpdate()– được gọi trên mọi khung hình của ảnh động. Theo dõi sự kiện này để sử dụng các giá trị được tính doValueAnimatortạo trong một ảnh động. Để sử dụng giá trị này, hãy truy vấn đối tượngValueAnimatorđược truyền vào sự kiện để lấy giá trị động hiện tại bằng phương thứcgetAnimatedValue(). Bạn phải triển khai trình nghe này nếu sử dụngValueAnimator.Tuỳ thuộc vào thuộc tính hoặc đối tượng mà bạn đang tạo ảnh động, bạn có thể cần gọi
invalidate()trên một Thành phần hiển thị để buộc vùng đó của màn hình vẽ lại chính nó bằng các giá trị ảnh động mới. Ví dụ: việc tạo hiệu ứng cho thuộc tính màu của một đối tượng Drawable sẽ chỉ khiến màn hình cập nhật khi đối tượng đó tự vẽ lại. Tất cả các phương thức thiết lập thuộc tính trên Chế độ xem, chẳng hạn nhưsetAlpha()vàsetTranslationX()đều vô hiệu hoá Chế độ xem một cách thích hợp, vì vậy, bạn không cần vô hiệu hoá Chế độ xem khi gọi các phương thức này bằng các giá trị mới.
-
Bạn có thể mở rộng lớp AnimatorListenerAdapter thay vì triển khai giao diện Animator.AnimatorListener nếu không muốn triển khai tất cả các phương thức của giao diện Animator.AnimatorListener. Lớp AnimatorListenerAdapter cung cấp các phương thức triển khai trống mà bạn có thể chọn ghi đè.
Ví dụ: đoạn mã sau đây tạo một AnimatorListenerAdapter chỉ cho lệnh gọi lại onAnimationEnd():
Kotlin
ObjectAnimator.ofFloat(newBall, "alpha", 1f, 0f).apply {
    duration = 250
    addListener(object : AnimatorListenerAdapter() {
        override fun onAnimationEnd(animation: Animator) {
            balls.remove((animation as ObjectAnimator).target)
        }
    })
}
Java
ValueAnimator fadeAnim = ObjectAnimator.ofFloat(newBall, "alpha", 1f, 0f);
fadeAnim.setDuration(250);
fadeAnim.addListener(new AnimatorListenerAdapter() {
public void onAnimationEnd(Animator animation) {
    balls.remove(((ObjectAnimator)animation).getTarget());
}
Tạo ảnh động cho các thay đổi về bố cục đối với các đối tượng ViewGroup
Hệ thống ảnh động thuộc tính cung cấp khả năng tạo ảnh động cho các thay đổi đối với các đối tượng ViewGroup cũng như cung cấp một cách dễ dàng để tạo ảnh động cho chính các đối tượng View.
Bạn có thể tạo hiệu ứng cho các thay đổi về bố cục trong một ViewGroup bằng lớp LayoutTransition. Các khung hiển thị bên trong một ViewGroup có thể trải qua một hiệu ứng xuất hiện và biến mất khi bạn thêm hoặc xoá các khung hiển thị đó khỏi một ViewGroup hoặc khi bạn gọi phương thức setVisibility() của một Khung hiển thị bằng VISIBLE, INVISIBLE hoặc GONE. Các View còn lại trong ViewGroup cũng có thể chuyển động đến vị trí mới khi bạn thêm hoặc xoá View. Bạn có thể xác định các ảnh động sau trong một đối tượng LayoutTransition bằng cách gọi setAnimator() và truyền vào một đối tượng Animator bằng một trong các hằng số LayoutTransition sau:
APPEARING– Một cờ cho biết ảnh động chạy trên các mục xuất hiện trong vùng chứa.CHANGE_APPEARING– Một cờ cho biết ảnh động chạy trên các mục đang thay đổi do một mục mới xuất hiện trong vùng chứa.DISAPPEARING– Cờ cho biết ảnh động chạy trên các mục đang biến mất khỏi vùng chứa.CHANGE_DISAPPEARING– Một cờ cho biết ảnh động chạy trên các mục đang thay đổi do một mục biến mất khỏi vùng chứa.
Bạn có thể xác định các ảnh động tuỳ chỉnh của riêng mình cho 4 loại sự kiện này để tuỳ chỉnh giao diện của các hiệu ứng chuyển đổi bố cục hoặc chỉ cần yêu cầu hệ thống ảnh động sử dụng ảnh động mặc định.
Để đặt thuộc tính android:animateLayoutchanges thành true cho ViewGroup, hãy làm như sau:
<LinearLayout
    android:orientation="vertical"
    android:layout_width="wrap_content"
    android:layout_height="match_parent"
    android:id="@+id/verticalContainer"
    android:animateLayoutChanges="true" />
Nếu bạn đặt thuộc tính này thành true, thì các Thành phần hiển thị được thêm hoặc xoá khỏi ViewGroup cũng như các Thành phần hiển thị còn lại trong ViewGroup sẽ tự động chuyển động.
Tạo ảnh động cho các thay đổi về trạng thái của thành phần hiển thị bằng StateListAnimator
Lớp StateListAnimator cho phép bạn xác định các đối tượng tạo ảnh động chạy khi trạng thái của một khung hiển thị thay đổi. Đối tượng này hoạt động như một trình bao bọc cho đối tượng Animator, gọi ảnh động đó bất cứ khi nào trạng thái thành phần hiển thị được chỉ định (chẳng hạn như "đã nhấn" hoặc "đã lấy tiêu điểm") thay đổi.
Bạn có thể xác định StateListAnimator trong một tài nguyên XML bằng phần tử <selector> gốc và các phần tử <item> con. Mỗi phần tử con sẽ chỉ định một trạng thái khung hiển thị khác do lớp StateListAnimator xác định. Mỗi <item> chứa định nghĩa cho một tập hợp hoạt ảnh thuộc tính.
Ví dụ: tệp sau đây sẽ tạo một bộ tạo ảnh động danh sách trạng thái thay đổi tỷ lệ x và y của khung hiển thị khi khung hiển thị đó được nhấn:
res/xml/animate_scale.xml
<?xml version="1.0" encoding="utf-8"?>
<selector xmlns:android="http://schemas.android.com/apk/res/android">
    <!-- the pressed state; increase x and y size to 150% -->
    <item android:state_pressed="true">
        <set>
            <objectAnimator android:propertyName="scaleX"
                android:duration="@android:integer/config_shortAnimTime"
                android:valueTo="1.5"
                android:valueType="floatType"/>
            <objectAnimator android:propertyName="scaleY"
                android:duration="@android:integer/config_shortAnimTime"
                android:valueTo="1.5"
                android:valueType="floatType"/>
        </set>
    </item>
    <!-- the default, non-pressed state; set x and y size to 100% -->
    <item android:state_pressed="false">
        <set>
            <objectAnimator android:propertyName="scaleX"
                android:duration="@android:integer/config_shortAnimTime"
                android:valueTo="1"
                android:valueType="floatType"/>
            <objectAnimator android:propertyName="scaleY"
                android:duration="@android:integer/config_shortAnimTime"
                android:valueTo="1"
                android:valueType="floatType"/>
        </set>
    </item>
</selector>
Để đính kèm bộ tạo ảnh động danh sách trạng thái vào một khung hiển thị, hãy thêm thuộc tính
android:stateListAnimator như sau:
<Button android:stateListAnimator="@xml/animate_scale"
        ... />
Giờ đây, các ảnh động được xác định trong animate_scale.xml sẽ được dùng khi trạng thái của nút này thay đổi.
Hoặc để thay vào đó, hãy chỉ định một trình tạo hiệu ứng danh sách trạng thái cho một khung hiển thị trong mã của bạn, hãy sử dụng phương thức AnimatorInflater.loadStateListAnimator() và chỉ định trình tạo hiệu ứng cho khung hiển thị bằng phương thức View.setStateListAnimator().
Hoặc thay vì tạo ảnh động cho các thuộc tính của thành phần hiển thị, bạn có thể phát ảnh động có thể vẽ giữa các thay đổi về trạng thái bằng cách sử dụng AnimatedStateListDrawable.
Theo mặc định, một số tiện ích hệ thống trong Android 5.0 sử dụng các ảnh động này. Ví dụ sau đây cho thấy cách xác định AnimatedStateListDrawable dưới dạng tài nguyên XML:
<!-- res/drawable/myanimstatedrawable.xml -->
<animated-selector
    xmlns:android="http://schemas.android.com/apk/res/android">

    <!-- provide a different drawable for each state-->
    <item android:id="@+id/pressed" android:drawable="@drawable/drawableP"
        android:state_pressed="true"/>
    <item android:id="@+id/focused" android:drawable="@drawable/drawableF"
        android:state_focused="true"/>
    <item android:id="@id/default"
        android:drawable="@drawable/drawableD"/>

    <!-- specify a transition -->
    <transition android:fromId="@+id/default" android:toId="@+id/pressed">
        <animation-list>
            <item android:duration="15" android:drawable="@drawable/dt1"/>
            <item android:duration="15" android:drawable="@drawable/dt2"/>
            ...
        </animation-list>
    </transition>
    ...
</animated-selector>
Sử dụng TypeEvaluator
Nếu muốn tạo hiệu ứng cho một loại mà hệ thống Android không biết, bạn có thể tạo trình đánh giá của riêng mình bằng cách triển khai giao diện TypeEvaluator. Các loại mà hệ thống Android nhận biết được là int, float hoặc một màu sắc, được các trình đánh giá loại IntEvaluator, FloatEvaluator và ArgbEvaluator hỗ trợ.
Chỉ có một phương thức để triển khai trong giao diện TypeEvaluator, đó là phương thức evaluate(). Điều này cho phép trình tạo ảnh động mà bạn đang dùng trả về một giá trị thích hợp cho thuộc tính được tạo ảnh động tại thời điểm hiện tại của ảnh động. Lớp FloatEvaluator minh hoạ cách thực hiện việc này:
Kotlin
private class FloatEvaluator : TypeEvaluator<Any> {

    override fun evaluate(fraction: Float, startValue: Any, endValue: Any): Any {
        return (startValue as Number).toFloat().let { startFloat ->
            startFloat + fraction * ((endValue as Number).toFloat() - startFloat)
        }
    }

}
Java
public class FloatEvaluator implements TypeEvaluator {

    public Object evaluate(float fraction, Object startValue, Object endValue) {
        float startFloat = ((Number) startValue).floatValue();
        return startFloat + fraction * (((Number) endValue).floatValue() - startFloat);
    }
}
Lưu ý: Khi ValueAnimator (hoặc ObjectAnimator) chạy, nó sẽ tính toán một phần đã trôi qua hiện tại của ảnh động (giá trị từ 0 đến 1), sau đó tính toán phiên bản được nội suy của phần đó tuỳ thuộc vào bộ nội suy mà bạn đang sử dụng. Phân số được nội suy là phân số mà TypeEvaluator nhận được thông qua tham số fraction, vì vậy bạn không cần phải tính đến bộ nội suy khi tính toán các giá trị được tạo hiệu ứng.
Sử dụng bộ nội suy
Bộ nội suy xác định cách tính các giá trị cụ thể trong một ảnh động dưới dạng hàm của thời gian. Ví dụ: bạn có thể chỉ định ảnh động diễn ra theo đường thẳng trong toàn bộ ảnh động, tức là ảnh động di chuyển đều đặn trong toàn bộ thời gian hoặc bạn có thể chỉ định ảnh động sử dụng thời gian không tuyến tính, chẳng hạn như sử dụng gia tốc hoặc giảm tốc ở đầu hoặc cuối ảnh động.
Bộ nội suy trong hệ thống ảnh động nhận một phần từ Animator (Trình tạo ảnh động) biểu thị thời gian đã trôi qua của ảnh động. Trình nội suy sửa đổi phân số này để trùng với loại ảnh động mà nó hướng đến. Hệ thống Android cung cấp một bộ nội suy chung trong android.view.animation package. Nếu không có lựa chọn nào phù hợp với nhu cầu của bạn, bạn có thể triển khai giao diện TimeInterpolator và tạo giao diện riêng.
Ví dụ: cách tính toán các phân số được nội suy của bộ nội suy mặc định AccelerateDecelerateInterpolator và LinearInterpolator được so sánh dưới đây.
LinearInterpolator không ảnh hưởng đến phần phân số đã trôi qua. AccelerateDecelerateInterpolator tăng tốc vào ảnh động và giảm tốc ra khỏi ảnh động. Các phương thức sau đây xác định logic cho những bộ nội suy này:
AccelerateDecelerateInterpolator
Kotlin
override fun getInterpolation(input: Float): Float =
        (Math.cos((input + 1) * Math.PI) / 2.0f).toFloat() + 0.5f
Java
@Override
public float getInterpolation(float input) {
    return (float)(Math.cos((input + 1) * Math.PI) / 2.0f) + 0.5f;
}
LinearInterpolator
Kotlin
override fun getInterpolation(input: Float): Float = input
Java
@Override
public float getInterpolation(float input) {
    return input;
}
Bảng sau đây biểu thị các giá trị gần đúng được tính toán bởi những bộ nội suy này cho một ảnh động kéo dài 1000 mili giây:
| mili giây đã trôi qua | Phân số đã trôi qua/Phân số được nội suy (Tuyến tính) | Phân số được nội suy (Tăng tốc/Giảm tốc) |
|---|---|---|
| 0 | 0 | 0 |
| 200 | 0,2 | 0,1 |
| 400 | 0,4 | 0,345 |
| 600 | 0,6 | .654 |
| 800 | 0,8 | 0,9 |
| 1000 | 1 | 1 |
Như bảng cho thấy, LinearInterpolator thay đổi các giá trị với cùng tốc độ, 0,2 cho mỗi 200 mili giây trôi qua. AccelerateDecelerateInterpolator thay đổi các giá trị nhanh hơn LinearInterpolator trong khoảng từ 200 mili giây đến 600 mili giây và chậm hơn trong khoảng từ 600 mili giây đến 1000 mili giây.
Chỉ định khung hình chính
Đối tượng Keyframe bao gồm một cặp thời gian/giá trị cho phép bạn xác định một trạng thái cụ thể tại một thời điểm cụ thể của ảnh động. Mỗi khung hình chính cũng có thể có bộ nội suy riêng để kiểm soát hành vi của ảnh động trong khoảng thời gian giữa thời gian của khung hình chính trước đó và thời gian của khung hình chính này.
Để tạo thực thể cho một đối tượng Keyframe, bạn phải dùng một trong các phương thức của nhà máy là ofInt(), ofFloat() hoặc ofObject() để lấy loại Keyframe phù hợp. Sau đó, bạn gọi phương thức của nhà máy ofKeyframe() để lấy một đối tượng PropertyValuesHolder. Sau khi có đối tượng, bạn có thể lấy một trình tạo hiệu ứng bằng cách truyền đối tượng PropertyValuesHolder và đối tượng để tạo hiệu ứng. Đoạn mã sau đây minh hoạ cách thực hiện việc này:
Kotlin
val kf0 = Keyframe.ofFloat(0f, 0f)
val kf1 = Keyframe.ofFloat(.5f, 360f)
val kf2 = Keyframe.ofFloat(1f, 0f)
val pvhRotation = PropertyValuesHolder.ofKeyframe("rotation", kf0, kf1, kf2)
ObjectAnimator.ofPropertyValuesHolder(target, pvhRotation).apply {
    duration = 5000
}
Java
Keyframe kf0 = Keyframe.ofFloat(0f, 0f);
Keyframe kf1 = Keyframe.ofFloat(.5f, 360f);
Keyframe kf2 = Keyframe.ofFloat(1f, 0f);
PropertyValuesHolder pvhRotation = PropertyValuesHolder.ofKeyframe("rotation", kf0, kf1, kf2);
ObjectAnimator rotationAnim = ObjectAnimator.ofPropertyValuesHolder(target, pvhRotation);
rotationAnim.setDuration(5000);
Tạo ảnh động cho khung hiển thị
Hệ thống ảnh động thuộc tính cho phép đơn giản hoá ảnh động của các đối tượng Chế độ xem và mang lại một số lợi thế so với hệ thống ảnh động chế độ xem. Hệ thống ảnh động của khung hiển thị đã chuyển đổi các đối tượng Khung hiển thị bằng cách thay đổi cách vẽ các đối tượng đó. Điều này được xử lý trong vùng chứa của mỗi Khung hiển thị, vì bản thân Khung hiển thị không có thuộc tính nào để thao tác. Điều này dẫn đến việc View được tạo hiệu ứng động, nhưng không gây ra thay đổi nào trong chính đối tượng View. Điều này dẫn đến hành vi như một đối tượng vẫn tồn tại ở vị trí ban đầu, mặc dù đối tượng đó được vẽ ở một vị trí khác trên màn hình. Trong Android 3.0, các thuộc tính mới và phương thức getter cũng như setter tương ứng đã được thêm vào để loại bỏ nhược điểm này.
Hệ thống ảnh động thuộc tính có thể tạo ảnh động cho các Thành phần hiển thị trên màn hình bằng cách thay đổi các thuộc tính thực tế trong các đối tượng Thành phần hiển thị. Ngoài ra, các View cũng tự động gọi phương thức invalidate() để làm mới màn hình bất cứ khi nào các thuộc tính của màn hình thay đổi. Các thuộc tính mới trong lớp View giúp tạo ảnh động cho thuộc tính là:
translationXvàtranslationY: Các thuộc tính này kiểm soát vị trí của Thành phần hiển thị dưới dạng một delta từ toạ độ bên trái và trên cùng do vùng chứa bố cục đặt.rotation,rotationXvàrotationY: Các thuộc tính này kiểm soát chế độ xoay ở chế độ 2D (thuộc tínhrotation) và 3D xung quanh điểm xoay.scaleXvàscaleY: Các thuộc tính này kiểm soát việc điều chỉnh tỷ lệ 2D của một Khung hiển thị xung quanh điểm xoay.pivotXvàpivotY: Các thuộc tính này kiểm soát vị trí của điểm trung tâm, điểm mà các phép biến đổi xoay và điều chỉnh tỷ lệ diễn ra xung quanh đó. Theo mặc định, điểm xoay nằm ở tâm của đối tượng.xvày: Đây là các thuộc tính tiện ích đơn giản để mô tả vị trí cuối cùng của Chế độ xem trong vùng chứa, dưới dạng tổng của các giá trị bên trái và trên cùng cũng như các giá trị translationX và translationY.alpha: Biểu thị độ trong suốt alpha trên Khung hiển thị. Theo mặc định, giá trị này là 1 (không trong suốt), với giá trị 0 thể hiện độ trong suốt hoàn toàn (không nhìn thấy).
Để tạo hiệu ứng cho một thuộc tính của đối tượng View, chẳng hạn như giá trị màu hoặc giá trị xoay, bạn chỉ cần tạo một trình tạo hiệu ứng thuộc tính và chỉ định thuộc tính View mà bạn muốn tạo hiệu ứng. Ví dụ:
Kotlin
ObjectAnimator.ofFloat(myView, "rotation", 0f, 360f)
Java
ObjectAnimator.ofFloat(myView, "rotation", 0f, 360f);
Để biết thêm thông tin về cách tạo trình tạo ảnh động, hãy xem các phần về cách tạo ảnh động bằng ValueAnimator và ObjectAnimator.
Tạo ảnh động bằng ViewPropertyAnimator
ViewPropertyAnimator cung cấp một cách đơn giản để tạo hiệu ứng cho một số thuộc tính của View song song, bằng cách sử dụng một đối tượng Animator cơ bản duy nhất. Đối tượng này hoạt động giống như ObjectAnimator, vì nó sửa đổi các giá trị thực tế của thuộc tính thành phần hiển thị, nhưng hiệu quả hơn khi tạo ảnh động cho nhiều thuộc tính cùng một lúc. Ngoài ra, mã để sử dụng ViewPropertyAnimator sẽ ngắn gọn và dễ đọc hơn nhiều. Các đoạn mã sau đây cho thấy sự khác biệt khi sử dụng nhiều đối tượng ObjectAnimator, một ObjectAnimator và ViewPropertyAnimator khi đồng thời tạo hiệu ứng cho thuộc tính x và y của một khung hiển thị.
Nhiều đối tượng ObjectAnimator
Kotlin
val animX = ObjectAnimator.ofFloat(myView, "x", 50f)
val animY = ObjectAnimator.ofFloat(myView, "y", 100f)
AnimatorSet().apply {
    playTogether(animX, animY)
    start()
}
Java
ObjectAnimator animX = ObjectAnimator.ofFloat(myView, "x", 50f);
ObjectAnimator animY = ObjectAnimator.ofFloat(myView, "y", 100f);
AnimatorSet animSetXY = new AnimatorSet();
animSetXY.playTogether(animX, animY);
animSetXY.start();
Một ObjectAnimator
Kotlin
val pvhX = PropertyValuesHolder.ofFloat("x", 50f)
val pvhY = PropertyValuesHolder.ofFloat("y", 100f)
ObjectAnimator.ofPropertyValuesHolder(myView, pvhX, pvhY).start()
Java
PropertyValuesHolder pvhX = PropertyValuesHolder.ofFloat("x", 50f);
PropertyValuesHolder pvhY = PropertyValuesHolder.ofFloat("y", 100f);
ObjectAnimator.ofPropertyValuesHolder(myView, pvhX, pvhY).start();
ViewPropertyAnimator
Kotlin
myView.animate().x(50f).y(100f)
Java
myView.animate().x(50f).y(100f);
Để biết thêm thông tin chi tiết về ViewPropertyAnimator, hãy xem bài đăng trên blog tương ứng của Nhà phát triển Android.
Khai báo ảnh động trong XML
Hệ thống ảnh động thuộc tính cho phép bạn khai báo ảnh động thuộc tính bằng XML thay vì thực hiện theo cách lập trình. Bằng cách xác định ảnh động trong XML, bạn có thể dễ dàng sử dụng lại ảnh động trong nhiều hoạt động và dễ dàng chỉnh sửa chuỗi ảnh động hơn.
Để phân biệt các tệp ảnh động sử dụng API ảnh động thuộc tính mới với những tệp sử dụng khung ảnh động khung hiển thị cũ, bắt đầu từ Android 3.1, bạn nên lưu các tệp XML cho ảnh động thuộc tính trong thư mục res/animator/.
Các lớp ảnh động thuộc tính sau đây có hỗ trợ khai báo XML bằng các thẻ XML sau:
ValueAnimator–<animator>ObjectAnimator–<objectAnimator>AnimatorSet–<set>
Để tìm các thuộc tính mà bạn có thể dùng trong khai báo XML, hãy xem Tài nguyên ảnh động. Ví dụ sau đây phát tuần tự 2 nhóm ảnh động đối tượng, trong đó nhóm lồng nhau đầu tiên phát cùng lúc 2 ảnh động đối tượng:
<set android:ordering="sequentially">
    <set>
        <objectAnimator
            android:propertyName="x"
            android:duration="500"
            android:valueTo="400"
            android:valueType="intType"/>
        <objectAnimator
            android:propertyName="y"
            android:duration="500"
            android:valueTo="300"
            android:valueType="intType"/>
    </set>
    <objectAnimator
        android:propertyName="alpha"
        android:duration="500"
        android:valueTo="1f"/>
</set>
Để chạy ảnh động này, bạn phải tăng cường tài nguyên XML trong mã thành đối tượng AnimatorSet, sau đó đặt đối tượng mục tiêu cho tất cả các ảnh động trước khi bắt đầu bộ ảnh động. Việc gọi setTarget() sẽ đặt một đối tượng mục tiêu duy nhất cho tất cả thành phần con của AnimatorSet để thuận tiện. Mã sau đây minh hoạ cách thực hiện việc này:
Kotlin
(AnimatorInflater.loadAnimator(myContext, R.animator.property_animator) as AnimatorSet).apply {
    setTarget(myObject)
    start()
}
Java
AnimatorSet set = (AnimatorSet) AnimatorInflater.loadAnimator(myContext,
    R.animator.property_animator);
set.setTarget(myObject);
set.start();
Bạn cũng có thể khai báo một ValueAnimator trong XML, như minh hoạ trong ví dụ sau:
<animator xmlns:android="http://schemas.android.com/apk/res/android"
    android:duration="1000"
    android:valueType="floatType"
    android:valueFrom="0f"
    android:valueTo="-100f" />
Để sử dụng ValueAnimator trước đó trong mã, bạn phải tăng cường đối tượng, thêm AnimatorUpdateListener, lấy giá trị ảnh động đã cập nhật và sử dụng giá trị đó trong một thuộc tính của một trong các khung hiển thị, như minh hoạ trong đoạn mã sau:
Kotlin
(AnimatorInflater.loadAnimator(this, R.animator.animator) as ValueAnimator).apply {
    addUpdateListener { updatedAnimation ->
        textView.translationX = updatedAnimation.animatedValue as Float
    }

    start()
}
Java
ValueAnimator xmlAnimator = (ValueAnimator) AnimatorInflater.loadAnimator(this,
        R.animator.animator);
xmlAnimator.addUpdateListener(new ValueAnimator.AnimatorUpdateListener() {
    @Override
    public void onAnimationUpdate(ValueAnimator updatedAnimation) {
        float animatedValue = (float)updatedAnimation.getAnimatedValue();
        textView.setTranslationX(animatedValue);
    }
});

xmlAnimator.start();
Để biết thông tin về cú pháp XML để xác định ảnh động thuộc tính, hãy xem phần Tài nguyên ảnh động .
Ảnh hưởng có thể xảy ra đối với hiệu suất giao diện người dùng
Các đối tượng tạo ảnh động cập nhật giao diện người dùng sẽ gây ra thêm công việc kết xuất cho mọi khung hình mà ảnh động chạy. Vì lý do này, việc sử dụng các ảnh động tiêu tốn nhiều tài nguyên có thể ảnh hưởng tiêu cực đến hiệu suất của ứng dụng.
Công việc cần thiết để tạo hiệu ứng cho giao diện người dùng sẽ được thêm vào giai đoạn tạo ảnh động của quy trình kết xuất. Bạn có thể biết liệu các ảnh động có ảnh hưởng đến hiệu suất của ứng dụng hay không bằng cách bật tính năng Phân tích trực quan tốc độ kết xuất của GPU và theo dõi giai đoạn ảnh động. Để biết thêm thông tin, hãy xem bài viết Hướng dẫn phân tích hiệu suất kết xuất của GPU.