반응형 UI 및 탐색
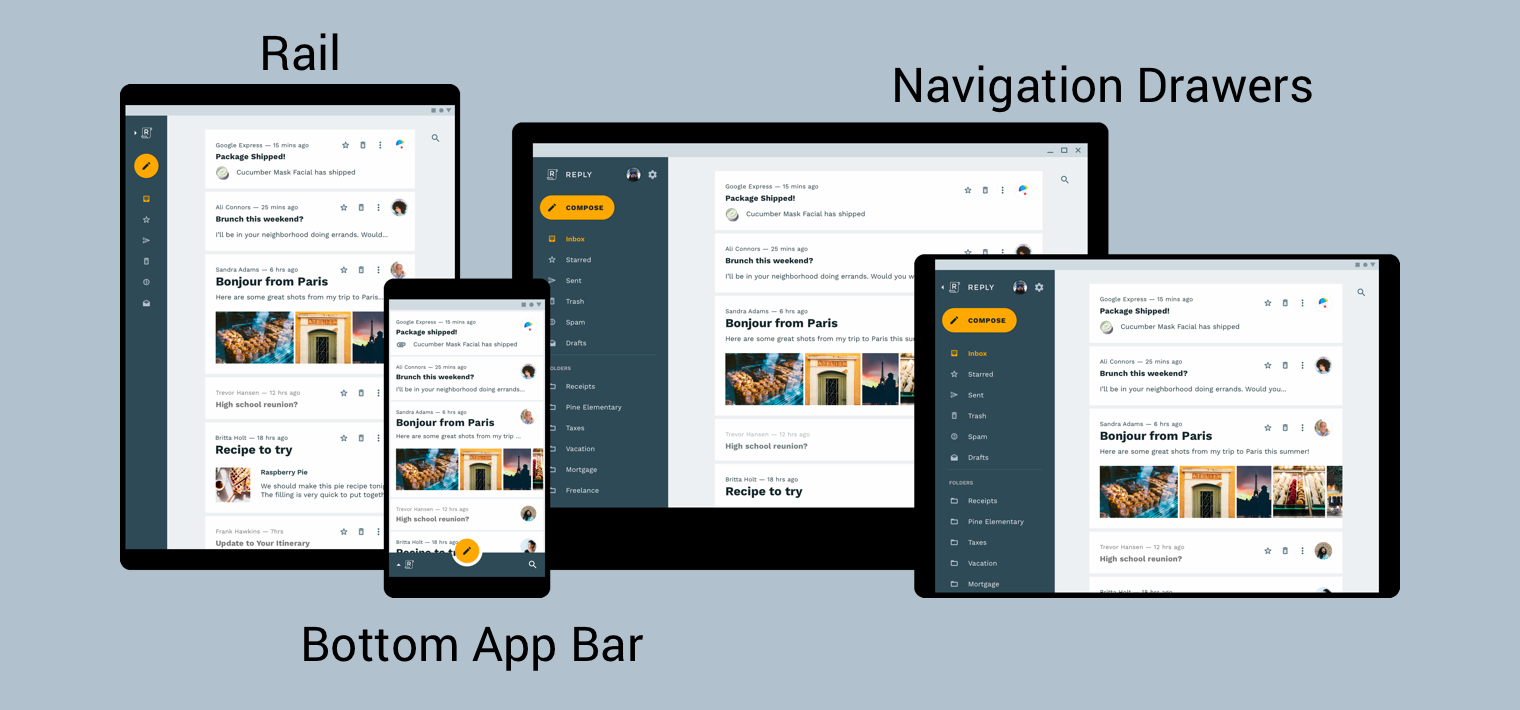
사용자에게 최상의 탐색 환경을 제공하려면 사용자 기기의 너비, 높이 및 최소 너비에 맞게 조정된 탐색 UI를 제공해야 합니다. 하단 앱 바, 항상 표시되거나 접을 수 있는 탐색 창, 레일 또는 사용 가능한 화면 공간과 앱의 고유한 스타일에 따라 완전히 새로운 것을 사용하길 바랄 수 있습니다.

머티리얼 디자인 제품 아키텍처 가이드에서는 환경 변경사항에 따라 동적으로 조정되는 UI인 반응형 UI를 빌드하기 위한 추가 컨텍스트와 고려사항을 제공합니다. 환경 변경사항의 예로는 너비, 높이, 방향, 사용자 언어 환경설정 조정 등이 있습니다. 이러한 환경 속성을 통칭하여 기기의 설정이라고 합니다.
런타임 시 이러한 속성 중 하나 이상이 변경되면 Android OS는 앱의 활동 및 프래그먼트를 제거하고 다시 만들어 응답합니다. 따라서 Android의 반응형 UI를 지원하기 위해 할 수 있는 가장 좋은 방법은 적절한 경우 리소스 구성 한정자를 사용하는지 그리고 하드 코딩 레이아웃 크기를 사용하지 않는지 확인하는 것입니다.
반응형 UI에서 전역 탐색 구현
전역 탐색을 반응형 UI의 일부로 구현하는 작업은 탐색 그래프를 호스팅하는 활동으로 시작됩니다. 실습 예는 탐색 Codelab을 확인하세요.
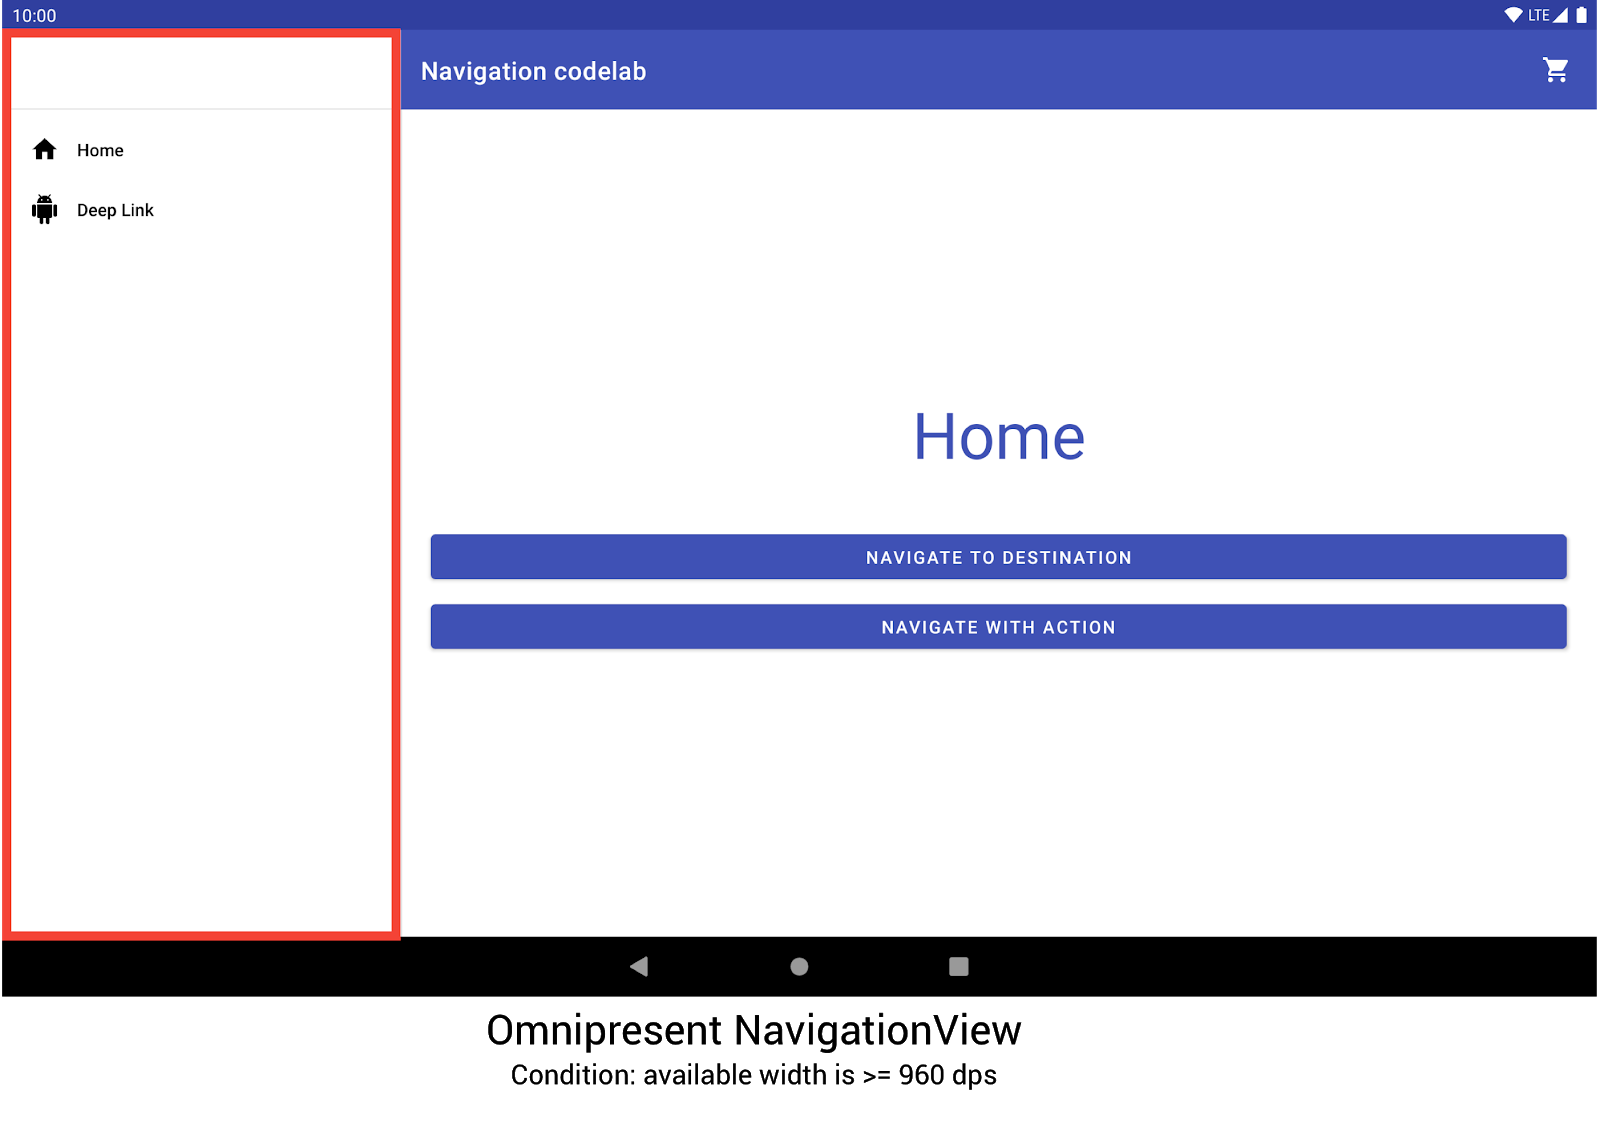
Codelab에서는 NavigationView를 사용하여 그림 2와 같이 탐색 메뉴를 표시합니다. 최소 960dp 너비로 렌더링되는 기기에서 실행되는 경우 이 NavigationView는 항상 화면에 표시됩니다.

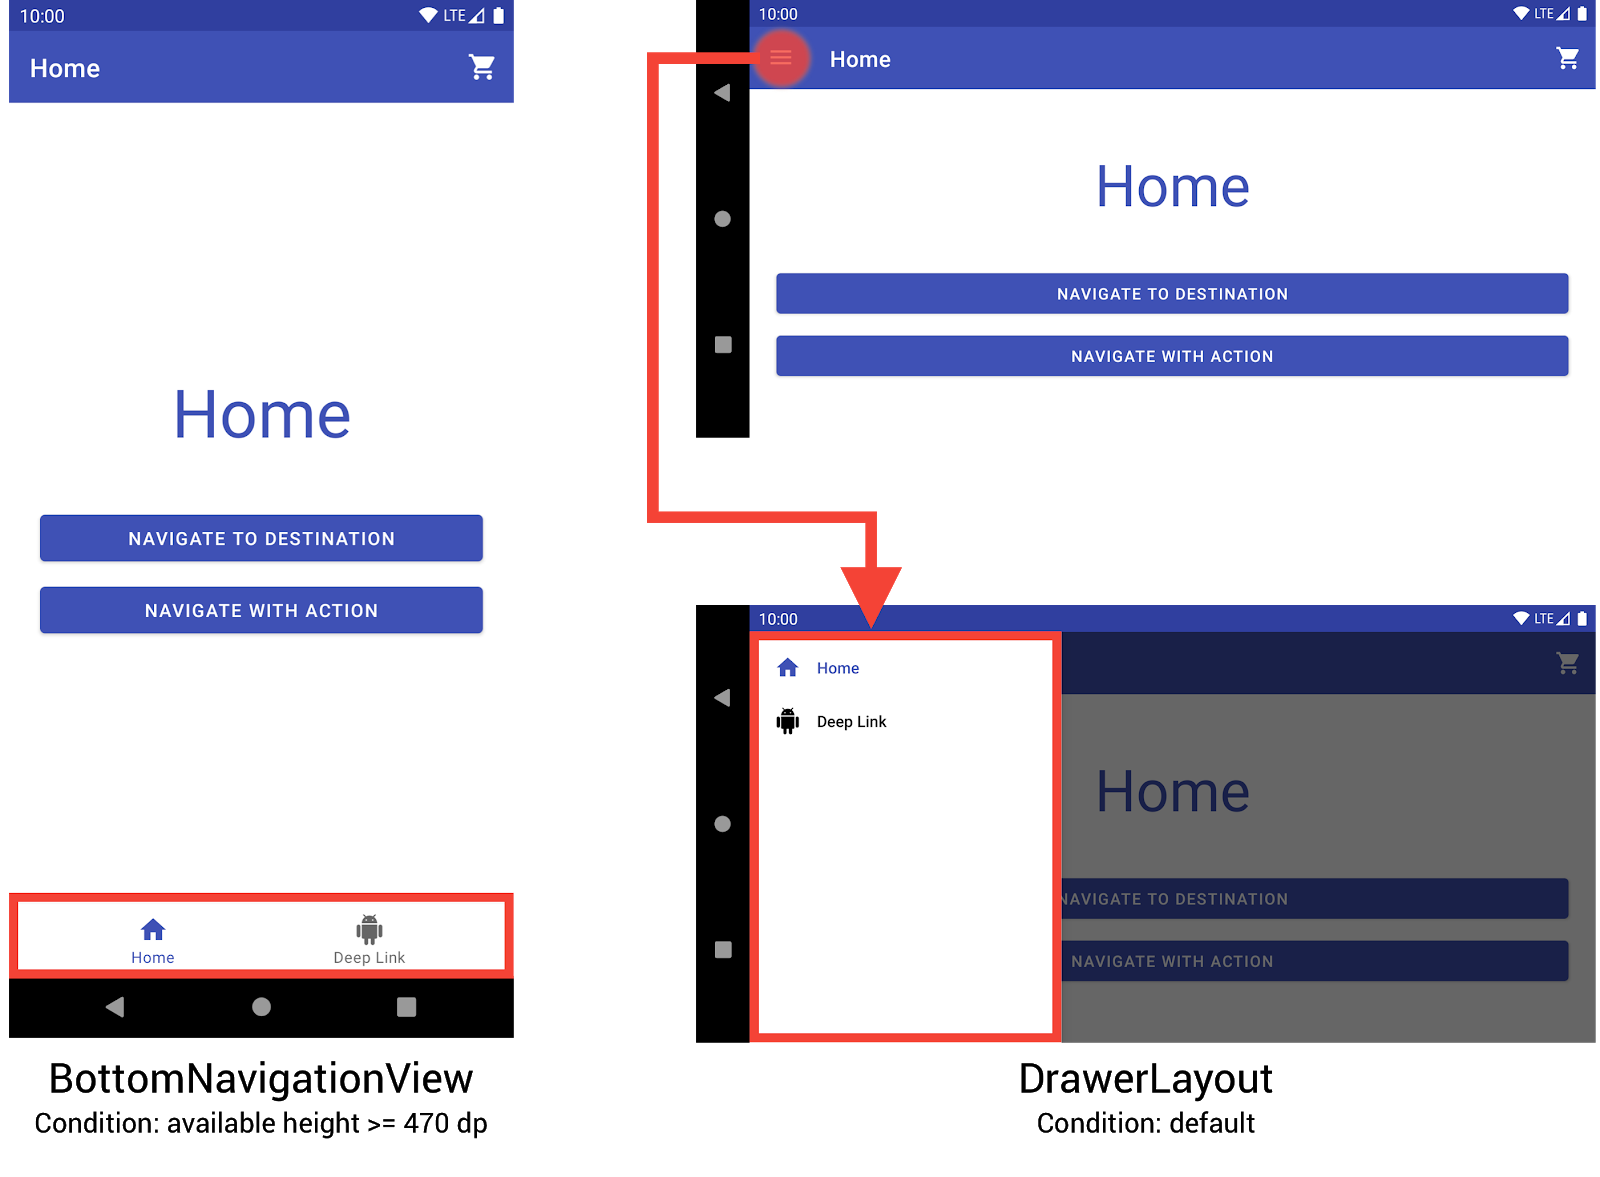
NavigationView를 사용하여 탐색 메뉴를 표시하는 탐색 Codelab다른 기기 크기 및 방향은 필요에 따라 DrawerLayout 또는 BottomNavigationView 사이에서 동적으로 전환됩니다.

BottomNavigationView 및 DrawerLayout을 사용하여 소형 기기에서 탐색 메뉴를 표시하는 탐색 Codelab세 가지 레이아웃을 만들어 이 동작을 구현할 수 있습니다. 여기서 각 레이아웃은 현재 기기 설정에 기반하여 원하는 탐색 요소와 뷰 계층 구조를 정의합니다.
각 레이아웃이 적용되는 설정은 레이아웃 파일이 배치되는 디렉터리 구조에 따라 결정됩니다. 예를 들어 NavigationView 레이아웃 파일은 res/layout-w960dp 디렉터리에서 찾을 수 있습니다.
<!-- res/layout-w960dp/navigation_activity.xml -->
<RelativeLayout
   xmlns:android="http://schemas.android.com/apk/res/android"
   xmlns:app="http://schemas.android.com/apk/res-auto"
   xmlns:tools="http://schemas.android.com/tools"
   android:layout_width="match_parent"
   android:layout_height="match_parent"
   tools:context="com.example.android.codelabs.navigation.MainActivity">

   <com.google.android.material.navigation.NavigationView
       android:id="@+id/nav_view"
       android:layout_width="wrap_content"
       android:layout_height="match_parent"
       android:layout_alignParentStart="true"
       app:elevation="0dp"
       app:headerLayout="@layout/nav_view_header"
       app:menu="@menu/nav_drawer_menu" />

   <View
       android:layout_width="1dp"
       android:layout_height="match_parent"
       android:layout_toEndOf="@id/nav_view"
       android:background="?android:attr/listDivider" />

   <androidx.appcompat.widget.Toolbar
       android:id="@+id/toolbar"
       android:layout_width="match_parent"
       android:layout_height="wrap_content"
       android:layout_alignParentTop="true"
       android:layout_toEndOf="@id/nav_view"
       android:background="@color/colorPrimary"
       android:theme="@style/ThemeOverlay.MaterialComponents.Dark.ActionBar" />

   <androidx.fragment.app.FragmentContainerView
       android:id="@+id/my_nav_host_fragment"
       android:name="androidx.navigation.fragment.NavHostFragment"
       android:layout_width="match_parent"
       android:layout_height="match_parent"
       android:layout_below="@id/toolbar"
       android:layout_toEndOf="@id/nav_view"
       app:defaultNavHost="true"
       app:navGraph="@navigation/mobile_navigation" />
</RelativeLayout>
하단 탐색 뷰는 res/layout-h470dp 디렉터리에 있습니다.
<!-- res/layout-h470dp/navigation_activity.xml -->
<LinearLayout
   xmlns:android="http://schemas.android.com/apk/res/android"
   xmlns:app="http://schemas.android.com/apk/res-auto"
   xmlns:tools="http://schemas.android.com/tools"
   android:layout_width="match_parent"
   android:layout_height="match_parent"
   android:orientation="vertical"
   tools:context="com.example.android.codelabs.navigation.MainActivity">

   <androidx.appcompat.widget.Toolbar
       android:id="@+id/toolbar"
       android:layout_width="match_parent"
       android:layout_height="wrap_content"
       android:background="@color/colorPrimary"
       android:theme="@style/ThemeOverlay.MaterialComponents.Dark.ActionBar" />

   <androidx.fragment.app.FragmentContainerView
       android:id="@+id/my_nav_host_fragment"
       android:name="androidx.navigation.fragment.NavHostFragment"
       android:layout_width="match_parent"
       android:layout_height="0dp"
       android:layout_weight="1"
       app:defaultNavHost="true"
       app:navGraph="@navigation/mobile_navigation" />

   <com.google.android.material.bottomnavigation.BottomNavigationView
       android:id="@+id/bottom_nav_view"
       android:layout_width="match_parent"
       android:layout_height="wrap_content"
       app:menu="@menu/bottom_nav_menu" />
</LinearLayout>
창 레이아웃은 res/layout 디렉터리에 있습니다. 구성별 한정자가 없는 기본 레이아웃에 이 디렉터리를 사용합니다.
<!-- res/layout/navigation_activity.xml -->
<androidx.drawerlayout.widget.DrawerLayout
   xmlns:android="http://schemas.android.com/apk/res/android"
   xmlns:app="http://schemas.android.com/apk/res-auto"
   xmlns:tools="http://schemas.android.com/tools"
   android:id="@+id/drawer_layout"
   android:layout_width="match_parent"
   android:layout_height="match_parent"
   tools:context="com.example.android.codelabs.navigation.MainActivity">

   <LinearLayout
       android:layout_width="match_parent"
       android:layout_height="match_parent"
       android:orientation="vertical">

       <androidx.appcompat.widget.Toolbar
           android:id="@+id/toolbar"
           android:layout_width="match_parent"
           android:layout_height="wrap_content"
           android:background="@color/colorPrimary"
           android:theme="@style/ThemeOverlay.MaterialComponents.Dark.ActionBar" />

       <androidx.fragment.app.FragmentContainerView
           android:id="@+id/my_nav_host_fragment"
           android:name="androidx.navigation.fragment.NavHostFragment"
           android:layout_width="match_parent"
           android:layout_height="match_parent"
           app:defaultNavHost="true"
           app:navGraph="@navigation/mobile_navigation" />
   </LinearLayout>

   <com.google.android.material.navigation.NavigationView
       android:id="@+id/nav_view"
       android:layout_width="wrap_content"
       android:layout_height="match_parent"
       android:layout_gravity="start"
       app:menu="@menu/nav_drawer_menu" />
</androidx.drawerlayout.widget.DrawerLayout>
Android는 적용할 리소스를 결정할 때 우선순위를 따릅니다. 이 예에서 -w960dp(또는 사용 가능한 너비 960dp 이상)는 -h470dp(또는 사용 가능한 높이 470 이상)보다 우선합니다. 기기 설정이 위 조건과 일치하지 않으면 기본 레이아웃 리소스(res/layout/navigation_activity.xml)가 사용됩니다.
탐색 이벤트를 처리할 때는 다음 예와 같이 현재 있는 위젯에 상응하는 이벤트만 연결해야 합니다.
Kotlin
class MainActivity : AppCompatActivity() {

   private lateinit var appBarConfiguration : AppBarConfiguration

   override fun onCreate(savedInstanceState: Bundle?) {
      super.onCreate(savedInstanceState)
      setContentView(R.layout.navigation_activity)
      val drawerLayout : DrawerLayout? = findViewById(R.id.drawer_layout)
      appBarConfiguration = AppBarConfiguration(
                  setOf(R.id.home_dest, R.id.deeplink_dest),
                  drawerLayout)

      ...

      // Initialize the app bar with the navigation drawer if present.
      // If the drawerLayout is not null here, a Navigation button will be added
      // to the app bar whenever the user is on a top-level destination.
      setupActionBarWithNavController(navController, appBarConfig)

      // Initialize the NavigationView if it is present,
      // so that clicking an item takes
      // the user to the appropriate destination.
      val sideNavView = findViewById<NavigationView>(R.id.nav_view)
      sideNavView?.setupWithNavController(navController)

      // Initialize the BottomNavigationView if it is present,
      // so that clicking an item takes
      // the user to the appropriate destination.
      val bottomNav = findViewById<BottomNavigationView>(R.id.bottom_nav_view)
      bottomNav?.setupWithNavController(navController)

      ...
    }

    ...
}
자바
public class MainActivity extends AppCompatActivity {

   private AppBarConfiguration appBarConfiguration;

   @Override
   protected void onCreate(@Nullable Bundle savedInstanceState) {
       super.onCreate(savedInstanceState);
       setContentView(R.layout.navigation_activity);
       NavHostFragment host = (NavHostFragment) getSupportFragmentManager()
               .findFragmentById(R.id.my_nav_host_fragment);
       NavController navController = host.getNavController();

       DrawerLayout drawerLayout = findViewById(R.id.drawer_layout);
       appBarConfiguration = new AppBarConfiguration.Builder(
               R.id.home_dest, R.id.deeplink_dest)
               .setDrawerLayout(drawerLayout)
               .build();

       // Initialize the app bar with the navigation drawer if present.
       // If the drawerLayout is not null here, a Navigation button will be added to
       // the app bar whenever the user is on a top-level destination.
       NavigationUI.setupActionBarWithNavController(
               this, navController, appBarConfiguration);


       // Initialize the NavigationView if it is present,
       // so that clicking an item takes
       // the user to the appropriate destination.
       NavigationView sideNavView = findViewById(R.id.nav_view);
       if(sideNavView != null) {
           NavigationUI.setupWithNavController(sideNavView, navController);
       }

       // Initialize the BottomNavigationView if it is present,
       // so that clicking an item takes
       // the user to the appropriate destination.
       BottomNavigationView bottomNav = findViewById(R.id.bottom_nav_view);
       if(bottomNav != null) {
           NavigationUI.setupWithNavController(bottomNav, navController);
       }

   }
}
기기 설정이 변경되면 명시적으로 설정하지 않는 한 Android는 이전 설정의 활동을 연결된 뷰와 함께 제거합니다. 그런 다음 새로운 설정을 위해 설계된 리소스로 활동을 다시 만듭니다. 그러면 제거되고 다시 만들어지는 활동이 onCreate()에서 적절한 전역 탐색 요소를 자동으로 연결합니다.
분할 뷰 레이아웃의 대안 고려
분할 뷰 레이아웃(마스터/세부정보 레이아웃)은 한때 태블릿과 기타 대형 화면 기기용으로 디자인하는 데 매우 인기 있고 권장되는 방법이었습니다.
Android 태블릿의 도입 이후 기기 생태계가 급속도로 성장했습니다. 대형 화면 기기의 설계 공간에 상당한 영향을 미친 요소 한 가지는 멀티 윈도우 모드, 특히 Chrome OS 기기에서처럼 완전히 크기를 조절할 수 있는 자유 형식 창의 도입이었습니다. 이는 화면 크기에 따라 탐색 구조를 변경하기보다는 반응하는 앱의 모든 화면에 훨씬 큰 중점을 둡니다.
탐색 라이브러리를 사용하여 분할 뷰 레이아웃 인터페이스를 구현할 수도 있지만 다른 대안을 고려해야 합니다.
대상 이름
android:label 속성을 사용하여 그래프의 대상 이름을 제공하면 콘텐츠가 계속 현지화될 수 있도록 항상 리소스 값을 사용해야 합니다.
<navigation ...>
    <fragment
        android:id="@+id/my_dest"
        android:name="com.example.MyFragment"
        android:label="@string/my_dest_label"
        tools:layout="@layout/my_fragment" />
    ...
리소스 값을 사용하면 구성이 변경될 때마다 대상에 가장 적절한 리소스가 자동으로 적용됩니다.
