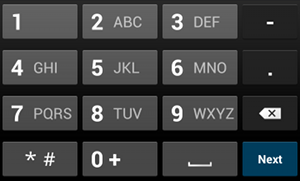
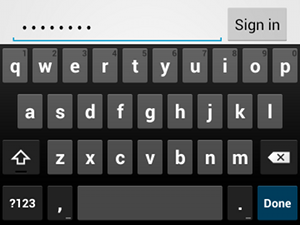
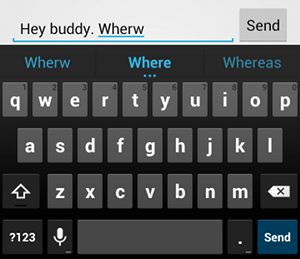
모든 텍스트 필드에는 이메일 주소, 전화번호 또는 일반 텍스트와 같은 특정 유형의 텍스트를 입력해야 합니다. 시스템에서 적절한 소프트 입력 방법(예: 터치 키보드)이 표시되도록 앱의 텍스트 필드별로 입력 유형을 지정해야 합니다.
입력 방법에 사용할 수 있는 버튼의 유형 이외에, 입력 방법이 맞춤법 제안을 제공하고 새 문장을 대문자로 시작하고 캐리지 리턴 버튼을 완료 또는 다음과 같은 작업 버튼으로 바꿀지 여부와 같은 동작을 지정할 수 있습니다. 이 페이지에서는 이러한 특성을 지정하는 방법을 보여줍니다.
대부분의 소프트 입력 방법에서는 현재 텍스트 필드에 적합한 사용자 작업 버튼을 하단 모서리에 제공합니다. 기본적으로 시스템은 이 버튼을 다음 작업 또는 완료 작업에 사용합니다. 단, 텍스트 필드에서 여러 줄 텍스트(예: android:inputType="textMultiLine" 적용)를 지원하는 경우는 예외이며, 이럴 때에는 작업 버튼은 캐리지 리턴입니다. 하지만 텍스트 필드에 더 적합할 수 있는 다른 작업(예: 보내기 또는 이동)을 지정할 수 있습니다.
키보드 작업 버튼을 지정하려면 android:imeOptions 속성을 "actionSend" 또는 "actionSearch" 같은 작업 값과 함께 사용합니다. 예를 들면 다음과 같습니다.
그림 4.android:imeOptions="actionSend"를 선언하면 보내기 버튼이 표시됩니다.
사용자가 입력할 때 제안 단어를 제공하려면 EditText의 서브클래스인 AutoCompleteTextView를 사용하면 됩니다.
자동 완성을 구현하려면 텍스트 제안을 제공하는 Adapter를 지정해야 합니다. 데이터베이스나 배열과 같은 데이터 출처에 따라 사용할 수 있는 여러 어댑터가 있습니다.
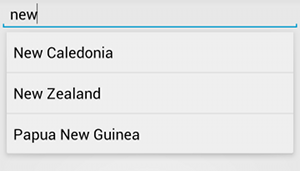
그림 5. 텍스트 제안이 포함된 AutoCompleteTextView의 예
다음 절차에서는 ArrayAdapter를 사용하여 배열에서 제안을 제공하는 AutoCompleteTextView를 설정하는 방법을 설명합니다.
레이아웃에 AutoCompleteTextView를 추가합니다. 다음은 텍스트 필드만 있는 레이아웃입니다.
// Get a reference to the AutoCompleteTextView in the layout.valtextView=findViewById(R.id.autocomplete_country)asAutoCompleteTextView// Get the string array.valcountries:Array<outString>=resources.getStringArray(R.array.countries_array)// Create the adapter and set it to the AutoCompleteTextView.ArrayAdapter<String>(this,android.R.layout.simple_list_item_1,countries).also{adapter->
textView.setAdapter(adapter)}
자바
// Get a reference to the AutoCompleteTextView in the layout.AutoCompleteTextViewtextView=(AutoCompleteTextView)findViewById(R.id.autocomplete_country);// Get the string array.String[]countries=getResources().getStringArray(R.array.countries_array);// Create the adapter and set it to the AutoCompleteTextView.ArrayAdapter<String>adapter=newArrayAdapter<String>(this,android.R.layout.simple_list_item_1,countries);textView.setAdapter(adapter);
위 예에서 새 ArrayAdapter가 초기화되어 countries_array 문자열 배열의 각 항목을 simple_list_item_1 레이아웃에 있는 TextView에 결합합니다. 이 레이아웃은 Android에서 제공되는 레이아웃으로, 목록에 있는 텍스트의 표준 모양을 제공합니다.
이 페이지에 나와 있는 콘텐츠와 코드 샘플에는 콘텐츠 라이선스에서 설명하는 라이선스가 적용됩니다. 자바 및 OpenJDK는 Oracle 및 Oracle 계열사의 상표 또는 등록 상표입니다.
최종 업데이트: 2025-07-26(UTC)
[[["이해하기 쉬움","easyToUnderstand","thumb-up"],["문제가 해결됨","solvedMyProblem","thumb-up"],["기타","otherUp","thumb-up"]],[["필요한 정보가 없음","missingTheInformationINeed","thumb-down"],["너무 복잡함/단계 수가 너무 많음","tooComplicatedTooManySteps","thumb-down"],["오래됨","outOfDate","thumb-down"],["번역 문제","translationIssue","thumb-down"],["샘플/코드 문제","samplesCodeIssue","thumb-down"],["기타","otherDown","thumb-down"]],["최종 업데이트: 2025-07-26(UTC)"],[],[],null,["# Specify the input method type\n\nTry the Compose way \nJetpack Compose is the recommended UI toolkit for Android. Learn how to use touch and input in Compose. \n[Set keyboard options →](/develop/ui/compose/text/user-input#keyboard-options) \n\nEvery text field expects a certain type of text input, such as an email address, phone number, or\nplain text. You must specify the input type for each text field in your app so the system displays\nthe appropriate soft input method, such as an on-screen keyboard.\n\nBeyond the type of buttons available with an input method, you can specify behaviors such as\nwhether the input method provides spelling suggestions, capitalizes new sentences, and replaces the\ncarriage return button with an action button such as **Done** or **Next**. This page shows how\nto specify these characteristics.\n\nSpecify the keyboard type\n-------------------------\n\nAlways declare the input method for your text fields by adding the\n[`android:inputType`](/reference/android/widget/TextView#attr_android:inputType)\nattribute to the\n[\u003cEditText\u003e](/reference/android/widget/EditText) element.\n**Figure 1.** The `phone` input type.\n\nFor example, if you want an input method for entering a phone number, use the\n`\"phone\"` value: \n\n```xml\n\u003cEditText\n android:id=\"@+id/phone\"\n android:layout_width=\"fill_parent\"\n android:layout_height=\"wrap_content\"\n android:hint=\"@string/phone_hint\"\n android:inputType=\"phone\" /\u003e\n```\n**Figure 2.** The `textPassword` input type.\n\nIf the text field is for a password, use the `\"textPassword\"` value so the text field\nconceals the user's input: \n\n```xml\n\u003cEditText\n android:id=\"@+id/password\"\n android:hint=\"@string/password_hint\"\n android:inputType=\"textPassword\"\n ... /\u003e\n```\n\nThere are several possible values documented with the `android:inputType` attribute,\nand you can combine some of the values to specify the input method appearance and additional\nbehaviors.\n\nEnable spelling suggestions and other behaviors\n-----------------------------------------------\n\n**Figure 3.** Adding `textAutoCorrect` provides auto-correction for misspellings.\n\nThe `android:inputType` attribute lets you specify various behaviors for the input\nmethod. Most importantly, if your text field is intended for basic text input---such as for a\ntext message---enable auto spelling correction with the `\"textAutoCorrect\"`\nvalue.\n\nYou can combine different behaviors and input method styles with the\n`android:inputType` attribute. For example, here's how to create a text field that\ncapitalizes the first word of a sentence and also auto-corrects misspellings: \n\n```xml\n\u003cEditText\n android:id=\"@+id/message\"\n android:layout_width=\"wrap_content\"\n android:layout_height=\"wrap_content\"\n android:inputType=\n \"textCapSentences|textAutoCorrect\"\n ... /\u003e\n```\n\nSpecify the input method action\n-------------------------------\n\nMost soft input methods provide a user action button in the bottom corner that's appropriate for\nthe current text field. By default, the system uses this button for either a **Next** or\n**Done** action unless your text field supports multi-line text---such as with\n`android:inputType=\"textMultiLine\"`---in which case the action button is a carriage\nreturn. However, you can specify other actions that might be more appropriate for your text field,\nsuch as **Send** or **Go**.\n\nTo specify the keyboard action button, use the\n[`android:imeOptions`](/reference/android/widget/TextView#attr_android:imeOptions)\nattribute with an action value such as `\"actionSend\"` or `\"actionSearch\"`. For\nexample:\n**Figure 4.** The **Send** button appears when you declare `android:imeOptions=\"actionSend\"`. \n\n```xml\n\u003cEditText\n android:id=\"@+id/search\"\n android:layout_width=\"fill_parent\"\n android:layout_height=\"wrap_content\"\n android:hint=\"@string/search_hint\"\n android:inputType=\"text\"\n android:imeOptions=\"actionSend\" /\u003e\n```\n\nYou can then listen for presses on the action button by defining a\n[TextView.OnEditorActionListener](/reference/android/widget/TextView.OnEditorActionListener)\nfor the [EditText](/reference/android/widget/EditText) element. In your\nlistener, respond to the appropriate IME action ID defined in the\n[EditorInfo](/reference/android/view/inputmethod/EditorInfo) class,\nsuch as\n[IME_ACTION_SEND](/reference/android/view/inputmethod/EditorInfo#IME_ACTION_SEND),\nas shown in the following example: \n\n### Kotlin\n\n```kotlin\nfindViewById\u003cEditText\u003e(R.id.search).setOnEditorActionListener { v, actionId, event -\u003e\n return@setOnEditorActionListener when (actionId) {\n EditorInfo.IME_ACTION_SEND -\u003e {\n sendMessage()\n true\n }\n else -\u003e false\n }\n}\n```\n\n### Java\n\n```java\nEditText editText = (EditText) findViewById(R.id.search);\neditText.setOnEditorActionListener(new OnEditorActionListener() {\n @Override\n public boolean onEditorAction(TextView v, int actionId, KeyEvent event) {\n boolean handled = false;\n if (actionId == EditorInfo.IME_ACTION_SEND) {\n sendMessage();\n handled = true;\n }\n return handled;\n }\n});\n```\n\nProvide auto-complete suggestions\n---------------------------------\n\nIf you want to provide suggestions to users as they type, you can use a subclass of\n`EditText` called\n[AutoCompleteTextView](/reference/android/widget/AutoCompleteTextView).\nTo implement auto-complete, you must specify an\n[Adapter](/reference/android/widget/Adapter) that provides the text\nsuggestions. There are several adapters available, depending on where the data is coming from, such\nas from a database or an array.\n**Figure 5.** Example of `AutoCompleteTextView` with text suggestions.\n\nThe following procedure describes how to set up an `AutoCompleteTextView` that\nprovides suggestions from an array using\n[ArrayAdapter](/reference/android/widget/ArrayAdapter):\n\n1. Add the `AutoCompleteTextView` to your layout. Here's a layout with only the text field: \n\n ```xml\n \u003c?xml version=\"1.0\" encoding=\"utf-8\"?\u003e\n \u003cAutoCompleteTextView xmlns:android=\"http://schemas.android.com/apk/res/android\"\n android:id=\"@+id/autocomplete_country\"\n android:layout_width=\"fill_parent\"\n android:layout_height=\"wrap_content\" /\u003e\n ```\n2. Define the array that contains all text suggestions. For example, here's an array of country names: \n\n ```xml\n \u003c?xml version=\"1.0\" encoding=\"utf-8\"?\u003e\n \u003cresources\u003e\n \u003cstring-array name=\"countries_array\"\u003e\n \u003citem\u003eAfghanistan\u003c/item\u003e\n \u003citem\u003eAlbania\u003c/item\u003e\n \u003citem\u003eAlgeria\u003c/item\u003e\n \u003citem\u003eAmerican Samoa\u003c/item\u003e\n \u003citem\u003eAndorra\u003c/item\u003e\n \u003citem\u003eAngola\u003c/item\u003e\n \u003citem\u003eAnguilla\u003c/item\u003e\n \u003citem\u003eAntarctica\u003c/item\u003e\n ...\n \u003c/string-array\u003e\n \u003c/resources\u003e\n ```\n3. In your [Activity](/reference/android/app/Activity) or [Fragment](/reference/android/app/Fragment), use the following code to specify the adapter that supplies the suggestions: \n\n ### Kotlin\n\n ```kotlin\n // Get a reference to the AutoCompleteTextView in the layout.\n val textView = findViewById(R.id.autocomplete_country) as AutoCompleteTextView\n // Get the string array.\n val countries: Array\u003cout String\u003e = resources.getStringArray(R.array.countries_array)\n // Create the adapter and set it to the AutoCompleteTextView.\n ArrayAdapter\u003cString\u003e(this, android.R.layout.simple_list_item_1, countries).also { adapter -\u003e\n textView.setAdapter(adapter)\n }\n ```\n\n ### Java\n\n ```java\n // Get a reference to the AutoCompleteTextView in the layout.\n AutoCompleteTextView textView = (AutoCompleteTextView) findViewById(R.id.autocomplete_country);\n // Get the string array.\n String[] countries = getResources().getStringArray(R.array.countries_array);\n // Create the adapter and set it to the AutoCompleteTextView.\n ArrayAdapter\u003cString\u003e adapter =\n new ArrayAdapter\u003cString\u003e(this, android.R.layout.simple_list_item_1, countries);\n textView.setAdapter(adapter);\n ```\n\n In the preceding example, a new `ArrayAdapter` is initialized to bind each item in the\n `countries_array` string array to a\n [TextView](/reference/android/widget/TextView) that exists in the\n `simple_list_item_1` layout. This is a layout provided by Android that provides a\n standard appearance for text in a list.\n4. Assign the adapter to the `AutoCompleteTextView` by calling [setAdapter()](/reference/android/widget/AutoCompleteTextView#setAdapter(T))."]]