
설정 구성 Android Jetpack의 구성요소
설정 화면이 크고 복잡하면 사용자가 특정 설정을 변경할 수 있습니다 환경설정 라이브러리는 설정 화면을 더 잘 구성하는 방법을 알아봅니다.
환경설정 카테고리
이와 관련된
단일 환경의 Preference 객체
아이콘을 사용하여 그룹화할 수 있습니다.
PreferenceCategory 가
PreferenceCategory는 카테고리 제목을 표시하고
카테고리입니다.
XML에서 PreferenceCategory를 정의하려면 Preference 태그를 다음과 같이 래핑합니다.
PreferenceCategory는 다음과 같습니다.
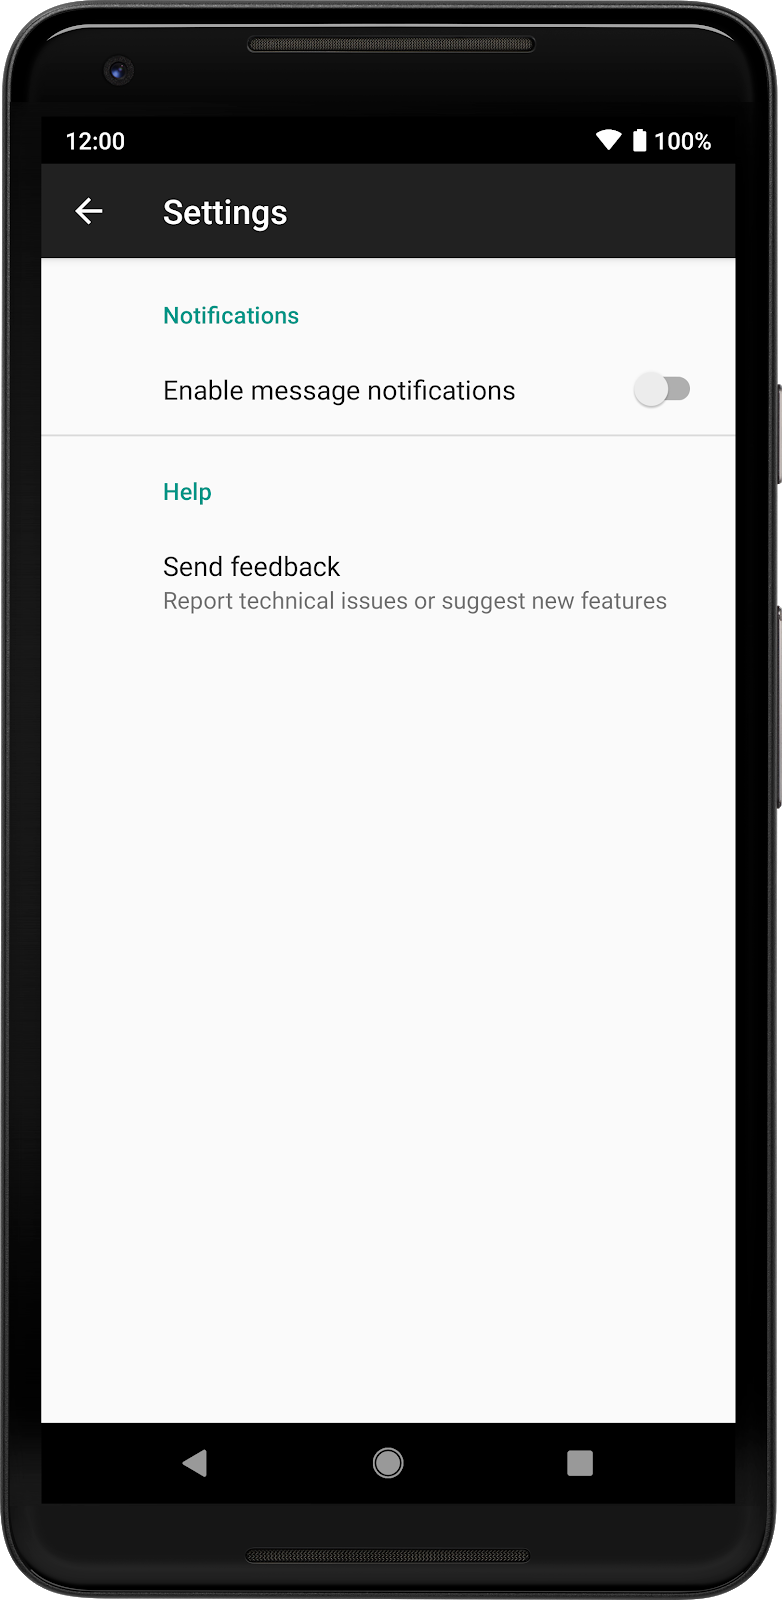
<PreferenceScreen
    xmlns:app="http://schemas.android.com/apk/res-auto">

    <PreferenceCategory
        app:key="notifications_category"
        app:title="Notifications">

        <SwitchPreferenceCompat
            app:key="notifications"
            app:title="Enable message notifications"/>

    </PreferenceCategory>

    <PreferenceCategory
        app:key="help_category"
        app:title="Help">

        <Preference
            app:key="feedback"
            app:summary="Report technical issues or suggest new features"
            app:title="Send feedback"/>

    </PreferenceCategory>

</PreferenceScreen>
결과는 다음과 같습니다.
계층 구조를 여러 개의 화면으로 분할
다수의 Preference 객체 또는 고유한 카테고리가 있는 경우 다음을 수행합니다.
별도의 화면에 표시할 수 있습니다. 각 화면은
PreferenceFragmentCompat와 별도의 계층 구조가 있습니다. 객체 Preference개
그러면 초기 화면에서는 광고와 관련 있는
선호합니다.
그림 2는 메시지와 동기화.
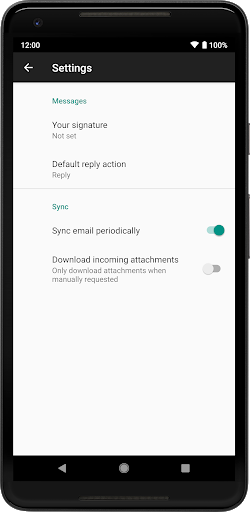
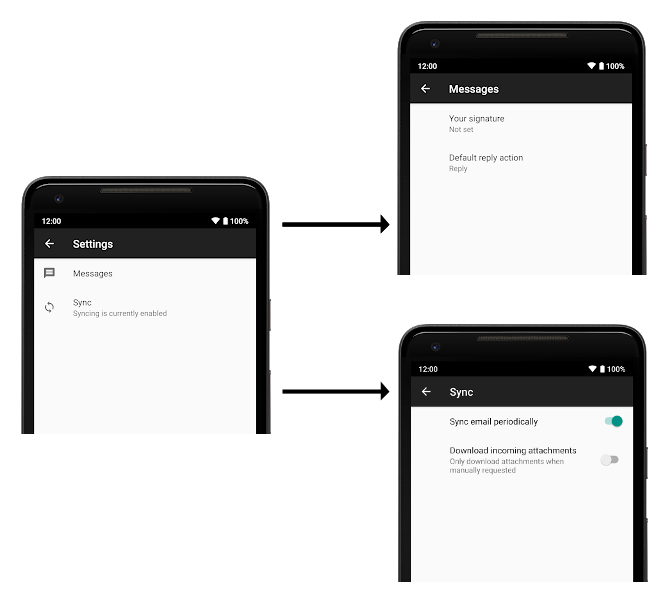
그림 3은 여러 화면으로 분할된 동일한 환경설정 집합을 보여줍니다.
화면을 Preference에 연결하려면 XML에서 app:fragment를 선언하거나
kubectl 명령어
Preference.setFragment()
다음과 같은 경우 PreferenceFragmentCompat의 전체 패키지 이름을 실행합니다.
다음 예와 같이 Preference를 탭합니다.
<Preference
        app:fragment="com.example.SyncFragment"
        .../>
사용자가 연결된 Fragment가 있는 Preference를 탭하면 인터페이스 메서드인 PreferenceFragmentCompat.OnPreferenceStartFragmentCallback.onPreferenceStartFragment()가 호출됩니다. 이 메서드에서 새 화면 표시를 처리하고
화면은 주변 Activity에 구현됩니다.
일반적인 구현은 다음과 유사합니다.
Kotlin
class MyActivity : AppCompatActivity(),
    PreferenceFragmentCompat.OnPreferenceStartFragmentCallback {
    ...
    override fun onPreferenceStartFragment(caller: PreferenceFragmentCompat, pref: Preference): Boolean {
        // Instantiate the new Fragment.
        val args = pref.extras
        val fragment = supportFragmentManager.fragmentFactory.instantiate(
                classLoader,
                pref.fragment)
        fragment.arguments = args
        fragment.setTargetFragment(caller, 0)
        // Replace the existing Fragment with the new Fragment.
        supportFragmentManager.beginTransaction()
                .replace(R.id.settings_container, fragment)
                .addToBackStack(null)
                .commit()
        return true
    }
}
자바
public class MyActivity extends AppCompatActivity implements
        PreferenceFragmentCompat.OnPreferenceStartFragmentCallback {
    ...
    @Override
    public boolean onPreferenceStartFragment(PreferenceFragmentCompat caller, Preference pref) {
        // Instantiate the new Fragment.
        final Bundle args = pref.getExtras();
        final Fragment fragment = getSupportFragmentManager().getFragmentFactory().instantiate(
                getClassLoader(),
                pref.getFragment());
        fragment.setArguments(args);
        fragment.setTargetFragment(caller, 0);
        // Replace the existing Fragment with the new Fragment.
        getSupportFragmentManager().beginTransaction()
                .replace(R.id.settings_container, fragment)
                .addToBackStack(null)
                .commit();
        return true;
    }
}
PreferenceScreens
중첩된
<PreferenceScreen>는 더 이상 지원되지 않습니다. 중첩된 Fragment 객체 사용
하세요.
별도의 활동 사용
또는, 각 화면에 맞춤설정할 것이 많거나 화면 간에 전체 Activity 전환을 한다면 각 PreferenceFragmentCompat에 별도의 Activity를 사용할 수 있습니다. 이렇게 하면, 각 Activity 및 이에 상응하는 설정 화면을 완전히 맞춤설정할 수 있습니다. 대부분의 앱에는
권장 대신 이전에 설명한 대로 Fragments를 사용하세요.
Preference에서 Activity를 실행하는 방법에 관한 자세한 내용은 다음을 참고하세요.
환경설정 작업.