คุณสามารถเพิ่ม UI ที่อิงตาม Compose ลงในแอปที่มีอยู่ซึ่งใช้การออกแบบที่อิงตาม View
หากต้องการสร้างหน้าจอใหม่ที่ใช้ Compose ทั้งหมด ให้กิจกรรมเรียกใช้เมธอด setContent() และส่งฟังก์ชันที่ประกอบกันได้ที่คุณต้องการ
class ExampleActivity : ComponentActivity() { override fun onCreate(savedInstanceState: Bundle?) { super.onCreate(savedInstanceState) setContent { // In here, we can call composables! MaterialTheme { Greeting(name = "compose") } } } } @Composable fun Greeting(name: String) { Text(text = "Hello $name!") }
โค้ดนี้มีลักษณะเหมือนกับโค้ดที่คุณจะเห็นในแอปที่ใช้ Compose เท่านั้น
ViewCompositionStrategy สำหรับ ComposeView
ViewCompositionStrategy
กำหนดเวลาที่ควรทิ้ง Composition ค่าเริ่มต้น
ViewCompositionStrategy.Default
จะทิ้ง Composition เมื่อ
ComposeView
พื้นฐานแยกออกจากหน้าต่าง เว้นแต่จะเป็นส่วนหนึ่งของคอนเทนเนอร์การจัดกลุ่ม เช่น RecyclerView ในแอปที่ใช้ Compose อย่างเดียวซึ่งมี Activity เดียว ลักษณะการทำงานเริ่มต้นนี้คือ สิ่งที่คุณต้องการ แต่หากคุณค่อยๆ เพิ่ม Compose ใน ฐานของโค้ด พฤติกรรมนี้อาจทำให้สถานะสูญหายในบางสถานการณ์
หากต้องการเปลี่ยน ViewCompositionStrategy ให้เรียกใช้เมธอด setViewCompositionStrategy()
แล้วระบุกลยุทธ์อื่น
ตารางด้านล่างสรุปสถานการณ์ต่างๆ ที่คุณใช้ ViewCompositionStrategy ได้
ViewCompositionStrategy |
คำอธิบายและสถานการณ์การทำงานร่วมกัน |
|---|---|
DisposeOnDetachedFromWindow |
ระบบจะทิ้ง Composition เมื่อแยก ComposeView ที่เกี่ยวข้องออกจากหน้าต่าง ได้ถูกแทนที่ด้วย DisposeOnDetachedFromWindowOrReleasedFromPool.สถานการณ์การทำงานร่วมกัน: * ComposeView ไม่ว่าจะเป็นองค์ประกอบเดียวในลำดับชั้นการแสดงผลของ View หรือในบริบทของหน้าจอ View/Compose แบบผสม (ไม่อยู่ใน Fragment) |
DisposeOnDetachedFromWindowOrReleasedFromPool (ค่าเริ่มต้น) |
คล้ายกับ DisposeOnDetachedFromWindow เมื่อองค์ประกอบไม่ได้อยู่ในคอนเทนเนอร์การจัดกลุ่ม เช่น RecyclerView หากอยู่ในคอนเทนเนอร์การจัดกลุ่ม ระบบจะทิ้งเมื่อคอนเทนเนอร์การจัดกลุ่มหลุดออกจากหน้าต่าง หรือเมื่อมีการทิ้งรายการ (เช่น เมื่อพูลเต็ม)สถานการณ์การทำงานร่วมกัน: * ComposeView ไม่ว่าจะเป็นองค์ประกอบเดียวในลำดับชั้นการแสดงผล หรือในบริบทของหน้าจอแบบผสมระหว่าง View กับ Compose (ไม่อยู่ใน Fragment)* ComposeView เป็นรายการในคอนเทนเนอร์การจัดกลุ่ม เช่น RecyclerView |
DisposeOnLifecycleDestroyed |
ระบบจะทิ้ง Composition เมื่อทำลาย Lifecycle ที่ระบุสถานการณ์การทำงานร่วมกัน * ComposeView ในมุมมองของ Fragment |
DisposeOnViewTreeLifecycleDestroyed |
ระบบจะทิ้ง Composition เมื่อ Lifecycle ที่ LifecycleOwner ที่ ViewTreeLifecycleOwner.get ของหน้าต่างถัดไปที่ View แนบอยู่ถูกทำลายสถานการณ์การทำงานร่วมกัน: * ComposeView ใน View ของ Fragment* ComposeView ในมุมมองที่ยังไม่ทราบวงจรของลูกค้า |
ComposeView ในส่วนย่อย
หากต้องการรวมเนื้อหา UI ของ Compose ใน Fragment หรือเลย์เอาต์ View ที่มีอยู่ ให้ใช้ ComposeView
และเรียกใช้เมธอด
setContent()
ComposeView เป็น View ของ Android
คุณใส่ ComposeView ในเลย์เอาต์ XML ได้เช่นเดียวกับ View อื่นๆ
<LinearLayout xmlns:android="http://schemas.android.com/apk/res/android" android:orientation="vertical" android:layout_width="match_parent" android:layout_height="match_parent"> <TextView android:id="@+id/text" android:layout_width="wrap_content" android:layout_height="wrap_content" /> <androidx.compose.ui.platform.ComposeView android:id="@+id/compose_view" android:layout_width="match_parent" android:layout_height="match_parent" /> </LinearLayout>
ในซอร์สโค้ด Kotlin ให้ขยายเลย์เอาต์จากทรัพยากร
เลย์เอาต์ที่กำหนดไว้ใน XML จากนั้นรับ ComposeView โดยใช้รหัส XML ตั้งค่ากลยุทธ์การจัดองค์ประกอบที่เหมาะกับโฮสต์ View มากที่สุด และเรียกใช้ setContent() เพื่อใช้ Compose
class ExampleFragmentXml : Fragment() { override fun onCreateView( inflater: LayoutInflater, container: ViewGroup?, savedInstanceState: Bundle? ): View { val view = inflater.inflate(R.layout.fragment_example, container, false) val composeView = view.findViewById<ComposeView>(R.id.compose_view) composeView.apply { // Dispose of the Composition when the view's LifecycleOwner // is destroyed setViewCompositionStrategy(ViewCompositionStrategy.DisposeOnViewTreeLifecycleDestroyed) setContent { // In Compose world MaterialTheme { Text("Hello Compose!") } } } return view } }
หรือคุณจะใช้ View Binding เพื่อรับการอ้างอิงไปยัง
ComposeView โดยอ้างอิงคลาส Binding ที่สร้างขึ้นสำหรับไฟล์เลย์เอาต์ XML ก็ได้
class ExampleFragment : Fragment() { private var _binding: FragmentExampleBinding? = null // This property is only valid between onCreateView and onDestroyView. private val binding get() = _binding!! override fun onCreateView( inflater: LayoutInflater, container: ViewGroup?, savedInstanceState: Bundle? ): View { _binding = FragmentExampleBinding.inflate(inflater, container, false) val view = binding.root binding.composeView.apply { // Dispose of the Composition when the view's LifecycleOwner // is destroyed setViewCompositionStrategy(ViewCompositionStrategy.DisposeOnViewTreeLifecycleDestroyed) setContent { // In Compose world MaterialTheme { Text("Hello Compose!") } } } return view } override fun onDestroyView() { super.onDestroyView() _binding = null } }
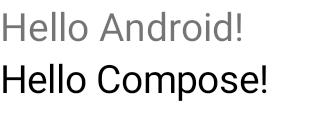
รูปที่ 1 ซึ่งแสดงเอาต์พุตของโค้ดที่เพิ่มองค์ประกอบ Compose ในลำดับชั้น UI ของ View ข้อความ "Hello Android!" แสดงโดยTextViewวิดเจ็ต
ข้อความ "Hello Compose!" แสดงโดยองค์ประกอบของข้อความ Compose
นอกจากนี้ คุณยังใส่ ComposeView ใน Fragment ได้โดยตรงหากสร้างแบบเต็มหน้าจอด้วย Compose ซึ่งจะช่วยให้คุณไม่ต้องใช้ไฟล์เลย์เอาต์ XML เลย
class ExampleFragmentNoXml : Fragment() { override fun onCreateView( inflater: LayoutInflater, container: ViewGroup?, savedInstanceState: Bundle? ): View { return ComposeView(requireContext()).apply { // Dispose of the Composition when the view's LifecycleOwner // is destroyed setViewCompositionStrategy(ViewCompositionStrategy.DisposeOnViewTreeLifecycleDestroyed) setContent { MaterialTheme { // In Compose world Text("Hello Compose!") } } } } }
ComposeView หลายอินสแตนซ์ในเลย์เอาต์เดียวกัน
หากมีองค์ประกอบ ComposeView หลายรายการในเลย์เอาต์เดียวกัน องค์ประกอบแต่ละรายการต้องมีรหัสที่ไม่ซ้ำกันเพื่อให้ savedInstanceState ทำงานได้
class ExampleFragmentMultipleComposeView : Fragment() { override fun onCreateView( inflater: LayoutInflater, container: ViewGroup?, savedInstanceState: Bundle? ): View = LinearLayout(requireContext()).apply { addView( ComposeView(requireContext()).apply { setViewCompositionStrategy( ViewCompositionStrategy.DisposeOnViewTreeLifecycleDestroyed ) id = R.id.compose_view_x // ... } ) addView(TextView(requireContext())) addView( ComposeView(requireContext()).apply { setViewCompositionStrategy( ViewCompositionStrategy.DisposeOnViewTreeLifecycleDestroyed ) id = R.id.compose_view_y // ... } ) } }
รหัส ComposeView กำหนดไว้ในไฟล์ res/values/ids.xml ดังนี้
<resources> <item name="compose_view_x" type="id" /> <item name="compose_view_y" type="id" /> </resources>
แสดงตัวอย่าง Composable ในเครื่องมือสร้างเลย์เอาต์
นอกจากนี้ คุณยังแสดงตัวอย่าง Composable ภายในเครื่องมือสร้างเลย์เอาต์สำหรับเลย์เอาต์ XML ที่มี ComposeView ได้ด้วย การทำเช่นนี้จะช่วยให้คุณเห็นลักษณะของ Composable
ในเลย์เอาต์ของ View และ Compose ที่ผสมกัน
สมมติว่าคุณต้องการแสดง Composable ต่อไปนี้ในเครื่องมือสร้างเลย์เอาต์ หมายเหตุ
Composable ที่มีคำอธิบายประกอบด้วย @Preview เหมาะที่จะแสดงตัวอย่างใน
เครื่องมือสร้างเลย์เอาต์
@Preview @Composable fun GreetingPreview() { Greeting(name = "Android") }
หากต้องการแสดง Composable นี้ ให้ใช้tools:composableNameแอตทริบิวต์เครื่องมือและตั้งค่าเป็นชื่อที่สมบูรณ์ในตัวเองของ Composable เพื่อแสดงตัวอย่างในเลย์เอาต์
<LinearLayout xmlns:android="http://schemas.android.com/apk/res/android" xmlns:tools="http://schemas.android.com/tools" android:orientation="vertical" android:layout_width="match_parent" android:layout_height="match_parent"> <androidx.compose.ui.platform.ComposeView android:id="@+id/my_compose_view" tools:composableName="com.example.compose.snippets.interop.InteroperabilityAPIsSnippetsKt.GreetingPreview" android:layout_height="match_parent" android:layout_width="match_parent"/> </LinearLayout>