
নিম্নলিখিত বিভাগগুলিতে গ্ল্যান্স ব্যবহার করে কীভাবে একটি মৌলিক অ্যাপ উইজেট তৈরি করতে হয় তা বর্ণনা করা হয়েছে।
ম্যানিফেস্টে AppWidget টি ঘোষণা করুন
সেটআপ ধাপগুলো সম্পন্ন করার পর, আপনার অ্যাপে AppWidget এবং এর মেটাডেটা ঘোষণা করুন।
GlanceAppWidgetReceiverথেকেAppWidgetরিসিভারটি প্রসারিত করুন:class MyAppWidgetReceiver : GlanceAppWidgetReceiver() { override val glanceAppWidget: GlanceAppWidget = TODO("Create GlanceAppWidget") }
আপনার
AndroidManifest.xmlফাইল এবং সংশ্লিষ্ট মেটাডেটা ফাইলে অ্যাপ উইজেটের প্রোভাইডারটি রেজিস্টার করুন:<receiver android:name=".glance.MyReceiver" android:exported="true"> <intent-filter> <action android:name="android.appwidget.action.APPWIDGET_UPDATE" /> </intent-filter> <meta-data android:name="android.appwidget.provider" android:resource="@xml/my_app_widget_info" /> </receiver>
AppWidgetProviderInfo মেটাডেটা যোগ করুন
এরপরে, @xml/my_app_widget_info ফাইলে অ্যাপ উইজেটের তথ্য তৈরি ও সংজ্ঞায়িত করতে "Create a widget" গাইডটি অনুসরণ করুন।
Glance-এর ক্ষেত্রে একমাত্র পার্থক্য হলো এতে কোনো initialLayout XML নেই, কিন্তু আপনাকে অবশ্যই একটি নির্ধারণ করতে হবে। আপনি লাইব্রেরিতে দেওয়া পূর্বনির্ধারিত লোডিং লেআউটটি ব্যবহার করতে পারেন:
<appwidget-provider xmlns:android="http://schemas.android.com/apk/res/android"
android:initialLayout="@layout/glance_default_loading_layout">
</appwidget-provider>
AppWidgetProviderInfo XML ঘোষণা করুন
AppWidgetProviderInfo অবজেক্টটি আপনার উইজেটের অপরিহার্য বৈশিষ্ট্যগুলো নির্ধারণ করে। আপনার XML মেটাডেটা রিসোর্স ফাইলে ( res/xml/my_app_widget_info.xml ) একটি <appwidget-provider> এলিমেন্টের ভিতরে AppWidgetProviderInfo সংজ্ঞায়িত করুন:
<appwidget-provider xmlns:android="http://schemas.android.com/apk/res/android"
    android:minWidth="40dp"
    android:minHeight="40dp"
    android:targetCellWidth="1"
    android:targetCellHeight="1"
    android:maxResizeWidth="250dp"
    android:maxResizeHeight="120dp"
    android:updatePeriodMillis="86400000"
    android:description="@string/example_appwidget_description"
    android:previewLayout="@layout/example_appwidget_preview"
    android:initialLayout="@layout/glance_default_loading_layout"
    android:configure="com.example.android.ExampleAppWidgetConfigurationActivity"
    android:resizeMode="horizontal|vertical"
    android:widgetCategory="home_screen"
    android:widgetFeatures="reconfigurable|configuration_optional">
</appwidget-provider>
উইজেটের আকার নির্ধারণের বৈশিষ্ট্য
ডিফল্ট হোম স্ক্রিন তার উইন্ডোতে উইজেটগুলোকে একটি নির্দিষ্ট উচ্চতা ও প্রস্থের সেল-ভিত্তিক গ্রিডের সাহায্যে স্থাপন করে। বেশিরভাগ হোম স্ক্রিন উইজেটগুলোকে কেবল গ্রিড সেলগুলোর পূর্ণসংখ্যার গুণিতক আকারেই দেখতে দেয়—উদাহরণস্বরূপ, আনুভূমিকভাবে দুটি সেল এবং উল্লম্বভাবে তিনটি সেল।
উইজেট সাইজিং অ্যাট্রিবিউটগুলো আপনাকে আপনার উইজেটের জন্য একটি ডিফল্ট আকার নির্দিষ্ট করতে এবং উইজেটের আকারের নিম্ন ও উচ্চ সীমা নির্ধারণ করতে দেয়। এই প্রসঙ্গে, একটি উইজেটের ডিফল্ট আকার হলো সেই আকার, যা উইজেটটি হোম স্ক্রিনে প্রথমবার যুক্ত হওয়ার সময় ধারণ করে।
নিম্নলিখিত সারণিতে উইজেটের আকার নির্ধারণ সম্পর্কিত <appwidget-provider> অ্যাট্রিবিউটগুলো বর্ণনা করা হয়েছে:
| বৈশিষ্ট্য এবং বিবরণ | |
|---|---|
targetCellWidth এবং targetCellHeight (অ্যান্ড্রয়েড ১২), minWidth এবং minHeight |
targetCellWidth ও targetCellHeight এবং minWidth ও minHeight নির্দিষ্ট করার পরামর্শ দিই, যাতে ব্যবহারকারীর ডিভাইস targetCellWidth ও targetCellHeight সমর্থন না করলে আপনার অ্যাপ minWidth ও minHeight ব্যবহার করতে পারে। সমর্থিত হলে, targetCellWidth ও targetCellHeight অ্যাট্রিবিউটগুলো minWidth ও minHeight অ্যাট্রিবিউটের চেয়ে অগ্রাধিকার পায়। |
minResizeWidth এবং minResizeHeight | উইজেটটির সর্বনিম্ন আকার নির্দিষ্ট করুন। এই মানগুলি সেই আকার নির্দিষ্ট করে যার নিচে উইজেটটি পাঠযোগ্য বা অন্যথায় ব্যবহারযোগ্য থাকে না। এই অ্যাট্রিবিউটগুলি ব্যবহার করে ব্যবহারকারী উইজেটটিকে ডিফল্ট আকারের চেয়ে ছোট আকারে পরিবর্তন করতে পারেন। minResizeWidth অ্যাট্রিবিউটটি উপেক্ষা করা হয় যদি এটি minWidth চেয়ে বড় হয় অথবা যদি হরাইজন্টাল রিসাইজিং সক্রিয় না থাকে। resizeMode দেখুন। একইভাবে, minResizeHeight অ্যাট্রিবিউটটি উপেক্ষা করা হয় যদি এটি minHeight এর চেয়ে বড় হয় অথবা যদি ভার্টিকাল রিসাইজিং সক্রিয় না থাকে। |
maxResizeWidth এবং maxResizeHeight | উইজেটটির প্রস্তাবিত সর্বোচ্চ আকার নির্দিষ্ট করুন। যদি মানগুলো গ্রিড সেলের মাপের গুণিতক না হয়, তবে সেগুলোকে নিকটতম সেলের আকারে রাউন্ড আপ করা হয়। maxResizeWidth অ্যাট্রিবিউটটি উপেক্ষা করা হয় যদি এটি minWidth এর চেয়ে ছোট হয় অথবা যদি হরাইজন্টাল রিসাইজিং সক্রিয় না থাকে। resizeMode দেখুন। একইভাবে, maxResizeHeight অ্যাট্রিবিউটটি উপেক্ষা করা হয় যদি এটি minHeight এর চেয়ে ছোট হয় অথবা যদি ভার্টিকাল রিসাইজিং সক্রিয় না থাকে। অ্যান্ড্রয়েড ১২-এ প্রবর্তিত। |
resizeMode | একটি উইজেটকে কীভাবে রিসাইজ করা যাবে, তার নিয়মাবলী এটি নির্দিষ্ট করে। হোম স্ক্রিনের উইজেটগুলোকে আনুভূমিকভাবে, উল্লম্বভাবে বা উভয় অক্ষ বরাবর রিসাইজযোগ্য করতে আপনি এই অ্যাট্রিবিউটটি ব্যবহার করতে পারেন। ব্যবহারকারীরা একটি উইজেটকে টাচ করে ধরে রাখলে তার রিসাইজ হ্যান্ডেলগুলো দেখা যায়, এরপর লেআউট গ্রিডে এর আকার পরিবর্তন করার জন্য আনুভূমিক বা উল্লম্ব হ্যান্ডেলগুলো ড্র্যাগ করেন। resizeMode অ্যাট্রিবিউটের ভ্যালুগুলোর মধ্যে রয়েছে horizontal , vertical , এবং none । একটি উইজেটকে আনুভূমিক এবং উল্লম্বভাবে রিসাইজযোগ্য হিসেবে ঘোষণা করতে, horizontal|vertical ব্যবহার করুন। |
উদাহরণ
পূর্ববর্তী সারণিতে থাকা অ্যাট্রিবিউটগুলো কীভাবে উইজেটের আকারকে প্রভাবিত করে তা বোঝানোর জন্য, নিম্নলিখিত স্পেসিফিকেশনগুলো ধরে নিন:
- একটি গ্রিড সেলের প্রস্থ ৩০ ডিপি এবং উচ্চতা ৫০ ডিপি।
- নিম্নলিখিত অ্যাট্রিবিউট স্পেসিফিকেশন প্রদান করা হলো:
<appwidget-provider xmlns:android="http://schemas.android.com/apk/res/android"
    android:minWidth="80dp"
    android:minHeight="80dp"
    android:targetCellWidth="2"
    android:targetCellHeight="2"
    android:minResizeWidth="40dp"
    android:minResizeHeight="40dp"
    android:maxResizeWidth="120dp"
    android:maxResizeHeight="120dp"
    android:resizeMode="horizontal|vertical" />
অ্যান্ড্রয়েড ১২ থেকে শুরু করে:
উইজেটের ডিফল্ট আকার হিসেবে targetCellWidth এবং targetCellHeight অ্যাট্রিবিউটগুলো ব্যবহার করুন।
উইজেটটির ডিফল্ট সাইজ হলো 2x2। উইজেটটিকে ছোট করে 2x1 অথবা বড় করে 4x3 পর্যন্ত রিসাইজ করা যায়।
অ্যান্ড্রয়েড ১১ এবং তার নিচের সংস্করণ:
উইজেটের ডিফল্ট আকার নির্ধারণ করতে minWidth এবং minHeight অ্যাট্রিবিউটগুলো ব্যবহার করুন।
ডিফল্ট প্রস্থ = Math.ceil(80 / 30) = 3
ডিফল্ট উচ্চতা = Math.ceil(80 / 50) = 2
ডিফল্টভাবে উইজেটটির সাইজ ৩x২। উইজেটটিকে ছোট করে ২x১ অথবা বড় করে ফুল স্ক্রিন পর্যন্ত রিসাইজ করা যায়।
অতিরিক্ত উইজেট বৈশিষ্ট্য
নিম্নলিখিত সারণিতে উইজেটের আকার নির্ধারণ ব্যতীত অন্যান্য বৈশিষ্ট্য সম্পর্কিত <appwidget-provider> অ্যাট্রিবিউটগুলো বর্ণনা করা হয়েছে।
| বৈশিষ্ট্য এবং বিবরণ | |
|---|---|
updatePeriodMillis | এটি নির্ধারণ করে যে উইজেট ফ্রেমওয়ার্ক কত ঘন ঘন onUpdate() কলব্যাক মেথডটি কল করার মাধ্যমে GlanceAppWidgetReceiver থেকে আপডেটের জন্য অনুরোধ করবে। ব্যাটারি সাশ্রয়ের জন্য আমরা যথাসম্ভব কম ঘন ঘন আপডেট করার পরামর্শ দিই—ঘণ্টায় একবারের বেশি নয়। বিস্তারিত জানতে, Glance স্টেট ম্যানেজমেন্ট-এর 'Widgets কখন আপডেট করতে হবে' বিভাগটি দেখুন। |
initialLayout | এটি সেই লেআউট রিসোর্সকে নির্দেশ করে যা গ্ল্যান্স UI কম্পোজিশনগুলো রেন্ডার হওয়ার আগে উইজেটটির লোডিং লেআউট নির্ধারণ করে। আপনি লাইব্রেরিতে প্রদত্ত পূর্বনির্ধারিত লোডিং লেআউটটি ব্যবহার করতে পারেন: @layout/glance_default_loading_layout । |
configure | ব্যবহারকারী উইজেট যোগ করলে যে কনফিগারেশন অ্যাক্টিভিটি চালু হয়, তা এটি নির্ধারণ করে। এই পৃষ্ঠার ‘একটি উইজেট কনফিগারেশন অ্যাক্টিভিটি বাস্তবায়ন করুন’ অংশটি দেখুন। |
description | আপনার উইজেটের জন্য উইজেট পিকার যে বিবরণ প্রদর্শন করবে, তা নির্দিষ্ট করে। অ্যান্ড্রয়েড ১২-এ চালু হয়েছে। |
previewLayout (অ্যান্ড্রয়েড ১২) এবং previewImage (অ্যান্ড্রয়েড ১১ ও তার নিম্নতর সংস্করণ) |
|
autoAdvanceViewId | উইজেটের হোস্ট দ্বারা স্বয়ংক্রিয়ভাবে অগ্রসর হওয়া উইজেট সাবভিউটির ভিউ আইডি নির্দিষ্ট করে। |
widgetCategory | আপনার উইজেটটি হোম স্ক্রিনে ( home_screen ), লক স্ক্রিনে ( keyguard ) নাকি উভয় স্ক্রিনেই দেখানো যাবে, তা নির্ধারণ করে। অ্যান্ড্রয়েড ৫.০ এবং তার পরবর্তী সংস্করণগুলোর জন্য, শুধুমাত্র home_screen বৈধ। |
widgetFeatures | উইজেট দ্বারা সমর্থিত বৈশিষ্ট্যগুলো ঘোষণা করে। উদাহরণস্বরূপ, যদি আপনার উইজেটের কনফিগারেশন ঐচ্ছিক হয়, তাহলে configuration_optional এবং reconfigurable উভয়ই উল্লেখ করুন। |
GlanceAppWidget সংজ্ঞায়িত করুন
একটি নতুন ক্লাস তৈরি করুন যা
GlanceAppWidgetথেকে এক্সটেন্ড করে এবংprovideGlanceমেথডটিকে ওভাররাইড করে। এই মেথডটিতেই আপনি আপনার উইজেট রেন্ডার করার জন্য প্রয়োজনীয় ডেটা লোড করতে পারবেন:class MyAppWidget : GlanceAppWidget() { override suspend fun provideGlance(context: Context, id: GlanceId) { // In this method, load data needed to render the AppWidget. // Use `withContext` to switch to another thread for long running // operations. provideContent { // create your AppWidget here Text("Hello World") } } }
আপনার
GlanceAppWidgetReceiverএরglanceAppWidgetএ এটি ইনস্ট্যানশিয়েট করুন:class MyAppWidgetReceiver : GlanceAppWidgetReceiver() { // Let MyAppWidgetReceiver know which GlanceAppWidget to use override val glanceAppWidget: GlanceAppWidget = MyAppWidget() }
আপনি এখন Glance ব্যবহার করে একটি AppWidget কনফিগার করেছেন।
উইজেট ব্রডকাস্ট পরিচালনা করতে GlanceAppWidgetReceiver ক্লাসটি ব্যবহার করুন।
GlanceAppWidgetReceiver অন্তর্নিহিত AppWidgetProvider এক্সটেন্ড করার মাধ্যমে উইজেট ব্রডকাস্ট এবং প্ল্যাটফর্ম স্টেট আপডেটের সমন্বয় সাধন করে। আপনার উইজেট আপডেট, ডিলিট, এনাবল বা ডিসেবল করা হলে এটি প্ল্যাটফর্ম ইভেন্ট গ্রহণ করে এবং সেগুলোকে Compose লাইফসাইকেল রিকোয়েস্টে রূপান্তরিত করে।
ম্যানিফেস্টে একটি উইজেট ঘোষণা করুন
আপনার AndroidManifest.xml ফাইলে আপনার GlanceAppWidgetReceiver ক্লাস সাবক্লাসটিকে একটি ব্রডকাস্ট রিসিভার হিসেবে ঘোষণা করুন:
<receiver android:name="ExampleAppWidgetReceiver"
          android:exported="false">
    <intent-filter>
        <action android:name="android.appwidget.action.APPWIDGET_UPDATE" />
    </intent-filter>
    <meta-data android:name="android.appwidget.provider"
               android:resource="@xml/my_app_widget_info" />
</receiver>
<receiver> এলিমেন্টটিতে android:name অ্যাট্রিবিউট থাকা আবশ্যক, যা রিসিভার ক্লাসকে নির্দিষ্ট করে। রিসিভারটিকে অবশ্যই <intent-filter> এর ভিতরে ACTION_APPWIDGET_UPDATE ব্রডকাস্ট অ্যাকশনটি গ্রহণ করতে হবে।
<meta-data> এলিমেন্টটির নাম অবশ্যই android.appwidget.provider হিসেবে উল্লেখ করতে হবে, এবং android:resource অ্যাট্রিবিউটটি আপনার AppWidgetProviderInfo XML মেটাডেটা রিসোর্স ( @xml/my_app_widget_info )-কে নির্দেশ করবে।
GlanceAppWidgetReceiver ক্লাসটি বাস্তবায়ন করুন
Glance-এ, আপনি সরাসরি AppWidgetProvider এর পরিবর্তে GlanceAppWidgetReceiver এক্সটেন্ড করেন। আপনার রিসিভারকে আপনার GlanceAppWidget ইনস্ট্যান্সের সাথে লিঙ্ক করার মাধ্যমে এটি ইমপ্লিমেন্ট করুন। GlanceAppWidgetReceiver এ উপলব্ধ প্রধান কলব্যাকগুলি নিম্নরূপভাবে কাজ করে:
-
onUpdate(): কম্পোজিশন আপডেট কার্যকর করার জন্য Glance দ্বারা স্বয়ংক্রিয়ভাবে ওভাররাইড করা হয়। আপনি যদি ম্যানুয়ালিonUpdateওভাররাইড করেন, তবে Glance-কে সফলভাবে কম্পোজিশন থ্রেড চালু করার সুযোগ দিতে আপনাকে অবশ্যইsuper.onUpdateকল করতে হবে । -
onAppWidgetOptionsChanged(): উইজেটটি প্রথমবার স্থাপন করা হলে বা এর আকার পরিবর্তন করা হলে এই ফাংশনটি কল করা হয়। Glance অভ্যন্তরীণভাবে অপশন বান্ডেলের আইটেমগুলো পড়ে নেয়, ফলে রানটাইম ডাইমেনশনের উপর ভিত্তি করে আপনার লেআউট নির্বিঘ্নে সামঞ্জস্য হয়। -
onDeleted(Context, IntArray): যখন ব্যবহারকারী কোনো নির্দিষ্ট উইজেট ইনস্ট্যান্স মুছে ফেলেন, তখন এটি কল করা হয়। -
onEnabled(Context): আপনার উইজেটের প্রথম ইনস্ট্যান্সটি সফলভাবে তৈরি হলে এটি ট্রিগার হয়। গ্লোবাল মাইগ্রেশন চালানোর জন্য এটি চমৎকার। -
onDisabled(Context): প্রোভাইডারের সর্বশেষ সক্রিয় ইনস্ট্যান্সটি সরিয়ে ফেলা হলে এটি কল করা হয়। -
onReceive(Context, Intent): নির্দিষ্ট কলব্যাক মেথডগুলোর আগে প্রতিটি প্ল্যাটফর্ম ব্রডকাস্টকে ইন্টারসেপ্ট করে। আপনাকে অবশ্যই নিশ্চিত করতে হবে যে আপনার লেখা যেকোনো কাস্টম রিসিভার লজিক যেনsuper.onReceive(context, intent)কল করে এবং নিজে থেকে কখনোইgoAsyncকল করবেন না , কারণ Glance স্বয়ংক্রিয়ভাবে অ্যাসিঙ্ক্রোনাসভাবে কাজ রাউট করে।
উইজেট ব্রডকাস্ট ইন্টেন্ট গ্রহণ করুন
অভ্যন্তরীণভাবে, GlanceAppWidgetReceiver নিম্নলিখিত মৌলিক প্ল্যাটফর্ম উইজেট ব্রডকাস্ট ইন্টেন্টগুলো ফিল্টার ও পরিচালনা করে:
-
ACTION_APPWIDGET_UPDATE -
ACTION_APPWIDGET_DELETED -
ACTION_APPWIDGET_ENABLED -
ACTION_APPWIDGET_DISABLED -
ACTION_APPWIDGET_OPTIONS_CHANGED
UI তৈরি করুন
নিচের কোড স্নিপেটটি UI তৈরি করার পদ্ধতি প্রদর্শন করে:
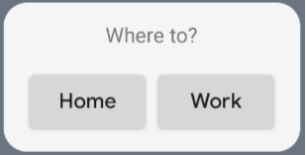
/* Import Glance Composables In the event there is a name clash with the Compose classes of the same name, you may rename the imports per https://kotlinlang.org/docs/packages.html#imports using the `as` keyword. import androidx.glance.Button import androidx.glance.layout.Column import androidx.glance.layout.Row import androidx.glance.text.Text */ class MyAppWidget : GlanceAppWidget() { override suspend fun provideGlance(context: Context, id: GlanceId) { // Load data needed to render the AppWidget. // Use `withContext` to switch to another thread for long running // operations. provideContent { // create your AppWidget here MyContent() } } @Composable private fun MyContent() { Column( modifier = GlanceModifier.fillMaxSize(), verticalAlignment = Alignment.Top, horizontalAlignment = Alignment.CenterHorizontally ) { Text(text = "Where to?", modifier = GlanceModifier.padding(12.dp)) Row(horizontalAlignment = Alignment.CenterHorizontally) { Button( text = "Home", onClick = actionStartActivity<MyActivity>() ) Button( text = "Work", onClick = actionStartActivity<MyActivity>() ) } } } }
পূর্ববর্তী কোড নমুনাটি নিম্নলিখিত কাজগুলো করে:
- সর্বোচ্চ স্তরের
Columnআইটেমগুলো উল্লম্বভাবে একটির পর একটি সাজানো থাকে। -
Columnউপলব্ধ স্থান অনুযায়ী নিজের আকার প্রসারিত করে (GlanceModifierএর মাধ্যমে) এবং এর বিষয়বস্তুকে উপরে (verticalAlignment) ও আনুভূমিকভাবে কেন্দ্রে (horizontalAlignment) স্থাপন করে। -
Columnবিষয়বস্তু ল্যাম্বডা ব্যবহার করে নির্ধারণ করা হয়। ক্রমটি গুরুত্বপূর্ণ।-
Columnপ্রথম আইটেমটি হলো একটিTextকম্পোনেন্ট, যেটিতে12.dpপ্যাডিং রয়েছে। - দ্বিতীয় আইটেমটি হলো একটি
Row(Row), যেখানে আইটেমগুলো একটির পর একটি আনুভূমিকভাবে সাজানো থাকে এবং দুটিButtonsআনুভূমিকভাবে কেন্দ্রে (horizontalAlignment) থাকে। চূড়ান্ত প্রদর্শনটি উপলব্ধ স্থানের উপর নির্ভর করে। এটি দেখতে কেমন হতে পারে তার একটি উদাহরণ নিচের ছবিটি:
-
আপনি কম্পোনেন্টগুলোর অবস্থান ও আকার পরিবর্তন করতে অ্যালাইনমেন্ট ভ্যালু পরিবর্তন করতে পারেন অথবা বিভিন্ন মডিফায়ার ভ্যালু (যেমন প্যাডিং) প্রয়োগ করতে পারেন। প্রতিটি ক্লাসের কম্পোনেন্ট, প্যারামিটার এবং উপলব্ধ মডিফায়ারগুলোর সম্পূর্ণ তালিকার জন্য রেফারেন্স ডকুমেন্টেশন দেখুন।
গোলাকার কোণা প্রয়োগ করুন
অ্যান্ড্রয়েড ১২ আপনার অ্যাপ উইজেটগুলির কোণার ব্যাসার্ধ গতিশীলভাবে কাস্টমাইজ করার জন্য সিস্টেম প্যারামিটার চালু করেছে:
-
system_app_widget_background_radius: উইজেট ব্যাকগ্রাউন্ড কন্টেইনারের কোণার ব্যাসার্ধ নির্দিষ্ট করে (কখনোই ২৮ dp-এর বেশি নয়)। - অভ্যন্তরীণ ব্যাসার্ধ: কন্টেন্ট ক্লিপিং প্রতিরোধ করতে, সিস্টেম ব্যাকগ্রাউন্ড আউটলাইনের উপর ভিত্তি করে আপনার অভ্যন্তরীণ কন্টেন্টের জন্য একটি আনুপাতিক ব্যাসার্ধ গণনা করুন:
systemRadiusValue - widgetPadding
Glance-এ, আপনি GlanceModifier.cornerRadius(android.R.dimen.system_app_widget_background_radius) ব্যবহার করে কম্পোজিশনে ডাইনামিকভাবে কর্নার রেডিয়াস সাইজিং প্রোপার্টি প্রয়োগ করতে পারেন।
অ্যান্ড্রয়েড ১১ (এপিআই লেভেল ৩০) বা তার নিচের সংস্করণে চালিত ডিভাইসগুলিতে ব্যাকওয়ার্ড কম্প্যাটিবিলিটি বজায় রাখার জন্য, কাস্টম অ্যাট্রিবিউট এবং কাস্টম থিম রিসোর্স ফলব্যাক প্রয়োগ করুন:
/values/attrs.xml<resources> <attr name="backgroundRadius" format="dimension" /> </resources>/values/styles.xml<resources> <style name="MyWidgetTheme"> <item name="backgroundRadius">@dimen/my_background_radius_dimen</item> </style> </resources>/values-31/styles.xml<resources> <style name="MyWidgetTheme" parent="@android:style/Theme.DeviceDefault.DayNight"> <item name="backgroundRadius">@android:dimen/system_app_widget_background_radius</item> </style> </resources>/drawable/my_widget_background.xml<shape xmlns:android="http://schemas.android.com/apk/res/android" android:shape="rectangle"> <corners android:radius="?attr/backgroundRadius" /> </shape>