
Starting in Android 8.0 (API level 26), all notifications must be assigned to a channel. For each channel, you can set the visual and auditory behavior that is applied to all notifications in that channel. Users can change these settings and decide which notification channels from your app can be intrusive or visible.
Check out the following video for an overview of channels and other notification features in Android 8.0.
The user settings for notification channels are available for each app in the system settings, as shown in figure 1.
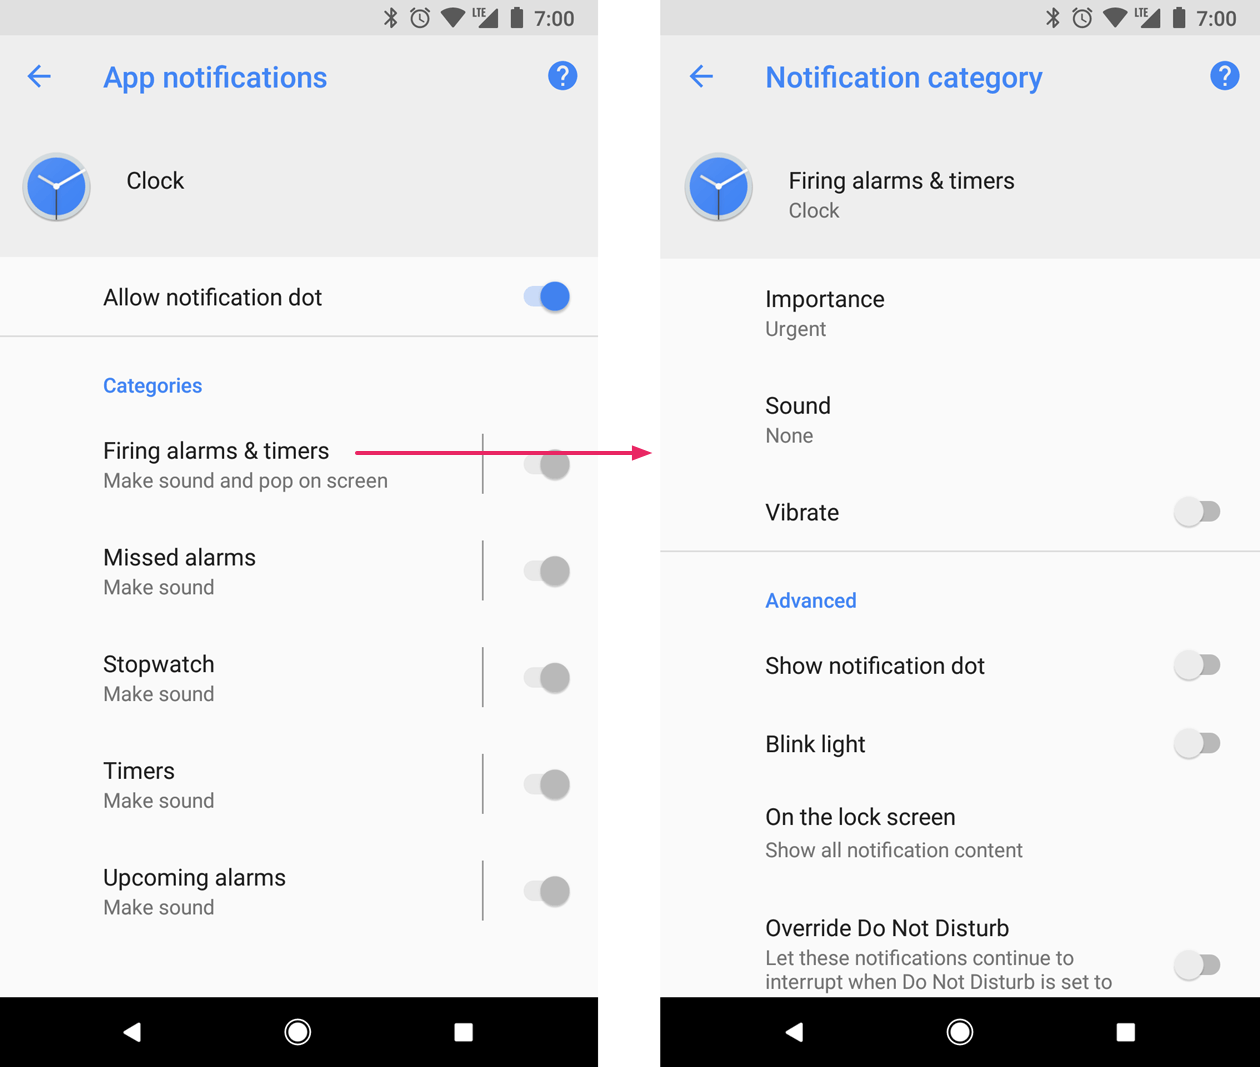
Figure 1. Notification settings for the Clock app and one of its channels.
After you create a notification channel, you can't change the notification behaviors. The user has complete control at that point. However, you can still change a channel's name and description.
Create a channel for each type of notification you need to send. You can also create notification channels to reflect choices made by users. For example, you can set up separate notification channels for each conversation group created by a user in a messaging app.
When you target Android 8.0 (API level 26) or higher, you must implement one or
more notification channels. If your targetSdkVersion is set to 25 or lower,
when your app runs on Android 8.0 (API level 26) or higher, it behaves the same
as on devices running Android 7.1 (API level 25) or lower.
Create a notification channel
To create a notification channel, follow these steps:
Construct a
NotificationChannelobject with a unique channel ID, user-visible name, and importance level.Optionally, specify the description that the user sees in the system settings with
setDescription().Register the notification channel by passing it to
createNotificationChannel().
The following example shows how to create and register a notification channel:
if (Build.VERSION.SDK_INT >= Build.VERSION_CODES.O) { // Create the NotificationChannel. val importance = NotificationManager.IMPORTANCE_DEFAULT val mChannel = NotificationChannel(CHANNEL_ID, name, importance) mChannel.description = descriptionText // Register the channel with the system. You can't change the importance // or other notification behaviors after this. val notificationManager = context.getSystemService(NotificationManager::class.java) notificationManager?.createNotificationChannel(mChannel) }
Recreating an existing notification channel with its original values performs no operation, so it's safe to call this code when starting an app.
By default, all notifications posted to a given channel use the visual and
auditory behaviors defined by the importance level from the
NotificationManagerCompat class, such as IMPORTANCE_DEFAULT or
IMPORTANCE_HIGH. See the next section for more information about
importance levels.
If you want to further customize your channel's default notification behaviors,
you can call methods such as enableLights(), setLightColor(),
and setVibrationPattern() on the NotificationChannel. Remember that
once you create the channel, you can't change these settings, and the user has
final control over whether these behaviors are active.
You can also create multiple notification channels in a single operation by
calling createNotificationChannels().
Set the importance level
Channel importance affects the interruption level of all notifications posted in
the channel. Specify it in the NotificationChannel constructor, using one of
five importance levels, ranging from IMPORTANCE_NONE(0) to
IMPORTANCE_HIGH(4).
To support devices running Android 7.1 (API level 25) or lower, you must also
call setPriority() for each notification, using a priority constant from
the NotificationCompat class.
The importance (NotificationManager.IMPORTANCE_*) and priority
(NotificationCompat.PRIORITY_*) constants map to the user-visible importance
options, as shown in the following table.
| User-visible importance level | Importance (Android 8.0 and higher) | Priority (Android 7.1 and lower) |
|---|---|---|
| Urgent Makes a sound and appears as a heads-up notification. |
IMPORTANCE_HIGH |
PRIORITY_HIGH or PRIORITY_MAX |
| High Makes a sound. |
IMPORTANCE_DEFAULT |
PRIORITY_DEFAULT |
| Medium Makes no sound. |
IMPORTANCE_LOW |
PRIORITY_LOW |
| Low Makes no sound and doesn't appear in the status bar. |
IMPORTANCE_MIN |
PRIORITY_MIN |
| None Makes no sound and doesn't appear in the status bar or shade. |
IMPORTANCE_NONE |
N/A |
All notifications, regardless of importance, appear in non-interruptive system UI locations, such as in the notification drawer and as a badge on the launcher icon, though you can modify the appearance of the notification badge.
Once you submit the channel to the NotificationManager, you can't change
the importance level. However, the user can change their preferences for your
app's channels at any time.
For information about choosing an appropriate priority level, see "Priority levels" in the Notifications design guide.
Read notification channel settings
Users can modify the settings for notification channels, including behaviors such as vibration and alert sound. If you want to know the settings a user applies to your notification channels, follow these steps:
Get the
NotificationChannelobject by callinggetNotificationChannel()orgetNotificationChannels().Query specific channel settings such as
getVibrationPattern(),getSound(), andgetImportance().
If you detect a channel setting that you believe inhibits the intended behavior for your app, you can suggest that the user change it and provide an action to open the channel settings, as shown in the next section.
Open the notification channel settings
After you create a notification channel, you can't change the notification channel's visual and auditory behaviors programmatically. Only the user can change the channel behaviors from the system settings. To provide your users quick access to these notification settings, add an item in your app's settings UI that opens these system settings.
You can open the system settings for notification channels with an
Intent that uses the ACTION_CHANNEL_NOTIFICATION_SETTINGS
action.
For example, the following sample code shows how you can redirect a user to the settings for a notification channel:
val intent = Intent(Settings.ACTION_CHANNEL_NOTIFICATION_SETTINGS).apply { putExtra(Settings.EXTRA_APP_PACKAGE, context.packageName) putExtra(Settings.EXTRA_CHANNEL_ID, CHANNEL_ID) } Button(onClick = { context.startActivity(intent) }) { Text("Open Channel Settings") }
Notice that the intent requires two extras that specify your app's package name (also known as the application ID) and the channel to edit.
Delete a notification channel
You can delete notification channels by calling
deleteNotificationChannel().
The following sample code demonstrates how to complete this process:
val notificationManager = ContextCompat.getSystemService<NotificationManager>(context, NotificationManager::class.java) notificationManager?.deleteNotificationChannel(channelId)
Create a notification channel group
If want to further organize the appearance of your channels in the settings UI, you can create channel groups. This is a good idea when your app supports multiple user accounts because it lets you create a notification channel group for each account. Channel groups help users differentiate and control multiple notification channels that have identical names.
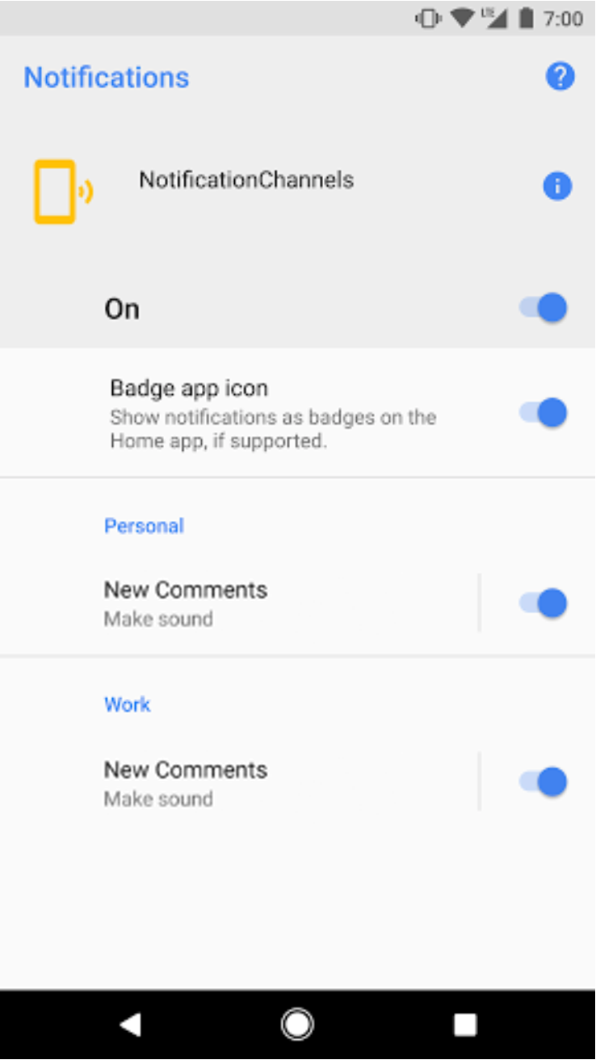
Figure 2. Notification channel settings with groups for personal and work accounts.
For example, a social networking app might include support for personal and work accounts. In this scenario, each account might require multiple notification channels with identical functions and names, such as the following:
A personal account with two channels:
New comments
Post recommendations
A business account with two channels:
New comments
Post recommendations
Organizing the notification channels into groups for each account lets users distinguish between them.
Each notification channel group requires an ID, which must be unique within your package, as well as a user-visible name. The following snippet demonstrates how to create a notification channel group.
fun createNotificationChannelGroup(context: Context, groupId: String, groupName: String) { val notificationManager = ContextCompat.getSystemService(context, NotificationManager::class.java) notificationManager?.createNotificationChannelGroup(NotificationChannelGroup(groupId, groupName)) }
After you create a new group, you can call
setGroup()
to associate a new NotificationChannel object with the group.
Once you submit the channel to the notification manager, you can't change the association between notification channel and group.