
알림은 사용 중이 아닌 앱의 이벤트에 관한 짧고 시기적절한 정보를 제공합니다. 이 문서에서는 다양한 기능이 있는 알림을 만드는 방법을 보여줍니다. Android에서 알림이 표시되는 방식에 관한 소개는 알림 개요를 참고하세요. 알림을 사용하는 샘플 코드는 GitHub의 SociaLite 샘플을 참고하세요.
이 페이지의 코드에서는 AndroidX 라이브러리의 NotificationCompat API를 사용합니다. 이 API를 사용하면 최신 Android 버전에서만 사용할 수 있는 기능을 추가하는 동시에 Android 9 (API 수준 28)와의 호환성을 계속 유지할 수 있습니다.
하지만 인라인 답장 작업과 같은 일부 기능은 이전 버전에서 작동하지 않습니다.
기본 알림 만들기
가장 기본적이고 간단한 형태(축소된 형태라고도 함)의 알림에는 아이콘, 제목, 소량의 텍스트 콘텐츠가 표시됩니다. 이 섹션에서는 사용자가 탭하여 앱에서 활동을 시작할 수 있는 알림을 만드는 방법을 보여줍니다.
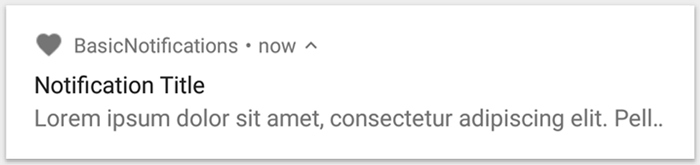
그림 1. 아이콘, 제목, 텍스트가 있는 알림
알림의 각 부분에 관한 자세한 내용은 알림 구성을 읽어보세요.
런타임 권한 선언
Android 13 (API 수준 33) 이상에서는 앱에서 예외 없는 (포그라운드 서비스 (FGS) 포함) 알림을 게시하기 위한 런타임 권한을 지원합니다.
앱의 매니페스트 파일에서 선언해야 하는 권한은 다음 코드 스니펫에 표시됩니다.
<manifest ...>
    <uses-permission android:name="android.permission.POST_NOTIFICATIONS"/>
    <application ...>
        ...
    </application>
</manifest>
런타임 권한에 관한 자세한 내용은 알림 런타임 권한을 참고하세요.
알림 콘텐츠 설정
시작하려면 NotificationCompat.Builder 객체를 사용하여 알림 콘텐츠와 채널을 설정하세요. 다음 예에서는 다음 항목이 포함된 알림을 만드는 방법을 보여줍니다.
setSmallIcon()으로 설정한 작은 아이콘. 사용자가 볼 수 있는 유일한 필수 콘텐츠입니다.setContentTitle()로 설정한 제목setContentText()로 설정한 본문 텍스트setPriority()로 설정한 알림 우선순위. 우선순위에 따라 Android 7.1 이하에서 알림이 얼마나 강제적이어야 하는지가 결정됩니다. Android 8.0 이상의 경우 다음 섹션에 표시된 대로 채널 중요도를 대신 설정하세요.
val textTitle = "Title" val textContent = "Content" val builder = NotificationCompat.Builder(context, CHANNEL_ID) .setSmallIcon(R.drawable.ic_logo) .setContentTitle(textTitle) .setContentText(textContent) .setPriority(NotificationCompat.PRIORITY_DEFAULT)
NotificationCompat.Builder 생성자에서는 채널 ID를 제공해야 합니다. Android 8.0 (API 수준 26) 이상과의 호환성을 위해 필요하지만 이전 버전에서는 무시됩니다.
기본적으로 알림의 텍스트 콘텐츠는 한 줄에 맞춰 잘립니다. 확장형 알림을 만들어 추가 정보를 표시할 수 있습니다.
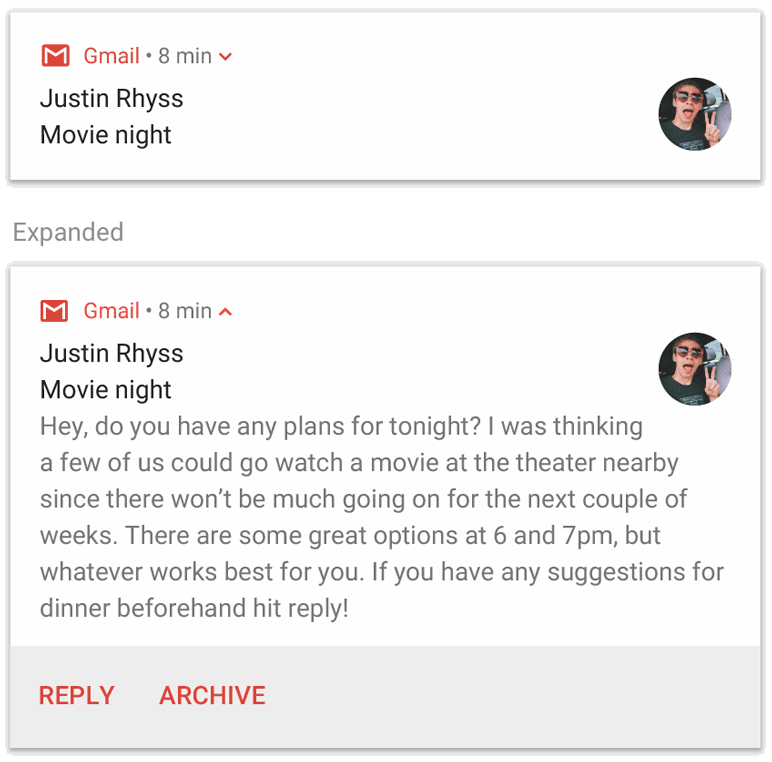
그림 2. 접힌 형태와 펼쳐진 형태의 확장 가능한 알림
알림을 더 길게 표시하고 싶은 경우 setStyle()을 사용하여 스타일 템플릿을 추가하여 확장 가능한 알림을 사용 설정할 수 있습니다. 예를 들어 다음 코드를 사용하면 더 큰 텍스트 영역이 생성됩니다.
val builder = NotificationCompat.Builder(context, CHANNEL_ID) .setSmallIcon(R.drawable.ic_logo) .setContentTitle("My notification") .setContentText("Much longer text that cannot fit one line...") .setStyle(NotificationCompat.BigTextStyle() .bigText("Much longer text that cannot fit one line...")) .setPriority(NotificationCompat.PRIORITY_DEFAULT)
이미지 및 미디어 재생 컨트롤을 추가하는 방법을 비롯한 기타 큰 알림 스타일에 관한 자세한 내용은 확장 가능한 알림 만들기를 참고하세요.
채널 만들기 및 중요도 설정
Android 8.0 이상에서 알림을 제공하려면 먼저 NotificationChannel 인스턴스를 createNotificationChannel()에 전달하여 앱의 알림 채널을 시스템에 등록해야 합니다. 다음 코드는 SDK_INT 버전에서 조건에 의해 차단됩니다.
fun createNotificationChannel(context: Context) { // Create the NotificationChannel, but only on API 26+ because // the NotificationChannel class is not in the Support Library. if (Build.VERSION.SDK_INT >= Build.VERSION_CODES.O) { val name = context.getString(R.string.channel_name) val descriptionText = context.getString(R.string.channel_description) val importance = NotificationManager.IMPORTANCE_DEFAULT val channel = NotificationChannel(CHANNEL_ID, name, importance).apply { description = descriptionText } // Register the channel with the system. val notificationManager: NotificationManager = context.getSystemService(NotificationManager::class.java) as NotificationManager notificationManager.createNotificationChannel(channel) } }
Android 8.0 이상에서 알림을 게시하려면 알림 채널을 만들어야 하므로 앱이 시작하자마자 이 코드를 실행해야 합니다. 기존 알림 채널을 만들면 아무 작업도 실행되지 않으므로 이 코드를 반복적으로 호출하는 것이 안전합니다.
NotificationChannel 생성자에는 importance가 필요하므로 NotificationManager 클래스의 상수 중 하나를 사용합니다. 이 매개변수는 이 채널에 속하는 알림으로 사용자를 방해하는 방법을 결정합니다. 이전 예에 표시된 대로 setPriority()를 사용하여 우선순위를 설정하여 Android 7.1 이하를 지원합니다.
다음 예와 같이 알림 중요도 또는 우선순위를 설정해야 하지만 시스템에서는 개발자에게 제공되는 알림 동작을 보장하지 않습니다. 경우에 따라 시스템에서 다른 요인을 기반으로 중요도 수준을 변경하지만 사용자가 언제든지 지정된 채널의 중요도 수준을 다시 정의할 수 있습니다.
여러 수준의 의미에 관한 자세한 내용은 알림 중요도 수준을 읽어보세요.
알림의 탭 작업 설정
모든 알림은 일반적으로 앱에서 알림에 상응하는 활동을 열려면 탭에 응답해야 합니다. 이렇게 하려면 PendingIntent 객체로 정의된 콘텐츠 인텐트를 지정하여 setContentIntent()에 전달해야 합니다.
다음 스니펫은 사용자가 알림을 탭하면 활동을 여는 기본 인텐트를 만드는 방법을 보여줍니다.
// Create an explicit intent for an Activity in your app. val intent = Intent(context, AlertDetails::class.java).apply { flags = Intent.FLAG_ACTIVITY_NEW_TASK or Intent.FLAG_ACTIVITY_CLEAR_TASK } val pendingIntent: PendingIntent = PendingIntent.getActivity(context, 0, intent, PendingIntent.FLAG_IMMUTABLE) val builder = NotificationCompat.Builder(context, CHANNEL_ID) .setSmallIcon(R.drawable.ic_logo) .setContentTitle("My notification") .setContentText("Hello World!") .setPriority(NotificationCompat.PRIORITY_DEFAULT) // Set the intent that fires when the user taps the notification. .setContentIntent(pendingIntent) .setAutoCancel(true)
이 코드는 setAutoCancel()을 호출하므로 사용자가 알림을 탭하면 자동으로 알림을 삭제합니다.
앞의 예에 나온 인텐트 플래그는 사용자가 알림을 사용하여 앱을 연 후 예상되는 탐색 환경을 유지합니다. 시작하는 활동 유형(다음 중 하나일 수 있음)에 따라 이 메서드를 사용할 수 있습니다.
알림의 응답에만 존재하는 활동. 사용자가 정상적으로 앱을 사용하는 동안 이 활동으로 이동할 이유가 없으므로 활동이 앱의 기존 작업 및 백 스택에 추가되는 대신 새 작업을 시작합니다. 이 인텐트는 앞의 샘플에서 생성된 인텐트 유형입니다.
앱의 일반 앱 흐름에 존재하는 활동. 이 경우 활동을 시작하면 백 스택이 생성되어 뒤로 및 위로 버튼에 관한 사용자의 기대가 유지됩니다.
알림 표시
알림을 표시하려면 NotificationManagerCompat.notify()를 호출하여 알림의 고유 ID와 NotificationCompat.Builder.build()의 결과를 전달합니다. 예를 들면 다음과 같습니다.
with(NotificationManagerCompat.from(context)) { if (ActivityCompat.checkSelfPermission( context, Manifest.permission.POST_NOTIFICATIONS ) != PackageManager.PERMISSION_GRANTED ) { // TODO: Consider calling ActivityCompat#requestPermissions here // to request the missing permissions, and then overriding // public fun onRequestPermissionsResult(requestCode: Int, permissions: Array<out String>, // grantResults: IntArray) // to handle the case where the user grants the permission. See the documentation // for ActivityCompat#requestPermissions for more details. return@with } // notificationId is a unique int for each notification that you must define. notify(notificationId, builder.build())
NotificationManagerCompat.notify()에 전달하는 알림 ID를 저장해야 합니다. 알림을 업데이트하거나 삭제하려면 나중에 필요하기 때문입니다.
또한 Android 13 이상을 실행하는 기기에서 기본 알림을 테스트하려면 알림을 수동으로 사용 설정하거나 알림을 요청하는 대화상자를 만드세요.
작업 버튼 추가
알림에 사용자가 신속하게 응답할 수 있는 최대 세 개의 작업 버튼을 제공할 수 있습니다(예: 알림 다시 알림, 문자 메시지에 답장). 하지만 이 작업 버튼은 사용자가 알림을 탭할 때 실행되는 작업과 중복되지 않아야 합니다.
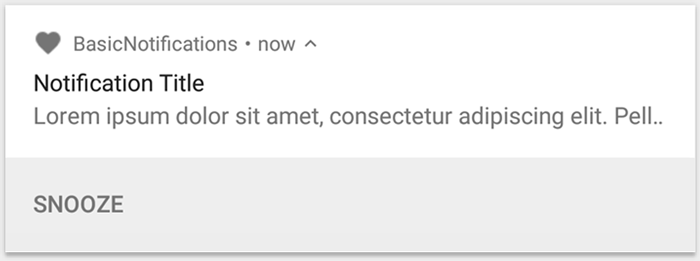
그림 3. 작업 버튼이 하나 있는 알림
작업 버튼을 추가하려면 PendingIntent를 addAction() 메서드에 전달하세요. 이는 활동을 실행하는 것을 제외하고 알림의 기본 탭 작업을 설정하는 것과 같습니다. 백그라운드에서 작업을 실행하는 BroadcastReceiver를 시작하는 것과 같이 다양한 작업을 할 수 있으므로 작업을 실행해도 이미 열려 있는 앱이 중단되지 않습니다.
예를 들어 다음 코드는 특정 수신자에게 브로드캐스트를 보내는 방법을 보여줍니다.
val ACTION_SNOOZE = "snooze" val snoozeIntent = Intent(context, MyBroadcastReceiver::class.java).apply { action = ACTION_SNOOZE putExtra(EXTRA_NOTIFICATION_ID, 0) } val snoozePendingIntent: PendingIntent = PendingIntent.getBroadcast(context, 0, snoozeIntent, PendingIntent.FLAG_IMMUTABLE) val builder = NotificationCompat.Builder(context, CHANNEL_ID) .setSmallIcon(R.drawable.ic_logo) .setContentTitle("My notification") .setContentText("Hello World!") .setPriority(NotificationCompat.PRIORITY_DEFAULT) .setContentIntent(pendingIntent) .addAction(R.drawable.snooze, context.getString(R.string.snooze), snoozePendingIntent)
BroadcastReceiver를 빌드하여 백그라운드 작업을 실행하는 방법에 관한 자세한 내용은 브로드캐스트 개요를 참고하세요.
대신 미디어 재생 버튼(예: 트랙 일시중지 및 건너뛰기)이 포함된 알림을 만드는 경우 미디어 컨트롤이 포함된 알림을 만드는 방법을 참고하세요.
바로 답장 작업 추가
Android 7.0 (API 수준 24)에서 도입된 바로 답장 작업을 사용하면 사용자가 알림에 직접 텍스트를 입력할 수 있습니다. 그러면 활동을 열지 않고 텍스트가 앱에 전송됩니다. 예를 들어 바로 답장 작업을 사용하여 사용자가 알림 내에서 문자 메시지에 답장하거나 작업 목록을 업데이트하도록 할 수 있습니다.

그림 4. '답장' 버튼을 탭하면 텍스트 입력란이 열립니다.
바로 답장 작업은 알림에 텍스트 입력란을 여는 추가 버튼으로 표시됩니다. 사용자가 입력을 마치면 시스템에서 알림 작업에 지정된 인텐트에 텍스트 응답을 첨부하고 인텐트를 앱에 보냅니다.
답장 버튼 추가
바로 답장을 지원하는 알림 작업을 만들려면 다음 단계를 따르세요.
알림 작업에 추가할 수 있는 RemoteInput.Builder의 인스턴스를 만듭니다. 이 클래스의 생성자는 시스템이 텍스트 입력의 키로 사용하는 문자열을 수락합니다. 나중에 앱은 이 키를 사용하여 입력 텍스트를 검색합니다.
// Key for the string that's delivered in the action's intent. val replyLabel: String = context.resources.getString(R.string.reply_label) val remoteInput: RemoteInput = RemoteInput.Builder(KEY_TEXT_REPLY).run { setLabel(replyLabel) build() }
답장 작업의 PendingIntent를 만듭니다.
// Build a PendingIntent for the reply action to trigger. val replyPendingIntent: PendingIntent = PendingIntent.getBroadcast(context, conversationId, getMessageReplyIntent(conversationId), PendingIntent.FLAG_MUTABLE)
addRemoteInput()을 사용하여 RemoteInput 객체를 작업에 연결합니다.
// Create the reply action and add the remote input. val action: NotificationCompat.Action = NotificationCompat.Action.Builder(R.drawable.reply, context.getString(R.string.reply_label), replyPendingIntent) .addRemoteInput(remoteInput) .build()
작업을 알림에 적용하고 알림을 발행합니다.
// Build the notification and add the action.
val newMessageNotification = NotificationCompat.Builder(context, CHANNEL_ID)
    .setSmallIcon(R.drawable.ic_message)
    .setContentTitle(context.getString(R.string.title))
    .setContentText(context.getString(R.string.content))
    .addAction(action)
    .build()

// Issue the notification.
NotificationManagerCompat.from(context).notify(notificationId, newMessageNotification)
그림 4와 같이 시스템이 사용자에게 알림 작업이 트리거될 때 응답을 입력하라는 메시지를 표시합니다.
답장에서 사용자 입력 가져오기
알림의 답장 UI에서 사용자 입력을 수신하려면 RemoteInput.getResultsFromIntent()를 호출하여 BroadcastReceiver에서 수신된 Intent를 전달합니다.
private fun getMessageText(intent: Intent): CharSequence? { return RemoteInput.getResultsFromIntent(intent)?.getCharSequence(KEY_TEXT_REPLY) }
텍스트를 처리한 후에는 동일한 ID와 태그(사용된 경우)로 NotificationManagerCompat.notify()를 호출하여 알림을 업데이트해야 합니다. 이는 바로 답장 UI를 숨기고 사용자에게 답장이 올바로 수신되고 처리되었음을 확인하기 위해 필요합니다.
// Build a new notification, which informs the user that the system // handled their interaction with the previous notification. val repliedNotification = NotificationCompat.Builder(context, CHANNEL_ID) .setSmallIcon(R.drawable.message) .setContentText(context.getString(R.string.replied)) .build() // Issue the new notification. NotificationManagerCompat.from(context).notify(notificationId, repliedNotification)
기타 데이터 가져오기
다른 데이터 유형을 처리하는 방식은 RemoteInput와 유사합니다. 다음 예에서는 이미지를 입력으로 사용합니다.
val replyLabel: String = context.resources.getString(R.string.reply_label) val remoteInput: RemoteInput = RemoteInput.Builder(KEY_REPLY).run { setLabel(replyLabel) // Allow for image data types in the input. // This method can be used again to allow for other data types. setAllowDataType("image/*", true) build() }
RemoteInput#getDataResultsFromIntent을 호출하고 해당 데이터를 추출합니다.
class ReplyReceiver : BroadcastReceiver() { override fun onReceive(context: Context, intent: Intent) { val dataResults = RemoteInput.getDataResultsFromIntent(intent, KEY_REPLY) val imageUri: Uri? = dataResults?.get("image/*") as? Uri if (imageUri != null) { // Extract the image context.contentResolver.openInputStream(imageUri)?.use { inputStream -> val bitmap = BitmapFactory.decodeStream(inputStream) // Display the image // ... } } } companion object { const val KEY_REPLY = "key_reply" const val KEY_TEXT_REPLY = "key_text_reply" } }
이 새로운 알림을 사용할 때 수신자의 onReceive() 메서드로 전달되는 컨텍스트를 사용하세요.
setRemoteInputHistory()를 호출하여 알림의 하단에 답장을 추가합니다. 하지만 메시지 앱을 빌드하는 경우 메시지 스타일 알림을 만들고 새 메시지를 대화에 추가해야 합니다.
메시지 앱의 알림에 관한 자세한 내용은 메시지 앱을 위한 권장사항 섹션을 참고하세요.
긴급 메시지 표시
앱에서 수신 전화 또는 알람 울림과 같이 시간이 중요한 긴급 메시지를 표시해야 할 수도 있습니다. 이 경우 전체 화면 인텐트를 알림과 연결할 수 있습니다.
알림이 호출되면 기기의 잠금 상태에 따라 다음 중 하나가 사용자에게 표시됩니다.
- 사용자의 기기가 잠겨 있으면 전체 화면 활동이 표시되어 잠금 화면을 덮습니다.
- 사용자의 기기가 잠겨 있지 않으면 알림을 처리하거나 닫기 위한 옵션이 포함된 펼친 형태로 알림이 표시됩니다.
다음 코드 스니펫은 알림을 전체 화면 인텐트와 연결하는 방법을 보여줍니다.
val fullScreenIntent = Intent(context, ImportantActivity::class.java) val fullScreenPendingIntent = PendingIntent.getActivity(context, 0, fullScreenIntent, PendingIntent.FLAG_IMMUTABLE) val builder = NotificationCompat.Builder(context, CHANNEL_ID) .setSmallIcon(R.drawable.ic_logo) .setContentTitle("My notification") .setContentText("Hello World!") .setPriority(NotificationCompat.PRIORITY_DEFAULT) .setFullScreenIntent(fullScreenPendingIntent, true)
잠금 화면 공개 상태 설정
잠금 화면에서 알림에 표시되는 세부정보 수준을 제어하려면 setVisibility()를 호출하고 다음 값 중 하나를 지정하세요.
VISIBILITY_PUBLIC: 알림의 전체 콘텐츠가 잠금 화면에 표시됩니다.VISIBILITY_SECRET: 알림의 어느 부분도 잠금 화면에 표시되지 않습니다.VISIBILITY_PRIVATE: 알림 아이콘과 콘텐츠 제목 등의 기본 정보만 잠금 화면에 표시됩니다. 알림의 전체 콘텐츠가 표시되지 않습니다.
VISIBILITY_PRIVATE을 설정하면 특정 세부정보를 숨기는 알림 콘텐츠의 대체 버전을 제공할 수도 있습니다. 예를 들어 SMS 앱에서 '새 문자 메시지가 3개 있습니다'라고 표시하면서도 문자 메시지의 내용과 발신자는 숨길 수 있습니다. 이 대체 알림을 제공하려면 우선 평소처럼 NotificationCompat.Builder로 대체 알림을 만드세요. 그런 다음 setPublicVersion()을 사용하여 대체 알림을 일반 알림에 첨부합니다.
사용자는 항상 알림이 잠금 화면에 표시되는지 여부를 최종적으로 제어하며 앱의 알림 채널을 기반으로 제어할 수도 있습니다.
알림 업데이트
알림을 발행한 후 업데이트하려면 NotificationManagerCompat.notify()를 다시 호출하여 이전에 사용한 것과 동일한 ID를 전달하세요. 이전 알림을 닫으면 새로운 알림이 대신 생성됩니다.
선택적으로 setOnlyAlertOnce()를 호출하여 알림이 나중에 업데이트될 때가 아니라 처음으로 표시될 때만 알림음, 진동 또는 시각적 실마리로 사용자를 방해하도록 할 수 있습니다.
알림 삭제
알림은 다음 중 한 가지가 발생할 때까지 계속 표시된 상태로 유지됩니다.
- 사용자가 앱을 닫습니다.
- 사용자가 알림을 탭합니다(알림을 만들 때
setAutoCancel()을 호출한 경우). - 특정 알림 ID에
cancel()를 호출합니다. 이 메서드는 진행 중인 알림도 삭제합니다. cancelAll()을 호출하여 이전에 발행한 모든 알림을 삭제합니다.setTimeoutAfter()를 사용하여 알림을 만들 때 제한 시간을 설정한 경우 지정된 시간이 지납니다. 필요한 경우 지정된 제한 시간이 지나기 전에 알림을 취소할 수 있습니다.
메시지 앱을 위한 권장사항
메시지 및 채팅 앱을 위한 알림을 만들 때 여기 나열된 권장사항을 고려하세요.
MessagingStyle 사용
Android 7.0 (API 수준 24)부터 Android는 메시지 콘텐츠 전용 알림 스타일 템플릿을 제공합니다. NotificationCompat.MessagingStyle 클래스를 사용하면 대화 제목, 추가 메시지, 알림의 콘텐츠 보기를 비롯하여 알림에 표시되는 여러 라벨을 변경할 수 있습니다.
다음 코드 스니펫은 MessagingStyle 클래스를 사용하여 알림의 스타일을 맞춤설정하는 방법을 보여줍니다.
val message1 = NotificationCompat.MessagingStyle.Message( messages[0].text, messages[0].time, messages[0].sender ) val message2 = NotificationCompat.MessagingStyle.Message( messages[1].text, messages[1].time, messages[1].sender ) notification = NotificationCompat.Builder(context, CHANNEL_ID) .setSmallIcon(R.drawable.ic_logo) .setStyle( NotificationCompat.MessagingStyle(Person.Builder().setName("Me").build()) .addMessage(message1) .addMessage(message2) ) .build()
Android 9.0 (API 수준 28)부터는 알림과 아바타를 최적으로 렌더링하기 위해 Person 클래스를 사용해야 합니다.
NotificationCompat.MessagingStyle를 사용할 때는 다음 단계를 따르세요.
MessagingStyle.setConversationTitle()을 호출하여 세 명 이상이 있는 그룹 채팅 제목을 설정합니다. 그룹 채팅의 이름이 좋은 대화 제목이며 채팅 이름이 없는 경우 대화 참가자 목록이 좋은 대화 제목입니다. 제목이 없으면 메시지가 대화에서 가장 최근에 메시지를 보낸 사람과의 일대일 대화에 속하는 것으로 오인될 수 있습니다.MessagingStyle.setData()메서드를 사용하여 이미지와 같은 미디어 메시지를 포함합니다. 패턴 이미지/* 의 MIME 유형이 지원됩니다.
바로 답장 사용
바로 답장을 사용하면 사용자가 메시지에 인라인으로 답장할 수 있습니다.
- 사용자가 인라인 답장 작업을 통해 답장한 후
MessagingStyle.addMessage()를 사용하여MessagingStyle알림을 업데이트하고 알림을 철회하거나 취소하지 마세요. 알림을 취소하지 않으면 사용자가 알림에서 여러 개의 답장을 보낼 수 있습니다. - 인라인 답장 작업을 Wear OS와 호환되도록 하려면
Action.WearableExtender.setHintDisplayInlineAction(true)을 호출합니다. addHistoricMessage()메서드를 사용하여 알림에 기록 메시지를 추가하여 바로 답장 대화에 컨텍스트를 제공하세요.
스마트 답장 사용 설정
- 스마트 답장을 사용 설정하려면 답장 작업에서
setAllowGeneratedResponses(true)를 호출하세요. 이렇게 하면 알림이 Wear OS 기기에 연결될 때 사용자가 스마트 답장 응답을 사용할 수 있습니다. 스마트 답장 응답은NotificationCompat.MessagingStyle알림에서 제공하는 컨텍스트를 사용하여 전적으로 시계 머신러닝 모델에서 생성되고 응답을 생성하도록 인터넷에 데이터가 업로드되지 않습니다.
알림 메타데이터 추가
- 기기가 방해 금지 모드에 있을 때 앱 알림을 처리하는 방법을 시스템에 알리려면 알림 메타데이터를 할당하세요. 예를 들어
addPerson()또는setCategory(Notification.CATEGORY_MESSAGE)메서드를 사용하여 방해 금지 모드를 재정의하세요.