여러 Gradle 모듈이 있는 프로젝트를 다중 모듈 프로젝트라고 합니다.
기능 모듈 없이 단일 APK로 제공되는 다중 모듈 프로젝트에서는 프로젝트 내 대부분의 모듈에 종속될 수 있는 app 모듈 및 나머지 모듈이 통상적으로 종속되는 base 또는 core 모듈이 있는 것이 일반적입니다. app 모듈에는 일반적으로 Application 클래스가 포함되어 있지만 base 모듈에는 프로젝트의 모든 모듈에서 공유되는 모든 공통 클래스가 포함되어 있습니다.
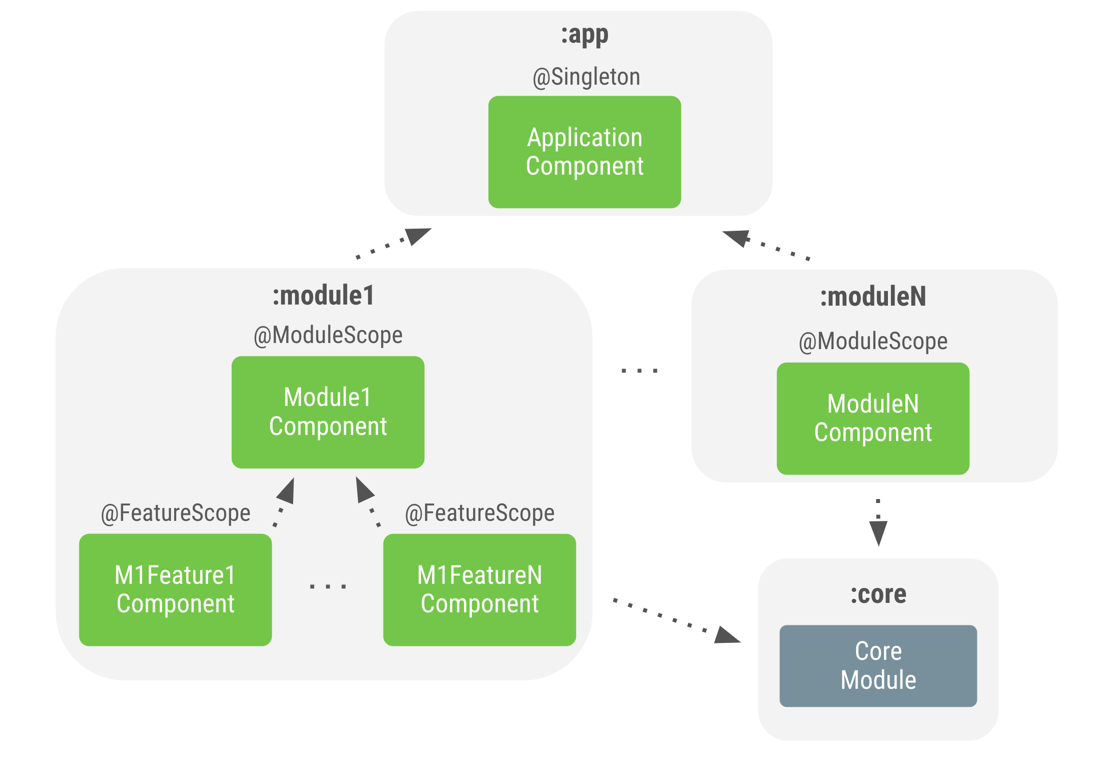
app 모듈은 앱의 싱글톤뿐만 아니라 다른 구성요소에서 필요할 수 있는 객체를 제공할 수 있는 애플리케이션 구성요소(예: 아래 이미지의 ApplicationComponent)를 선언하는 데 적합합니다. 예를 들어 OkHttpClient, JSON 파서, 데이터베이스 접근자 또는 core 모듈에 정의될 수 있는 SharedPreferences 객체와 같은 클래스는 app 모듈에 정의된 ApplicationComponent에 의해 제공됩니다.
app 모듈에는 수명이 더 짧은 다른 구성요소도 있을 수 있습니다.
로그인 후 사용자별 구성(예: UserSession)이 있는 UserComponent를 예로 들 수 있습니다.
프로젝트의 다양한 모듈에서 그림 1과 같이 모듈과 관련된 로직을 갖는 부분 구성요소를 하나 이상 정의할 수 있습니다.

그림 1. 다중 모듈 프로젝트의 Dagger 그래프 예
예를 들어 login 모듈에서 LoginRepository와 같은 기능에 공통적인 객체를 제공할 수 있는 맞춤 @ModuleScope 주석으로 LoginComponent 범위를 지정할 수 있습니다. 이 모듈 내에는 다른 맞춤 범위를 가진 LoginComponent에 종속되는 다른 구성요소도 있을 수 있습니다(예: ViewModel 객체와 같은 추가 기능별 로직의 범위를 지정할 수 있는 LoginActivityComponent 또는 TermsAndConditionsComponent의 @FeatureScope).
Registration과 같은 다른 모듈의 경우 유사한 설정이 있습니다.
다중 모듈 프로젝트의 일반적인 규칙은 동일한 수준의 모듈이 서로 종속되면 안 된다는 것입니다. 서로 종속되었다면 공유 로직(모듈 간 종속 항목)이 상위 모듈의 일부여야 하는지 검토합니다. 그렇다면 클래스를 상위 모듈로 이동하도록 리팩터링합니다. 리팩터링하지 않으려면 상위 모듈을 확장하는 새 모듈을 만들고 두 개의 원래 모듈에서 모두 새 모듈을 확장합니다.
권장사항으로서 일반적으로 다음과 같은 경우에 모듈에서 구성요소를 만듭니다.
LoginActivityComponent에서와 같이 필드 삽입을 실행해야 합니다.LoginComponent에서와 같이 객체의 범위를 지정해야 합니다.
이러한 경우 중 어느 것에도 해당되지 않으며 모듈의 객체를 제공하는 방법을 Dagger에 알려야 한다면 클래스에 구성 삽입이 불가능한 경우 @Provides 또는 @Binds 메서드를 사용하여 Dagger 모듈을 생성 및 노출합니다.
Dagger 부분 구성요소를 사용한 구현
Android 앱에서 Dagger 사용 문서 페이지는 부분 구성요소를 만들고 사용하는 방법을 다룹니다. 그러나 기능 모듈은 app 모듈에 관해 알지 못하므로 개발자는 동일한 코드를 사용할 수 없습니다. 예를 들어 일반적인 로그인 흐름 및 이전 페이지에 있는 코드에 관해 생각해보면 코드가 더 이상 컴파일되지 않습니다.
Kotlin
class LoginActivity: Activity() {
  ...

  override fun onCreate(savedInstanceState: Bundle?) {
    // Creation of the login graph using the application graph
    loginComponent = (applicationContext as MyDaggerApplication)
                        .appComponent.loginComponent().create()

    // Make Dagger instantiate @Inject fields in LoginActivity
    loginComponent.inject(this)
    ...
  }
}
Java
public class LoginActivity extends Activity {
    ...

    @Override
    protected void onCreate(Bundle savedInstanceState) {
        // Creation of the login graph using the application graph
        loginComponent = ((MyApplication) getApplicationContext())
                                .appComponent.loginComponent().create();

        // Make Dagger instantiate @Inject fields in LoginActivity
        loginComponent.inject(this);

        ...
    }
}
그 이유는 login 모듈이 MyApplication 또는 appComponent에 관해 알지 못하기 때문입니다. 모듈이 작동하도록 하려면 MyApplication이 구현해야 하는 FeatureComponent를 제공하는 인터페이스를 기능 모듈에서 정의해야 합니다.
다음 예에서는 로그인 흐름에 관한 login 모듈에서 LoginComponent를 제공하는 LoginComponentProvider 인터페이스를 정의할 수 있습니다.
Kotlin
interface LoginComponentProvider {
    fun provideLoginComponent(): LoginComponent
}
Java
public interface LoginComponentProvider {
   public LoginComponent provideLoginComponent();
}
이제 LoginActivity는 위에 정의된 코드 스니펫 대신 이 인터페이스를 사용합니다.
Kotlin
class LoginActivity: Activity() {
  ...

  override fun onCreate(savedInstanceState: Bundle?) {
    loginComponent = (applicationContext as LoginComponentProvider)
                        .provideLoginComponent()

    loginComponent.inject(this)
    ...
  }
}
Java
public class LoginActivity extends Activity {
    ...

    @Override
    protected void onCreate(Bundle savedInstanceState) {
        loginComponent = ((LoginComponentProvider) getApplicationContext())
                                .provideLoginComponent();

        loginComponent.inject(this);

        ...
    }
}
이제 MyApplication은 인터페이스를 구현하고 필요한 메서드를 구현해야 합니다.
Kotlin
class MyApplication: Application(), LoginComponentProvider {
  // Reference to the application graph that is used across the whole app
  val appComponent = DaggerApplicationComponent.create()

  override fun provideLoginComponent(): LoginComponent {
    return appComponent.loginComponent().create()
  }
}
Java
public class MyApplication extends Application implements LoginComponentProvider {
  // Reference to the application graph that is used across the whole app
  ApplicationComponent appComponent = DaggerApplicationComponent.create();

  @Override
  public LoginComponent provideLoginComponent() {
    return appComponent.loginComponent.create();
  }
}
이는 다중 모듈 프로젝트에서 Dagger 부분 구성요소를 사용하는 방법입니다. 기능 모듈을 사용하면 모듈이 서로 종속되는 방식으로 인해 솔루션이 달라집니다.
기능 모듈이 포함된 구성요소 종속 항목
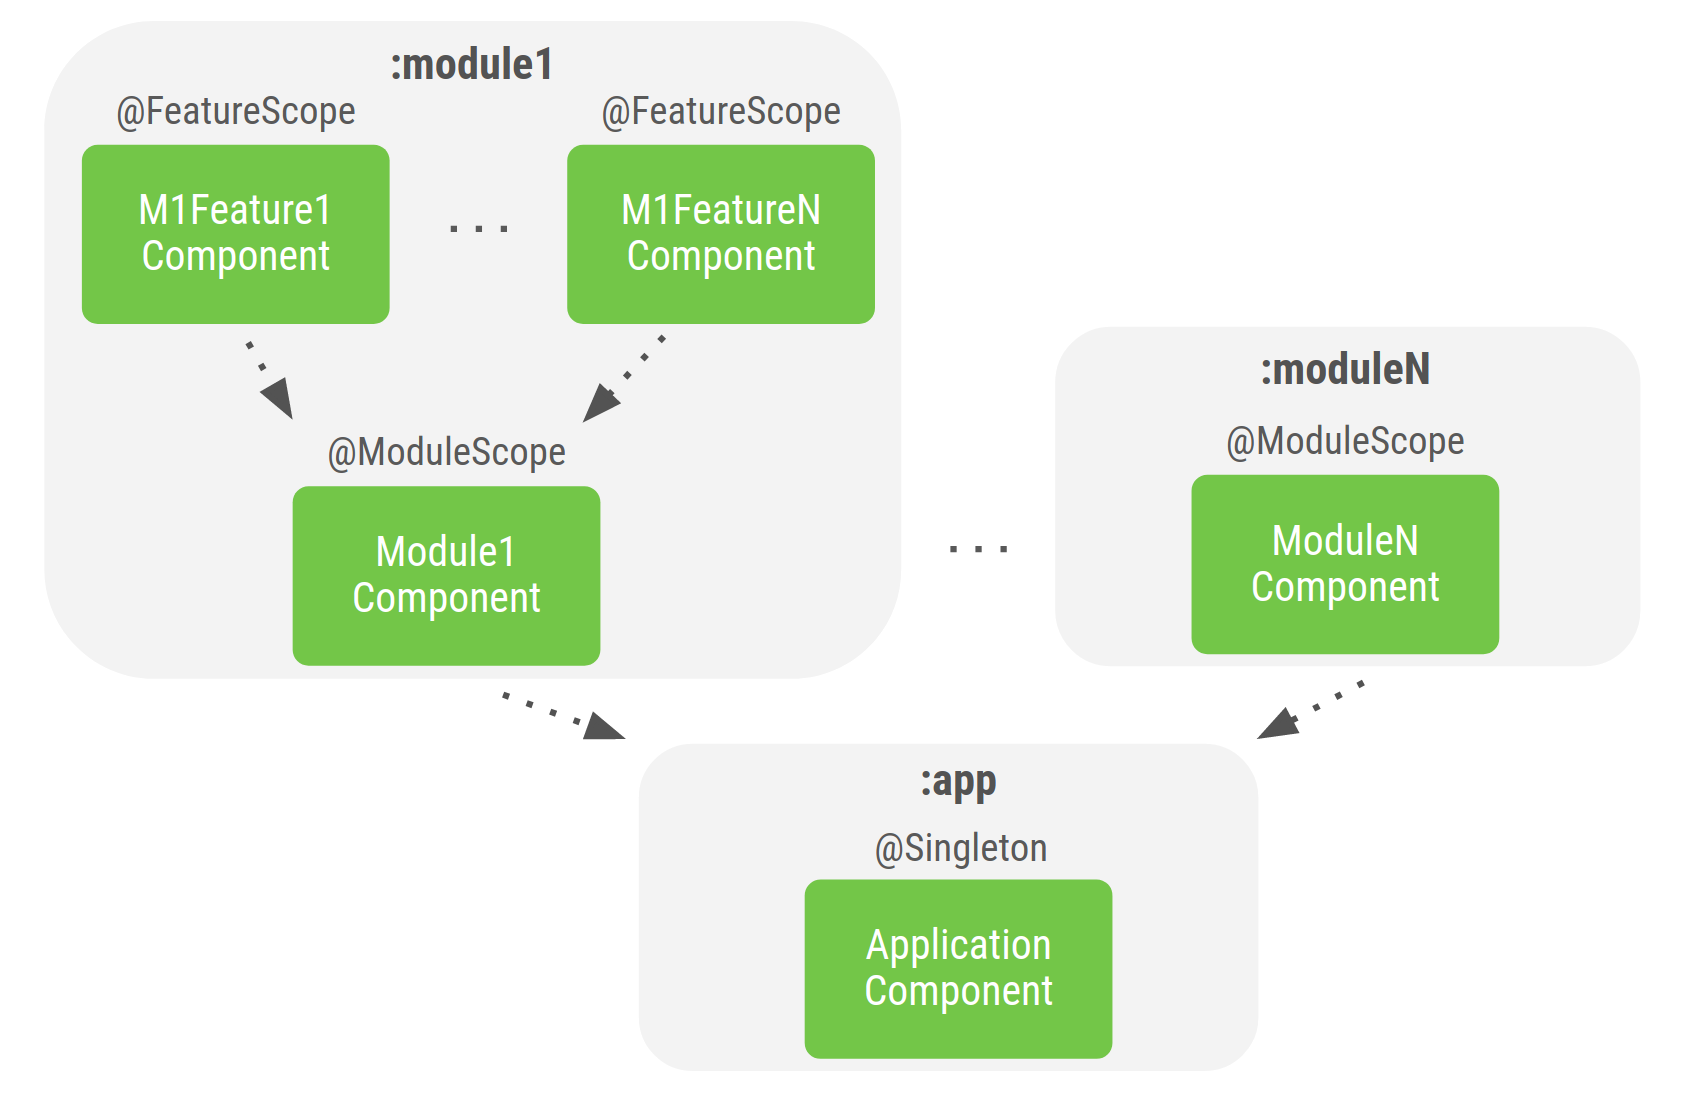
기능 모듈을 사용하면 일반적으로 모듈이 서로 종속되는 방식이 반전됩니다. app 모듈이 기능 모듈을 포함하는 대신, 기능 모듈은 app 모듈에 종속됩니다. 모듈이 구성되는 방식은 그림 2를 참고하세요.

그림 2. 기능 모듈이 있는 프로젝트의 Dagger 그래프 예
Dagger에서 구성요소는 부분 구성요소에 관해 알아야 합니다. 이 정보는 상위 구성요소에 추가된 Dagger 모듈(예: Android 앱에서 Dagger 사용의 SubcomponentsModule 모듈)에 포함되어 있습니다.
안타깝게도 앱과 기능 모듈 간의 종속 항목 반전으로 인해 부분 구성요소는 빌드 경로에 있지 않으므로 app 모듈에 표시되지 않습니다. 예를 들어 login 기능 모듈에 정의된 LoginComponent는 app 모듈에 정의된 ApplicationComponent의 부분 구성요소일 수 없습니다.
Dagger에는 이 문제를 해결하는 데 사용할 수 있는 구성요소 종속 항목이라는 메커니즘이 있습니다. 하위 구성요소는 상위 구성요소의 부분 구성요소가 아니며 하위 구성요소는 상위 구성요소에 종속됩니다. 여기에서 상위-하위 관계는 없습니다. 이제 구성요소는 특정 종속 항목을 얻기 위해 다른 요소에 종속됩니다. 종속 구성요소가 유형을 사용하려면 구성요소가 그래프에서 유형을 노출해야 합니다.
예를 들어 login이라는 기능 모듈은 app Gradle 모듈에서 사용 가능한 AppComponent에 종속되는 LoginComponent를 빌드하려고 합니다.
다음은 app Gradle 모듈의 일부인 클래스 및 AppComponent의 정의입니다.
Kotlin
// UserRepository's dependencies
class UserLocalDataSource @Inject constructor() { ... }
class UserRemoteDataSource @Inject constructor() { ... }

// UserRepository is scoped to AppComponent
@Singleton
class UserRepository @Inject constructor(
    private val localDataSource: UserLocalDataSource,
    private val remoteDataSource: UserRemoteDataSource
) { ... }

@Singleton
@Component
interface AppComponent { ... }
Java
// UserRepository's dependencies
public class UserLocalDataSource {

    @Inject
    public UserLocalDataSource() {}
}

public class UserRemoteDataSource {

    @Inject
    public UserRemoteDataSource() { }
}

// UserRepository is scoped to AppComponent
@Singleton
public class UserRepository {

    private final UserLocalDataSource userLocalDataSource;
    private final UserRemoteDataSource userRemoteDataSource;

    @Inject
    public UserRepository(UserLocalDataSource userLocalDataSource, UserRemoteDataSource userRemoteDataSource) {
        this.userLocalDataSource = userLocalDataSource;
        this.userRemoteDataSource = userRemoteDataSource;
    }
}

@Singleton
@Component
public interface ApplicationComponent { ... }
app Gradle 모듈을 포함하는 login Gradle 모듈에는 LoginViewModel 인스턴스를 삽입해야 하는 LoginActivity가 있습니다.
Kotlin
// LoginViewModel depends on UserRepository that is scoped to AppComponent
class LoginViewModel @Inject constructor(
    private val userRepository: UserRepository
) { ... }
Java
// LoginViewModel depends on UserRepository that is scoped to AppComponent
public class LoginViewModel {

    private final UserRepository userRepository;

    @Inject
    public LoginViewModel(UserRepository userRepository) {
        this.userRepository = userRepository;
    }
}
LoginViewModel은 사용 가능하고 AppComponent로 범위가 지정된 UserRepository의 종속 항목을 갖습니다. 다음과 같이 AppComponent에 종속되는 LoginComponent를 만들어서 LoginActivity를 삽입해 보겠습니다.
Kotlin
// Use the dependencies attribute in the Component annotation to specify the
// dependencies of this Component
@Component(dependencies = [AppComponent::class])
interface LoginComponent {
    fun inject(activity: LoginActivity)
}
Java
// Use the dependencies attribute in the Component annotation to specify the
// dependencies of this Component
@Component(dependencies = AppComponent.class)
public interface LoginComponent {

    void inject(LoginActivity loginActivity);
}
LoginComponent는 구성요소 주석의 종속 항목 매개변수에 AppComponent의 종속 항목을 추가하여 이 종속 항목을 지정합니다. LoginActivity는 Dagger에 의해 삽입되므로 인터페이스에 inject() 메서드를 추가합니다.
LoginComponent를 만들 때 AppComponent의 인스턴스를 전달해야 합니다. 그렇게 하려면 다음과 같이 구성요소 팩토리를 사용합니다.
Kotlin
@Component(dependencies = [AppComponent::class])
interface LoginComponent {

    @Component.Factory
    interface Factory {
        // Takes an instance of AppComponent when creating
        // an instance of LoginComponent
        fun create(appComponent: AppComponent): LoginComponent
    }

    fun inject(activity: LoginActivity)
}
Java
@Component(dependencies = AppComponent.class)
public interface LoginComponent {

    @Component.Factory
    interface Factory {
        // Takes an instance of AppComponent when creating
        // an instance of LoginComponent
        LoginComponent create(AppComponent appComponent);
    }

    void inject(LoginActivity loginActivity);
}
이제 LoginActivity는 LoginComponent의 인스턴스를 만들고 inject() 메서드를 호출할 수 있습니다.
Kotlin
class LoginActivity: Activity() {

    // You want Dagger to provide an instance of LoginViewModel from the Login graph
    @Inject lateinit var loginViewModel: LoginViewModel

    override fun onCreate(savedInstanceState: Bundle?) {
        // Gets appComponent from MyApplication available in the base Gradle module
        val appComponent = (applicationContext as MyApplication).appComponent

        // Creates a new instance of LoginComponent
        // Injects the component to populate the @Inject fields
        DaggerLoginComponent.factory().create(appComponent).inject(this)

        super.onCreate(savedInstanceState)

        // Now you can access loginViewModel
    }
}
Java
public class LoginActivity extends Activity {

    // You want Dagger to provide an instance of LoginViewModel from the Login graph
    @Inject
    LoginViewModel loginViewModel;

    @Override
    protected void onCreate(Bundle savedInstanceState) {
        super.onCreate(savedInstanceState);

        // Gets appComponent from MyApplication available in the base Gradle module
        AppComponent appComponent = ((MyApplication) getApplicationContext()).appComponent;

        // Creates a new instance of LoginComponent
        // Injects the component to populate the @Inject fields
        DaggerLoginComponent.factory().create(appComponent).inject(this);

        // Now you can access loginViewModel
    }
}
LoginViewModel은 UserRepository에 종속됩니다. 따라서 LoginComponent가 AppComponent에서 이 클래스에 액세스할 수 있게 하려면 AppComponent가 인터페이스에 이 클래스를 노출해야 합니다.
Kotlin
@Singleton
@Component
interface AppComponent {
    fun userRepository(): UserRepository
}
Java
@Singleton
@Component
public interface AppComponent {
    UserRepository userRepository();
}
종속 구성요소가 있는 범위 지정 규칙은 부분 구성요소와 동일한 방식으로 작동합니다. LoginComponent는 AppComponent의 인스턴스를 사용하므로 동일한 범위 주석을 사용할 수 없습니다.
LoginViewModel의 범위를 LoginComponent로 지정하려면 이전에 맞춤 @ActivityScope 주석을 사용하여 그랬던 것과 동일하게 지정합니다.
Kotlin
@ActivityScope
@Component(dependencies = [AppComponent::class])
interface LoginComponent { ... }

@ActivityScope
class LoginViewModel @Inject constructor(
    private val userRepository: UserRepository
) { ... }
Java
@ActivityScope
@Component(dependencies = AppComponent.class)
public interface LoginComponent { ... }

@ActivityScope
public class LoginViewModel {

    private final UserRepository userRepository;

    @Inject
    public LoginViewModel(UserRepository userRepository) {
        this.userRepository = userRepository;
    }
}
권장사항
ApplicationComponent는 항상app모듈에 있어야 합니다.모듈에서 필드 삽입을 실행해야 하거나 애플리케이션의 특정 흐름에 관한 객체 범위를 지정해야 한다면 모듈에 Dagger 구성요소를 만듭니다.
유틸리티 또는 도우미로 사용하기 위한 것으로서 그래프를 빌드할 필요가 없는(Dagger 구성요소가 필요한 이유) Gradle 모듈의 경우, 생성자 삽입을 지원하지 않는 클래스의 @Provides 및 @Binds 메서드를 사용하여 공개 Dagger 모듈을 생성 및 노출합니다.
기능 모듈이 있는 Android 앱에서 Dagger를 사용하려면 구성요소 종속 항목을 사용하여
app모듈에 정의된ApplicationComponent에서 제공하는 종속 항목에 액세스하면 됩니다.
