สร้างบิตแมปที่ปรับขนาดได้ (ไฟล์ 9 แพตช์)
จัดทุกอย่างให้เป็นระเบียบอยู่เสมอด้วยคอลเล็กชัน
บันทึกและจัดหมวดหมู่เนื้อหาตามค่ากำหนดของคุณ
เครื่องมือ Draw 9-patch เป็นโปรแกรมแก้ไข WYSIWYG ที่รวมอยู่ใน Android Studio เครื่องมือนี้ช่วยให้คุณสร้าง
รูปภาพบิตแมปที่ปรับขนาดโดยอัตโนมัติเพื่อให้พอดีกับเนื้อหาของมุมมองและขนาดของ
หน้าจอ คุณสามารถปรับขนาดส่วนที่เลือกของรูปภาพในแนวนอนหรือแนวตั้งตามตัวบ่งชี้
ที่วาดภายในรูปภาพ
หากต้องการทราบข้อมูลเบื้องต้นเกี่ยวกับกราฟิก NinePatch และวิธีการทำงาน โปรดอ่านภาพวาด NinePatch
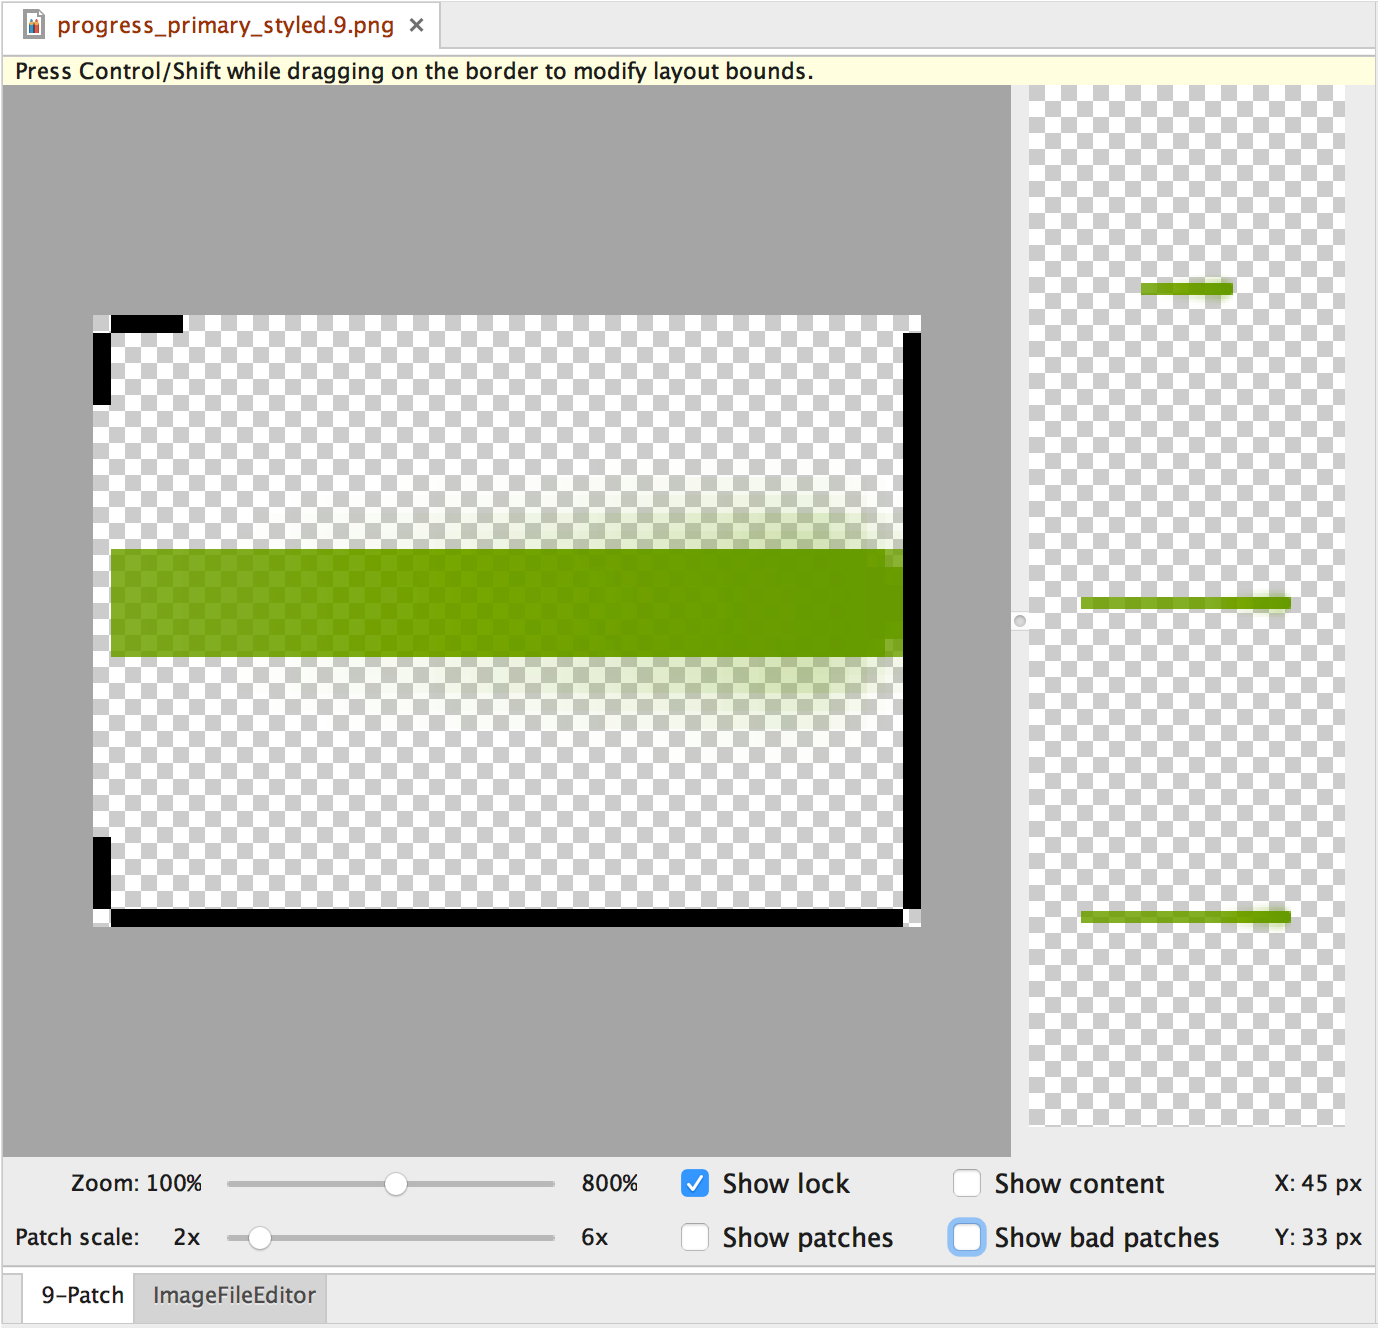
รูปที่ 1 เครื่องมือวาด 9-patch ของ Android Studio
แสดงรูปภาพ NinePatch
ทำตามขั้นตอนต่อไปนี้เพื่อสร้างกราฟิก NinePatch โดยใช้เครื่องมือ Draw 9-patch ใน Android
Studio คุณจะต้องมีรูปภาพ PNG ที่ต้องการสร้างเป็นรูปภาพ NinePatch
- ใน Android Studio ให้คลิกขวาที่รูปภาพ PNG ที่ต้องการสร้าง
รูปภาพ NinePatch จากนั้นคลิกสร้างไฟล์ 9-patch
- ป้อนชื่อไฟล์สำหรับรูปภาพ NinePatch แล้วคลิกตกลง ระบบจะสร้างรูปภาพ
โดยใช้นามสกุลไฟล์
.9.png
- ดับเบิลคลิกไฟล์ NinePatch ใหม่เพื่อเปิดใน Android Studio
ในพื้นที่ทํางานที่เปิดขึ้นมา บานหน้าต่างด้านซ้ายคือพื้นที่วาดภาพ ซึ่งคุณสามารถแก้ไข
เส้นสําหรับแพตช์ที่ยืดหยุ่นและพื้นที่เนื้อหาได้ บานหน้าต่างด้านขวา
คือพื้นที่แสดงตัวอย่าง ซึ่งคุณสามารถดูตัวอย่างกราฟิกเมื่อยืด
- คลิกภายในเส้นรอบวง 1 พิกเซลเพื่อวาดเส้นที่กำหนดแพตช์ที่ยืดหยุ่นได้และ (ไม่บังคับ) พื้นที่เนื้อหา
คลิกขวาเพื่อลบ
เส้นที่วาดก่อนหน้านี้ (ใน Mac ให้กด Shift ค้างไว้แล้วคลิก)
- เมื่อเสร็จแล้ว ให้คลิกไฟล์ > บันทึกเพื่อบันทึกการเปลี่ยนแปลง
หากต้องการเปิดไฟล์ NinePatch ที่มีอยู่แล้วใน Android
Studio ให้ดับเบิลคลิกไฟล์
ตรวจสอบว่าภูมิภาคที่ยืดหยุ่นมีขนาดอย่างน้อย 2x2 พิกเซลเพื่อให้แน่ใจว่ากราฟิก NinePatch จะปรับขนาดลงได้อย่างถูกต้อง
ไม่เช่นนั้น ภูมิภาคเหล่านั้นอาจหายไปเมื่อลดขนาด หากต้องการหลีกเลี่ยงการประมาณค่าระหว่างการปรับขนาด
ซึ่งอาจทำให้สีที่ขอบเขตเปลี่ยนไป ให้เว้นพื้นที่ว่างเพิ่มเติม 1 พิกเซลในกราฟิกก่อนและหลัง
บริเวณที่ยืดหยุ่นได้
หมายเหตุ: ไฟล์ PNG ปกติ (*.png
) จะ
โหลดโดยมีเส้นขอบขนาด 1 พิกเซลที่ว่างเปล่าเพิ่มรอบรูปภาพ คุณวาด
แพตช์ที่ยืดหยุ่นและพื้นที่เนื้อหาภายในเส้นขอบได้
ระบบจะโหลดไฟล์ NinePatch ที่บันทึกไว้ก่อนหน้านี้ (*.9.png
) ตามเดิม
โดยไม่มีการเพิ่มพื้นที่วาดเนื่องจากมีอยู่แล้ว
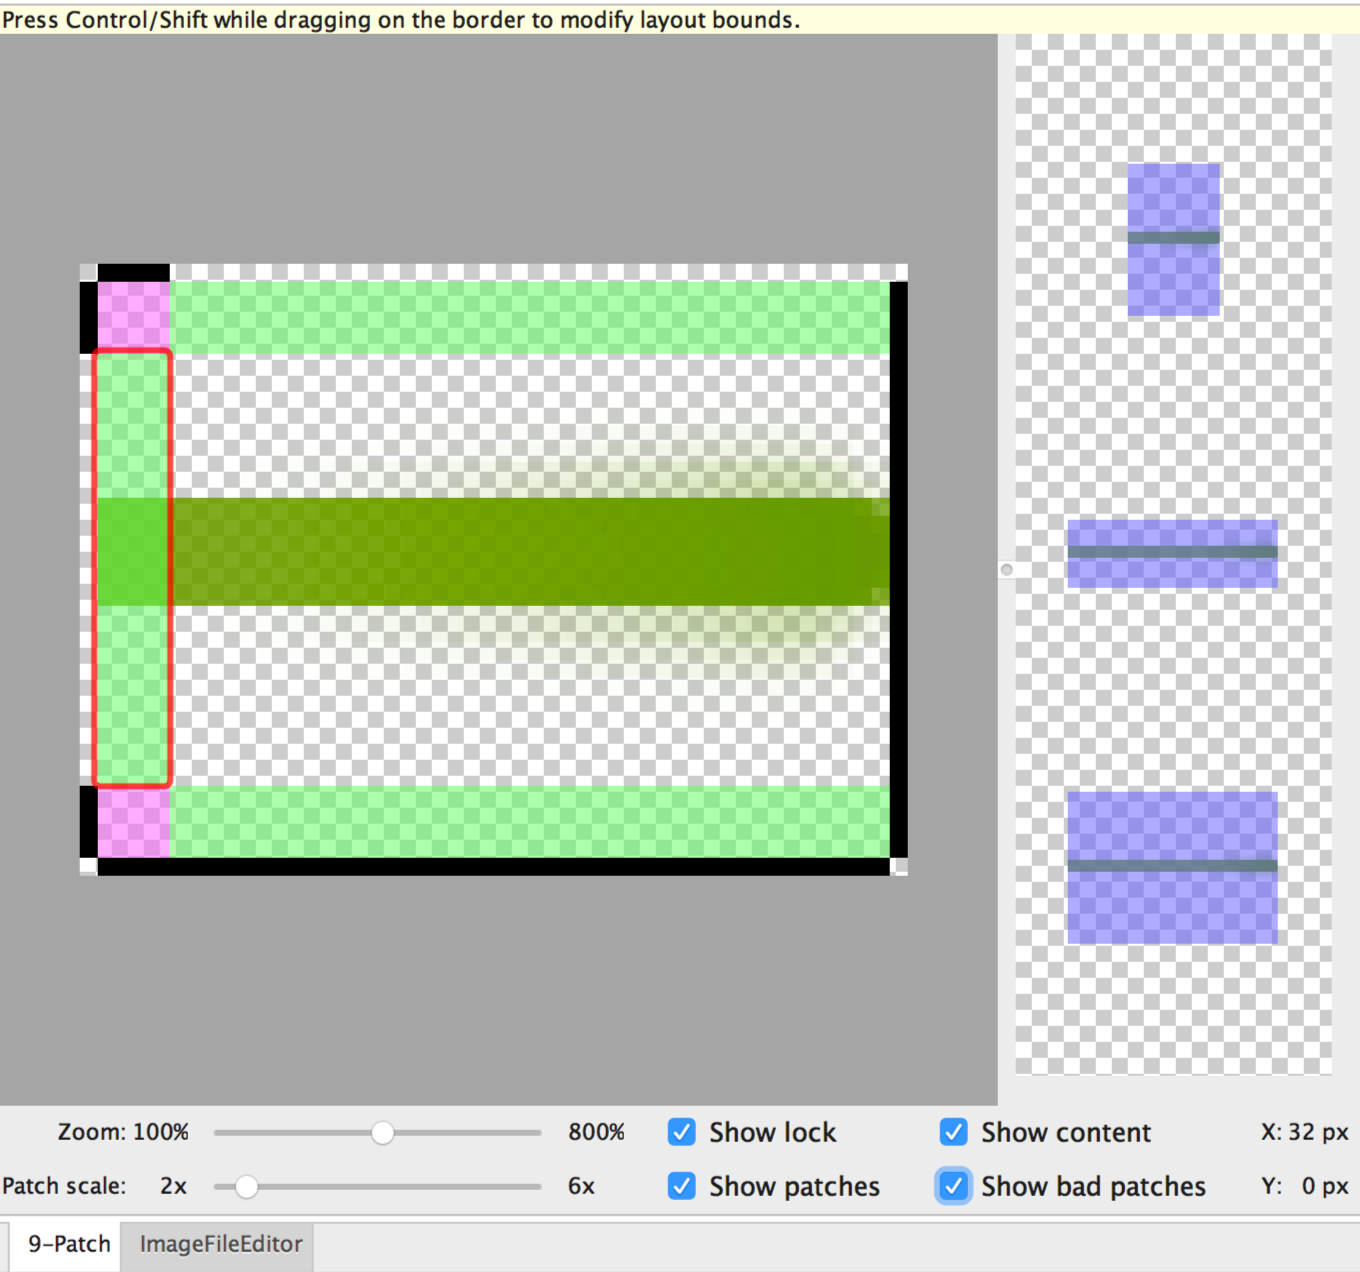
รูปที่ 2 รูปภาพ NinePatch ใน Android Studio
แสดงเนื้อหา แพตช์ และแพตช์ที่ไม่ถูกต้อง
การควบคุมที่ไม่บังคับ ได้แก่
- ซูม: ปรับระดับการซูมของกราฟิกในพื้นที่วาดภาพ
- ขนาดแพตช์: ปรับขนาดของรูปภาพในพื้นที่แสดงตัวอย่าง
- แสดงการล็อก: แสดงภาพพื้นที่ที่วาดไม่ได้ของกราฟิกเมื่อวางเมาส์
- แสดงแพตช์: ดูตัวอย่างแพตช์ที่ยืดหยุ่นได้สีชมพูในพื้นที่วาด สีชมพู
แสดงถึงแพตช์ที่ยืดหยุ่นได้ ดังแสดงในรูปที่ 2
- แสดงเนื้อหา: ไฮไลต์พื้นที่เนื้อหาในรูปภาพตัวอย่าง สีม่วงแสดงถึง
พื้นที่ที่อนุญาตให้แสดงเนื้อหา ดังแสดงในรูปที่ 2
- แสดงแพตช์ที่ไม่ดี: เพิ่มเส้นขอบสีแดงรอบพื้นที่แพตช์ที่อาจ
ทำให้เกิดอาร์ติแฟกต์ในกราฟิกเมื่อยืด ดังที่แสดงในรูปที่ 2 หากกำจัดแพตช์ที่ไม่ดีทั้งหมด คุณจะรักษาความสอดคล้องของภาพที่ยืดออก
ตัวอย่างเนื้อหาและโค้ดในหน้าเว็บนี้ขึ้นอยู่กับใบอนุญาตที่อธิบายไว้ในใบอนุญาตการใช้เนื้อหา Java และ OpenJDK เป็นเครื่องหมายการค้าหรือเครื่องหมายการค้าจดทะเบียนของ Oracle และ/หรือบริษัทในเครือ
อัปเดตล่าสุด 2025-07-27 UTC
[[["เข้าใจง่าย","easyToUnderstand","thumb-up"],["แก้ปัญหาของฉันได้","solvedMyProblem","thumb-up"],["อื่นๆ","otherUp","thumb-up"]],[["ไม่มีข้อมูลที่ฉันต้องการ","missingTheInformationINeed","thumb-down"],["ซับซ้อนเกินไป/มีหลายขั้นตอนมากเกินไป","tooComplicatedTooManySteps","thumb-down"],["ล้าสมัย","outOfDate","thumb-down"],["ปัญหาเกี่ยวกับการแปล","translationIssue","thumb-down"],["ตัวอย่าง/ปัญหาเกี่ยวกับโค้ด","samplesCodeIssue","thumb-down"],["อื่นๆ","otherDown","thumb-down"]],["อัปเดตล่าสุด 2025-07-27 UTC"],[],[],null,["# Create resizable bitmaps (9-patch files)\n\nThe Draw 9-patch tool is a WYSIWYG editor included in Android Studio. The tool lets you create\nbitmap images that automatically resize to accommodate the contents of the view and the size of\nthe screen. You can scale selected parts of the image horizontally or vertically based on indicators\ndrawn within the image.\n\nFor an introduction to NinePatch graphics and how they work, read\n[NinePatch drawables](/guide/topics/graphics/2d-graphics#nine-patch).\n\n**Figure 1.** Android Studio's\nDraw 9-patch tool displaying a NinePatch image.\n\nFollow these steps to create a NinePatch graphic using the Draw 9-patch tool in Android\nStudio. You'll need the PNG image that you'd like to create a NinePatch image from.\n\n1. In Android Studio, right-click the PNG image you'd like to create a NinePatch image from, then click **Create 9-patch file**.\n2. Enter a filename for your NinePatch image and click **OK** . Your image will be created with the `.9.png` file extension.\n3. Double-click your new NinePatch file to open it in Android Studio. \n\n In the workspace that opens, the left pane is your drawing area, where you can edit\n the lines for the stretchable patches and content area. The right\n pane is the preview area, where you can preview your graphic when stretched.\n4. Click within the 1-pixel perimeter to draw the lines that define the stretchable patches and (optional) the content area. \n\n Right-click to erase\n previously drawn lines (on Mac, hold Shift and click).\n5. When done, click **File** \\\u003e **Save** to save your changes.\n\nTo open an existing NinePatch file in Android\nStudio, double-click the file.\n\nTo make sure that your NinePatch graphics scale down properly, verify that any\nstretchable regions are at least 2x2 pixels in size.\nOtherwise, those regions may disappear when scaled down. To avoid interpolation during scaling\nthat may cause the color at the boundaries to change, provide 1 pixel of extra safe\nspace in the graphics before and after stretchable regions.\n\n**Note:** A normal PNG file (`*.png`) is\nloaded with an empty 1-pixel border added around the image. You can draw\nthe stretchable patches and content area within the border.\nA previously saved NinePatch file (`*.9.png`) is loaded as-is,\nwith no drawing area added because it already exists.\n\n**Figure 2.** A NinePatch image in Android Studio\nshowing content, patches, and bad patches.\n\nOptional controls include:\n\n- **Zoom**: Adjust the zoom level of the graphic in the drawing area.\n- **Patch scale**: Adjust the scale of the images in the preview area.\n- **Show lock**: Visualize the non-drawable area of the graphic on mouse-over.\n- **Show patches**: Preview the pink stretchable patches in the drawing area. Pink indicates a stretchable patch, as shown in figure 2.\n- **Show content**: Highlight the content area in the preview images. Purple indicates the area where content is allowed, as shown in figure 2.\n- **Show bad patches**: Adds a red border around patch areas that may produce artifacts in the graphic when stretched, as shown in figure 2. If you eliminate all bad patches, you will maintain the visual coherence of your stretched image."]]