使用 Resource Manager 管理应用的界面资源
使用集合让一切井井有条
根据您的偏好保存内容并对其进行分类。
Resource Manager 是一个工具窗口,用于在应用中导入、创建、管理和使用资源。若要打开该工具窗口,您可以从菜单中依次选择 View > Tool Windows > Resource Manager,也可以在左侧栏中选择 Resource Manager。
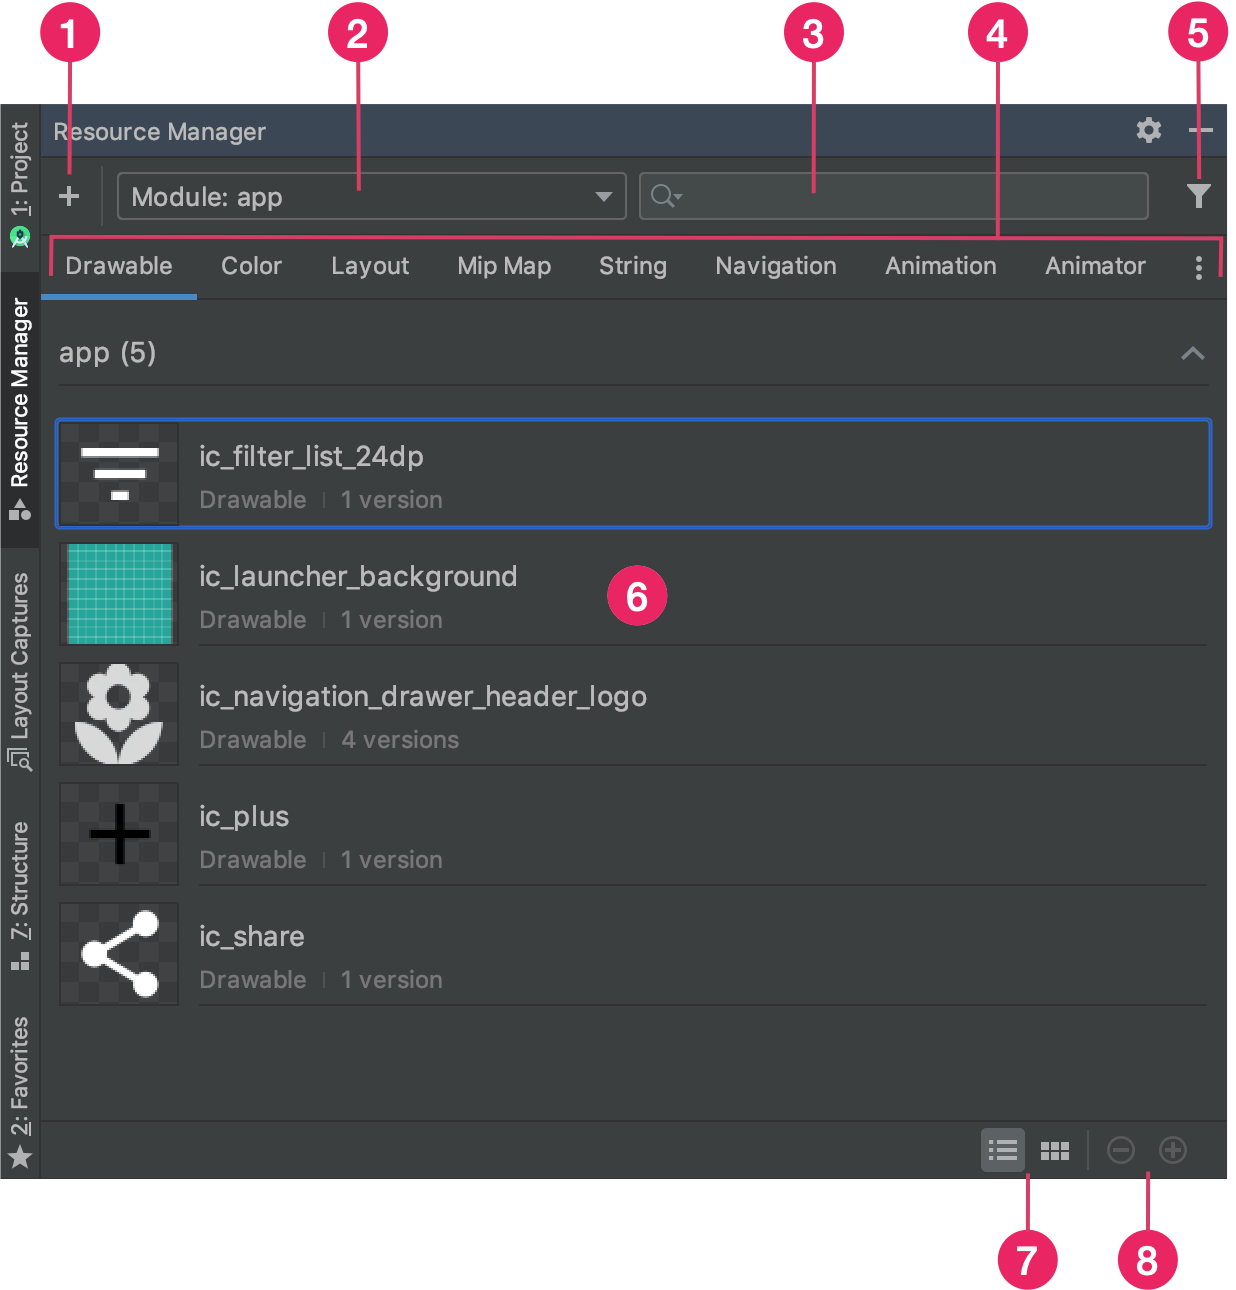
图 1. Resource Manager 工具窗口。
- 点击 Add 图标
可向项目添加新的资源。您可以添加图片资源、矢量资源、字体或资源文件和值,也可以将可绘制对象导入到项目中。
- 选择一个模块可查看该模块专属的资源。
- 使用搜索栏在项目的所有模块中搜索资源。
- 按照 Resource Manager 中的类型显示资源。
使用这些标签页可在各种资源类型之间切换。点击溢出图标
可显示其他资源类型。
- 借助过滤器按钮,过滤本地相关模块、外部库和 Android 框架中显示的资源。您还可以使用该过滤器来显示主题背景属性。
- 在主要内容区域中预览您的资源。右键点击某项资源可打开上下文菜单,您可以通过该菜单重命名资源、在应用中搜索使用了该资源的位置。
- 点击这些按钮能够以图块或列表形式列出资源。
- 点击这些按钮可更改资源的预览大小。
除了上述功能之外,Resource Manager 还提供了一种将可绘制对象批量导入项目中的方法。若要批量导入,您可以采用以下任一方法:
- 将图片文件(包括 SVG 文件)直接拖动到 Resource Manager 中。
- 使用 Import Drawables 向导。
如需了解详情,请参阅将可绘制对象导入项目中部分。
如需查看更多详细信息,请在 Resource Manager 中双击相应的资源。如果某项资源有多个版本,此详细视图将显示每个版本以及所有关联的限定符,如图 2 所示。您可以在此视图中双击特定版本以在编辑器窗口中打开它。
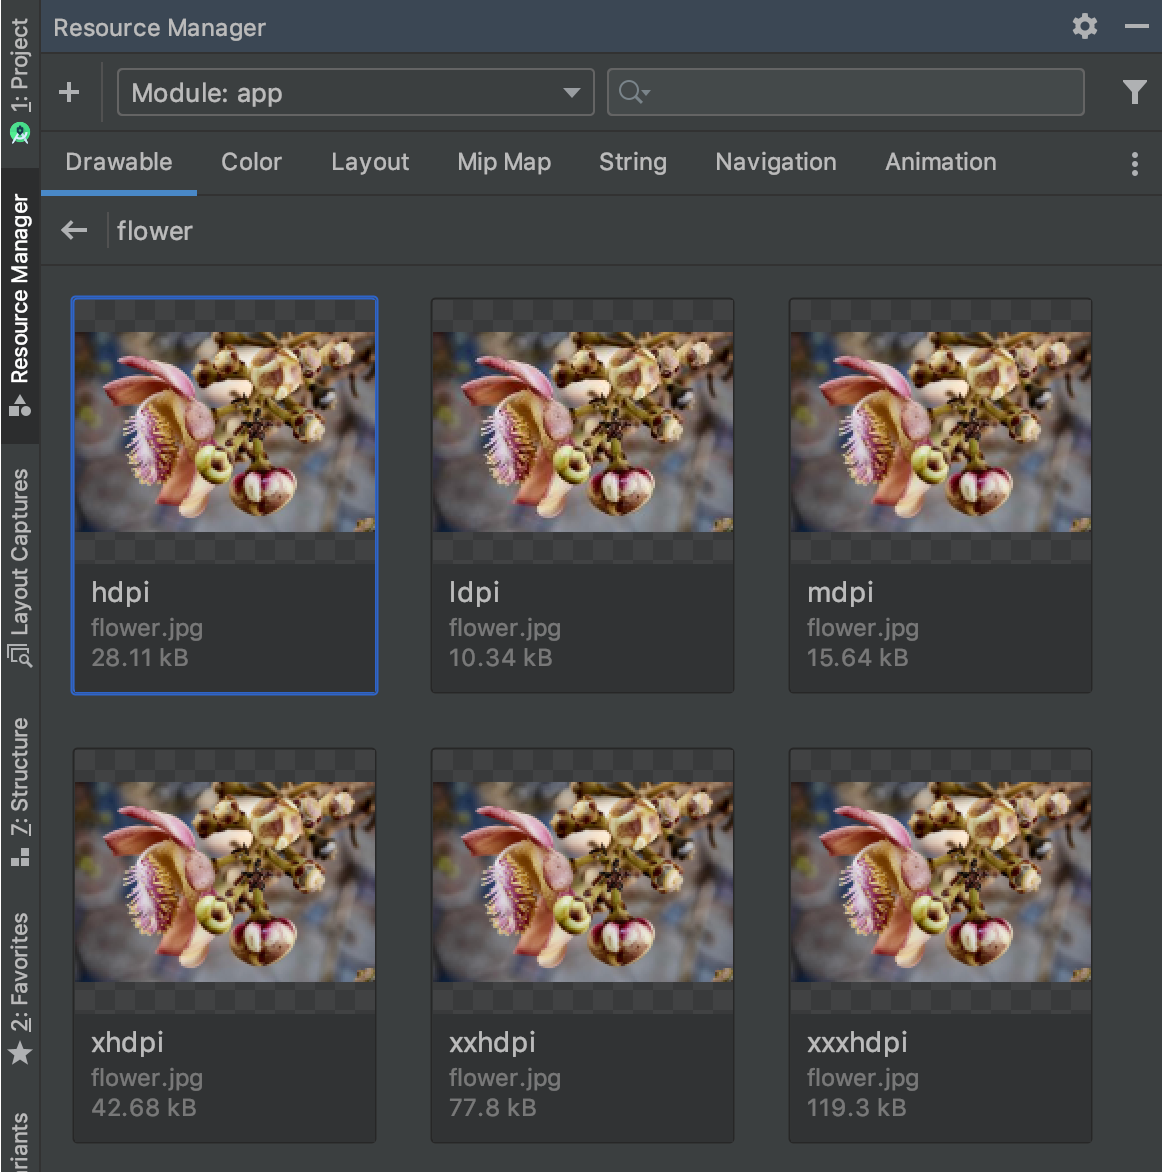
图 2. Resource Manager 显示适用于不同屏幕密度的图片资源版本。
将可绘制对象导入项目中
您可以使用 Resource Manager 将图片资源导入项目中。如需查看受支持的图片类型列表,请参阅图片支持。
若要将图片资源导入项目中,请执行以下操作:
将图片直接拖动到 Android Studio 的 Resource Manager 窗口中。
- 除此以外,您还可以:
- 点击加号图标 (+).
- 选择 Import Drawables,如图 3 所示。
- 选择要导入的文件和文件夹。
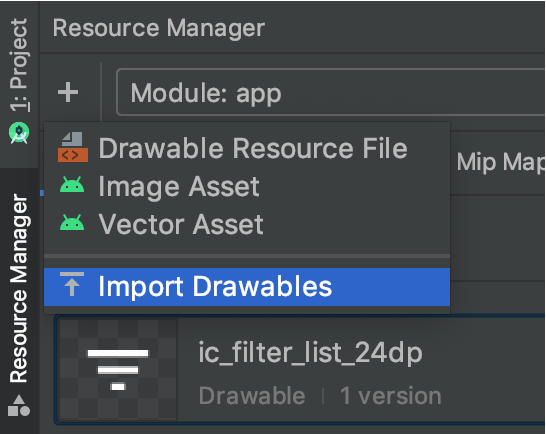
图 3. 从菜单中选择 Import Drawables。
此时将显示 Import drawables 对话框,如图 4 所示。此对话框会显示您要导入的资源的列表。您可以通过点击资源预览上方的文本框来重命名资源。
如果您要提供同一资源的多个版本,请添加设备配置限定符(如以下部分中所述),以描述资源支持的特定配置。
例如,如果您要为同一资源提供适用于不同屏幕密度的多个版本,则可以为每个版本添加一个 Density 限定符。请注意,如果两项或多项资源具有相同的名称和限定符,则仅导入一个版本。
如需详细了解资源限定符,请参阅提供备用资源。
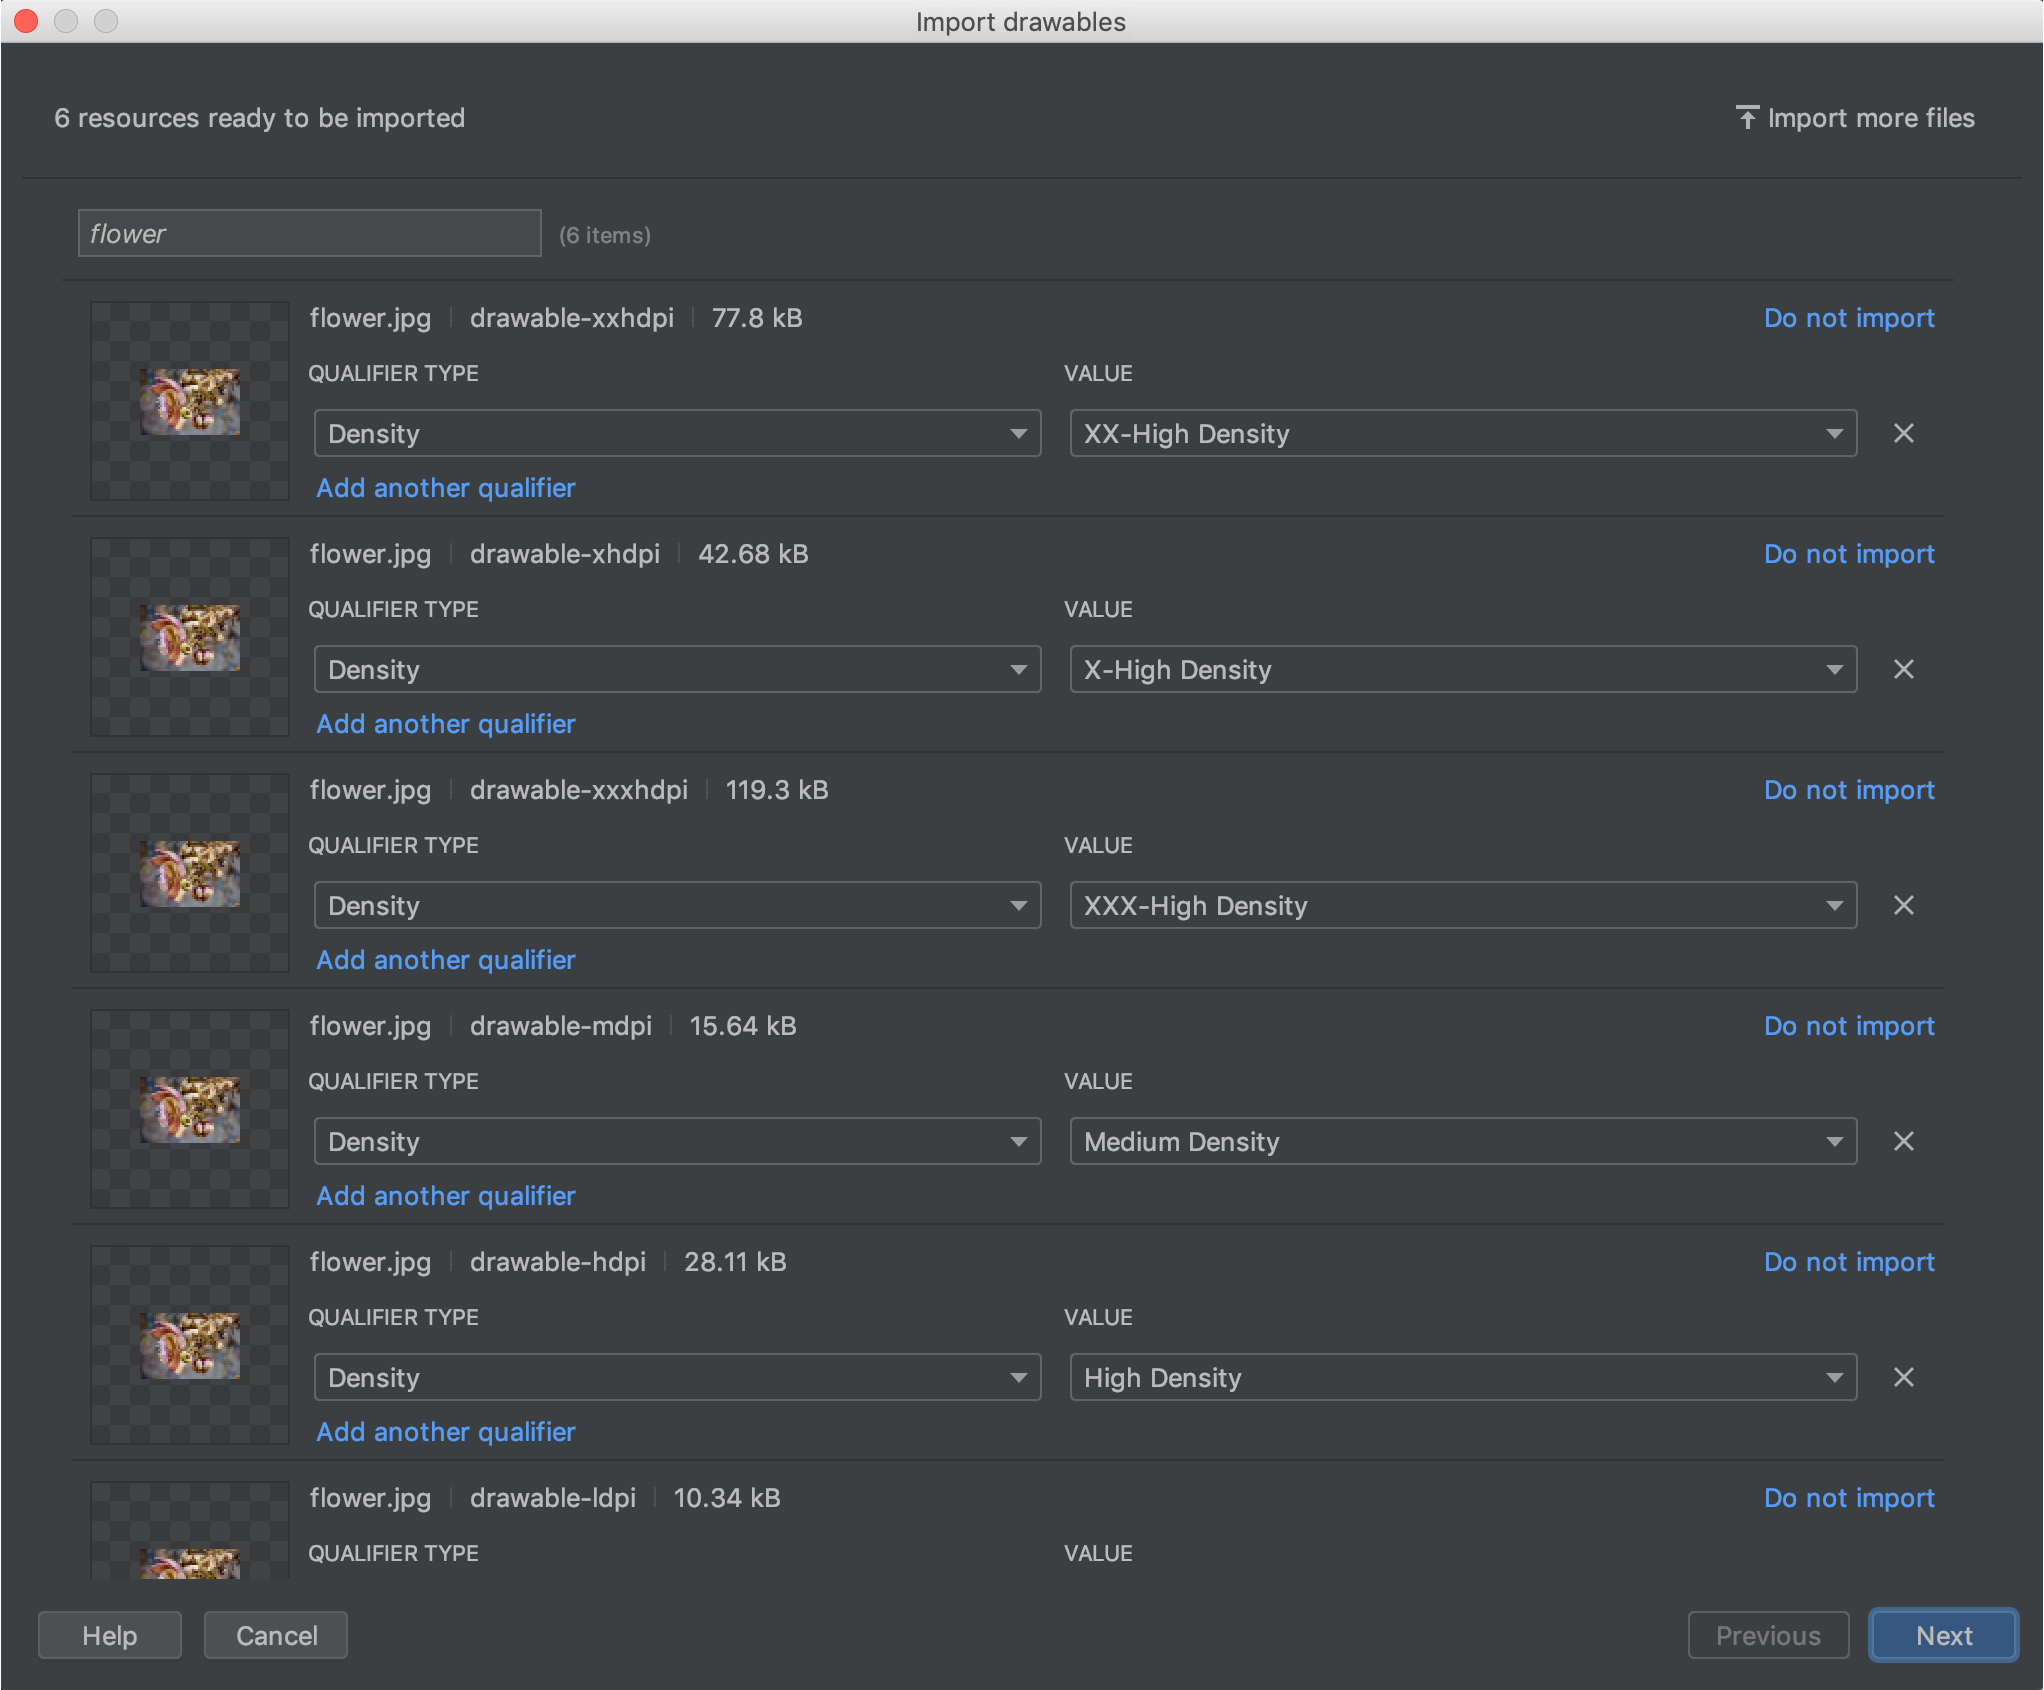
图 4. Import drawables 对话框。
为资源命名并添加任何所需的限定符后,点击 Next。
下一个屏幕会显示要导入的资源的摘要。准备好导入后,点击 Import。
在 Resource Manager 窗口中,您的资源现在已可供您在项目中使用了,如图 5 所示。
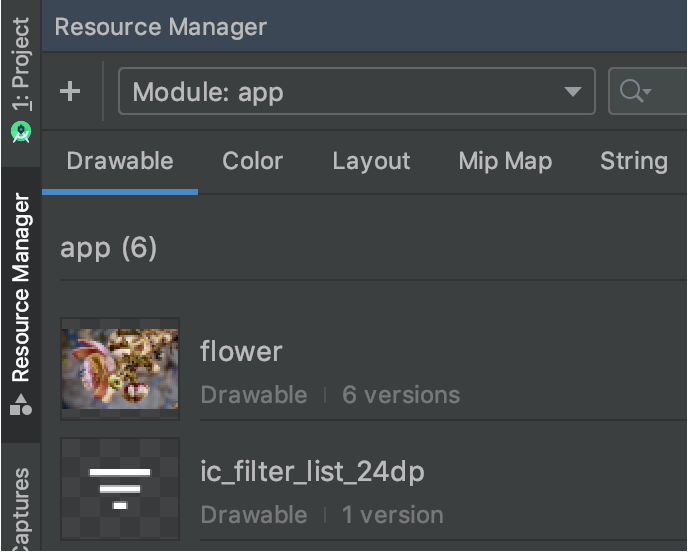
图 5. Resource Manager 现在会显示您导入的图片。
自动解析可绘制对象的密度
当您导入文件或文件夹时,如果其路径包含密度限定符,Resource Manager 会自动在导入过程中应用密度限定符。Resource Manager 可以解析 Android 的密度限定符和 iOS 的缩放比例。
下表列出了受支持的不同密度在 Android 和 iOS 系统中的表示方法:
密度 |
Android 密度限定符 |
iOS 缩放比例 |
低密度(约 120dpi) |
ldpi |
不支持 |
中密度(约 160dpi) |
mdpi |
原始缩放 |
高密度(约 240dpi) |
hdpi |
不支持 |
超高密度(约 320dpi) |
xhdpi |
@2x |
超超高密度(约 480dpi) |
xxhdpi |
@3x |
超超超高密度(约 640dpi) |
xxxhdpi |
@4x |
以下示例说明了导入后输入路径如何转换为资源路径:
- Android 密度限定符:
hdpi
- 输入路径:/UserFolder/icon1/hdpi/icon.png
资源路径:<projectFolder>/<moduleFolder>/src/main/res/drawable-hdpi/icon.png
- Android 密度限定符:
xxhdpi
- 输入路径:/UserFolder/icon1/abc-xxhdpi/icon.png
资源路径:<projectFolder>/<moduleFolder>/src/main/res/drawable-xxhdpi/icon.png
- iOS 缩放比例:@2x
- 输入路径:/UserFolder/icon1/icon@2x.png
资源路径:<projectFolder>/<moduleFolder>/src/main/res/drawable-xhdpi/icon.png
- iOS 缩放比例:@2x
- 输入路径:/UserFolder/icon1/icon@2x_alternate.png
资源路径:<projectFolder>/<moduleFolder>/src/main/res/drawable-xhdpi/icon_alternate.png
如需详细了解如何支持不同的设备像素密度,请参阅支持不同的像素密度。
将可绘制对象拖动到布局中
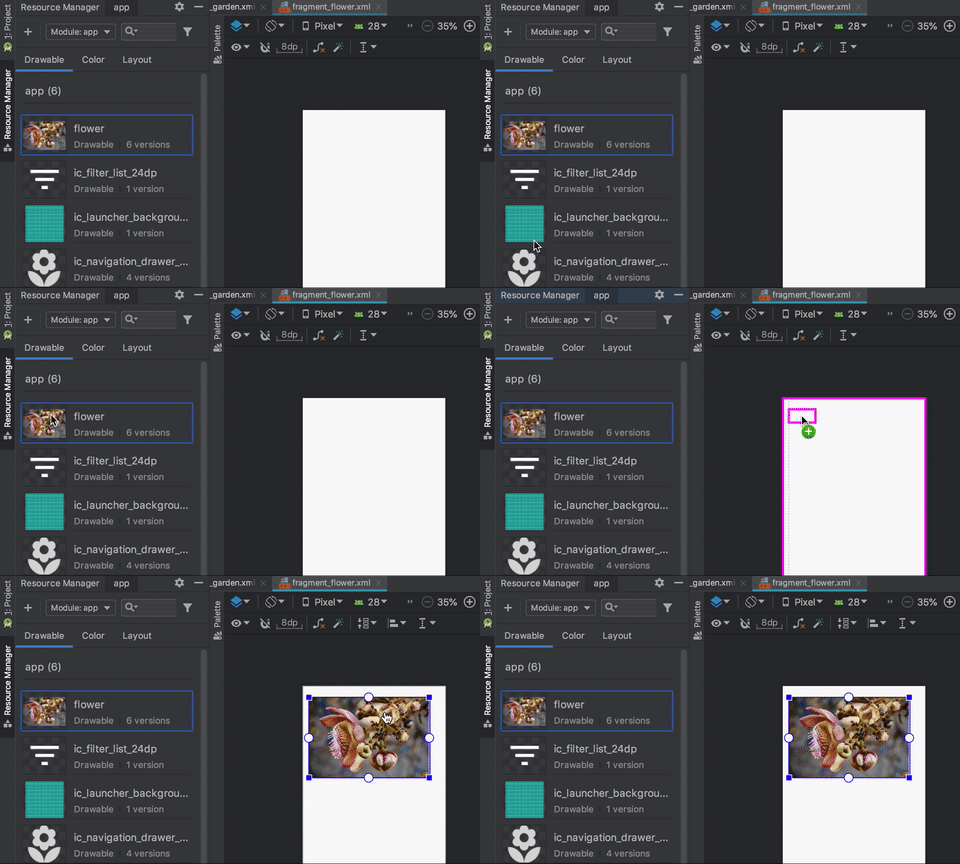
您可以将可绘制对象从 Resource Manager 直接拖动到布局中。将资源拖动到布局上时,Resource Manager 会为该可绘制对象创建相应的 ImageView
,如动画 1 所示:

动画 1.将可绘制对象拖动到 Design 视图中的布局上。
您也可以直接拖动到布局的 XML 上,如动画 2 所示:
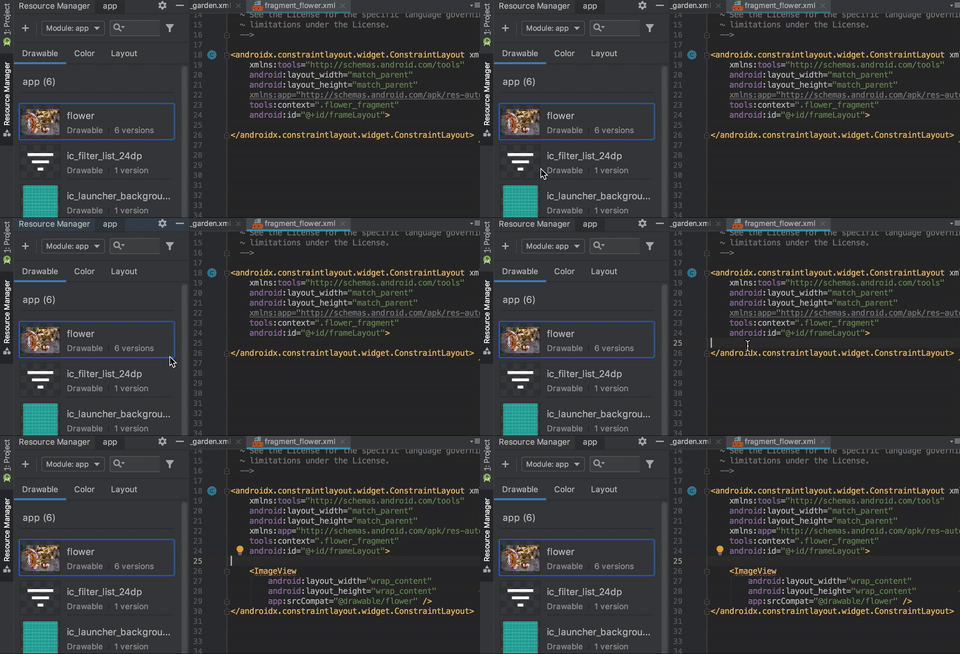
动画 2.将可绘制对象拖动到 Text 视图中的布局上。
将可绘制对象拖动到 Text 标签页中的布局上时,根据可绘制对象在布局中所放的位置,生成的代码会有所不同:
- 如果将可绘制对象拖动到空白区域,Resource Manager 会生成相应的
ImageView
。
- 如果您将可绘制对象拖动到布局 XML 中的任何属性上,Resource Manager 会将该属性值替换为对该可绘制对象的引用。您还可以将任何其他资源类型拖动到 XML 属性上以替换属性值。
- 如果将可绘制对象拖动到现有的
ImageView
元素上,Resource Manager 会替换相应的源代码属性。
本页面上的内容和代码示例受内容许可部分所述许可的限制。Java 和 OpenJDK 是 Oracle 和/或其关联公司的注册商标。
最后更新时间 (UTC):2025-07-27。
[[["易于理解","easyToUnderstand","thumb-up"],["解决了我的问题","solvedMyProblem","thumb-up"],["其他","otherUp","thumb-up"]],[["没有我需要的信息","missingTheInformationINeed","thumb-down"],["太复杂/步骤太多","tooComplicatedTooManySteps","thumb-down"],["内容需要更新","outOfDate","thumb-down"],["翻译问题","translationIssue","thumb-down"],["示例/代码问题","samplesCodeIssue","thumb-down"],["其他","otherDown","thumb-down"]],["最后更新时间 (UTC):2025-07-27。"],[],[],null,["# Manage your app's UI resources with Resource Manager\n\nResource Manager is a tool window for importing, creating, managing, and\nusing resources in your app. To open the tool window, select\n**View \\\u003e Tool Windows \\\u003e Resource Manager** from the menu or select\n**Resource Manager** in the left side bar.\n\n**Figure 1.** The Resource Manager tool window.\n\n1. Click **Add** to add a new resource to your project. You can add image assets, vector assets, fonts, or resource files and values, or you can [import drawables](#import) into your project.\n2. Select a module to view resources specific to that module.\n3. Search for a resource across all modules in your project using the search bar.\n4. Display your resources according to [type](/guide/topics/resources/available-resources) in the Resource Manager. Use these tabs to switch between resource types. Click the overflow icon to show additional resource types.\n5. Filter the displayed resources from local dependent modules, external libraries, and the Android framework using the filter button. You can also use the filter to show theme attributes.\n6. Preview your resources in the main content area. Right-click a resource to see a context menu where you can rename the resource and search your app for where the resource is used.\n7. Click these buttons to view your resources as either tiles or lists.\n8. Click these buttons to change the preview size of your resources.\n\nIn addition to these features, the Resource Manager provides a\nway to bulk-import drawables into your project. To bulk-import, you can either:\n\n- Drag your image files---including SVG files---directly onto the Resource Manager.\n- Use the **Import Drawables** wizard.\n\nFor more information, see the [Import drawables into your project](#import)\nsection.\n\nTo see more detailed information, double-click a resource in Resource\nManager. If you have multiple versions of a resource, this detailed view\ndisplays each version along with any associated qualifiers, as shown in\nfigure 2. From here, you can double-click a specific version to open it\nin an editor window.\n\n**Figure 2.** The Resource Manager showing versions of an image resource for\ndifferent screen densities.\n\nImport drawables into your project\n----------------------------------\n\nYou can use the Resource Manager to import image resources into your project.\nFor a list of supported image types, see\n[Image support](/guide/topics/media/media-formats#image-formats).\n\nTo import image resources into your project, do the following:\n\n1. Drag your images directly onto the **Resource Manager** window in\n Android Studio.\n\n - Alternatively, you can:\n 1. Click the plus icon (**+**).\n 2. Choose **Import Drawables**, as shown in figure 3.\n 3. Select the files and folders that you want to import.\n\n **Figure 3.** Select **Import Drawables** from the menu.\n2. The **Import drawables** dialog appears, as shown in figure 4. This dialog\n displays a list of the resources you're importing. You can rename resources\n by clicking the text box above a resource's preview.\n\n If you're providing multiple versions of the same resource, add\n [device configuration qualifiers](#automatic-parsing), as described in the\n following section, that describe the\n specific configuration that each resource supports.\n\n For example, if you're providing multiple versions of the same resource for\n different screen densities, you can add a **Density** qualifier for each\n version. Note that if two or more resources have the same name and\n qualifiers, only one version is imported.\n\n For more information on resource qualifiers, see\n [Providing alternative resources](/guide/topics/resources/providing-resources#AlternativeResources).\n\n **Figure 4.** The **Import drawables** dialog.\n\n Once you've named your resources and added any necessary qualifiers, click\n **Next**.\n3. The next screen shows a summary of the resources you're importing. When\n you're ready to import, click **Import**.\n\nIn the **Resource Manager** window, your resources are now ready for you to use\nin your project, as shown in figure 5.\n\n**Figure 5.** The Resource Manager now shows your imported images.\n\n### Automatically parse drawable densities\n\nWhen you import a file or folder and its path contains a density qualifier,\nthe Resource Manager automatically applies the density qualifier as part of the\nimport. The Resource Manager can parse both Android's density qualifiers and\niOS's scale factors.\n\nThis table lists how different supported densities are represented for\nAndroid and iOS:\n\n| Density | Android density qualifier | iOS scaling factor |\n|--------------------------------------------|---------------------------|--------------------|\n| Low-density (\\~120 dpi) | `ldpi` | not supported |\n| Medium-density (\\~160 dpi) | `mdpi` | original scale |\n| High-density (\\~240 dpi) | `hdpi` | not supported |\n| Extra-high-density (\\~320 dpi) | `xhdpi` | @2x |\n| Extra-extra-high-density (\\~480 dpi) | `xxhdpi` | @3x |\n| Extra-extra-extra-high-density (\\~640 dpi) | `xxxhdpi` | @4x |\n\nHere are some examples of how input paths translate to resource paths after\nimport:\n\nAndroid density qualifier: `hdpi`\n: **Input path:** /UserFolder/icon1/***hdpi*** /icon.png \n\n **Resource path:** *\\\u003cprojectFolder\\\u003e* /*\\\u003cmoduleFolder\\\u003e* /src/main/res/***drawable-hdpi***/icon.png\n\nAndroid density qualifier: `xxhdpi`\n: **Input path:** /UserFolder/icon1/abc-***xxhdpi*** /icon.png \n\n **Resource path:** *\\\u003cprojectFolder\\\u003e* /*\\\u003cmoduleFolder\\\u003e* /src/main/res/***drawable-xxhdpi***/icon.png\n\niOS scaling factor: @2x\n: **Input path:** /UserFolder/icon1/icon***@2x*** .png \n\n **Resource path:** *\\\u003cprojectFolder\\\u003e* /*\\\u003cmoduleFolder\\\u003e* /src/main/res/***drawable-xhdpi***/icon.png\n\niOS scaling factor: @2x\n: **Input path:** /UserFolder/icon1/icon***@2x*** _alternate.png \n\n **Resource path:** *\\\u003cprojectFolder\\\u003e* /*\\\u003cmoduleFolder\\\u003e* /src/main/res/***drawable-xhdpi***/icon_alternate.png\n\nFor more information on supporting devices with different pixel densities, see\n[Support different pixel densities](/training/multiscreen/screendensities).\n\nDrag drawables into your layout\n-------------------------------\n\nYou can drag drawables from the Resource Manager directly onto a\nlayout. When you drag a resource onto a layout, the Resource Manager creates a\ncorresponding `ImageView` for that drawable, as shown in animation 1:\n\n**Animation 1.** Drag drawables onto a layout in **Design**\nview.\n\nYou can also drag directly onto the XML of the layout, as shown in\nanimation 2:\n\n**Animation 2.** Drag drawables onto a layout in **Text** view.\n\nWhen dragging a drawable onto a layout in the **Text** tab, the generated code\ndiffers depending on where you place the drawable in the layout:\n\n- If you drag a drawable onto a blank area, the Resource Manager generates a corresponding `ImageView`.\n- If you drag a drawable onto any attribute in the layout XML, the Resource Manager replaces that attribute value with a reference to the drawable. You can also drag any other resource type onto an XML attribute to replace the attribute value.\n- If you drag a drawable onto an existing `ImageView` element, the Resource Manager replaces the corresponding source attribute."]]